Let's Encrypt + Docker = wildcard certs

If you ever wanted to use a wildcard certificate with your Synology NAS you probably found that out of the box that's not possible. In this tutorial, you can find the steps needed to get a Let's Encrypt wildcard certificate using a Docker container.
Intro
So in a few words what's the general idea here? Well if you are not familiar with Let's encrypt, you can google it ofc, but it's a free root certificate authority that lets you issue and use free SSL certificates that you can then use to protect your websites and services. The only downside (if you can call it that way) is that they last only 3 months. After that, you need to renew them. Well in my book, a few minutes work every 3 months for 0$ cost of a single wildcard certificate, is well worth it.
DSM wildcard support?
As I said before, DSM in its current version does not support wildcard certificates, but it does support LE certs in general. So for most, getting a LE SSL cert for their Synology DDNS name will be enough. The problem starts to appear when you have multiple services on your Synology NAS (or any device in general) that you wanna publish on the Internet using their own subdomain names.
For example, let's say you register a free DDNS name on your Synology NAS called mynas.synology.me. This is a public domain name that will point to your nas from any browser over the Internet and its resources. Great! To make things even better since the latest (current) version of DSM 6.2.2, Synology has made changes so when you do register a DDNS name with their service you will generate a LE SSL cert on the fly. Brilliant.
Now that we have a working certificate and a DDNS name you can access your NAS using this url: https://mynas.synology.me. For most, the case is closed. For others, that wanna use multiple services on their NAS and/or maybe wanna access those same services using a custom domain name, things get a bit more complicated.
Let's say that you have specific services that you wanna access via a custom domain name like https://service.mynas.synology.me. With your current setup and LE certificate, this will not work. Synology's LE certificates do not support subdomain names in their certificates (unless you create them manually and specify multiple SAN names), so accessing this URL will give you a warning in your browser saying the connection is not secure. The reason is that subdomain names are not covered by that specific certificate. If you continue to add more services each with their own subdomain name and/or have multiple NAS devices with even more sites and services this becomes a real problem.
Solution? Wildcard certificate. This type of certificate in its form looks like this *.yourdomain.something. This means that it will cover your root domain as well as any other subdomain name (*) that you want. Problem solved. Well not exactly. For this to work on your Synology NAS you have to import that type of certificate into your NAS and then assign it to your sites and services. If we recall what I said before, DSM does not support wildcard certificates so we have to do this some other way.
Docker Let's Encrypt to the rescue
If your NAS supports Docker, great. If it's not supported, have no fear you can run this method on any other device that supports Docker (including a windows machine for example) and have your certificates created there. Then just simply import them and you're done.
Step 01 - Install Docker and download the LE image
I will assume that you know how to manage and work with Docker images and containers (at least a little bit), considering that this will be done via the docker command line (Synology Docker UI is limited).
So, install Docker from Package Center if you already don't have it installed and download a LE image. There are a number of images out there but I will focus on linuxserver one that you can get here: https://hub.docker.com/r/linuxserver/swag
Using Synology Docker UI, go to Registry tab and search for it. Then click the Download button and select Latest to grab the latest version of the image. After the download is completed we can move to the next step.
Step 02 - register a custom domain name
There are a number of domain name hosting companies out there so chose the one that fits your needs (some cool name) and your budget. After you register a domain name continue forward and be prepared to make changes in your domain name configuration section to use Cloudflare DNS servers (following steps).
Step 03 - register a free account with Cloudflare
Now that you have a cool domain name it's time to protect it behind Cloudflare and on top of that use CF as a DNS validation (you will see why later on) for your future LE certificates.
Go to https://www.cloudflare.com and register a free account with them. As soon as you have registered you will be pointed towards a wizard to "Add a site".
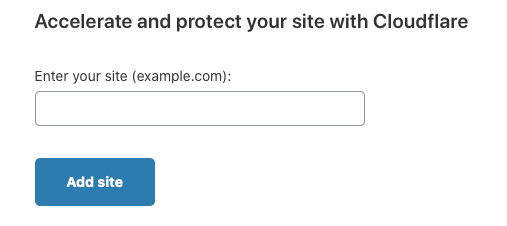
As the label states, enter your newly registered domain name and click add site.
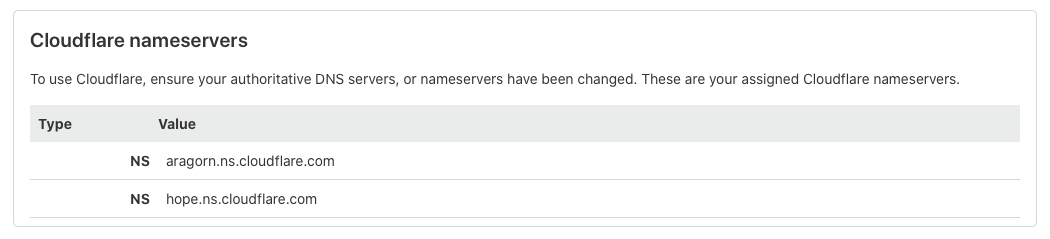
After you have entered your domain name, CF will try and contact it and ask you to change your domain DNS server to CF domain server in order to complete the process. This means that you now have to go to your domain name register, login, and enter CF domain name server as primary and secondary DNS server. Considering that various hosting companies use different user interfaces this will depend but each of them has DNS section where you can make the change.
In the end, the change will look like this (on CF side):
Step 04 - Add a TXT record in your Cloudflare DNS
Now that you have completed adding your site to Cloudflare it will take some time for it to be ready. CF will notify you when this is done and when all the steps are completed and in order.
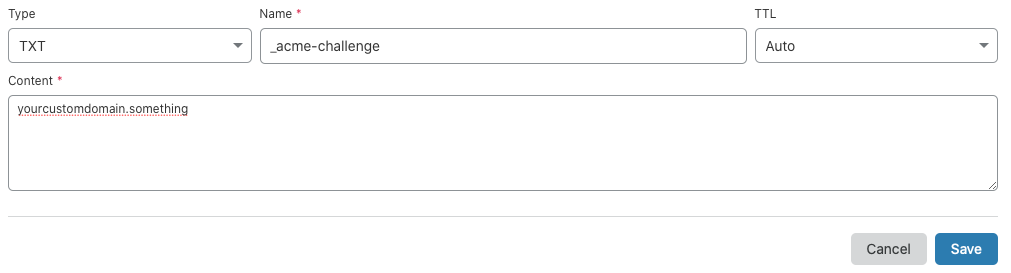
One final thing that you need to do before we start with the Docker LE container. Log into your Cloudflare account and go to the DNS section (3rd button on the top). Here you will create all DNS records that you will use with this custom domain name but before this, we need a TXT record.
Click "Add record" and fill in the fields as follows:
Step 05 - LE docker container
Now that we have done all the steps needed to connect our site to CF it's time to make the container that will actually create new certificates with your domain name.
Log into your Synology NAS using SSH
Be sure to execute the following container creation as root. To elevate to root permissions run the following command at ssh prompt (after logging in with your own user account):
sudo -i
After that enter your same password again and you will be logged in as root. Now we can start with docker container creation. Run the following as a single line command (I have broken it down for easier reading, just delete \ at the end of each line).
docker create \
  --name=letsencrypt \
  --cap-add=NET_ADMIN \
  -e PUID=1000 \
  -e PGID=1000 \
  -e TZ=Europe/London \
  -e URL=yourdomain.url \
  -e SUBDOMAINS=wildcard
  -e VALIDATION=dns \
  -e DNSPLUGIN=cloudflare \
  -e EMAIL=e-mail \
  -e DHLEVEL=2048 \
  -v /path/to/appdata/config:/config \
  --restart unless-stopped \
  linuxserver/swag
Be sure to change all remaining values to correspond to your needs. Path to app data is important considering that it will be a place where all the files and certs will eventually end up.
After you have set everything up and created a container, run it. Be sure to check the logs. The creation will fail for sure because we are missing one more thing. After you get an error in the logs, stop the container and follow the next step.
Step 06 - Cloudflare API key
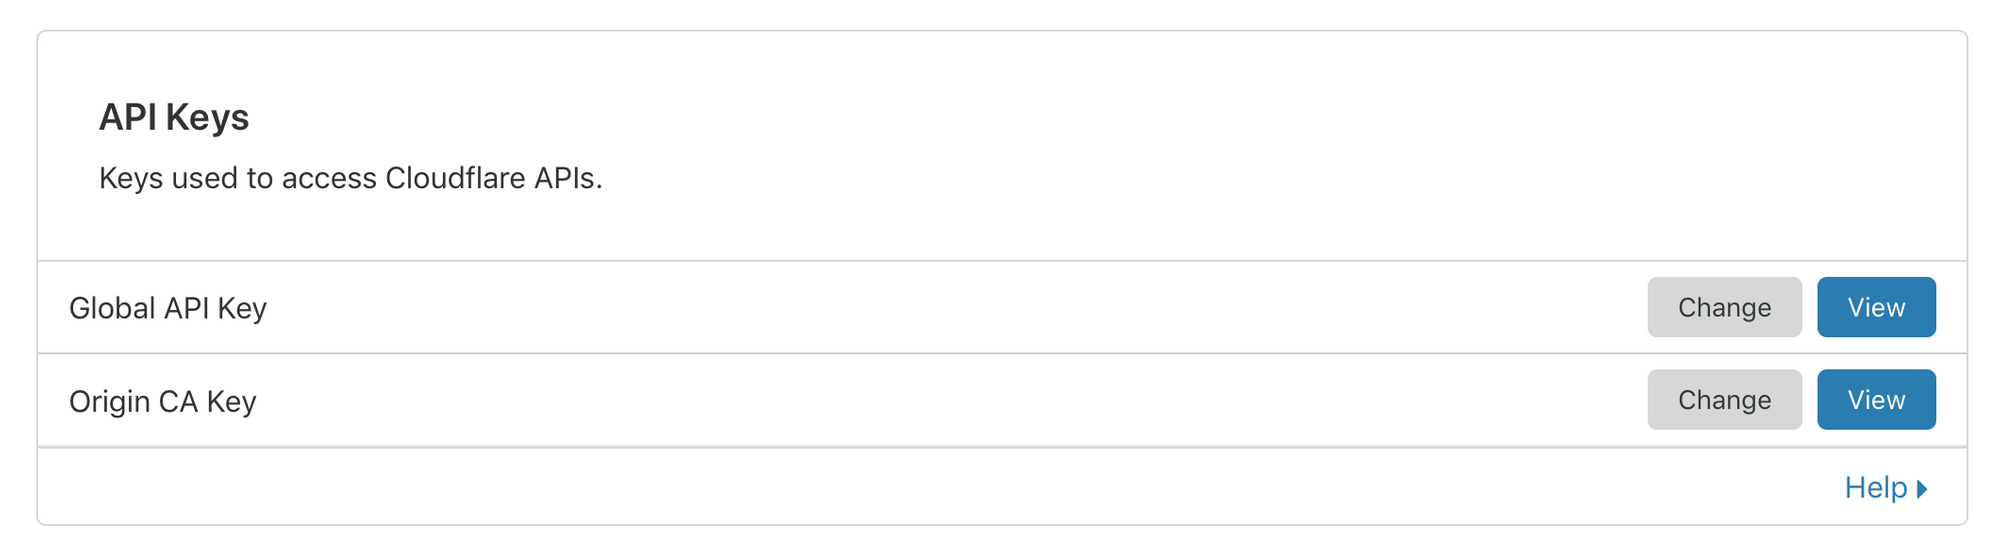
To make DNS validation via Cloudflare complete, we need to bind this container with the Cloudflare account. For this, we will use your CF login (email address) and a generated API key via the CF user interface.
Log into CF and go to My profile in the upper-righthand corner. Then switch to API Token tab (last one) and find the Global API Key section. Click the view button and write down the API itself.
With this information now we can go and check the location of the mapped volume for this container on your nas. This location will be the one that you have mapped using the -v command in docker create (step 5). Using File station for example or simply mapping the location on your computer via network share open the folder that contains a folder structure that was generated 1st time you have run the container.
...
crontabs
dns-conf
etc
fail2ban
keys
logs
nginx
php
www
This is what the folder structure for config folder should look like on your NAS location that you have mapped to your LE container. Using a text editor edit the file in the dns-conf folder named cloudflare.ini.
Simply enter your CF login email address and the API key in the corresponding places and save the file.
dns_cloudflare_email = your_CF_login_email_address
dns_cloudflare_api_key = your_CF_api_key
Step 07 - rerun the LE container
Now that we have everything set up, it's time to run the container again. Keep your eye on the log and follow it. If everything is set up as it should be, the creation of certs should be no more than a few minutes.
Generated certificates will end up in etc > letsencrypt > live > your_domain_name folder path so look for them there.
If you see a number of files there with .pem extension on that location, congratulations, you have done it! Now you can stop the container until the next time you need to renew your certificates. When that time comes you will just start the container and wait for a fresh set to be created, then just simply import them as you will now following the next step.
Step 08 - import your LE certs into DSM
This whole process was done so that we can have a wildcard certificate inside DSM. Considering that the docker container is isolated, DSM is not aware of the certificate. For this certificate to be imported into DSM you will need 2 files from the live folder:
fullchain.pem & privkey.pem
Log into your NAS DSM interface and go to Control Panel > Security > Certificate
Click Add button > Add a new certificate > Import certificate and you will end up here:
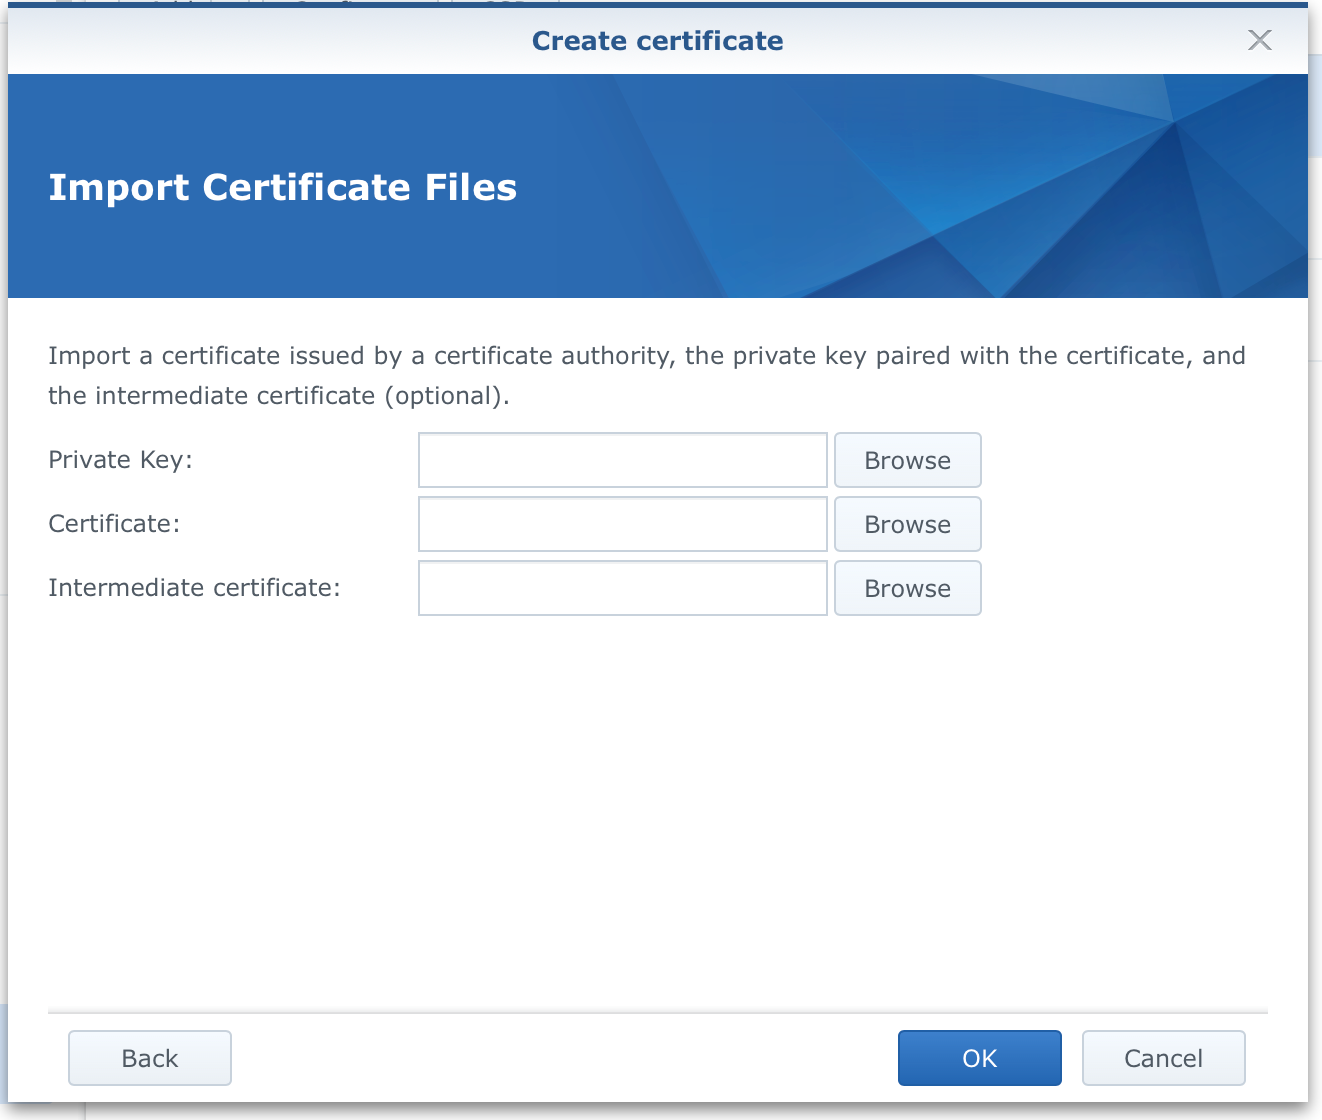
The private key field is where you will insert your privkey.pem file and Certificate field for the fullchain.pem file. The last field (intermediate) is not needed. Finally, click OK.
If all goes well you should see a new wildcard certificate imported and listed under the certificates tab.
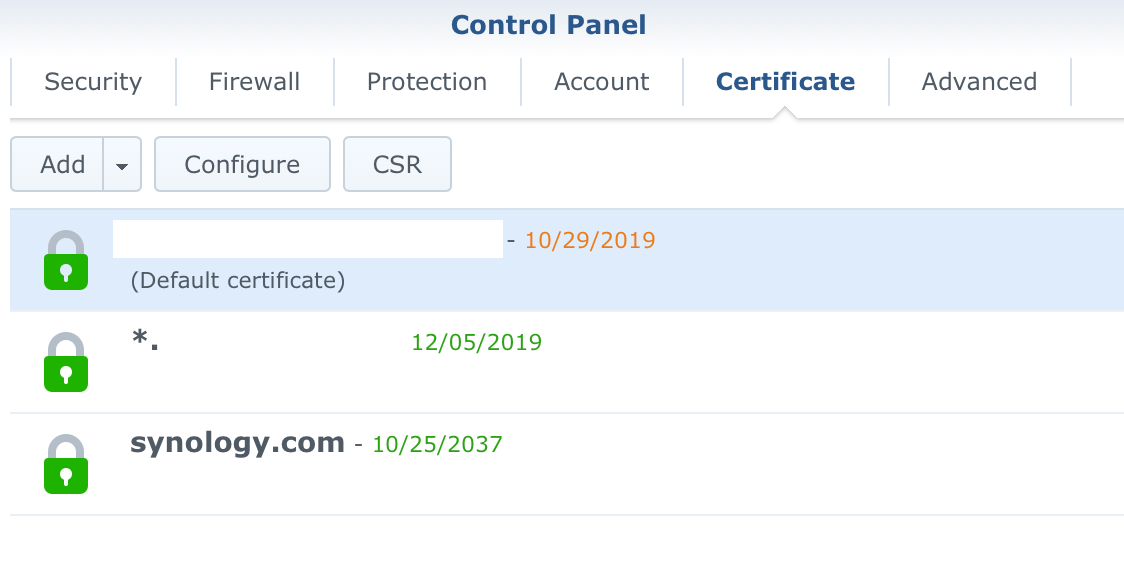
The only thing left to do now is to use the Configure button and assign your wildcard certificate to specific services running on your NAS.
Guess this was not the shortest tutorial or the easiest one, but keep in mind that this will have to be done only once. Every 3 months you will have to just 1) run the container to get new certificates and 2) repeat the last step to import fresh certificates into DSM.
Getting a 3rd party domain wild card cert using Synology UI and Cloudflare
Since DSM version 6.2.3-25423, Synology has included this in their release notes:
11. Added support for Let's Encrypt wildcard certificates
One month later they have included a similar feature:
11. Added support for Let's Encrypt wildcard certificates for Synology DDNS
Slight difference but I will focus on the first one. This will allow you to (finally) get a LE wild card certificate for your domain using Synology Security UI. For this, we will have to use the same steps regarding setting up your domain with Cloudflare and configuring the TXT record.
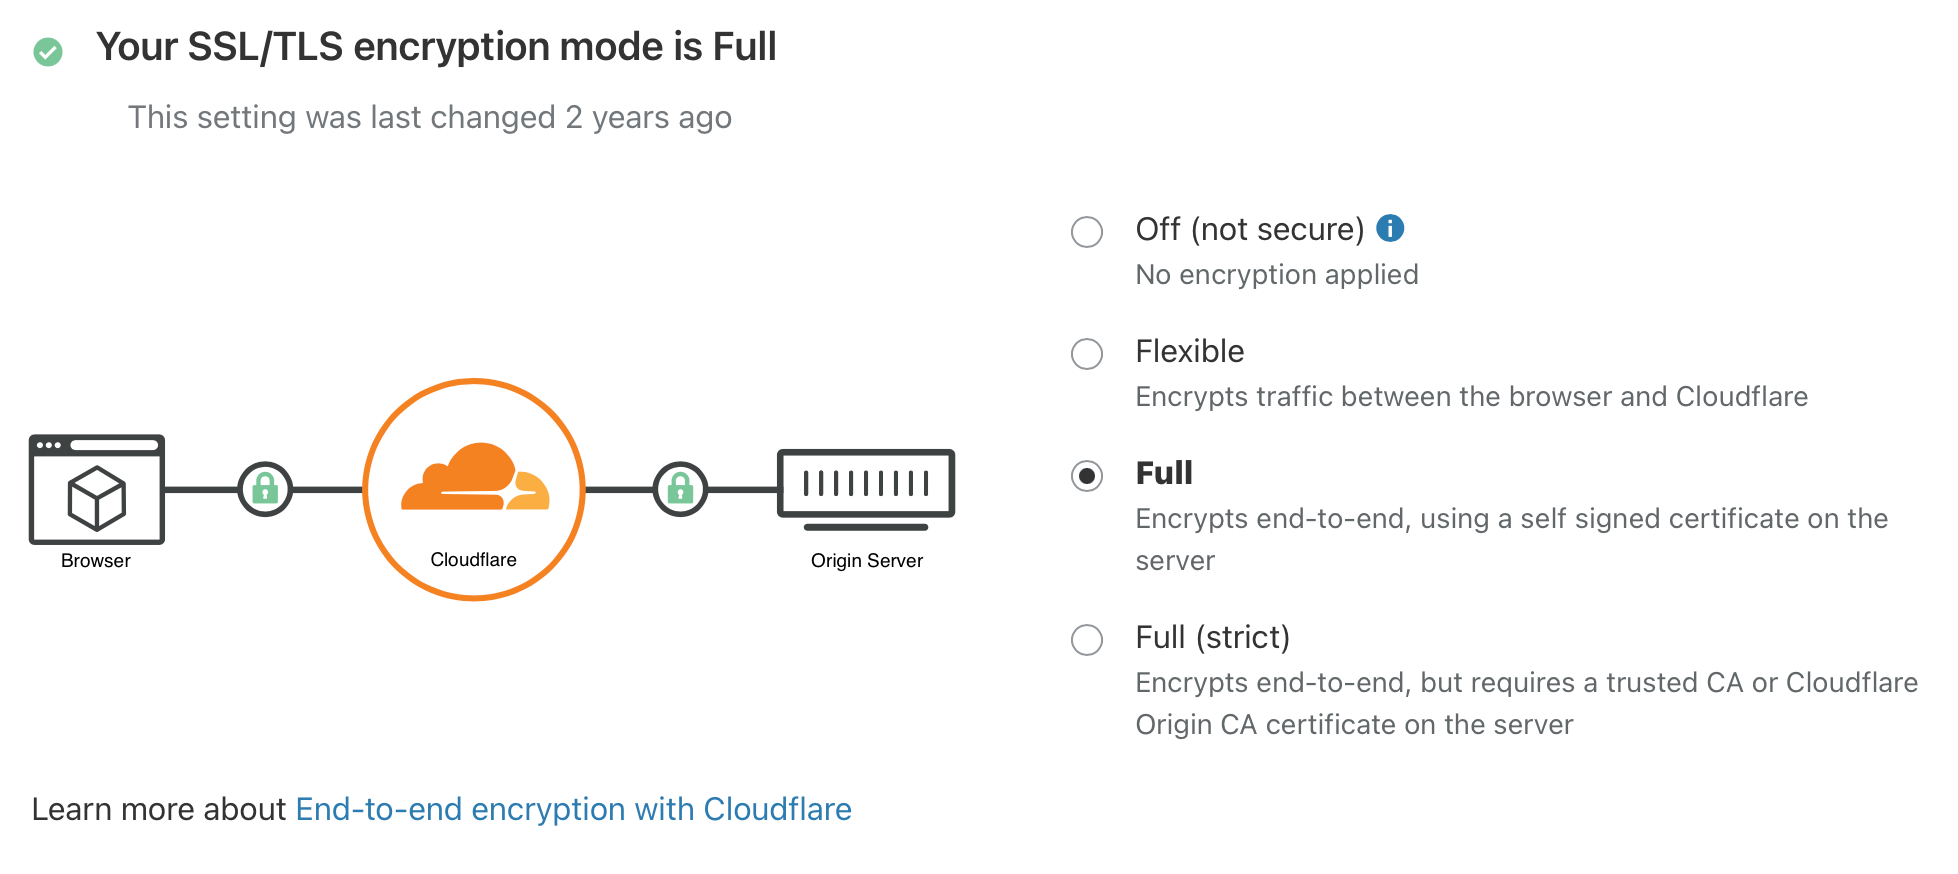
So make sure to use Step 02-04 above and then get back here for step 05. On top of those steps also log into Cloudflare and go to its SSL/TLS menu.
Make sure to select your SSL/TLS encryption mode to Full, or Full (strict)
Step 05 - issue a LE cert using DSM Security UI
Go into Control Panel > Security > Certificate (tab) and click Add.
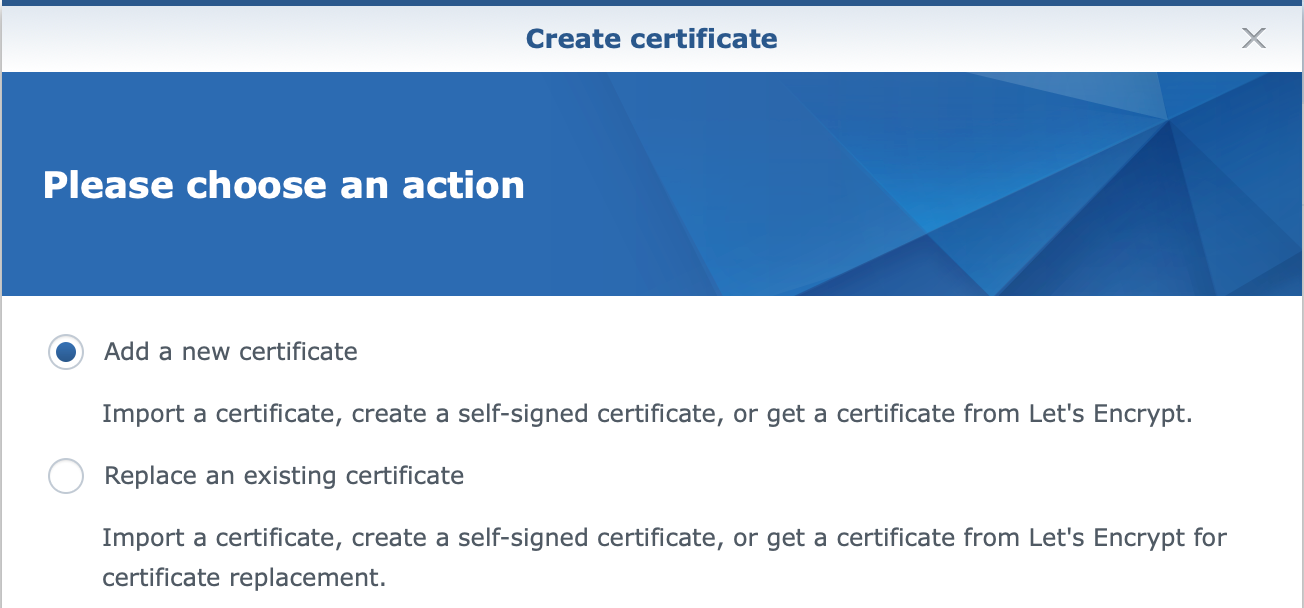
Follow the wizard.
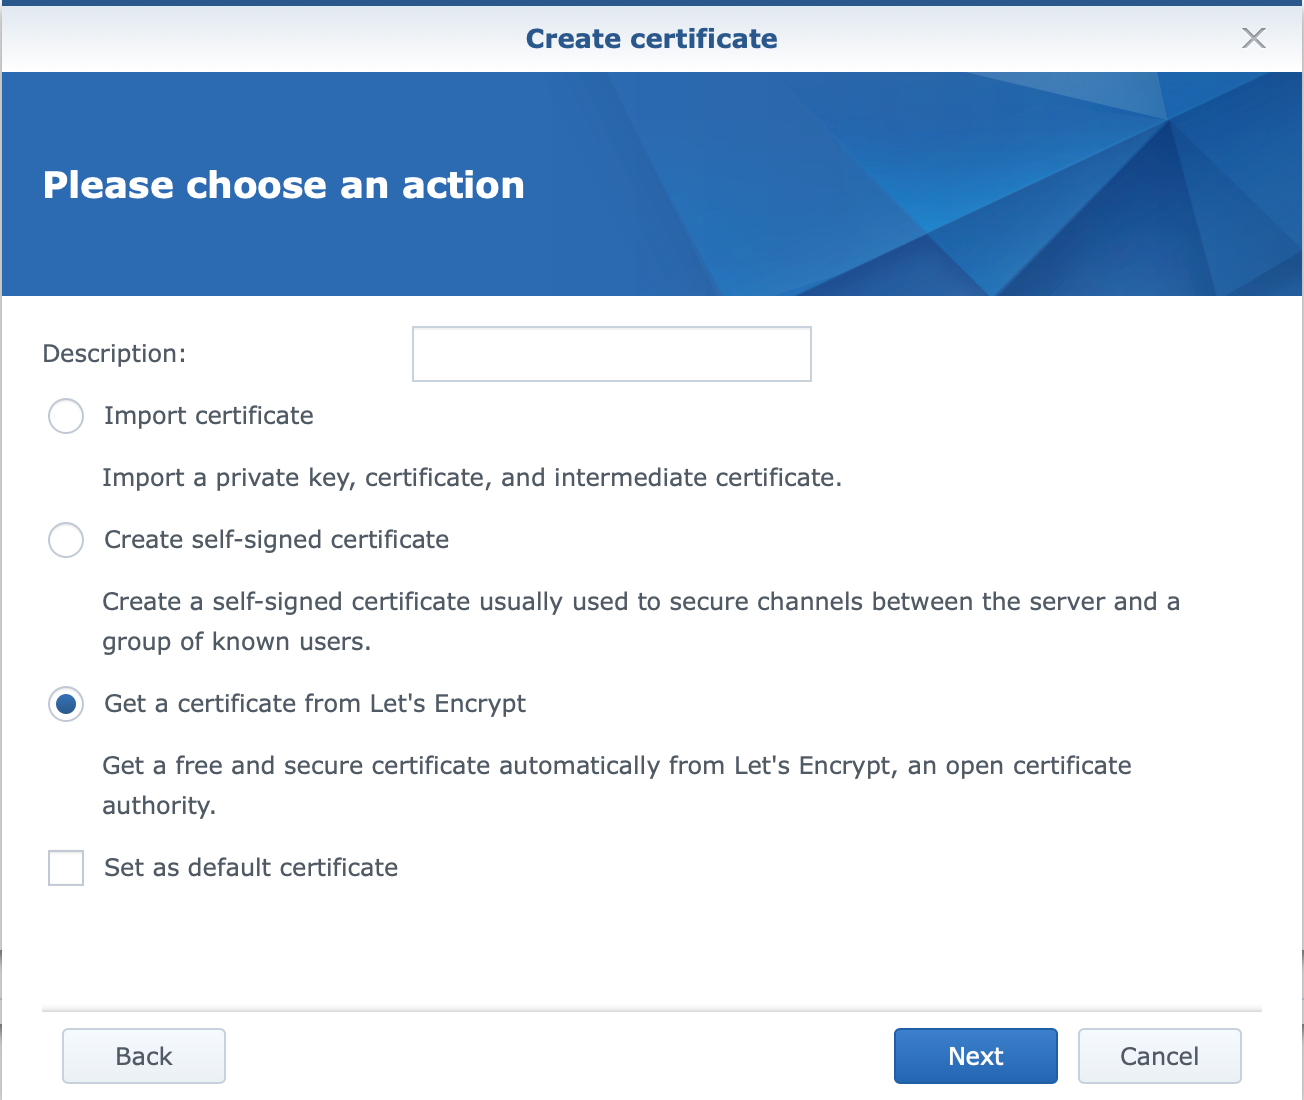
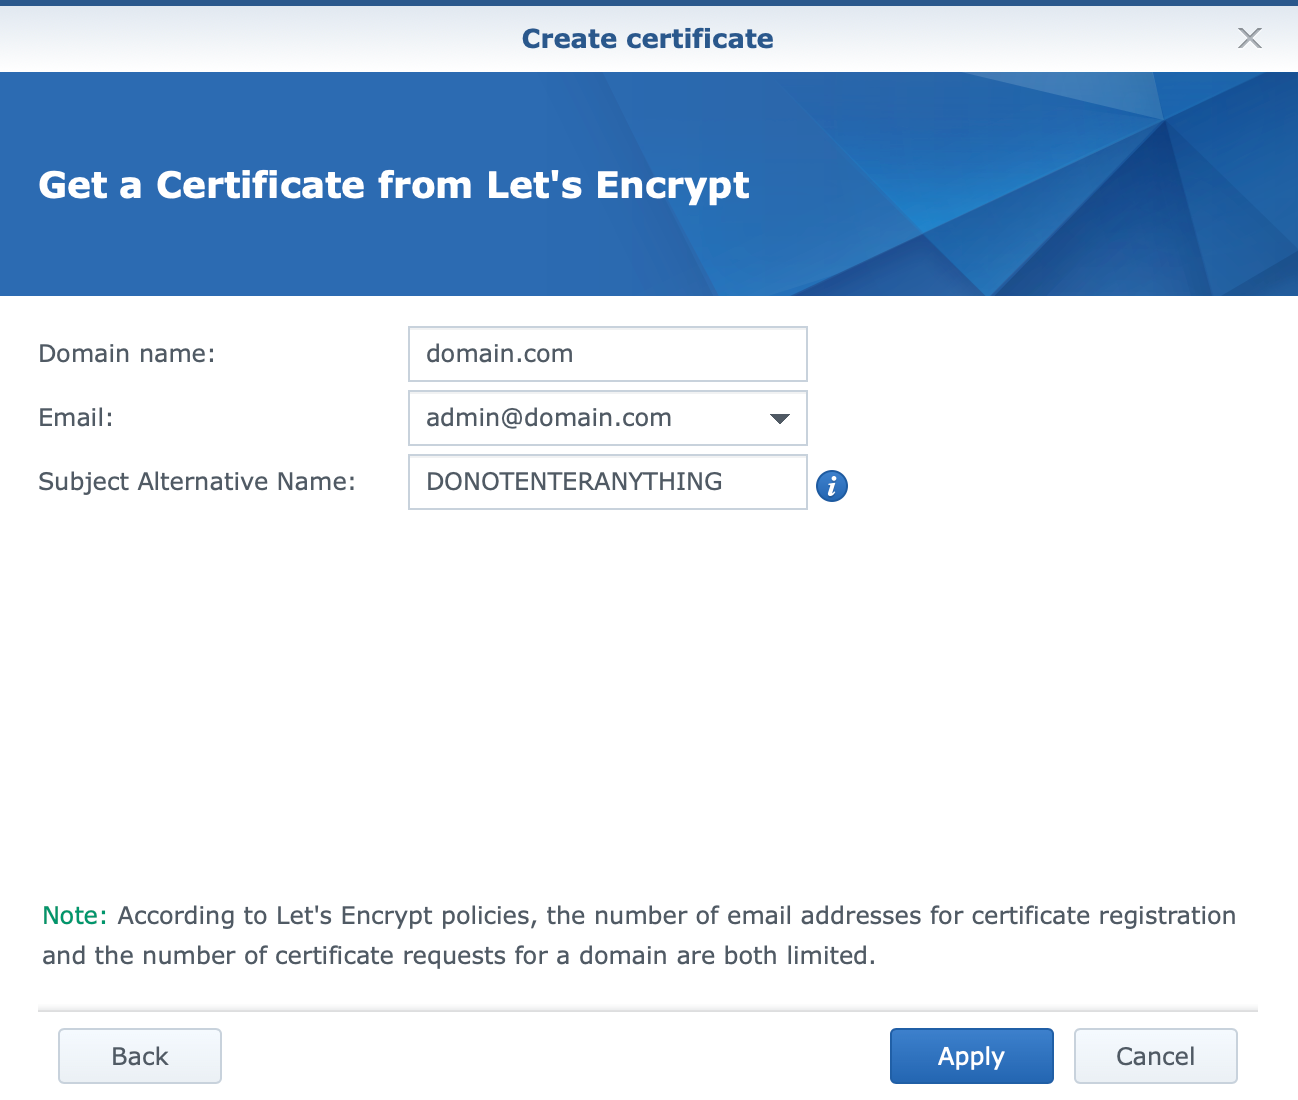
The important element here is to enter just your root domain without any * before it, and it will generate a wild card certificate.
So, do not enter *.domain.com for your domain name, but rather just domain.com.
If you have configured everything on CF as stated above, and have port 80 open on your router you should get a new wild card certificate running. Also, the renewal will be done from the DSM side as well in the future.
If there are any questions, comments, corrections, etc, feel free to comment below.


