Synology Reverse Proxy

UPDATE: in case you do not wanna use Synology's reverse proxy, look into a custom NGINX Docker setup that will in the end give more options and features when it comes to some other custom modifications
This tutorial will cover a few short steps that you need to know and setup in order to make your apps and services accessible via the internet (or LAN) using a specific domain name and custom (or default) port. It will also help you to avoid exposing your real IP address, custom port or simply to have a nice load balance solution in case you need it.
So whats reverse proxy?
No reason to break it down here considering there is a perfectly good explanation here: https://en.wikipedia.org/wiki/Reverse_proxy
The only thing that might be worth mentioning here is that Synology DSM uses NGINX as its revers proxy platform in case some of you are wondering.
How to setup apps and services on your NAS on a custom domain name and hide internal port number?
One of the main reasons RP is useful is the fact that it will prevent you to have to open up a large number of ports on your router in order to get access to your apps that you have hosted on your NAS.
Let's take a web app hosted on your NAS as an example running on port 1030. If you want to access that app in your LAN you would access it via your browser using something like this:
http://10.0.15.20:1030
As we can see from this example, we are accessing the service via http not https, using your local IP address of your NAS and specifying its port number of 1030. Great. This works, locally. What about getting access to this via the Internet? Well, you will have to 1st open up a port 1030 on your router in order to make this work. Sure why not? Ok, what happens when you have 10 separate apps running on 10 different ports? The number of ports that you are exposing your LAN to the internet is rapidly growing. Wouldn't it be better to have one port and push all access to those 10 apps via a single port number?
Welcome, reverse proxy. Now before we can make all this work nice and easy there is also a need to make all your apps respond to a different domain name. Why? Well if we will push them via one port then RP needs to know how each request from the internet should be separated and forwarded to a specific destination (app).
To make this work, we will need a domain name with subdomain names for each app that we wanna target and use. As an example, lets say that your domain name is uberdomain.com. Each app will have a specific subdomain name of its own, like, app1.uberdomain.com, app2.uberdomain.com, or something that defines them better.
If you recall before we accessed an app via port 1030 using a non secure http protocol. This was not safe back in the '90, let alone today. So we will also need a secure certificate that will protect your uberdomain.com. This can be done using any commercial providers that sell SSL certificates or you can use a free Let's Encrypt authority to issue yourself a valid certificate.
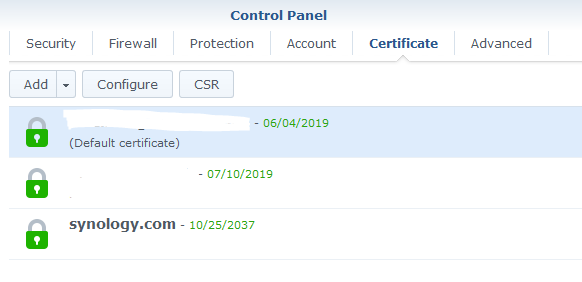
Atm, I will not focus on this just so we stay on topic, so let's assume that you have a valid certificate and a registered domain name all configured in your Syno box (Control Panel > Certificate)
How to configure a service via RP?
Opening up Control Panel > Application Portal, you will see a number of options, one of which is RP.
Here you can define as many services and app you wanna access using their specific and unique domain name and pushing them via the same port and protocol.
Before we had a service on port 1030 using a http port. Lets focus on that app and try and configure it to be accessible via its global unique name on port 443 (default https port) via https protocol.
In the end, what does this mean? Well you will be able to access your app using https (secure) protocol, its own unique name (and not a local IP address) and without the need to enter port number (considering that 443 is the default https port and there is no need to enter is in any modern browser).
Your end result will look something like this:
https://app1.uberdomain.com
Much better, right?
Click the Create button and you will be presented with this dialog box:
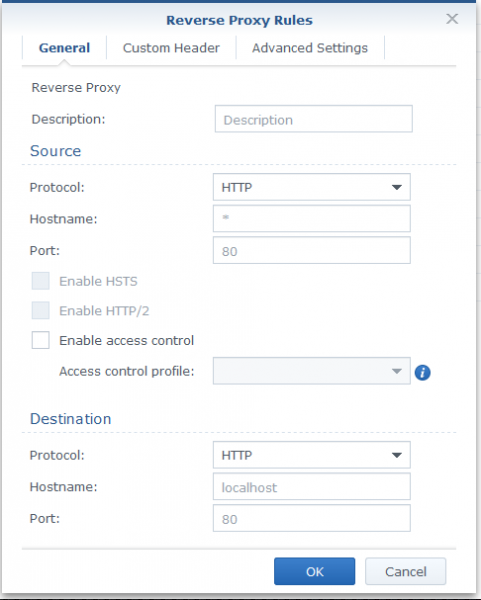
There are 3 main sections that need to be filled. Description, Source and Destination.
After filling everything up your end result will look something like this:
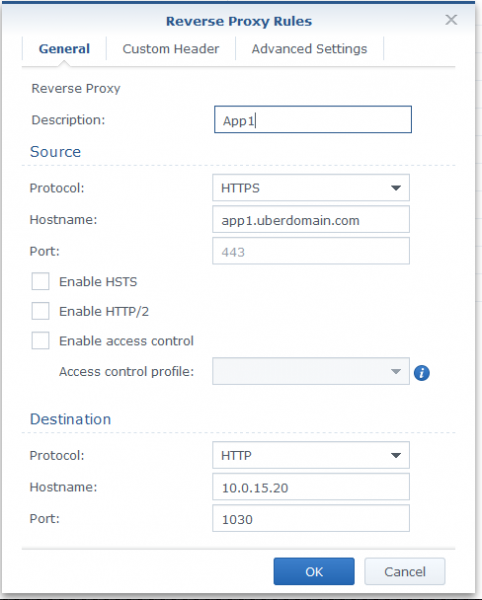
A bit of explanation here. Source in RP is your end domain name that you wanna use as well as the port you wanna access (443 in this case) your service. Here you are limited to using the FQDN format so no subfolders are allowed, for example:
https://usebdomain.com/app1
Destination section is where you tell RP to what specific destination request against app1.uberdomain.com name will end up. Keep in mind that you have to have correct protocol, hostname and port defined. In this example case, we are using the same parameters as you would use when accessing your service locally in LAN.
Now as a final step, you need to do one more thing. Because you are accessing your service via https protocol, you need to bind that new RP rule to your SSL cert in the Certificate section mentioned before. So, go to Control Panel > Certificates and click the Configure button.
In the list of all services using your various SSL certificates look for the new App1 entry and make sure that you select your uberdomain.com certificate from the drop down menu.
That's it! You can now access your internal service via the internet via a secure https protocol.
To recap. For this to work you will need:
- a registered domain name
- a valid certificate for that domain name
- 443 port (or the port of your choice) forwarded on your router towards your NAS local IP address