Bitwarden - a self-hosted password manager

version: "3.5"
services:
  bw:
    image: vaultwarden/server
    network_mode: "bridge"
    container_name: "bw"
    ports:
      -  "80:80"
      -  "3012:3012"
    volumes:
      -  "/volume2/bitwarden:/data"
    environment:
      - "SMTP_PASSWORD=password" #add SMTP_XXXX variables to allow public user managment (account reset etc)
      - "SMTP_USERNAME=username"
      - "SMTP_SECURITY=starttls"
      - "SMTP_PORT=587"
      - "SMTP_FROM=from_email"
      - "SMTP_HOST=smtp.gmail.com"
      - "DOMAIN=https://yourdomain.com" #add your public domain name
      - "TZ=Europe/Paris"
      - "WEBSOCKET_ENABLED=true" #Enable this if you want to use the LiveSync feature on port 3012
      - "SIGNUPS_ALLOWED=false" #true or false if you want to enable or disable public signups
      - "ADMIN_TOKEN=xxxxxxxxxxxxxxxxxxxxxxxxxxxxxx" #add custom string for logging into the admin UI
      - "PUSH_ENABLED=true"
      - "PUSH_INSTALLATION_ID=xxxxxxxxxxxxxx"
      - "PUSH_INSTALLATION_KEY=xxxxxxxxxxxxxx"
    restart: always
In this post, I will focus on running a self-hosted alternative to some commercial solutions out there, like 1Password for example. Nowadays when privacy is at its peak having your personal accounts, passwords, credit cards, etc, in some "cloud" could be an issue for some.
So let's see if BitWarden can be a solution for you. You can self-host it or run your account from BW "cloud" as well.
Let's start.
1st thing - install Docker via Package Center or if your NAS doesn't support it, install it manually by downloading the package from Synology site. After that, you can use the Manual Install button in Package Center to install Docker. Keep in mind that this is not 100% supported and some features of docker will still not function. If your NAS is from the '+' lineup, then you are good to go.
This tutorial will focus on a custom vaultwarden/server image that I use as well. Its updated and maintained all the time so there is no need to worry. Support for it can be reached on their Matrix chat channel if needed.
After you have installed Docker open it up and you will land on a similar screen:
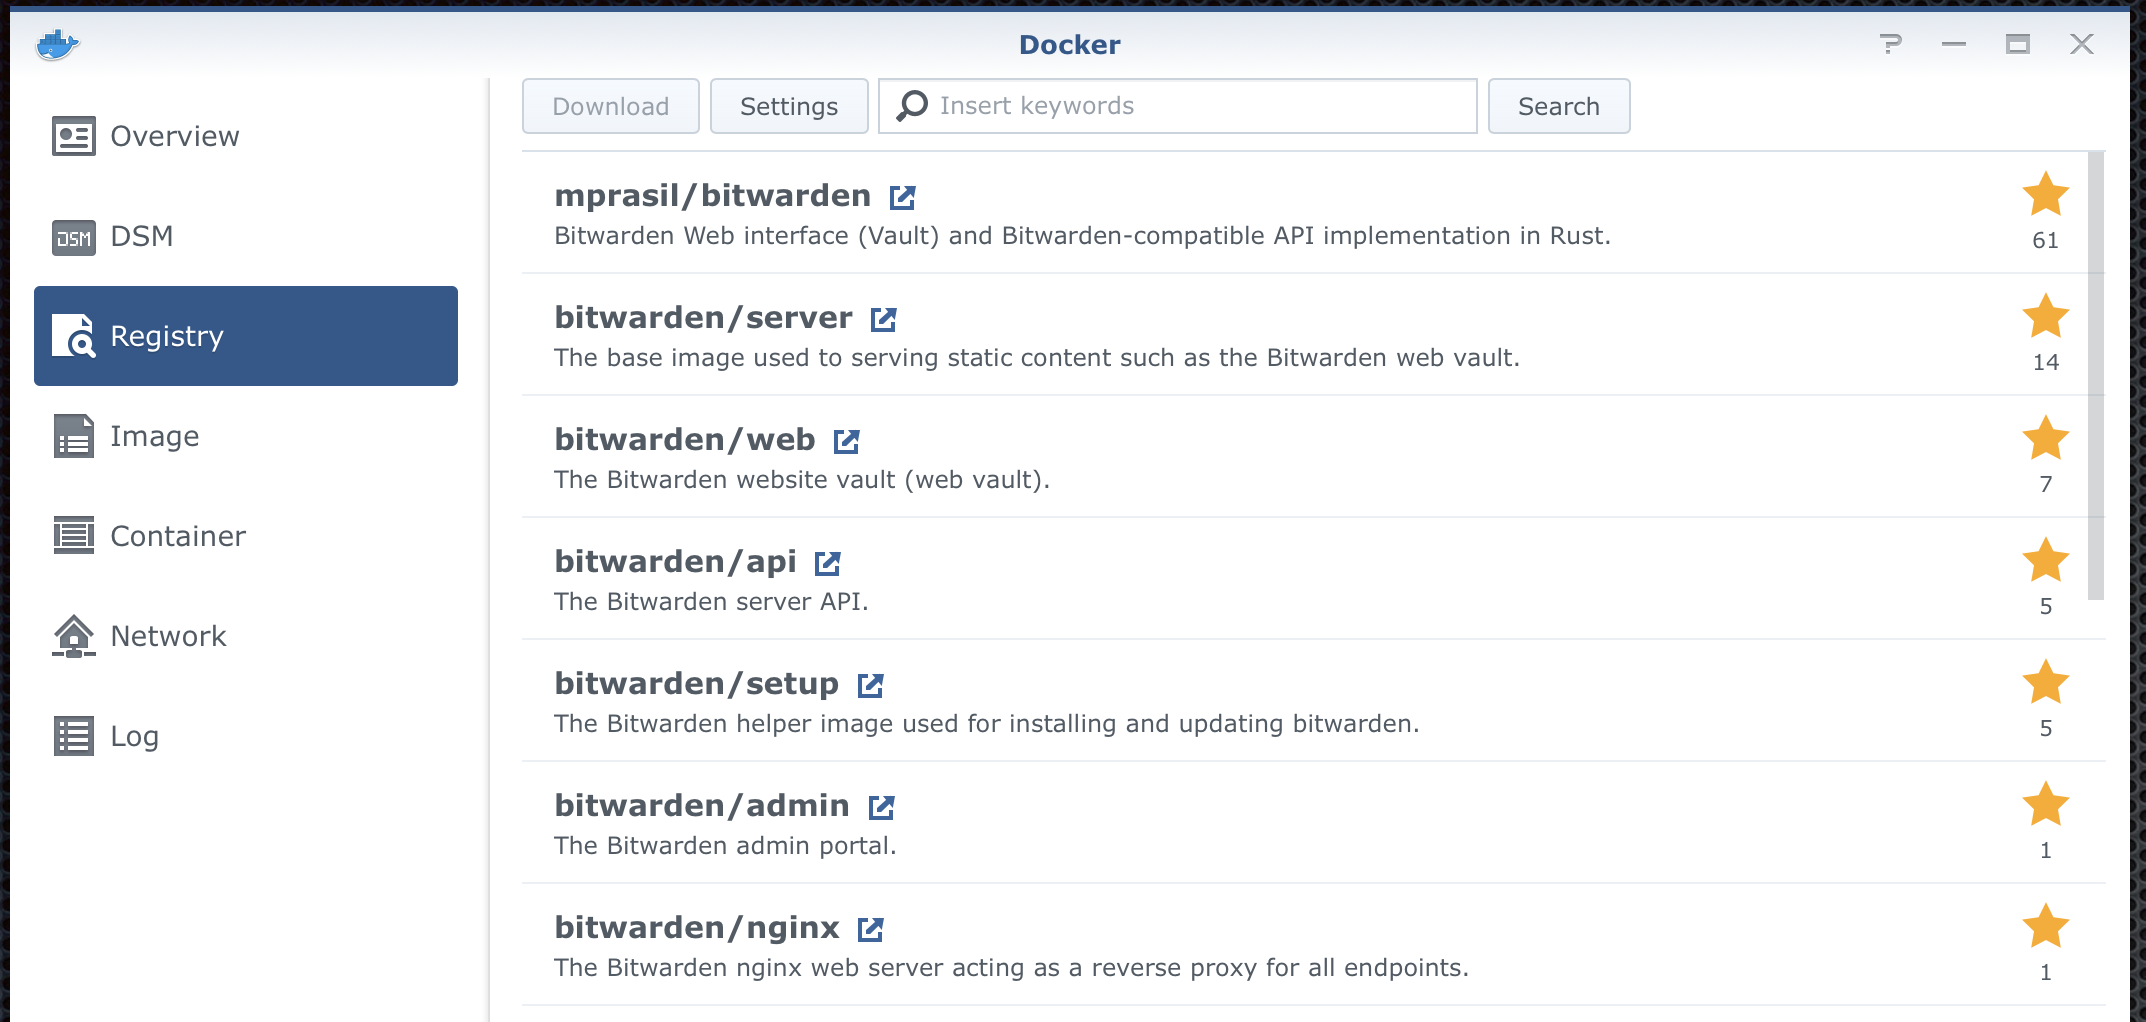
Switch over to the Registry tab and use the search field to type in bitwarden. After a few seconds, you should get a list similar to this one.
As you can see vaultwarden/server is the top result for me, if that's not the case with you just find it manually. Select it and hit the download button. A pop-up window will show up asking you what version you want. Select the latest and click ok.
Now wait for the image to download and DSM will notify you when it's ready via a system notification.
As soon as that's done, switch over to the Image tab inside Docker. You should see bitwarden image in the list:

Now that the image has been downloaded click on it and press the Launch button on the top.
This action will start the Container creation wizard. So remember, an image creates a container and you can create multiple containers from a single image if you need to. The 1st step in this wizard looks like this:

Give the container a name, enable resource limit (optional, but I like to use it to control how much ram and CPU priority the container needs), and then click the Advanced Settings button (not Next). As it's shown on the image I gave the BW container only 50MB of RAM as the maximum (it's not gonna use that much anyway) just to be on the safe side. docker has a great benefit in that it can limit resources so that a buggy image/container will not take all of your NAS resources in case there is a memory leak or some nasty bug in the image itself.
Opening the Advanced settings window will show up multiple tabs that need to be configured (not all and not for every container):
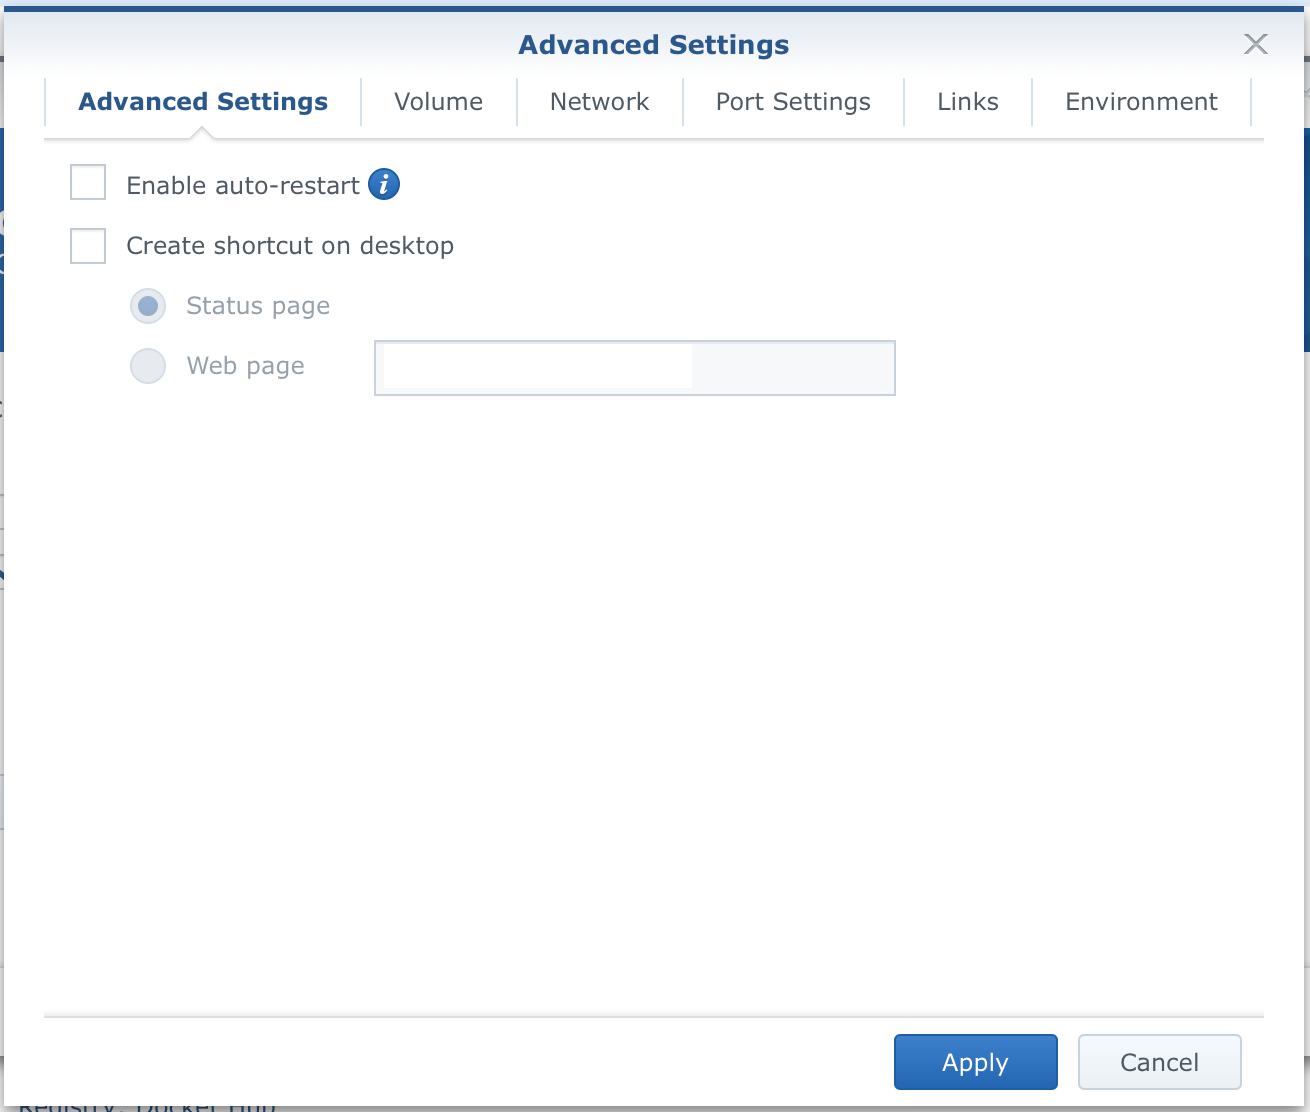
The Auto-restart feature is nice to have ON in case you need to reboot your NAS or Docker for that matter and want all your containers booting automatically. Ofc this is an optional setting but still. Regarding shortcuts on the desktop, personally, I don't use them. Desktop in this context is DSM desktop, not your computer desktop. I use Heimdall for all my docker URL needs so this option is OFF (again, you can use it if you choose to do so).
Moving to the 2nd tab, Volume. Now, this is the most important thing that needs to be done when working with containers. Read up on those so that I don't start messing with this tutorial too much, but in short, it means this. If you start working with your container, all information, configuration, data, etc, are sandboxed inside the container. This means that after you restart your container (reboot, NAS update, Docker update, docker image update) it will reset itself to initial settings. As a result, all your work will be reset and gone.
That means that in the case of BW, all your imported data, and long random passwords that you have defined are gone! Now that you have understood the importance of this let's configure an outside volume that will keep your data safe from this scenario.
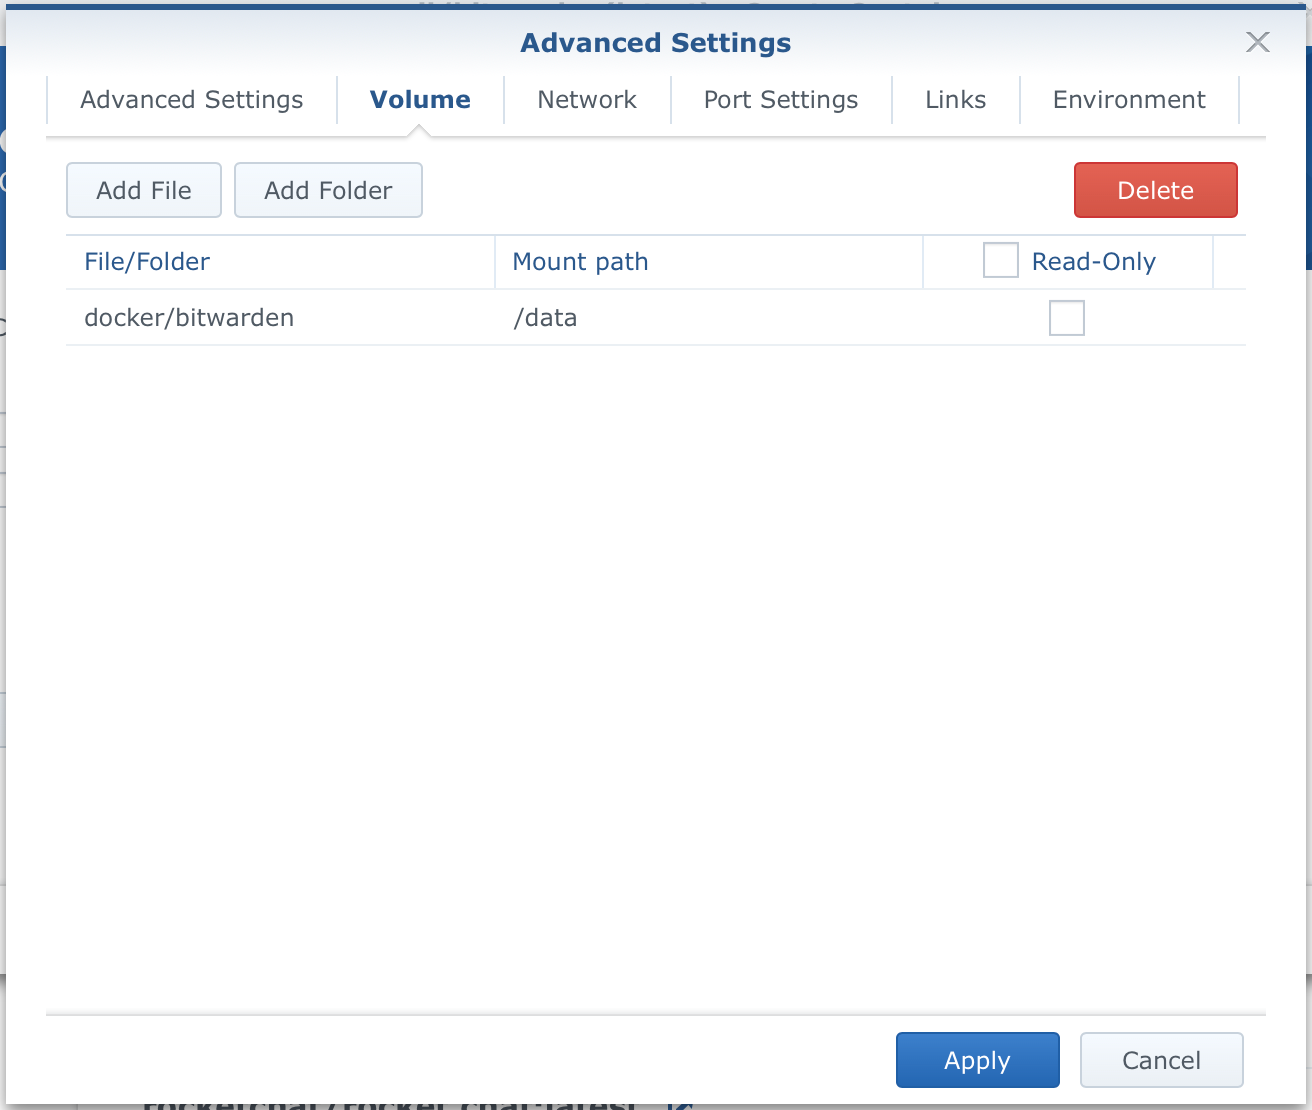
The Volume tab is used to map files or folders from within the container outside to your local shared folder(s) on your NAS. As a result, even if something happens to the container your data will be safe and all you have to do is recreate the container and attach it to the same volume to get access to your data. That's the whole beauty of Docker. Moving your data around regardless of what's hosting your container.
In the image above I have mapped the left side (your NAS folder structure) to the right side (container mount path). The principle is the same. The left side is your local NAS destination where you want containers folder data stored.
In the case of this BitWarden image, all data is stored in the /data folder as indicated by instructions on the image web page. So to recap, I have mapped docker/bitwarden local path (bitwarden is a subfolder of /docker folder that you will get after you install Docker. Ofc you don't have to use that destination if you don't want to) to /data folder that BW image is using. This, as a result, will mean that all my data will actually be in docker/bitwarden folder on my NAS and not sandboxed in the container itself.
You can (and preferred to do so) backup those folders as they are essential, unlike the rest of the container that's expendable.
Moving over to 3rd tab - Network. Here you can select networks that you want your container to use. You can make new networks for specific subnets or you can use the default one, bridge. In the spirit of this tutorial just use the bridge. This will mean that all containers using this network will be essentially in a NAT configuration with your NAS. Meaning you will access those apps and services using your local NAS IP address and a custom port defined on the following tab, Port Settings.
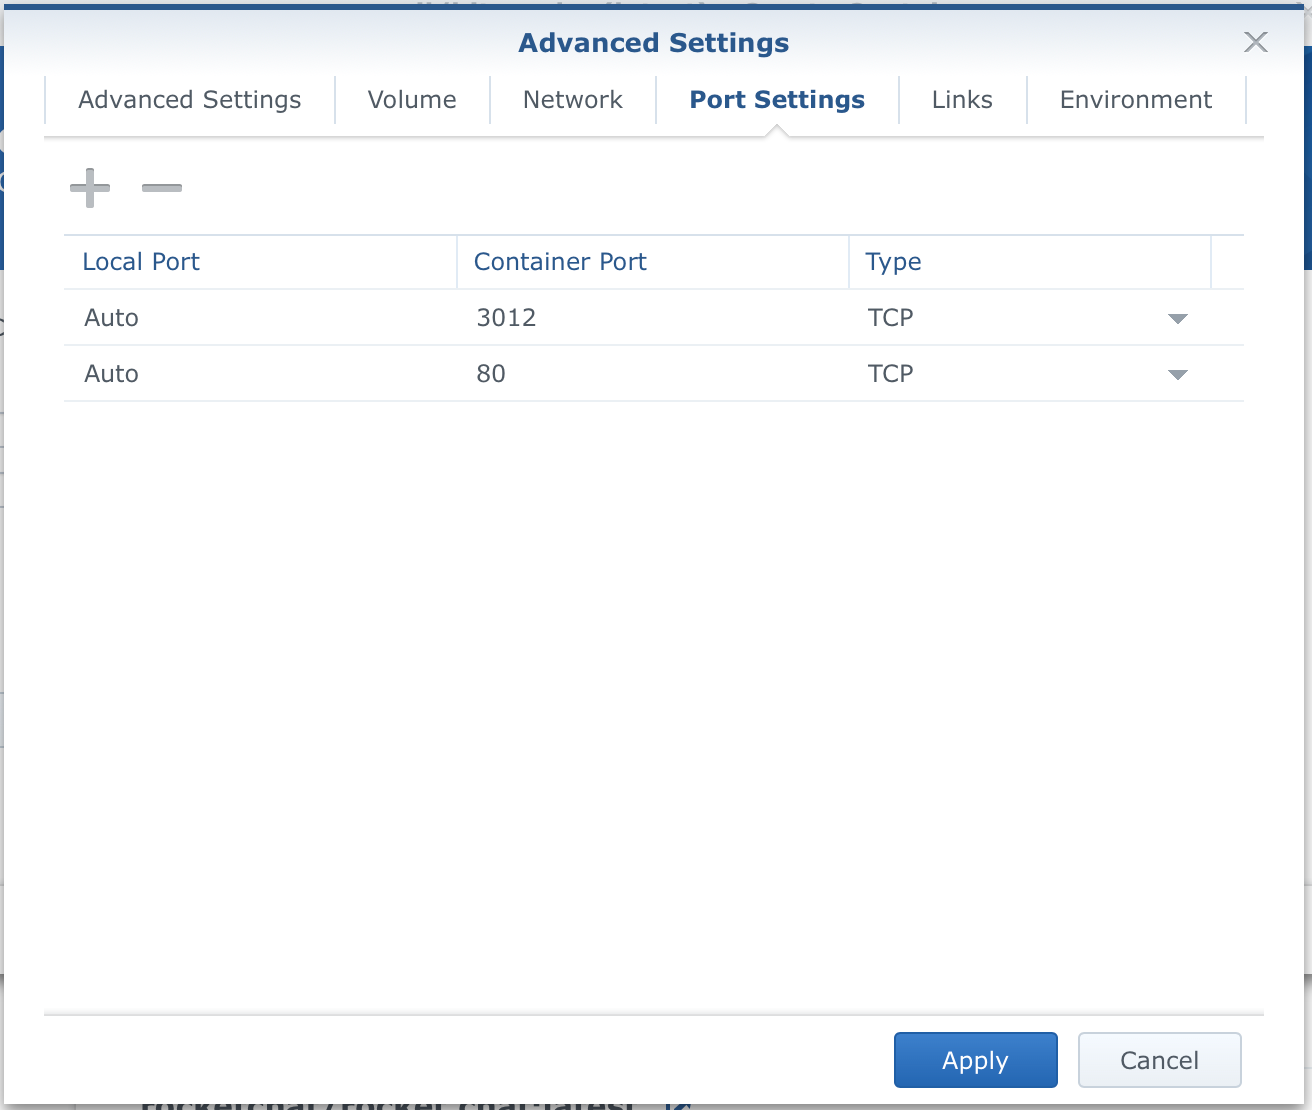
Same as with volumes, ports are configured the same way. Left side local host ports (on your NAS), right side container ports. DO NOT change the container side numbers, or you will have problems running the container in the 1st place. It can be reconfigured but you will have to do it on the image level, so not important for now. Another reason why this is not needed is that you can use almost any port for the Local port value that you want.
So change auto value to a port of your choosing. The general rule would be to use some non-system/default port like 1024 or above. Keep in mind that if you want to access your Docker containers with a custom domain name on an HTTPS/443 port, this is not the place to do it (a separate tutorial for that). At the moment you want to stick with the customs number (it can be the same as the container one) to get things going.
My example would be 1024 and 1025 for the pair.
The next tab, Links, is not needed for this container to run. So moving to the last one, Environment.
Even though this particular container even this tab is not needed, there will be a huge number of images that use this section.
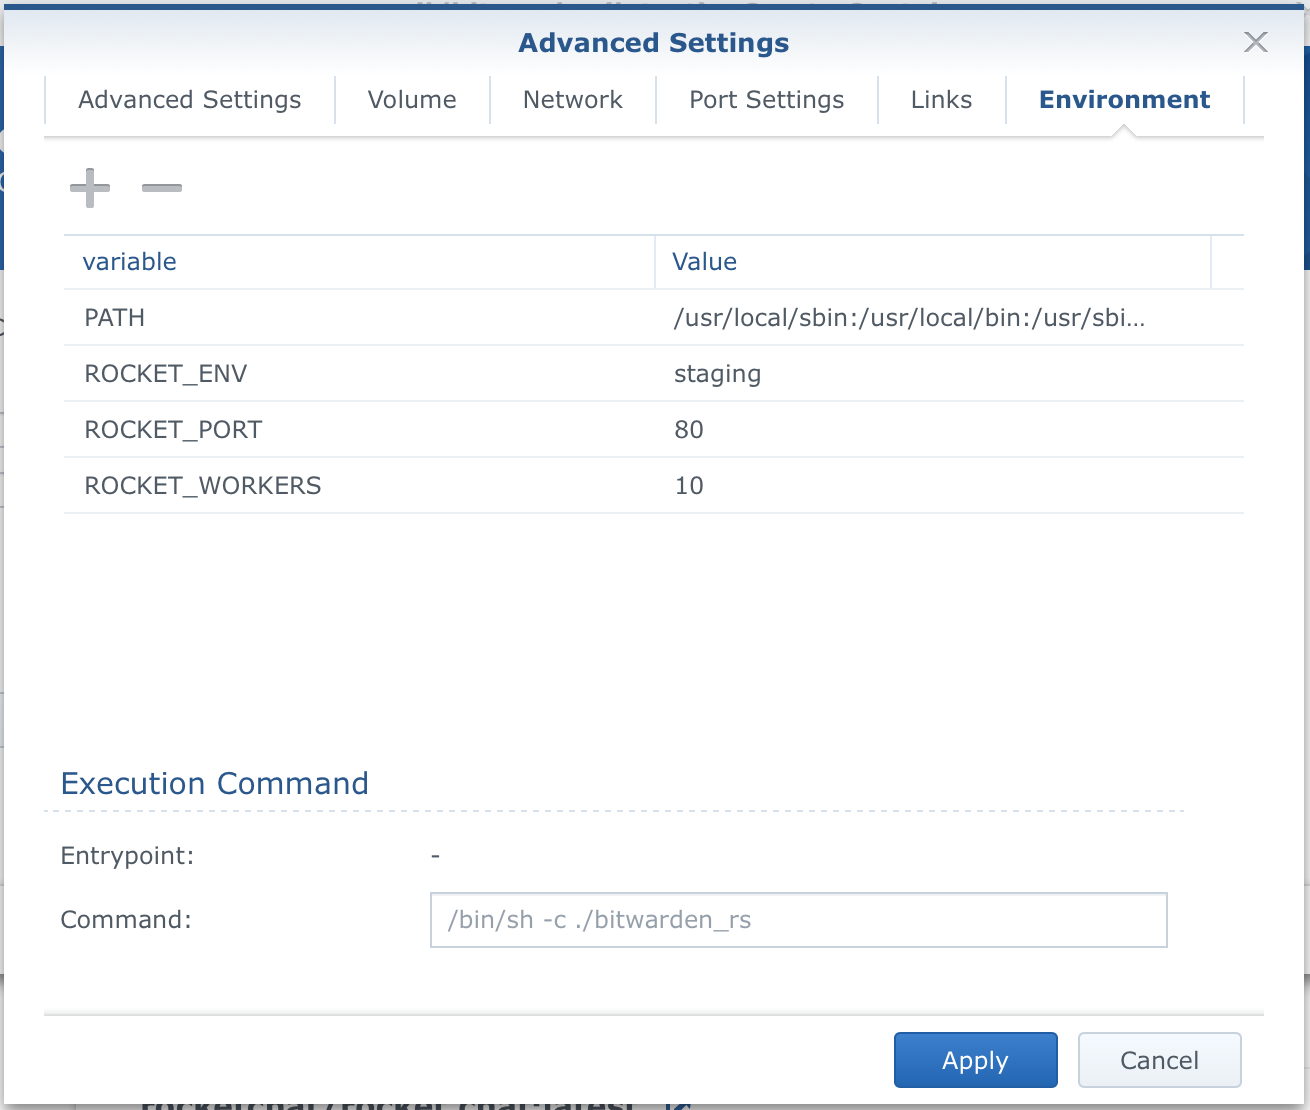
Most variables are case-sensitive so be aware of that. In this example, the image has already a number of variables set for us and there is no need to configure any additional ones. Keep your eye on the image page that you are about to use for any -e switches as that's the env variable that needs to be configured, added, or changed to your needs.
UPDATE:
SIGNUPS_ALLOWED=false
Another addition is that you can access your BW admin page by using the following variable:
ADMIN_TOKEN=xxxxxxx
Since VaultWarden version 1.28.0+, it is possible to secure the admin token so that it is not visible in plain text format. The way to do it is by using Argon2 and generation a PHC string.
In case you are using Portainer to maintain your docker-compose driven instance, here is a quick example of how to get this going.
First, locate the container and use the console function to bash into it.
In the prompt, run the following command: /vaultwarden hash --preset owasp . We will be prompted to enter the password that we will use later on the actual admin page to log in.
Once the string has been generated, it will look similar to this one:
ADMIN_TOKEN=$argon2id$v=19$m=65540,t=2,p=4$H5Xns1Juvmy4BR2rB0fRg4yn6O7CdIFRV4mw/J/y4iM$pejf9RXHz2jYorvspelm5cnD/9Jf/BD6cnikiUASz0U
Now that we have the string, add it to the compose environment variable list but make sure to make the following changes to avoid interpolation in the actual docker-compose file.
There is a need to escape all five (5) occurrences of the dollar sign $ that is part of the string by using two dollar signs instead $$.
The above string then needs to look like this:
ADMIN_TOKEN=$$argon2id$$v=19$$m=65540,t=2,p=4$$H5Xns1Juvmy4BR2rB0fRg4yn6O7CdIFRV4mw/J/y4iM$$pejf9RXHz2jYorvspelm5cnD/9Jf/BD6cnikiUASz0U
Add it as such to the compose file, recreate the container, and then test it out.
To access your BW admin page use the following URL:
https://yourBWurl/admin
Now just enter the password that was used while generating the PHC string and you should be able to log into the admin UI.
In order to protect it using a reverse proxy, add this to your RP entry to make the admin page inaccessible via the public URL:
location /admin {
return 404;
}
Of course, you can use your local IP address to access your BW admin page and make any administration needed.
UPDATE 09/07/2023 - v 1.29 - Mobile client push
With version 1.29, VaultWarden team has added new features for the mobile apps, push notification sync support.
 dani-garcia
With this feature active on your instance, any changes done inside the VaultWarden server will be instantly visible to the mobile clients. This means, adding a new item, changing it, or creating and deleting the folder, for example.
In order to activate and use it, there are two major steps that need to be done. First is to get the installation ID and key, from the official Bitwarden request site.
If you are unfamiliar with this site, it is the same one that will generate the ID and key value for your self-hosted version of the official BW instance, or the upcoming BitWarden Unified setup.
In any event, once you have the ID and Key, make the changes to the compose file as follows:
PUSH_ENABLED=true
PUSH_INSTALLATION_ID=CHANGEME
PUSH_INSTALLATION_KEY=CHANGEME
Alter the variables listed above with the values you have got from the official BW request site, and rebuild the container using the 1.29 image version.
Now that we have gone through all the advanced settings, click Apply and you will close this window. Back in the main window, click Next, review the Summary, and click Apply.
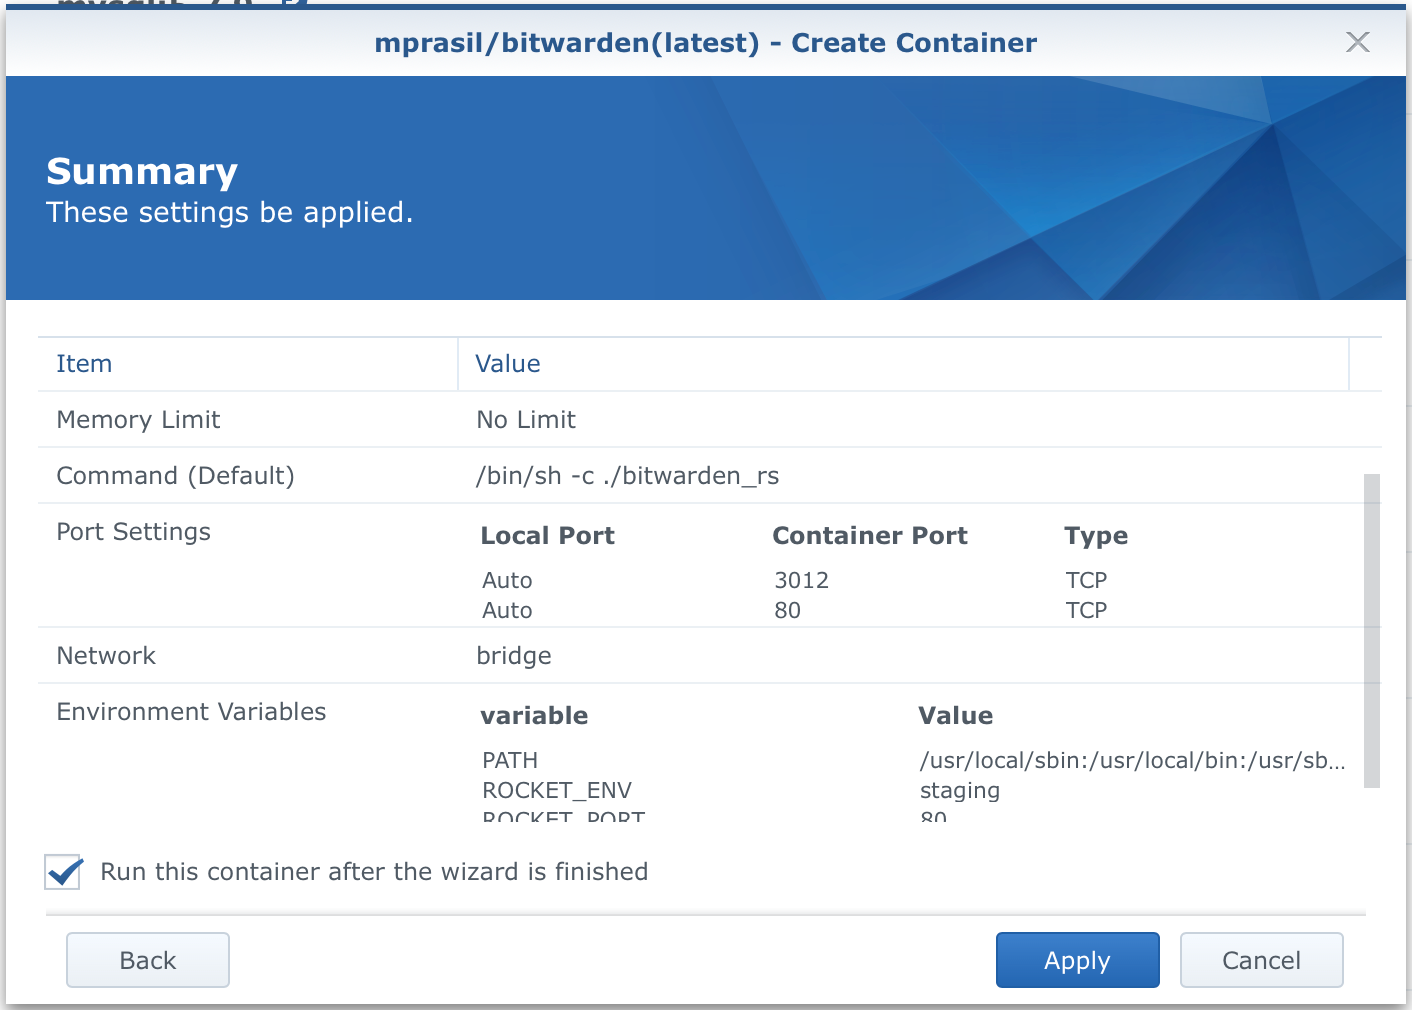
If you have left the check box next to Run this container after the wizard is finished checking, your container will now be created and started. To verify that all is running well, move to the Container tab in Docker main window to find the BW container up and running.

That's it! All that's left now is to go to your NAS IP address followed by the port number that you have defined to access the user interface.
An example of the URL would be: http://10.100.10.12:80 or whatever port you have defined as a local port for container port 80 (80 would be usually registered as in use).
Now that you have your new BW self-hosted instance running, enjoy it and prepare to make it accessible via the internet using a valid SSL certificate, a custom domain name, and reverse proxy.
Bitwarden extension shortcuts
In case you do use BW a lot when it comes to logging in to various sites (both local and remote) you might want to try and use BW keyboard shortcuts to help you in those tasks. Using the extension icon all the time can become tedious, so using your keyboard will come as second nature real quickly.
There are four (4) main default shortcuts for browser extensions:
Ctrl/CMD + Shift + Y → Activate extension
Ctrl/CMD + Shift + L → Autofill, press again to cycle through matching logins
Ctrl/CMD + Shift + 9 → Generate a password and copy it to the clipboard
Ctrl/CMD + Shift + N → Lock extension
So almost anything you want. One that activates the extension locks it, as well as autofill the values, and finally generates a password, all under your fingertips.
There is also a benefit of using the shortcuts as for a password that uses TOTP for its 2FA (second-factor authentification) you can simply paste the value once you have invoked the autofill.
Using the Cmd/Ctrl + Shift + L will automatically copy your TOTP to your clipboard after auto-filling. All you have to do is Cmd/Ctrl + V to paste!
Now that's cool right there.