Cut the cord - Plex Live TV using XTEVE and IPTV

With high-speed internet and almost everything else running online, it was only a matter of time before old OTA and cable access become too expensive and vintage.
The content nowadays is everywhere and the battle of streaming services is in full swing. There is so much content out there that it feels a bit overwhelming at times, but in some cases, there is still a need for some local tv content.
OTA and cable content in a typical household usually require multiple receivers, one for each tv set, and the price in those cases can add up quickly. But on top of that what if you want to watch your tv content on any device, not just the tv? What about phones, tablets, or even away from your home? In those cases, in the old days, you would be out of luck. To top it all, what if you forgot to record some content? Wouldn’t it be great if you can set it up to be recorded while you are away from your home?
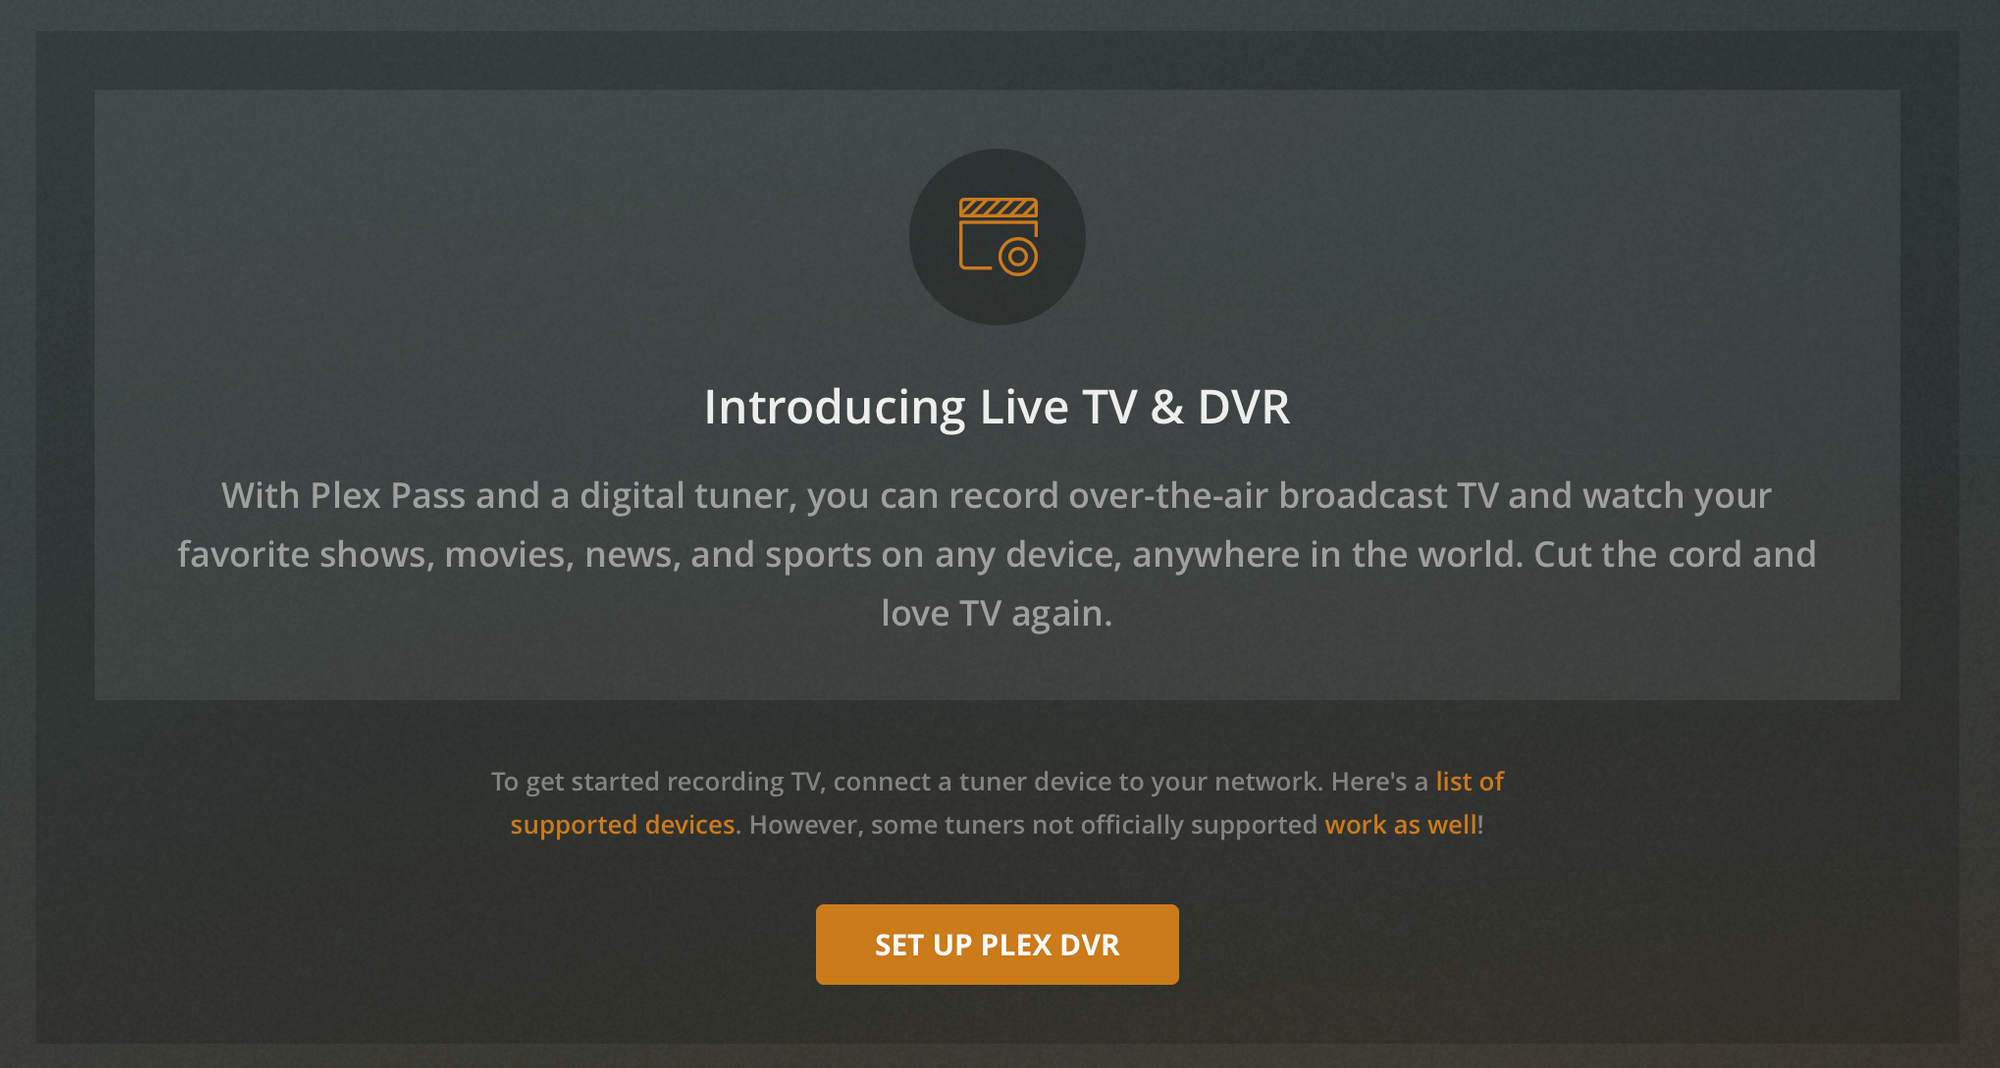
Enter Plex Live TV and DVR. If you are unfamiliar with this product just google it a bit and you will get an idea of its potential. Let’s just say it’s a central media hub for all your streaming needs. If you want to stream your BL rips or DVDs, music, photos you name it, Plex can deliver. On top of that, it can do live tv as well but unlike all the other features, this last one is a paid one. Also called Plex Pass feature. Now it’s worth mentioning that there is also a large number of other features as well but today I will focus on Live TV.
So with the Plex Pass feature in the bag, I will show you how to get your over the air content into Plex and onto every device that Plex can work on.
Before we begin, you will need a running Plex server with a plex pass subscription so bear that in mind.
This setup also includes running XTEVE. That’s a TV proxy that will emulate an OTA receiver. Plex works with a number of receivers, but if you don’t have one you can run one inside a Docker platform, or as a platform on your win/mac/Linux machine of your choice.
My setup will be Plex on a Synology NAS, XTEVE running in Docker on that same NAS and as a source of channels, I will be using a demo IPTV M3U list (so no real OTA antenna).
Just before I continue let’s make one thing clear. You can run the same setup on Plex with your receiver (HDHomerun for example) connected to your cable or regular antenna.
The scenario that I’m showing here is for situations where you don’t have any hardware apart from your NAS but have access to the Internet. As a proof of concept, this setup will be more than fine.
Configuring a virtual receiver
First, we need to setup up xteve (or any alternative tv proxy like tellytv for example) so that we can prepare it for Plex Live TV configuration in the last step.
For my example, I have used a docker image https://hub.docker.com/r/bl0m1/xtevedocker to create xteve container that we then use to connect with your iptv channel list.
By default, this image is running on port 34400, with a single volume needed to map the location of your offline m3u files (if you choose to use that method).
This is the configuration for the docker container:
docker run -it -d --name=xteve -p 34400:34400 -v ~/xteve_home:/home/xteve/.xteve bl0m1/xtevedocker:latest
As we can see there is only one port mapped and a single volume path. I will not get into too many details on docker setup and configuration in this article as I presume that you have the basic knowledge of running a docker container.
After you have set up the XTEVE container and have it up and running it will most likely be on the IP address of your NAS running on its default 34400 port (unless you have changed that). In any case, you can access the interface by going to the default page on http://your_NAS_IP:34400/web.
Before you get a list of your channels you will need to map your M3U file with xTeVe. To do that just open the Playlist section and add a new source. If you have mapped your local xteve folder to the destination in this article then the volume should look something like this:
/volume1/docker/xteve:/home/xteve/.xteve
In that case, your m3u file needs to go on your NAS in the following folder:
/volume1/docker/xteve/data
Now using the Playlist wizard, and let's say that the file is called xteve.m3u, add the following path:
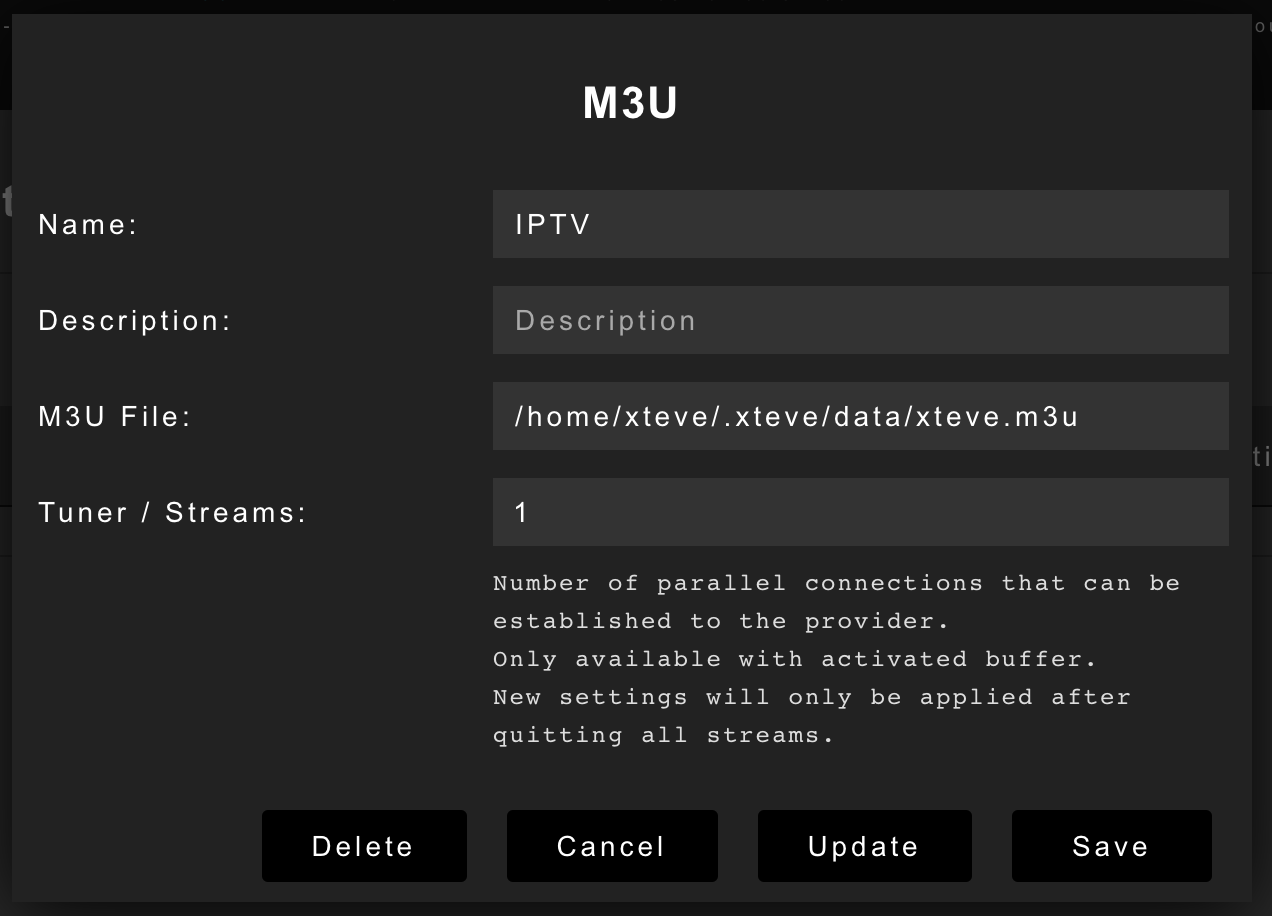
After the initial wizard (entering your first list as a M3U local file or a remote address and a valid XMLTV (EPG) file/url) you will be land on the xteve default UI.
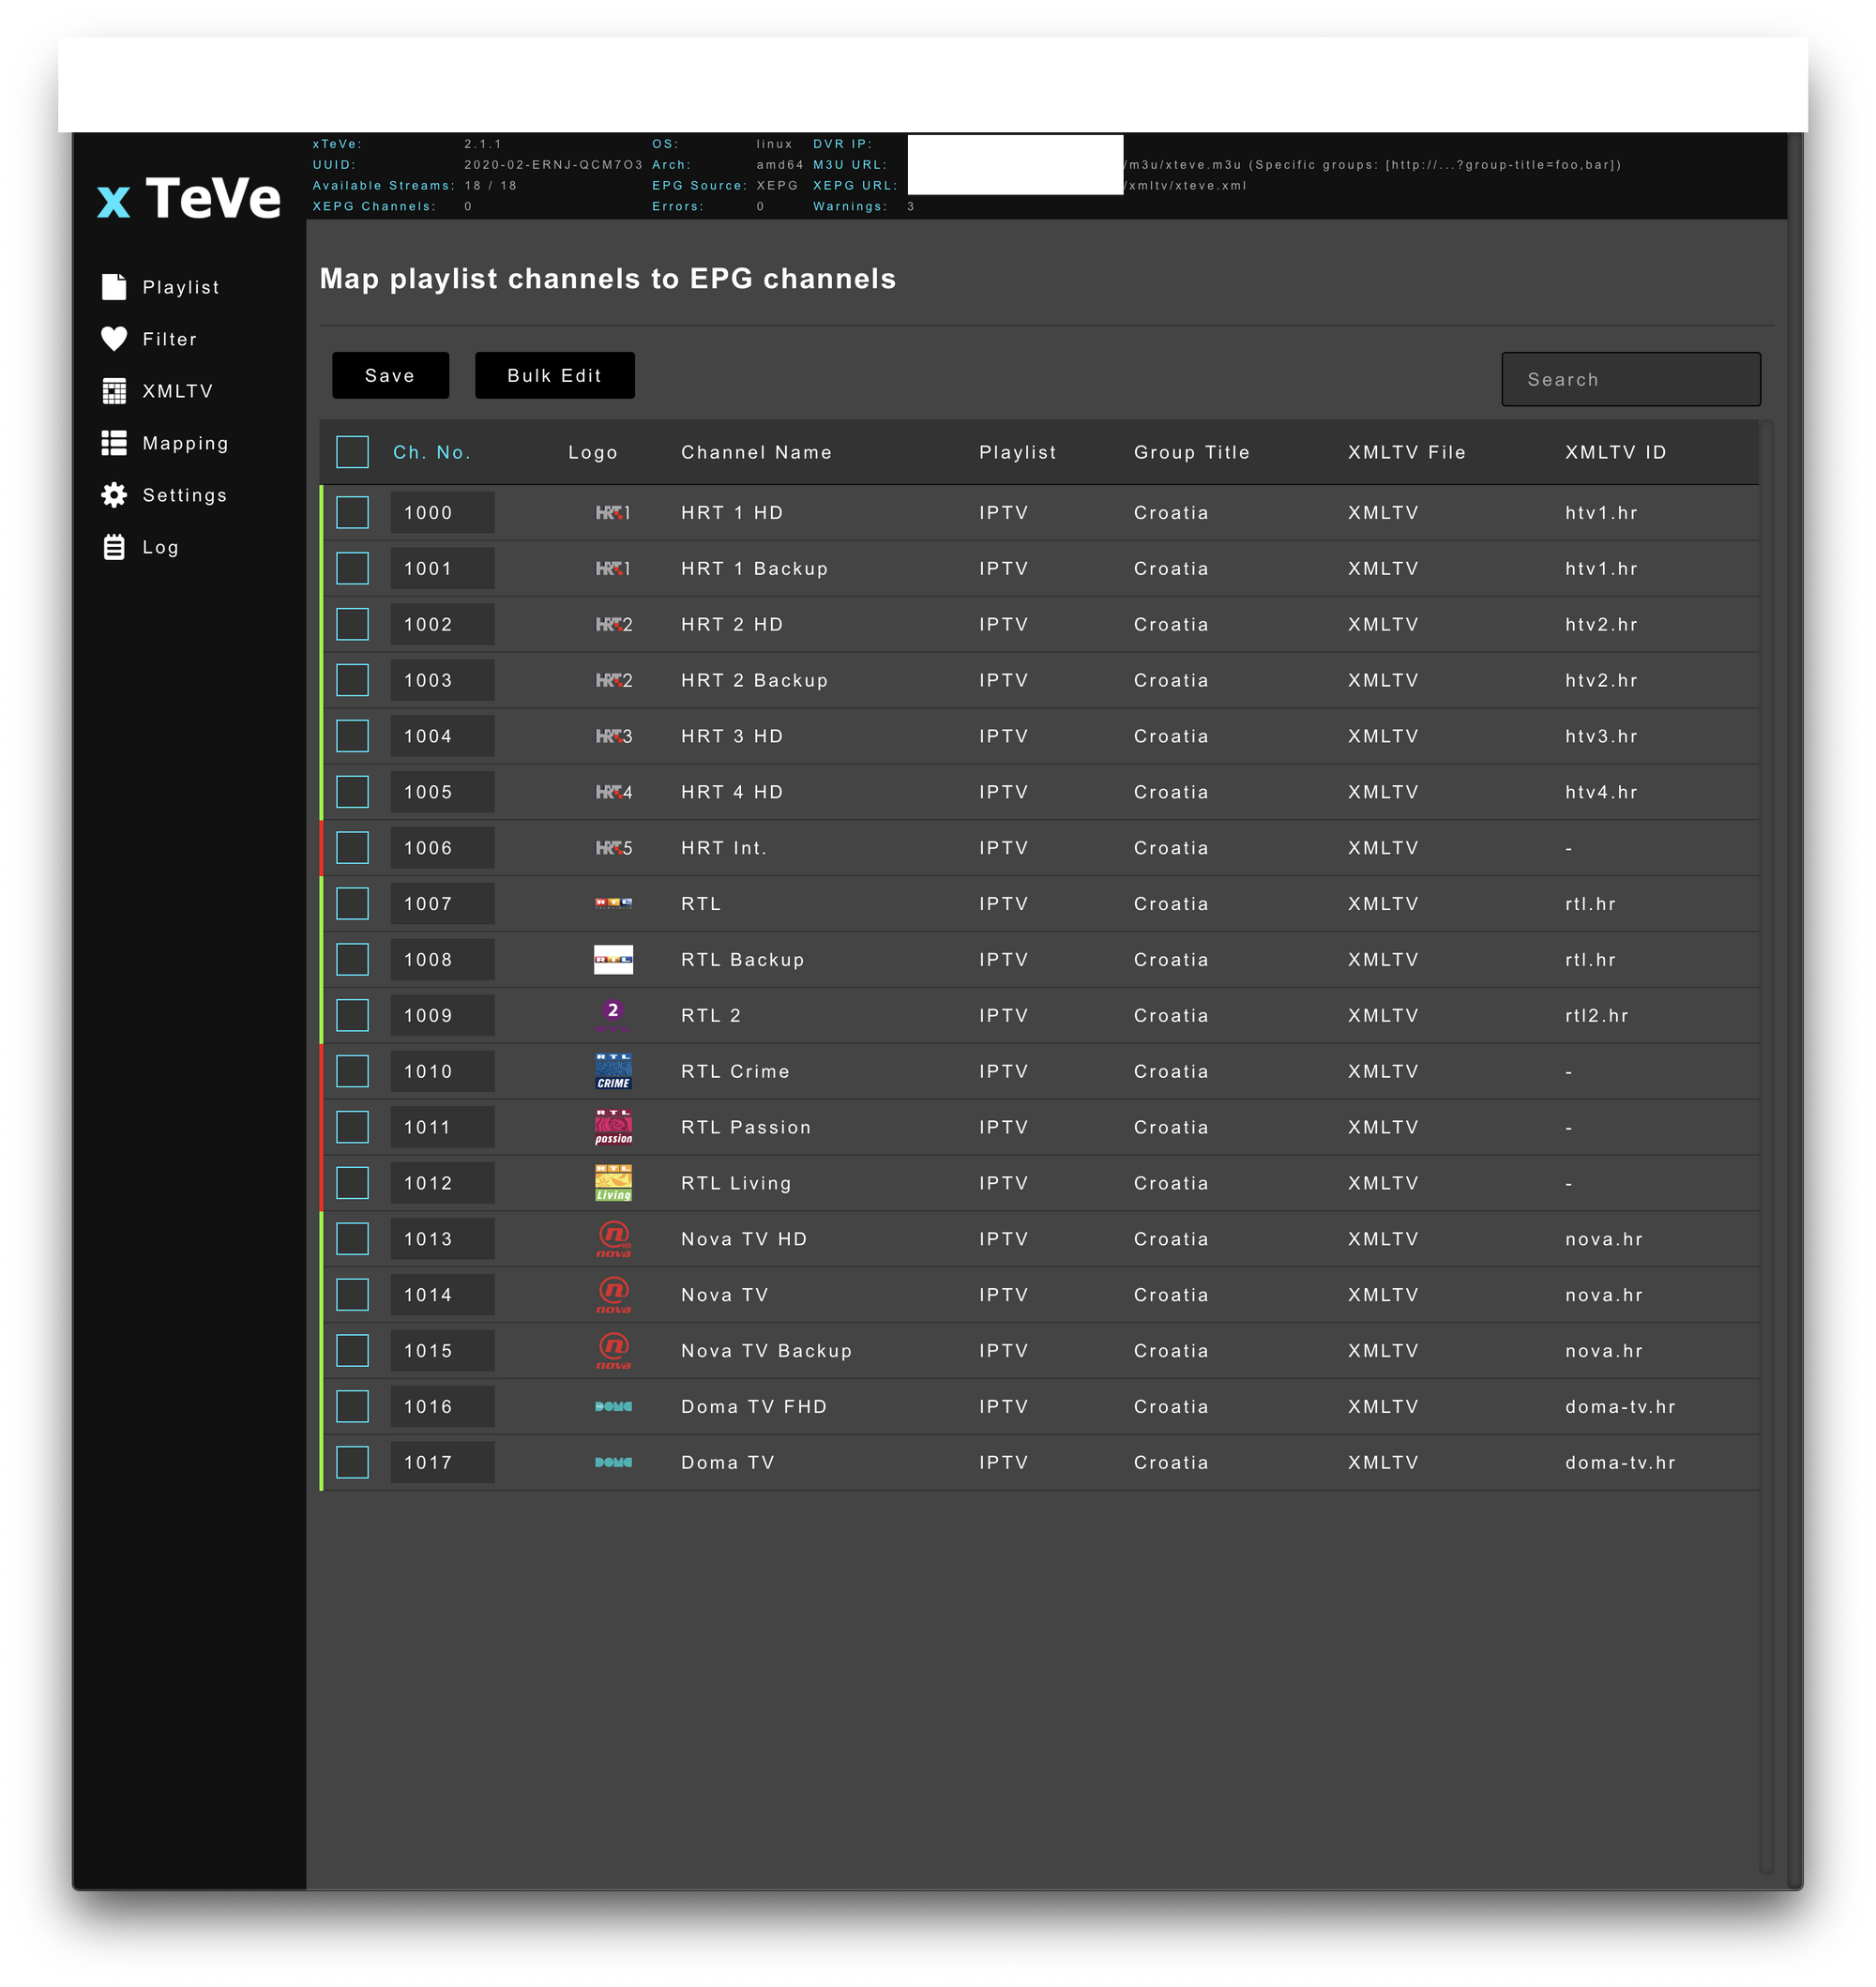
The main thing to do here is to map your channel list (called playlist) and your XMLTV (EPG) source. This has to be completed here (and repeated in PLEX as well) in order for Plex LiveTV wizard to detect the channels when you configure it the first time (more on this a bit later).
XTEVE has an option of filtering your list(s) depending on your needs. So for example you can filter out certain channels from IPTV lists that do not meet your criteria. Keep in mind that most IPTV lists can have a lot of channels (thousands) but Plex LiveTV, at the moment of this article, supports only a max number of 480 channels.
I will not get into too much on XTEVE configuration considering its wiki site and overall documentation is rich with all the information that you might need, so dig in.
For this setup/demo you can use any IPTV list on the internet that you can get your hands on as well as a XMLTV list/URL to make this work. Keep in mind that most EPG solutions (XMLTV lists) are paid, so I will not list here any specific ones. You can also run your own solution to create daily or weekly EPG for free but that's a topic for another article.
So, now that we have a running XTEVE setup and a working list of channels with their valid EPG, it's time to configure Plex LiveTV and connect it to this tv proxy.
Plex LiveTV configuration
As mentioned above, LiveTV and DVR are premium Plex features and as such require a Plex Pass subscription.
If you have a Plex server running on hardware that supports hardware transcoding (also a Plex Pass feature), this will be good news for you. Live TV can at times, require transcoding depending on your choice of Plex client device. In certain cases, video and/or audio will need to be transcoded and with HW transcode support your CPU will not be pegged that much (if at all) as it would be while transcoding would be on a pure software level.
Log into your Plex server and open up the Settings section. In the left column under the Manage section, you will find the Live TV & DVR option.
For this to work Plex needs to find your digital tuner (XTEVE in this case) on your network. There is also a manual input option so if it will not detect XTEVE you can manually input it in this format:
IP_address_of_your_NAS:34400
Click continue. In the next step, your tuner should be detected and you will see the list of channels as well (those that you mapped in XTEVE with their corresponding EPG). If all the channels that you were expecting are listed just click continue again.
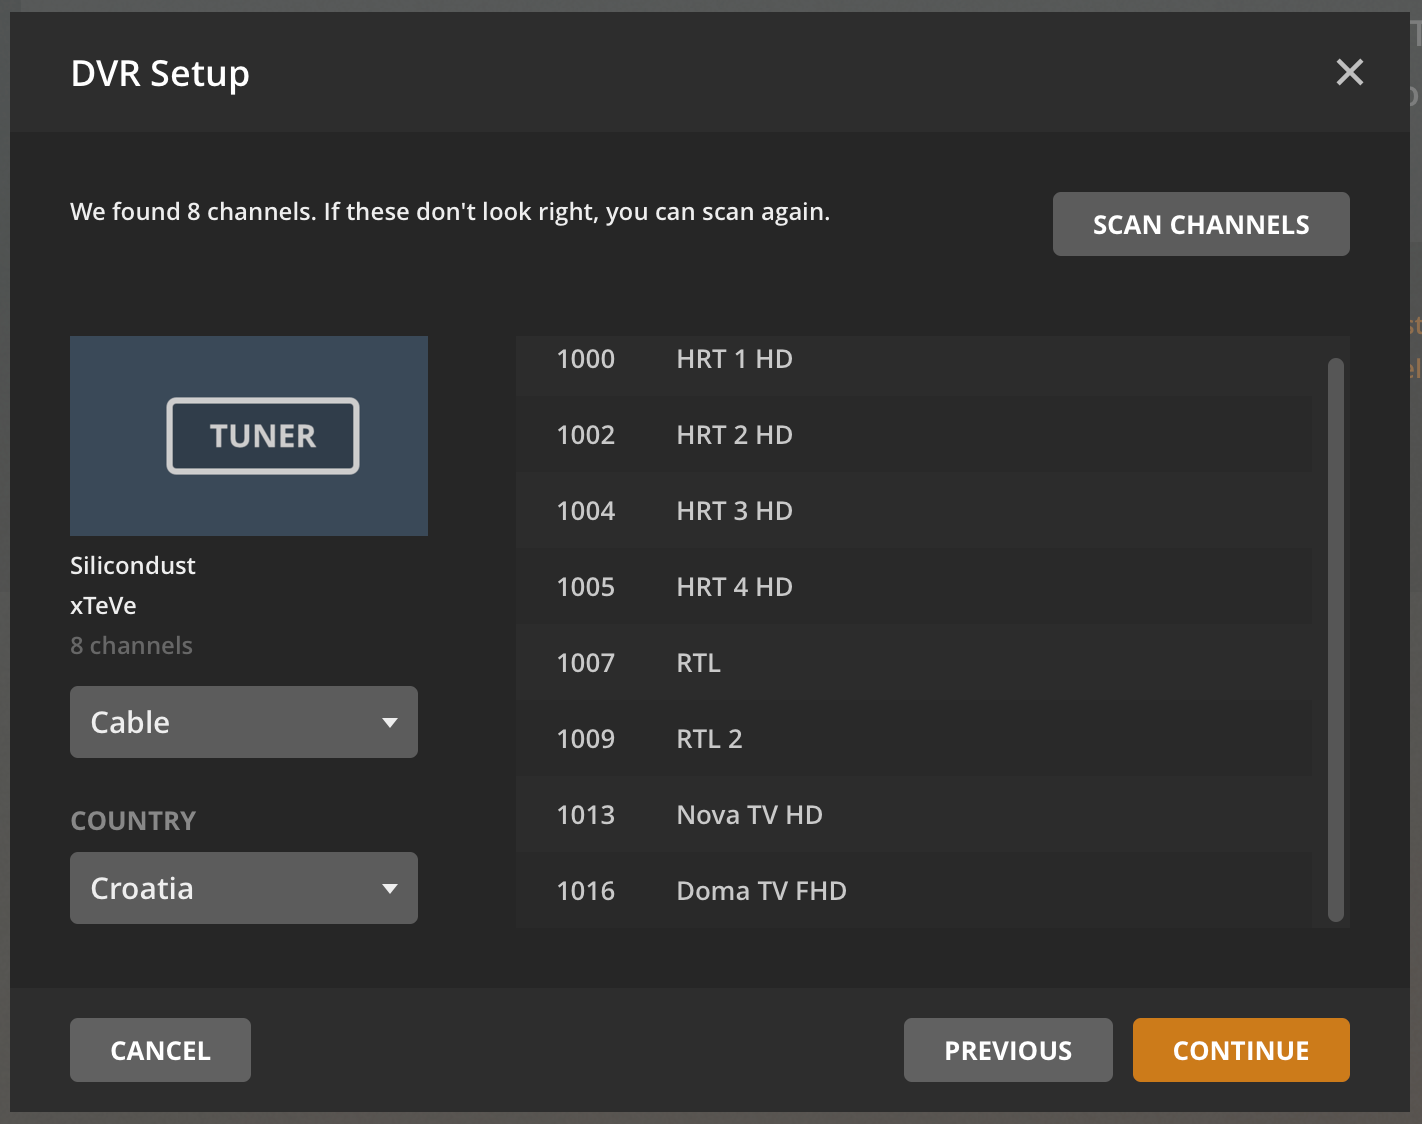
In the next step, Plex will ask for your EPG (XMLTV) source. Even though we have mapped the channels in XTEVE we have to do it again here. So if you have used a public list or static file enter the path to that file and continue forward.
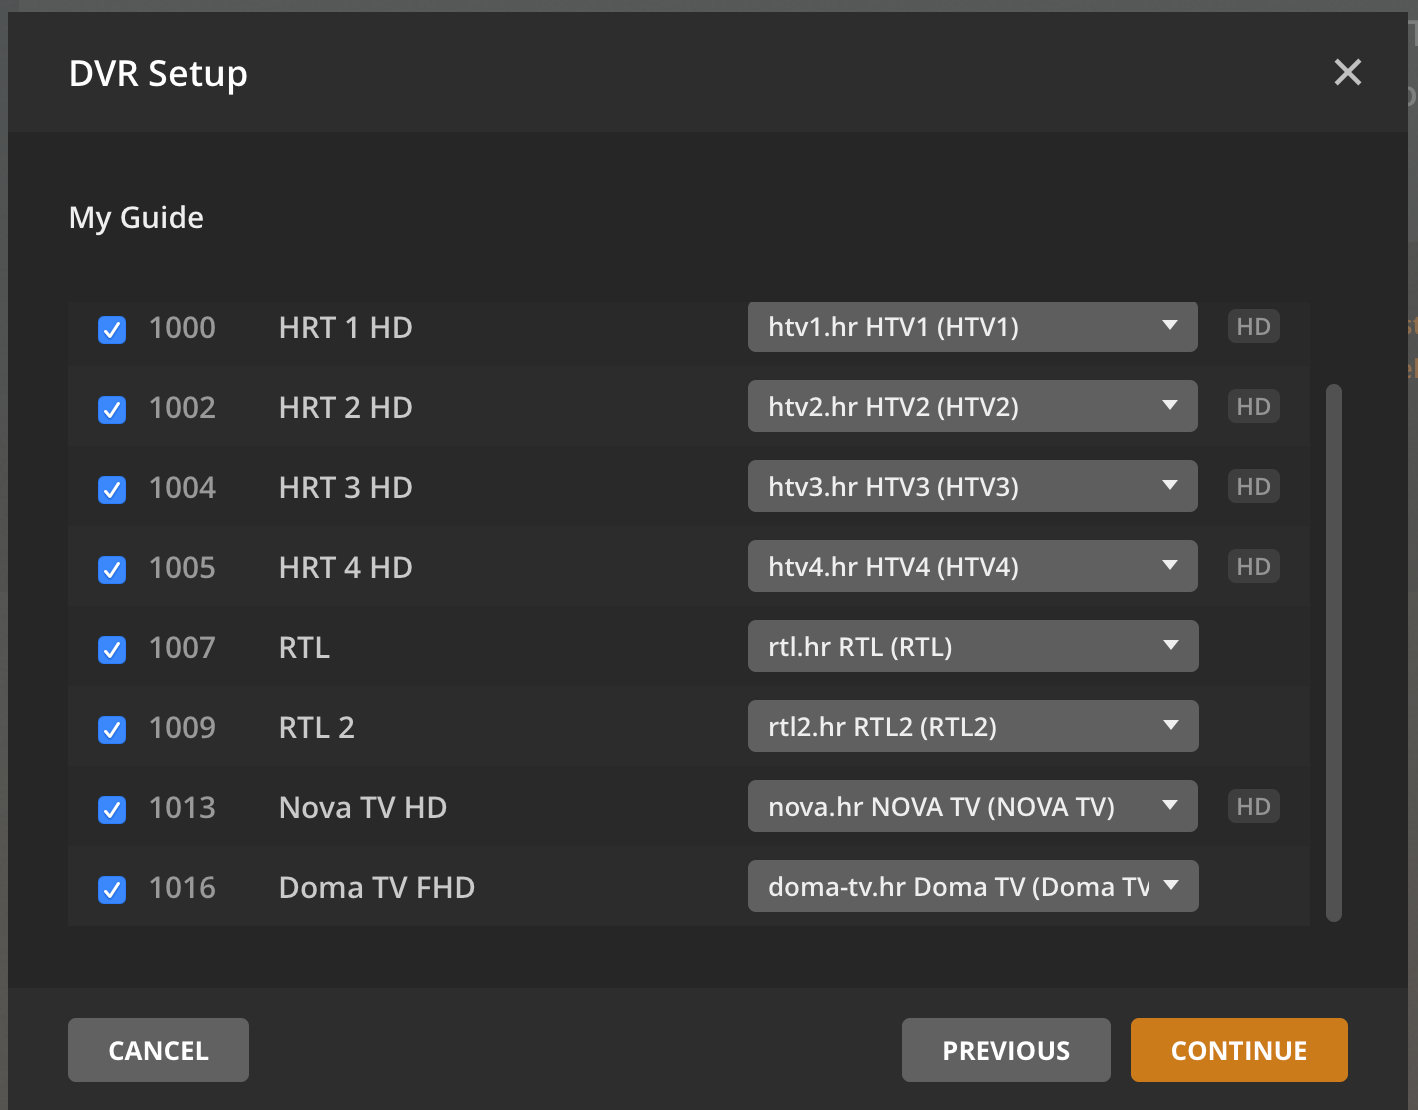
As you can see we need to map all the channels again (if not detected automatically) with their corresponding EPG code in order for Plex LiveTV to be able to pull the timetable as well as the description for all the content of all those channels.
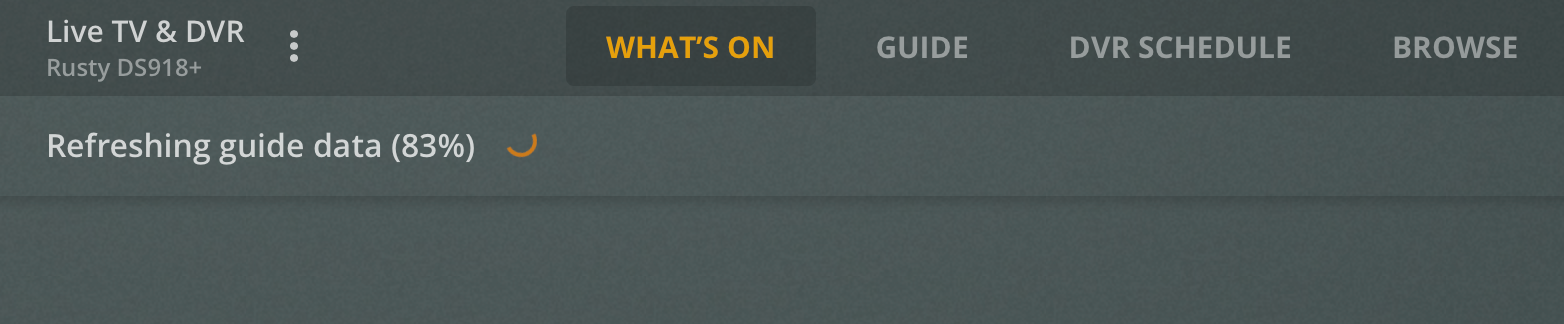
As a final step, you need to be patient. Building the guide for the first time can take some time depending on the number of channels as well and the amount of data in the EPG for each channel. For about 2-3 days worth of data and about 10 channels, it will be done in a matter of minutes (of this will depend on your sources, internet speed, etc).
Now that we have completed the setup, it would be good to reset the Plex server. There is a known problem with XTEVE and Plex if this is not done. XTEVE tuner will be presented as not accessible unless you reboot (but it will still work fine).
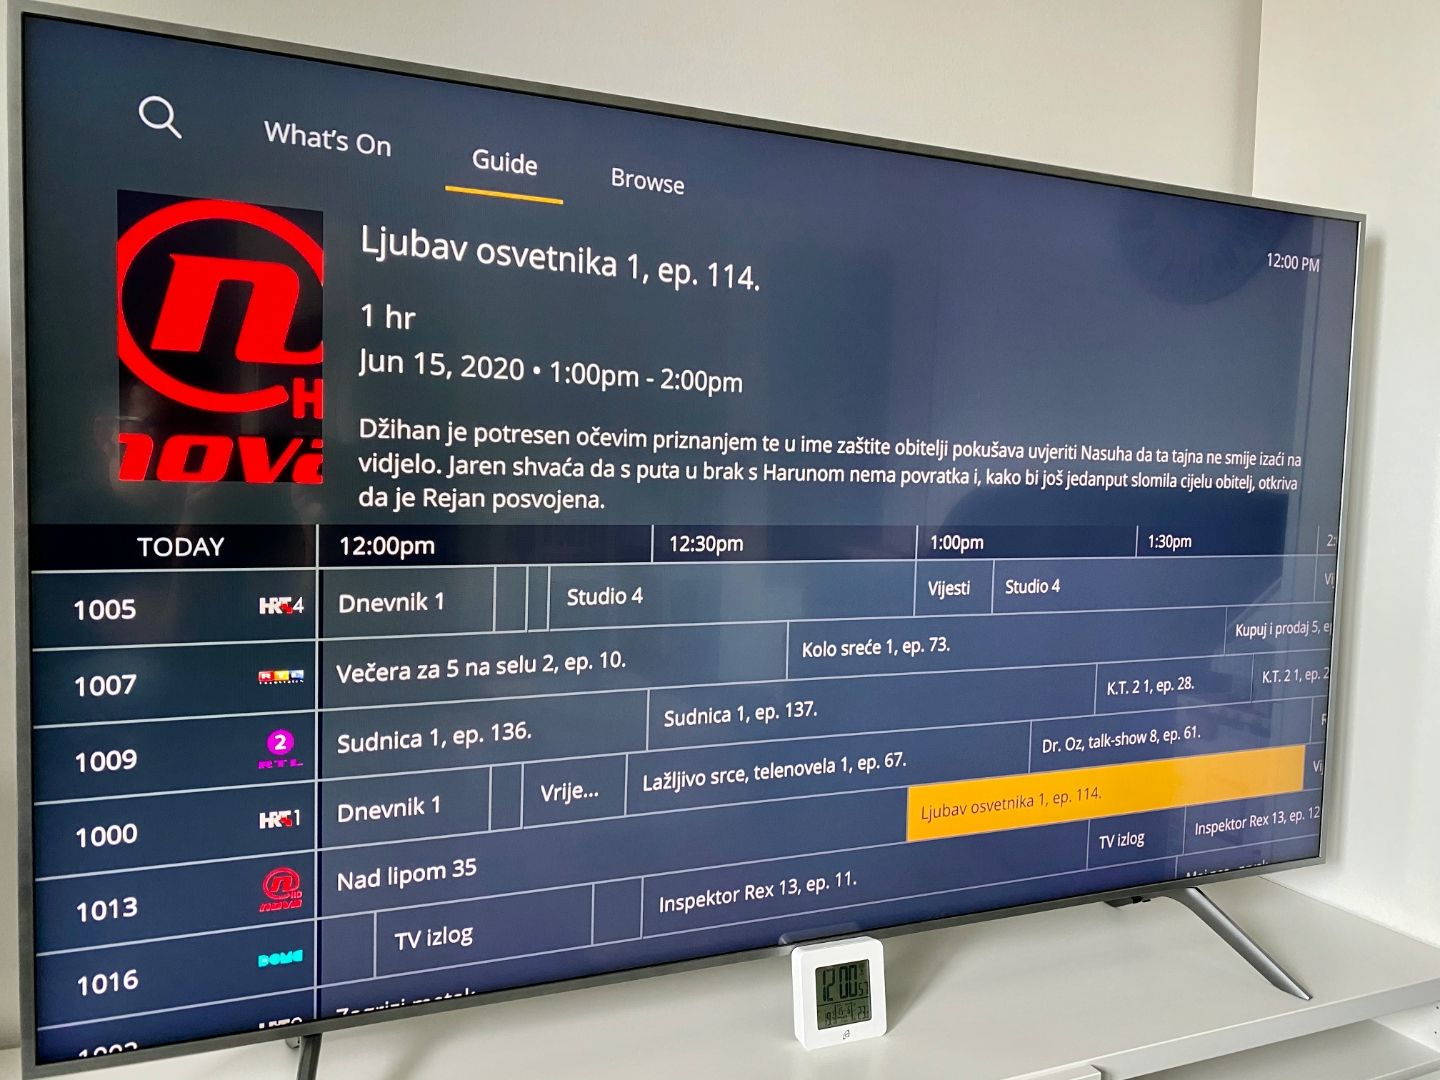
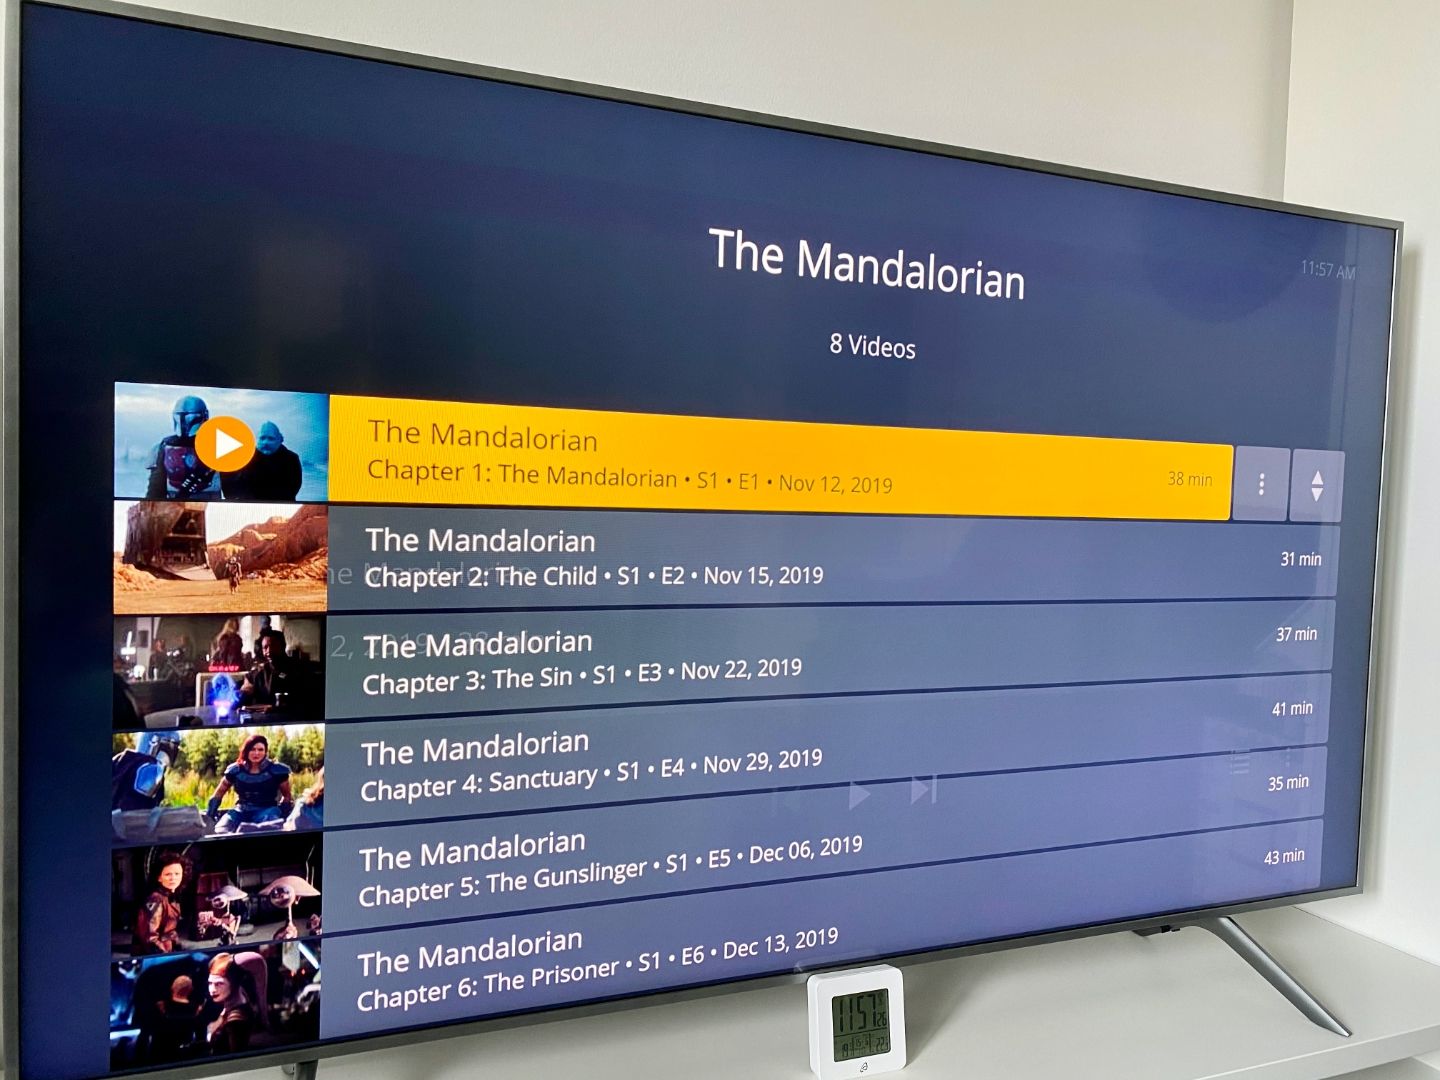
After all, this is done, you are good to go and enjoy your content. Visit the Live TV & DVR section on your Plex server and you will be presented with a similar TV Guide.
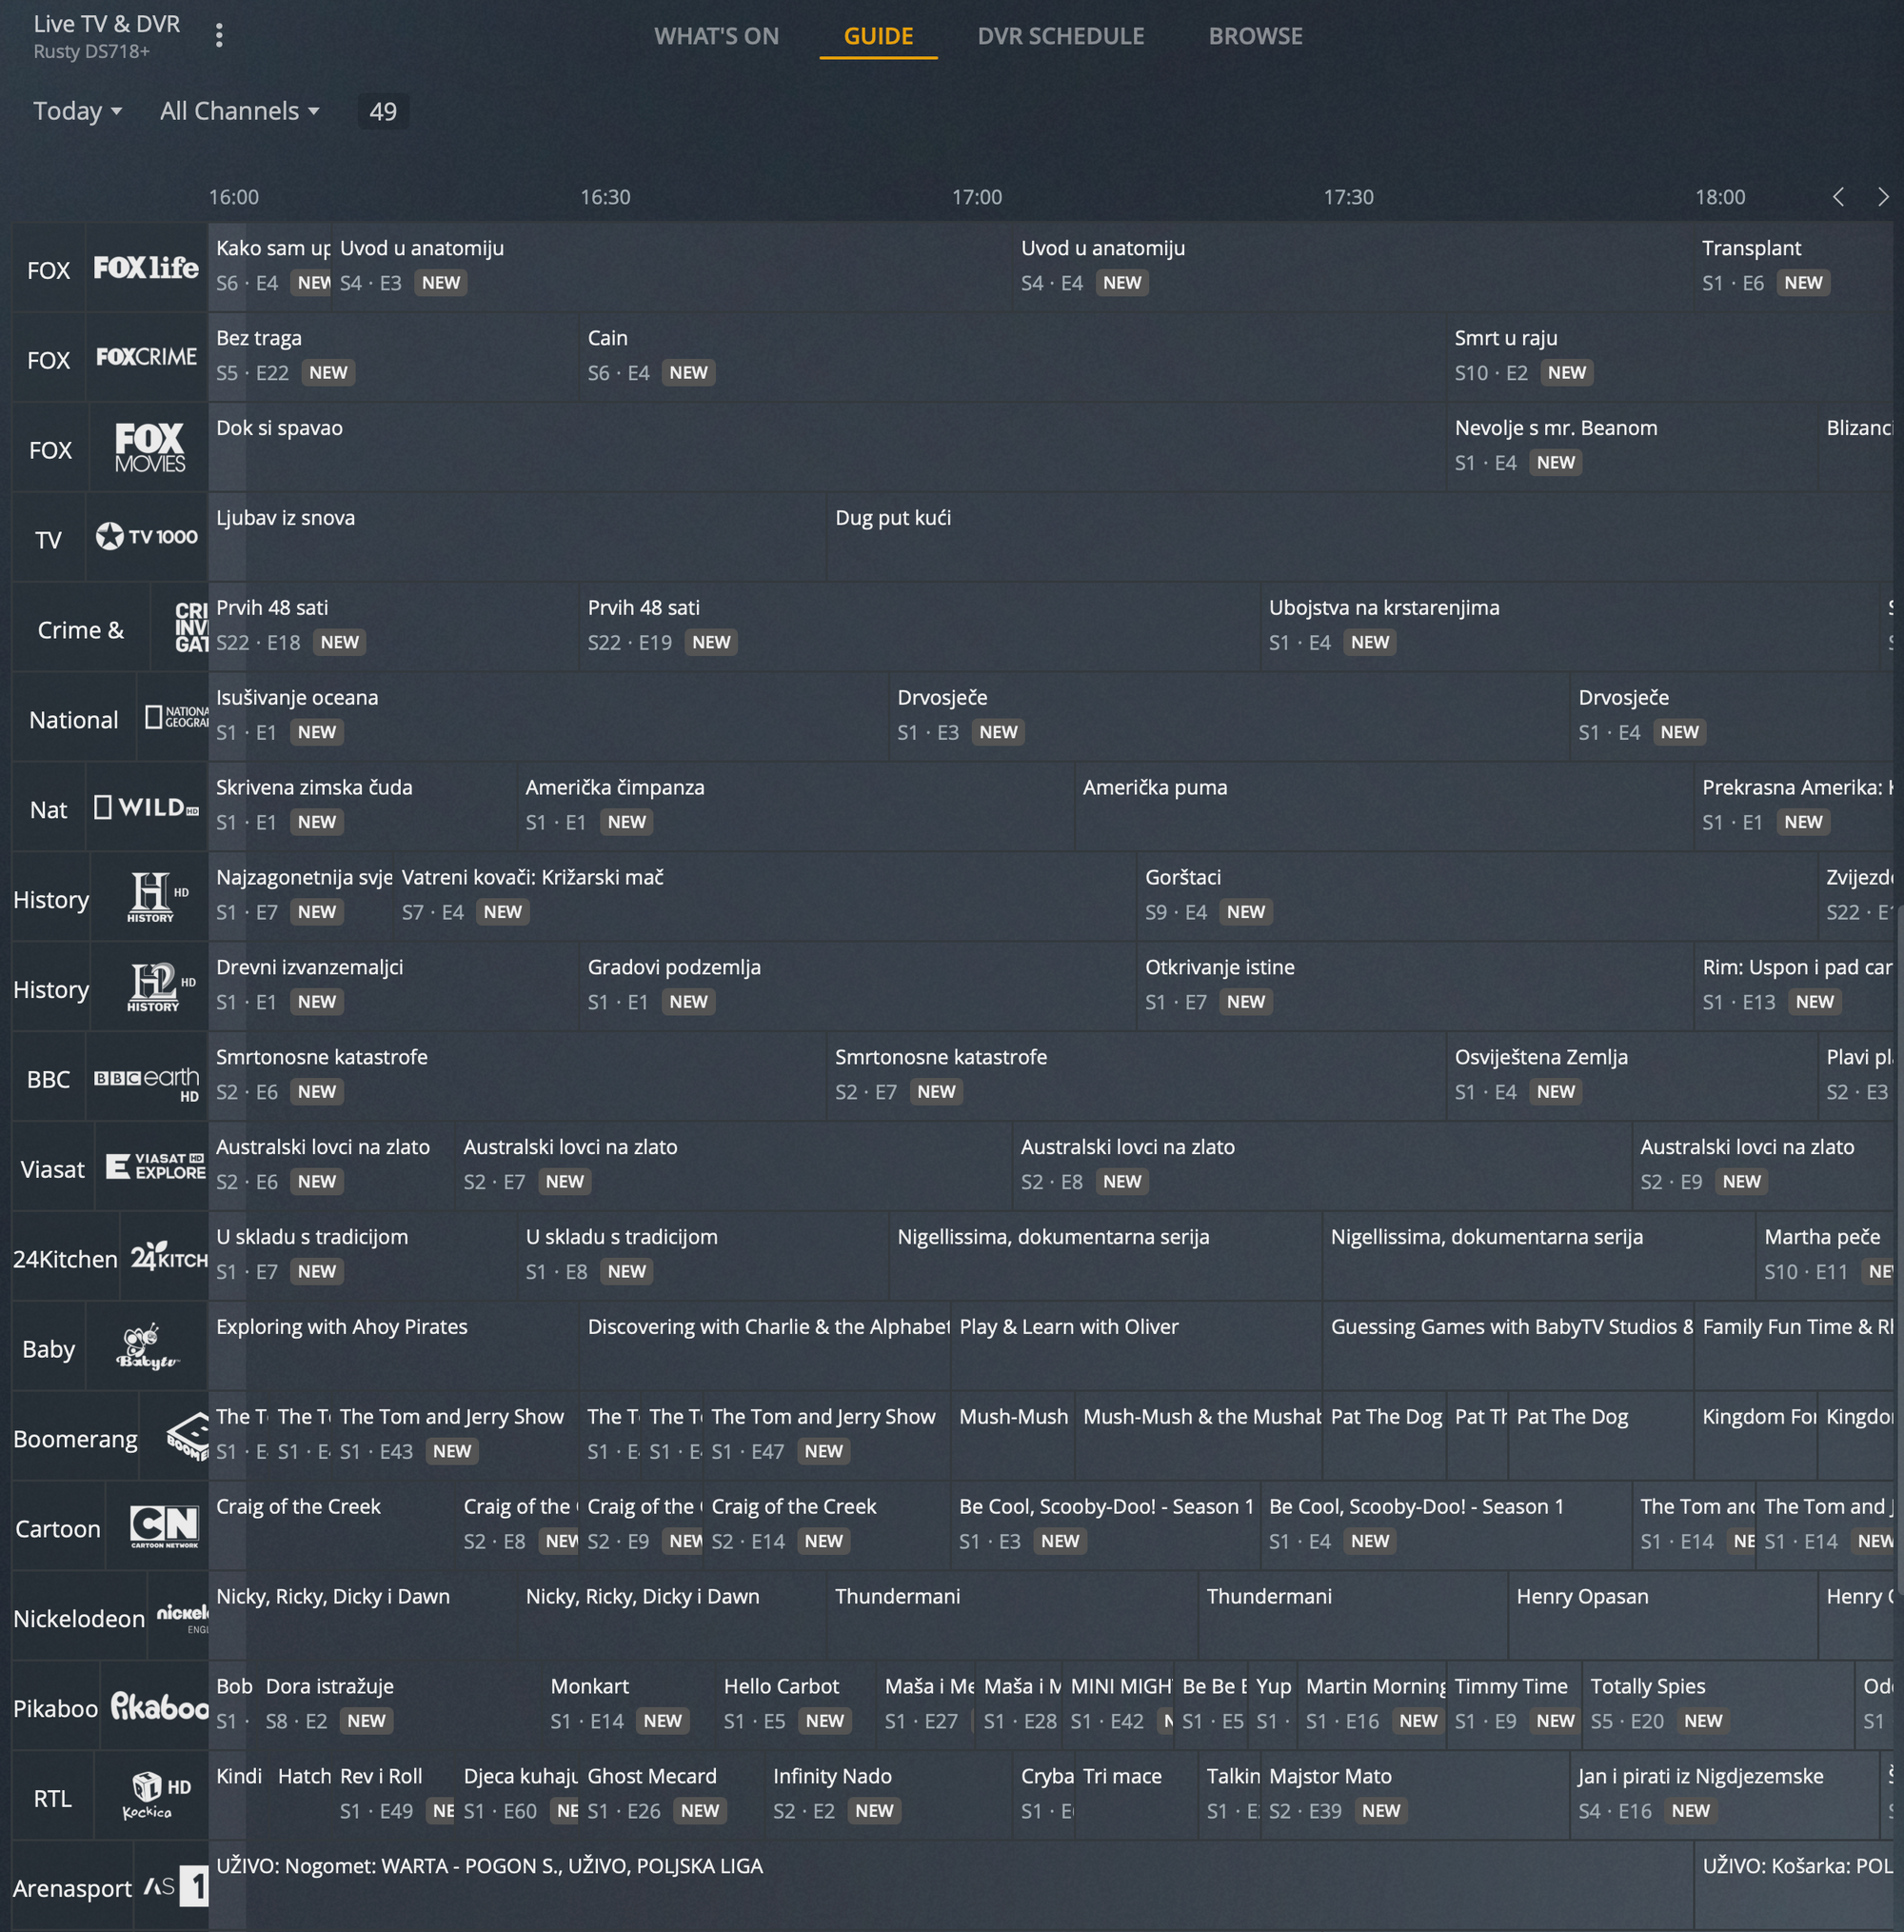
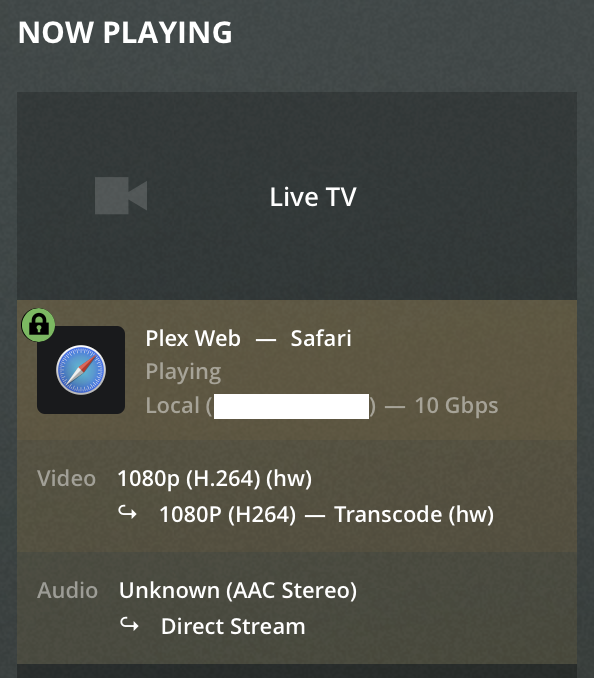
Clicking on any channel name will tune Live TV broadcast and for all the things that you see in the guide in the future, you will have the option to record and save in a library that you can prepare for it. All that content will be crawled as well and you can edit them as you see fit.
Plex Live TV playback and utilization
Considering that you now have OTA content on any device that you can use Plex on give yourself a pat on the back.
At the time of this article, this great feature works on all Plex platforms but on the Samsung Tizen (TVs 2016+). To clarify, Live TV works on them but the grid feature is missing, meaning you will only be able to tune into things that are about to start or record what's to come. If for any reason you switch channels, you will not be able to go back to the content that's already in progress. Stupid I know, but Plex is working on it, and hopefully, the guide will be available soon.
As I mentioned before, depending on your client platform of choice, some channels will require transcoding like any other movie or tv show that you can stream via plex. In some cases, audio will be just repacked in a different container, and video will be transcoded if an unsupported codec is detected.
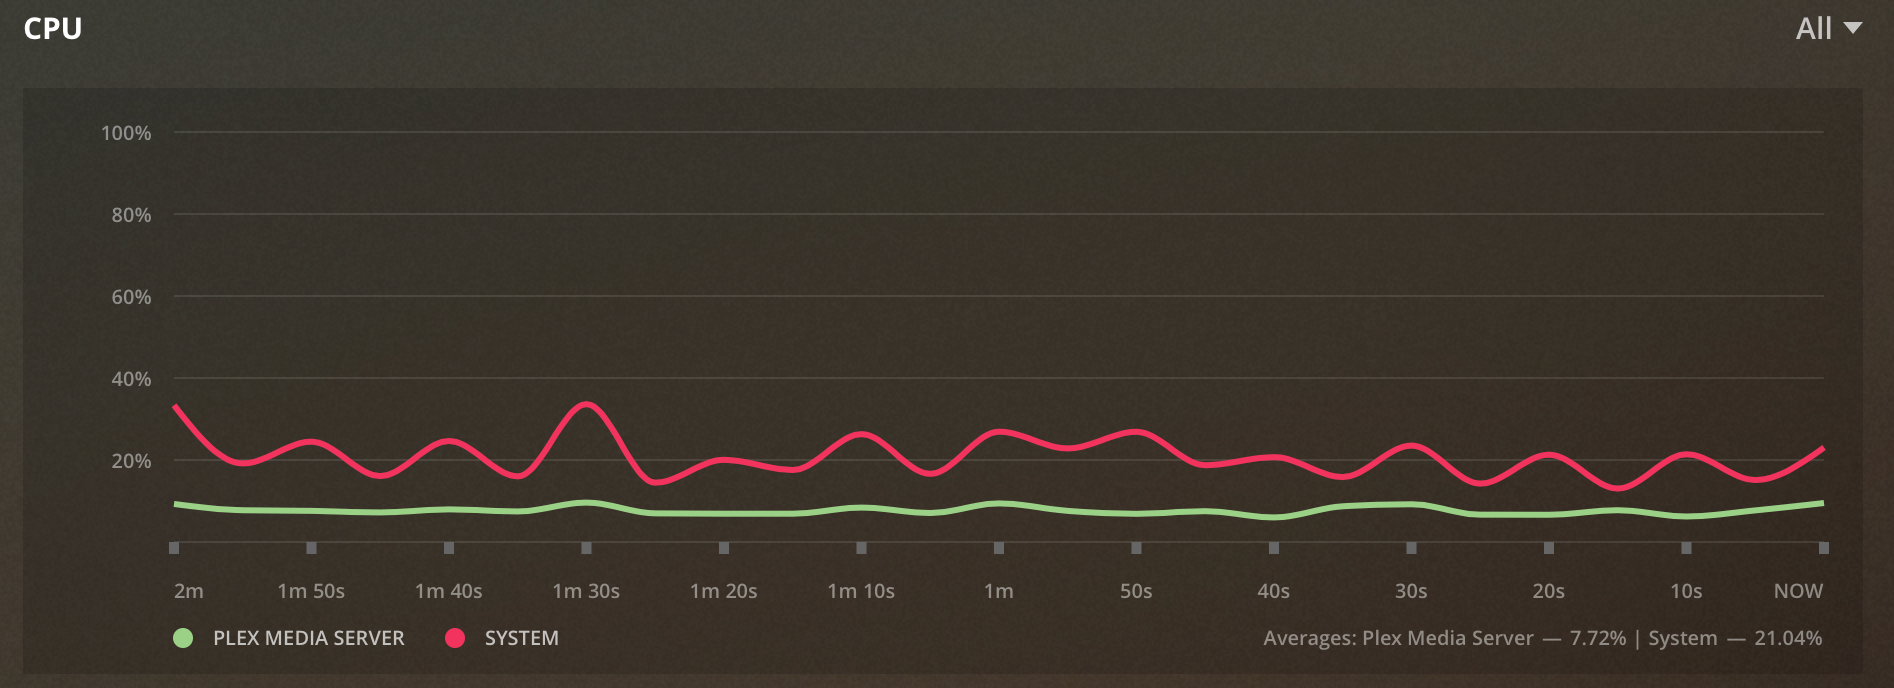
This will have a bigger or smaller CPU impact on your Plex server (NAS in this case) depending on the hardware transcoding feature is active (supported) or not. Most NAS devices from Intel have a QuickSync technology built-in and that's what Plex uses to make use of the HW transcoding.
On a typical device that has HW transcoding CPU utilization will be almost non-existing.
If you are running the Plex Home feature (Plex server with multiple local Plex users) you can also enable the Plex Live TV feature to be visible to those users just like any other library and content on your Plex server.
On the other hand, this feature will not work for your outside (remote) Plex users. You will be able to share any recorded content, of course, considering it will be a part of a library that you can choose to share with them.
So to sum it up. If you have a tuner that you can hook up to your LAN and have a working Plex server with the Plex Pass feature, there is no reason for you not to give this a go. It will eliminate your need to have multiple set-top boxes for your OTA/cable, save you money in the process and give you your content in a great visual presentation on more devices than you can handle.
New Samsung Tizen App Preview
Finally! After many months (years!) of waiting it is finally here. The new rewritten Tizen Plex app! This will give new life and options to your Plex TV experience. Here is a short overview of the new options that have been introduced.
Skip Intro - This was a much-requested feature that allows for TV shows that have a longer intro (more than 20sec) to be detected by Plex and then offered as a skip intro button. It works like a charm, and up until now, it was on selected platforms. Finally, it has arrived on Tizen as well.
LiveTV Guide - I can't tell you how much I have been waiting for this option. I mean having a Live TV option, and not having the ability to have a guide EGP/grid view. Crazy right? Well, it is finally here, and it works great. Just like it does on any other platform that supports it.
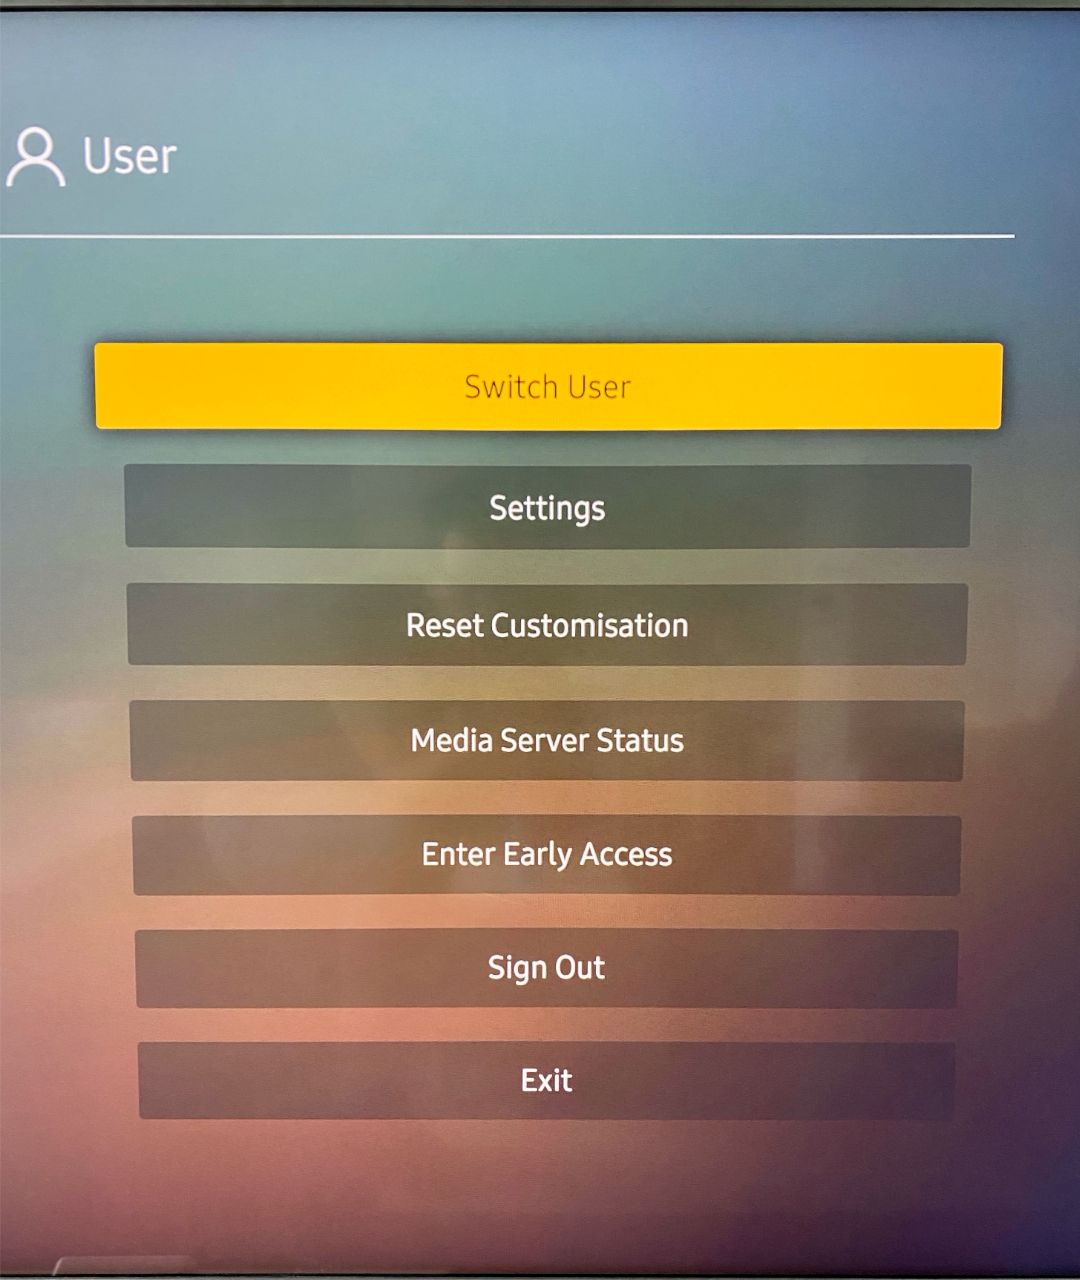
Now if you want to run and use these options, you will need two things. Plex Pass and you will need to activate the "Early Access" option. What this will do (you can switch it back of course) is allow you to use these options using the new version of the Plex app.
I have to say that the interface has changed a bit and it's a lot faster off the bat. Love it.
To make this happen open up the Plex app and go to your user profile. There you will see the "Enter Early Access" button. Click it and let Plex reload.
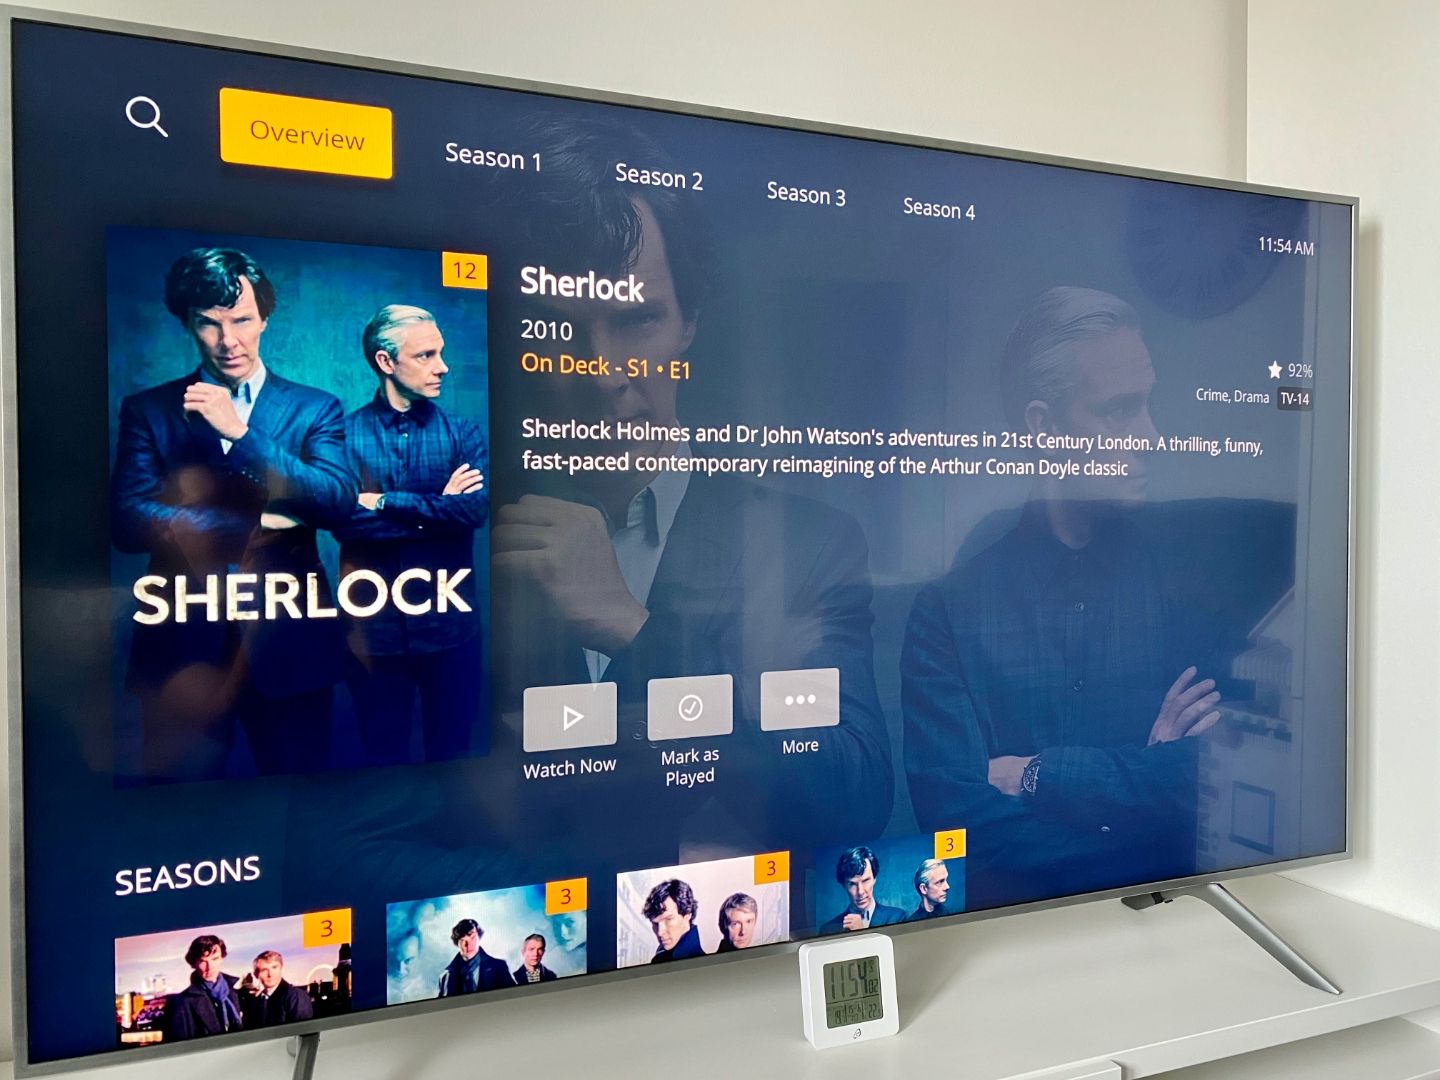
With its new speed, Plex also now offers a familiar but slightly new and better look when it comes to your content. So when you are in the TV Show mode you have quick access buttons along with the top menu that offer access to all-season on the fly. No need to enter a season and then back out to enter another. Really nice.
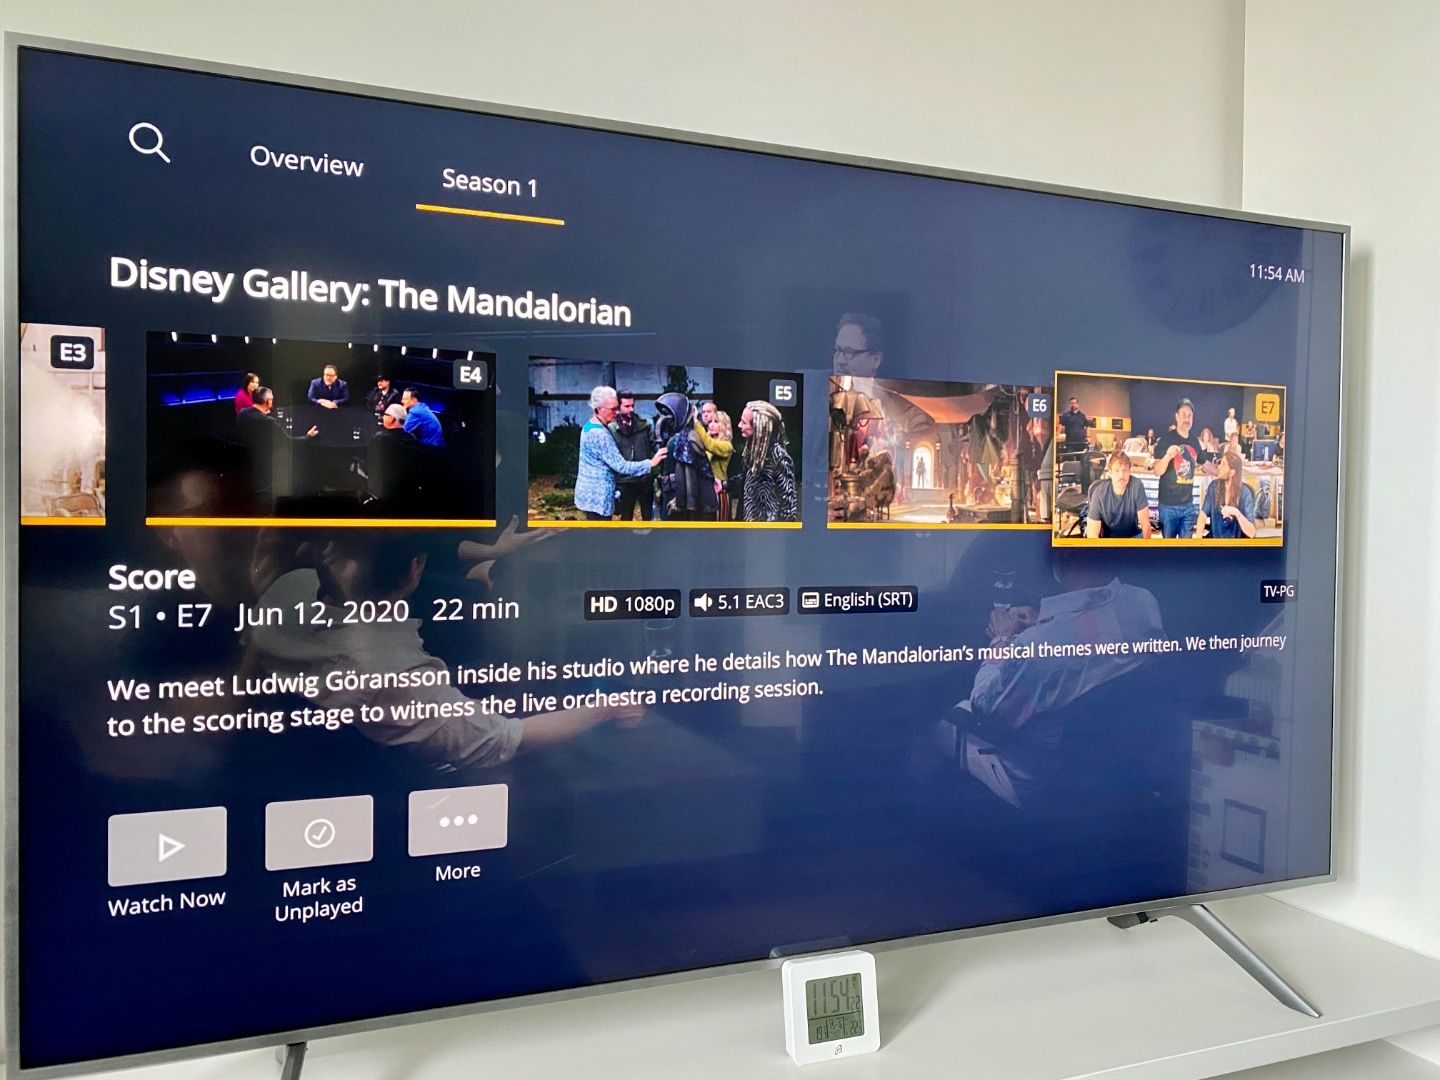
Listing of season, episodes, or any content for that matter, is really fluent and fast now and there was work done on the episode view as well.
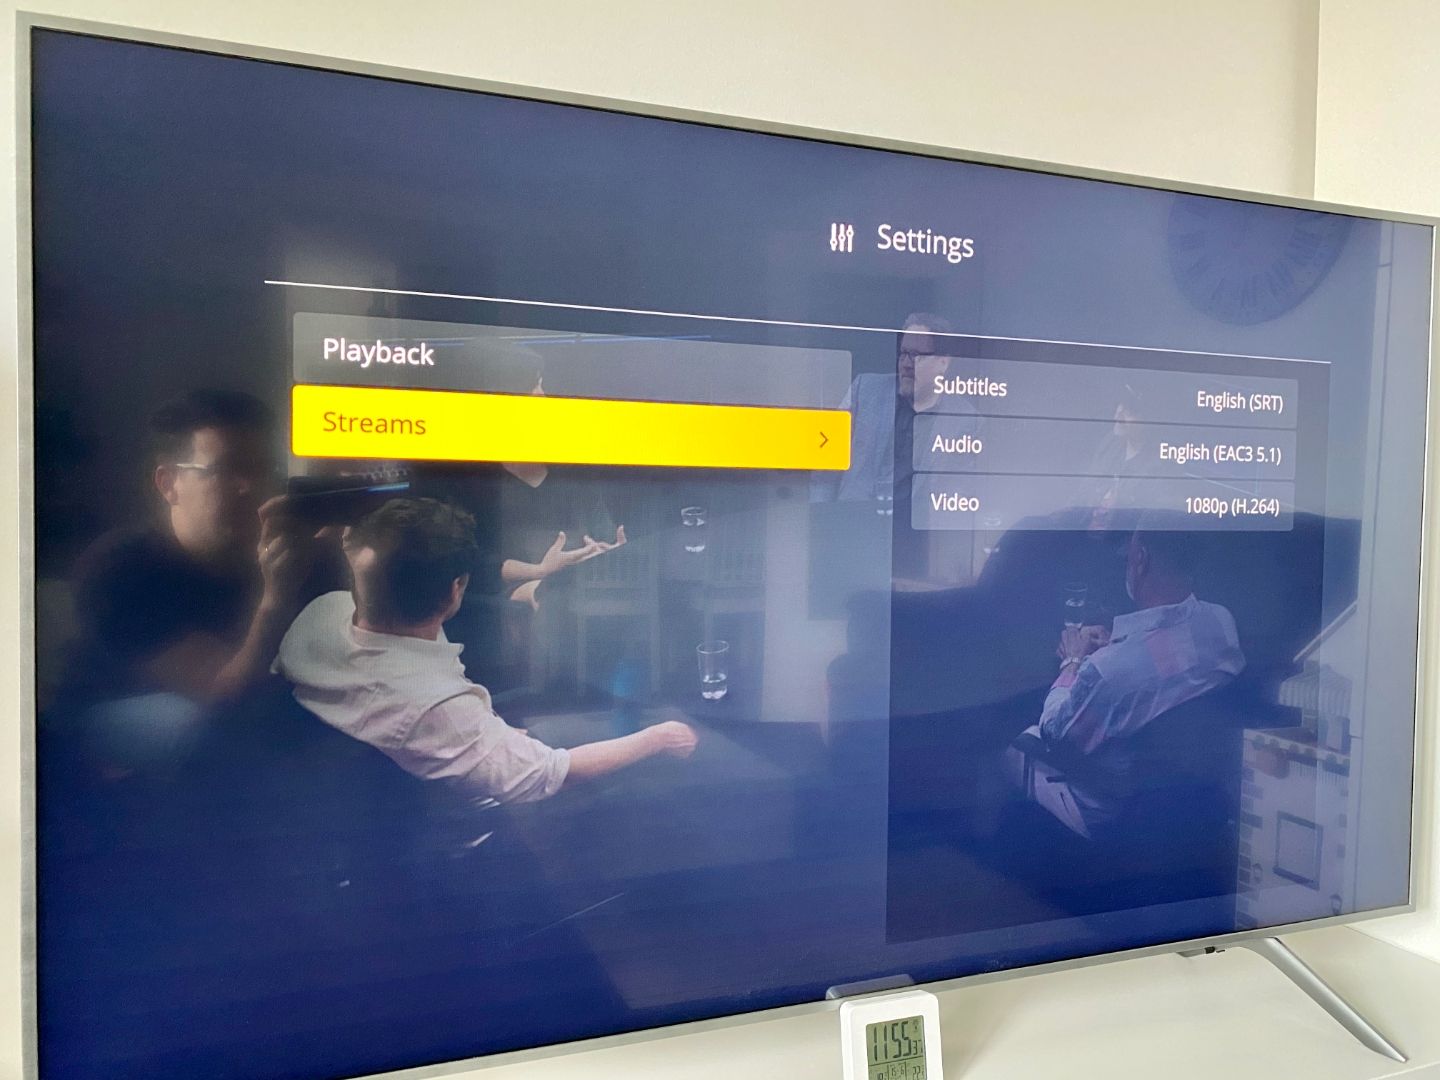
One thing that does bother me a bit at the moment is that if you want to access the audio, video, or subtitle section you have to click a lot more (deeper). So accessing the options starts with the "more..." button but then it is all inside the "streams" submenu. More clicking, but at least the options are there.
Still, not to sound negative, one more option that really is a great addition for my taste, is the overlay list of episodes. What I mean by that is that you can get the list of all the episodes in the season while watching your current one without stopping. Simple option but I love it!
Well, there you have it, a short update on this article. Hope you will find it useful.
As always, ask away, comment, and criticize!