Pocket ID - passkey OIDC provider

It's been a while since I explored passwordless or single-factor authentication methods, especially in the context of Synology's DSM OS. Although the Secure SignIn platform has been available for some time (introduced with DSM 7), I haven't utilized it due to its limitation to just DSM.

Passwordless login is not a new concept, with hardware keys still being the most secure option. In the realm of software-based systems, solutions like Keycloak are frequently mentioned. A while ago, I experimented with the Authelia platform, which is primarily used to add login functionality (with 2FA) to applications that lack it inherently. However, I eventually chose not to adopt it.
All applications running via reverse proxy have some form of authentication (with 2FA added on top), which was more than adequate. The remaining systems are accessed exclusively via VPN.
Despite this, logging into all these applications and systems is necessary—whether through a simple password, a password with 2FA, or biometric methods. This can become cumbersome when dealing with multiple systems.
In essence, it boils down to convenience versus security. Passkeys have been available for a few years as a passwordless login method, yet the support depends on the systems we intend to use. While adoption is reasonable, not all platforms have incorporated it as their primary login mechanism.
The idea behind PocketID
Enter Pocket ID, a lightweight and user-friendly OIDC (Open ID Connector) provider. It leverages passkey methods to facilitate login for any service or platform that supports the OIDC standards.
So, what is the ultimate goal? Logging into Synology DSM can be achieved through various SSO methods, with OIDC being one of them. The objective is to configure and deploy Pocket ID as the passkey provider, enabling DSM login without a username, password, or any 2FA method.
By definition, passkeys offer greater security compared to the traditional username/password method, even with the addition of 2FA. Let's explore the steps to set up Pocket ID, configure it behind a reverse proxy, and ultimately use it to configure DSM to utilize the OIDC connector for faster and more secure logins.
Setting up PocketID via Docker
Pocket ID as a platform has been around for a year, but it only reached version 1.0 last week. Though I had been monitoring its development, I awaited this milestone before considering it for "production" use.
The documentation for the platform is exceptional—highly detailed and easy to follow—so be sure to review it for more information.
This platform can be deployed entirely internally or externally through a reverse proxy with HTTPS. For this example, we will use the latter approach. The solution will be deployed via Docker with a Postgres database, behind an NGINX proxy.
While there are various methods to use Docker, I will opt for the docker-compose approach through the Portainer platform.
Portainer's usage of docker compose can be utilized under the "stacks" section.
services:
  pocket-id:
    image: ghcr.io/pocket-id/pocket-id
    container_name: pocketid
    restart: unless-stopped
    ports:
      - 1411:1411
    volumes:
      - "/volume1/docker/pocketid:/app/data"
    environment:
    - APP_URL=https://pocketid.domain.com
    - TRUST_PROXY=true
    - PUID=1000
    - PGID=1000
    - DB_PROVIDER=postgres
    - DB_CONNECTION_STRING=postgres://username:password@ip_address_of_postgres:5432/pocketid_database_name
    # Optional healthcheck
    healthcheck:
      test: "curl -f http://localhost:1411/healthz"
      interval: 1m30s
      timeout: 5s
      retries: 2
      start_period: 10s
Example of Pocket ID docker compose YAML file
Depending on your needs and deployment options, the YAML file may vary. For instance, Pocket ID supports SQLite, eliminating the requirement for an external Postgres instance.
Additionally, all environmental variables can be stored in a .env file instead of embedding them in the compose file. The choice depends on your deployment preferences.
Reviewing the documentation is advantageous and recommended. However, if that's not an option, let's briefly go over several key variables based on this example:
APP_URL=https://pocketid.domain.com this is the URL where the Pocket ID instance will be accessible. If the instance needs to be used globally, ensure it operates behind a reverse proxy under a secure HTTPS FQDN. In such a setup, use the TRUST_PROXY=true variable.
Regarding reverse proxy options, many are available. If you use one, I run an NGINX instance as part of an NPM solution. For configuration details, please refer to this article before proceeding down that path.

Article on how to configure and use NGINX proxy manager (NPM)
Finally, consider the PUID and PGID variables. Ensure that you configure a DSM account to run this instance, securing its PUID and PGID values by accessing DSM via SSH. This involves logging into DSM with the relevant DSM account using an SSH client and executing the id command to list user and group values. In DSM, user IDs typically start from 1026 and onwards, so make sure to enter the correct one.
Alternatively, you can use an existing DSM account and retrieve its values following the steps outlined above.

Once the Pocket ID instance is operational inside Docker and accessible via its URL (whether private or public), it's time to set up the primary "admin" account. The appealing aspect here is the absence of a password, relying solely on passkey configuration. Notably, multiple passkeys can be configured for the same account.
Access the setup page by using the following URL: https://pocketid.domain.com/login/setup
After completing the setup and creating the admin profile, the URL becomes inaccessible to unauthorized users, and the only way to access the Pocket ID instance is through a valid passkey option.

To save and use the passkey, you need an OS that supports it, a password manager, or a hardware device. In this case, the Bitwarden password manager is used to store the Pocket ID passkey.
Pocket ID features
Upon logging into Pocket ID, you'll encounter a clean user interface, which also supports dark mode. Within the UI, you can access the audit log that predominantly displays two actions: client authorization and sign-in.
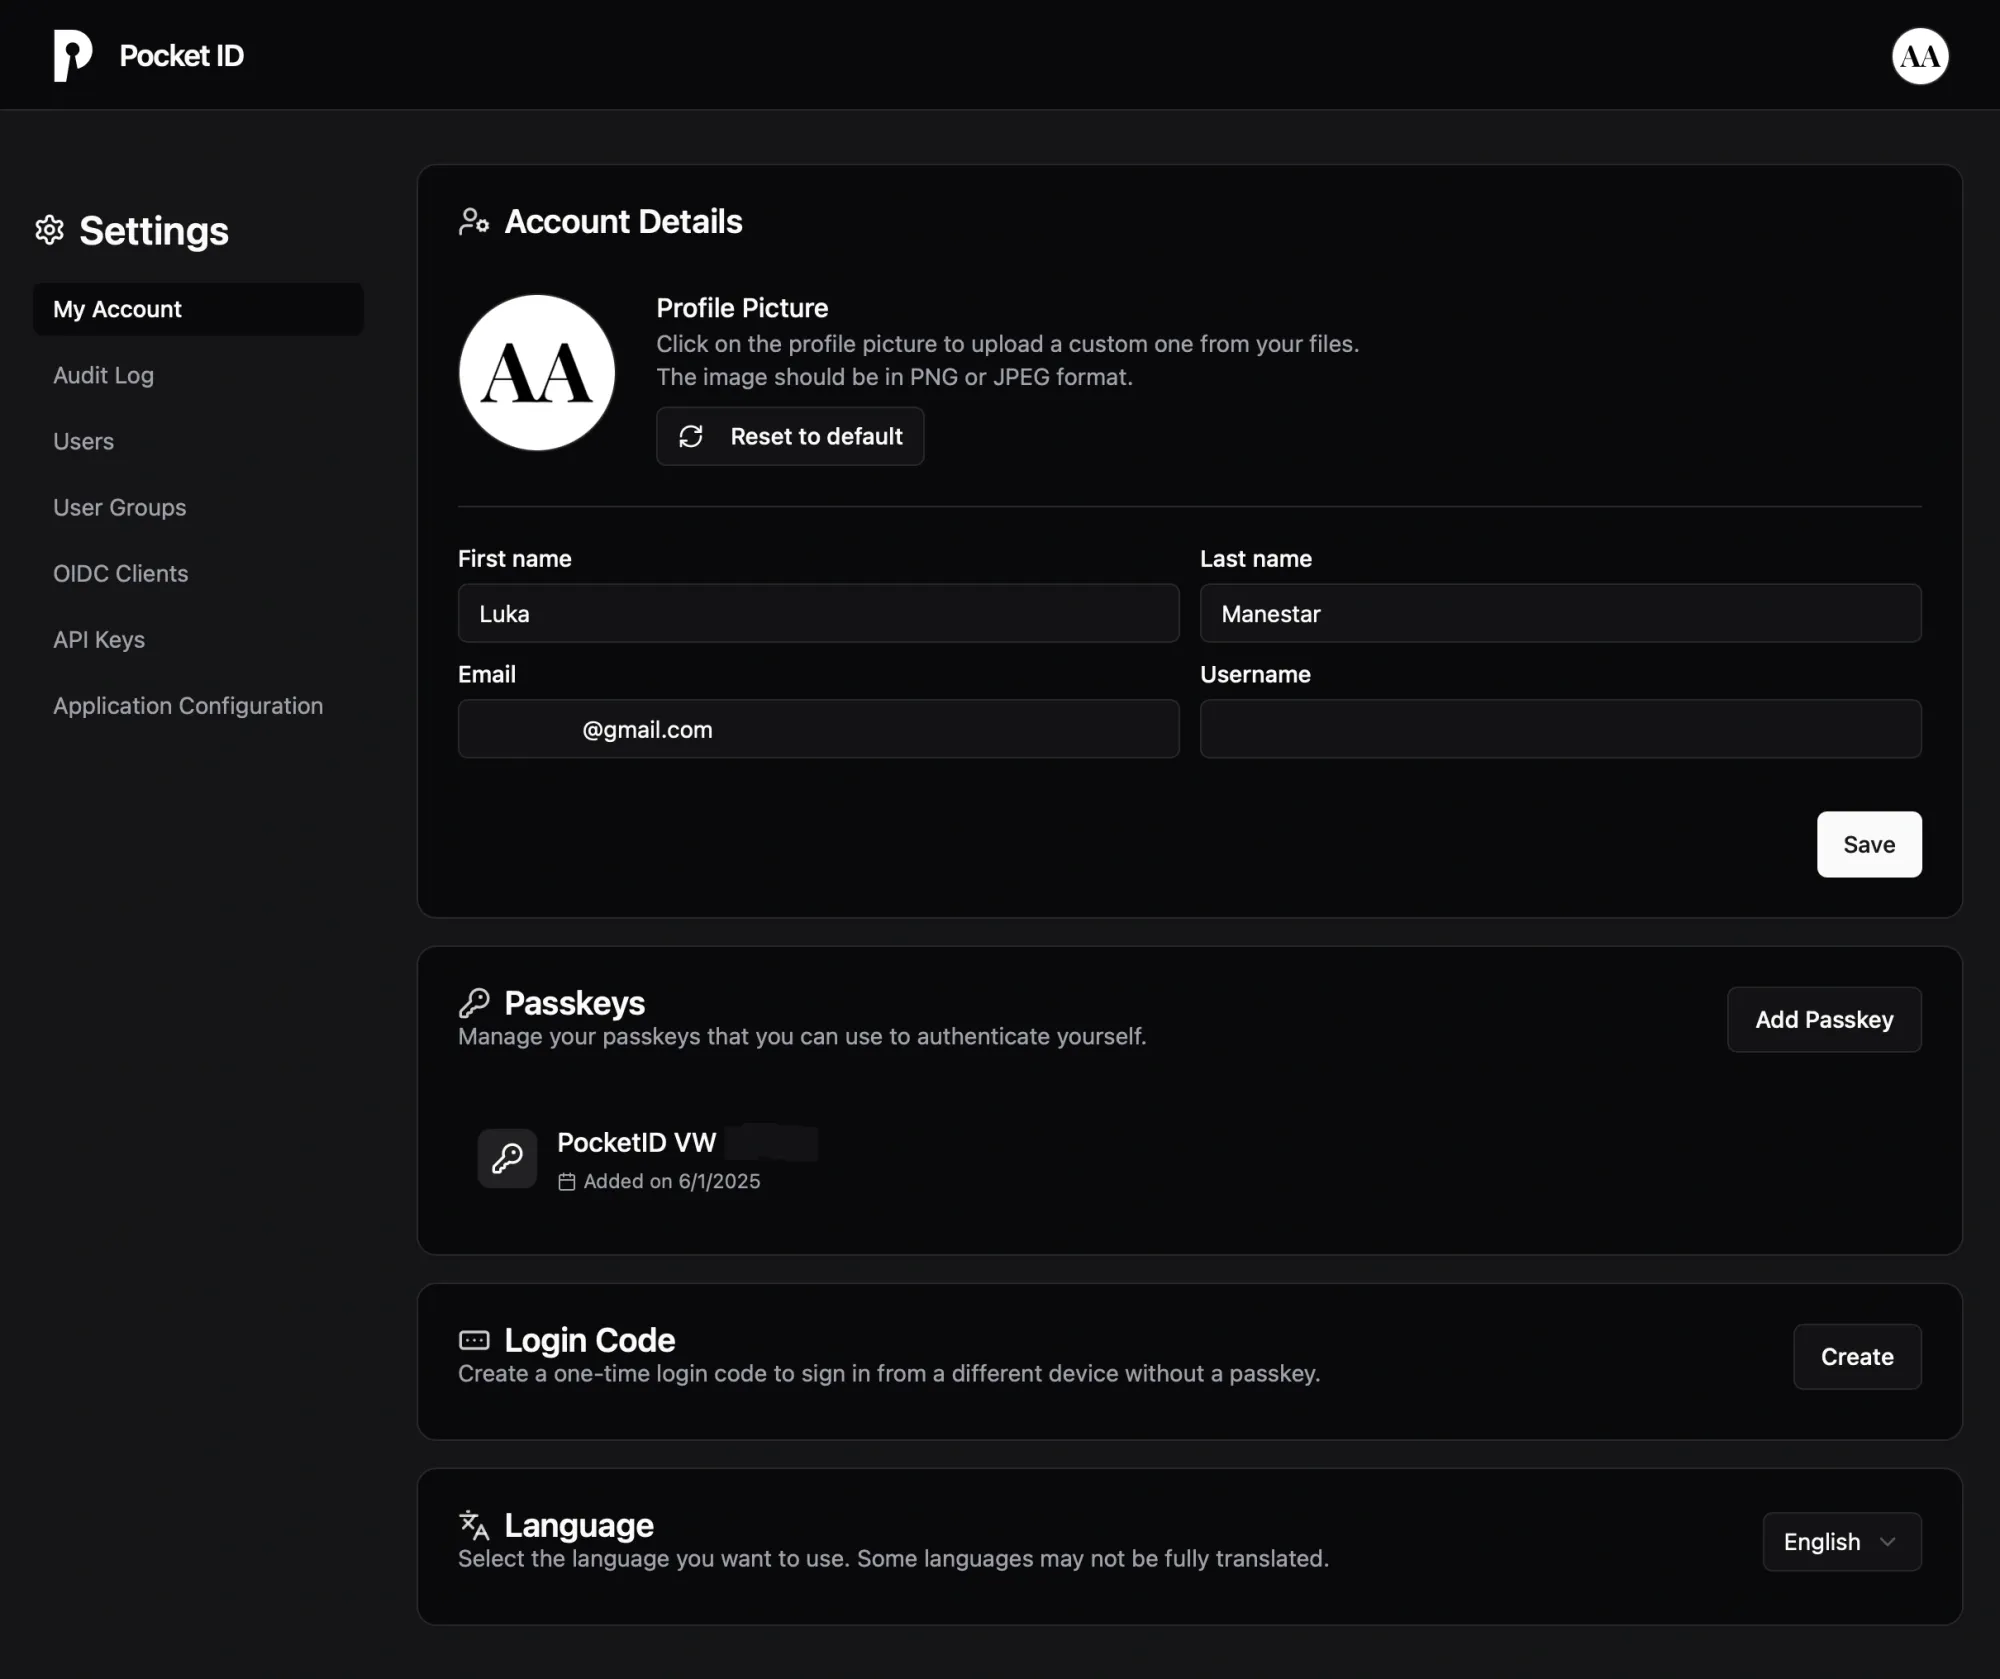
Additionally, the User and Group section enables the creation of more user accounts and groups, which can later be integrated into OIDC client configurations for more granular access control. Although Pocket ID is primarily an OIDC provider, it also offers LDAP functionality for syncing users and groups.
Creating an OIDC client for Synology DSM usage
With Pocket ID up and running and passkey login functioning, we can begin creating new OIDC client connectors. These connectors can then be configured on the Synology DSM OS to enable a truly passwordless login experience, eliminating the need to type in any credential elements.
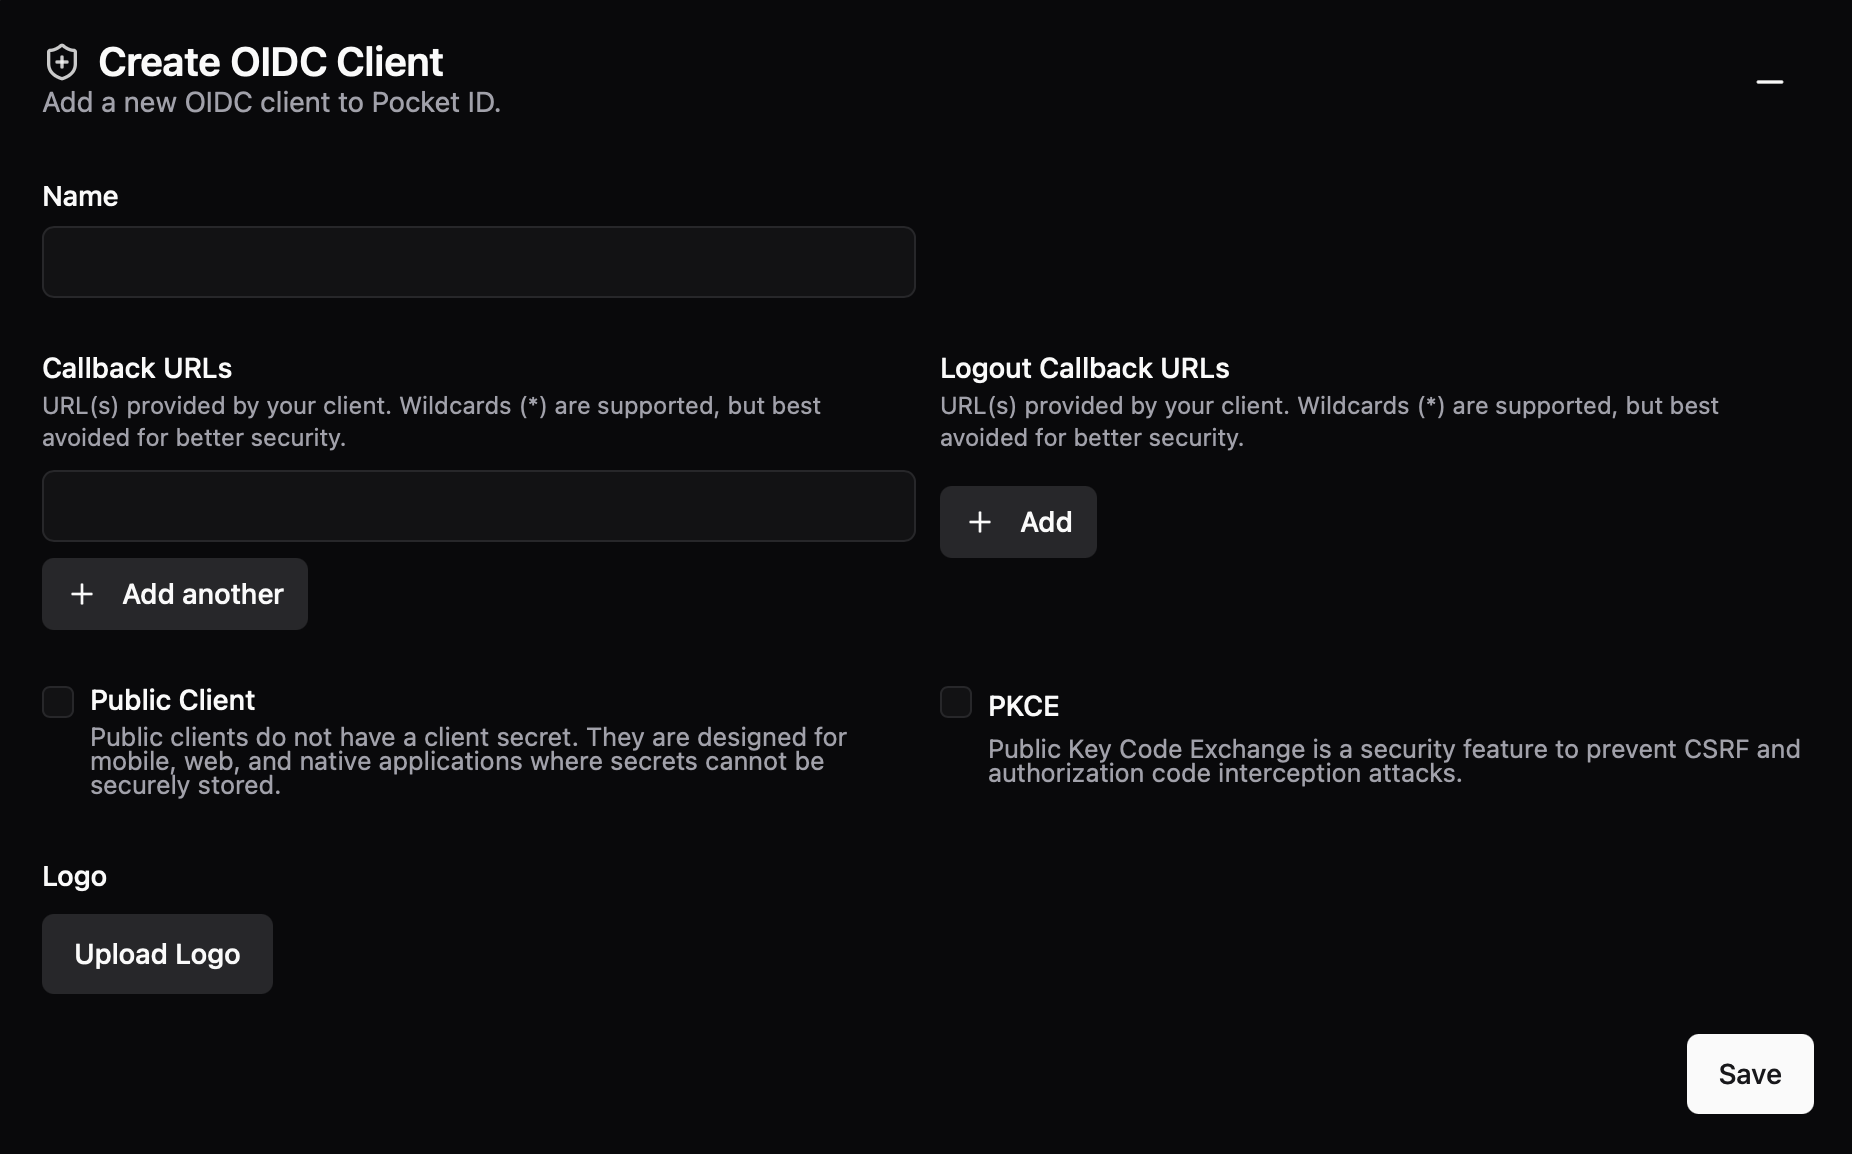
When creating a connector for Synology's DSM, the key parameter to focus on is the Callback URLs. You can add any HTTPS endpoint you choose, whether it has valid SSL termination or not (the client browser will handle that aspect). For DSM, you could enter URLs such as https://nas.domain.com/ or https://10.20.30.13:1156/.
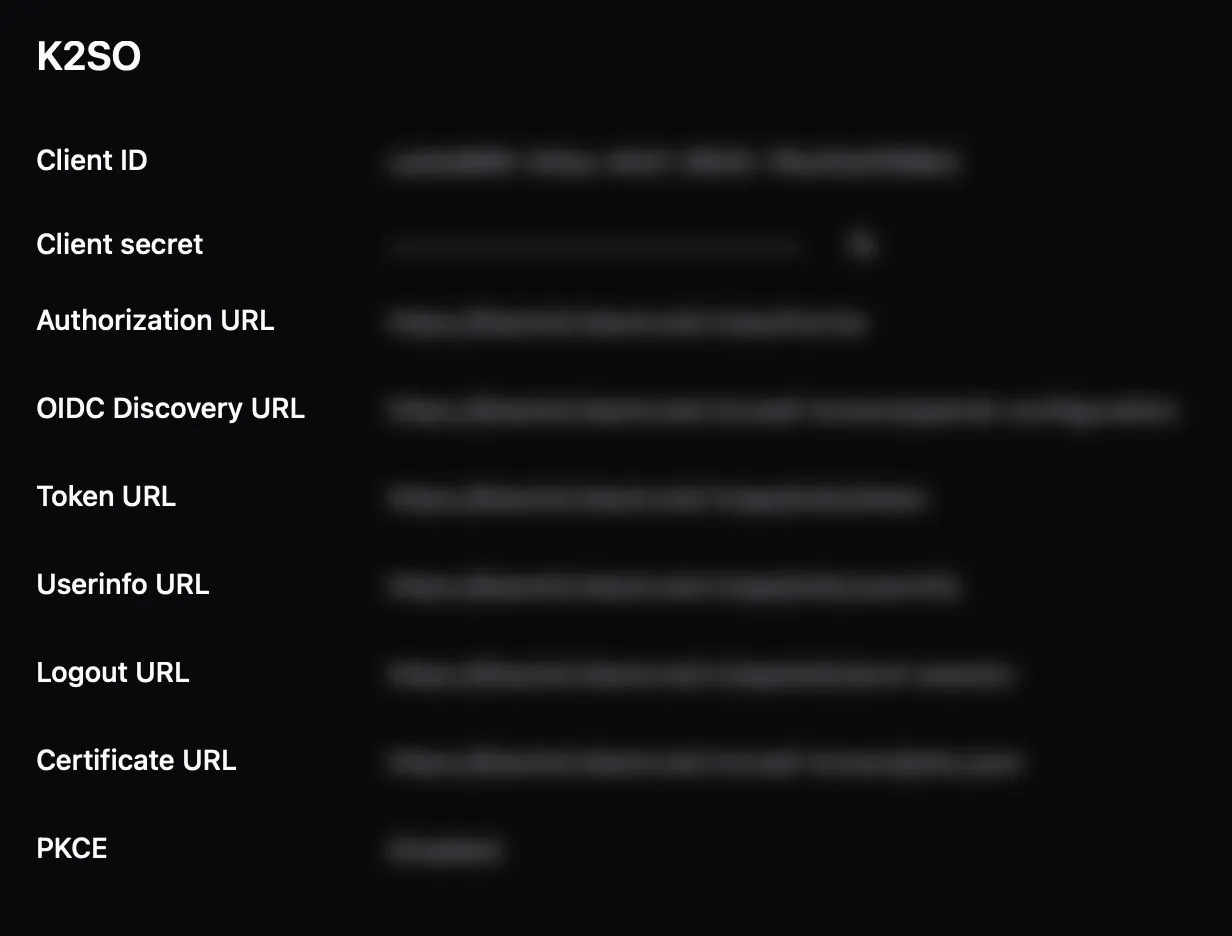
/#/signin and the end to properly initiate the action. While it will not make any issues with a single entry, using it with multiple redirect URLs it will always terminate to the last one in the list!Once saved, Pocket ID generates the client ID, secret, discovery URL, and more. These details will be essential in the next step when setting up the SSO OIDC on the DSM side.
Setting up OIDC SSO on Synology DSM
Now that we have the OIDC in place ready to go, it is time to log into the DSM and configure it.
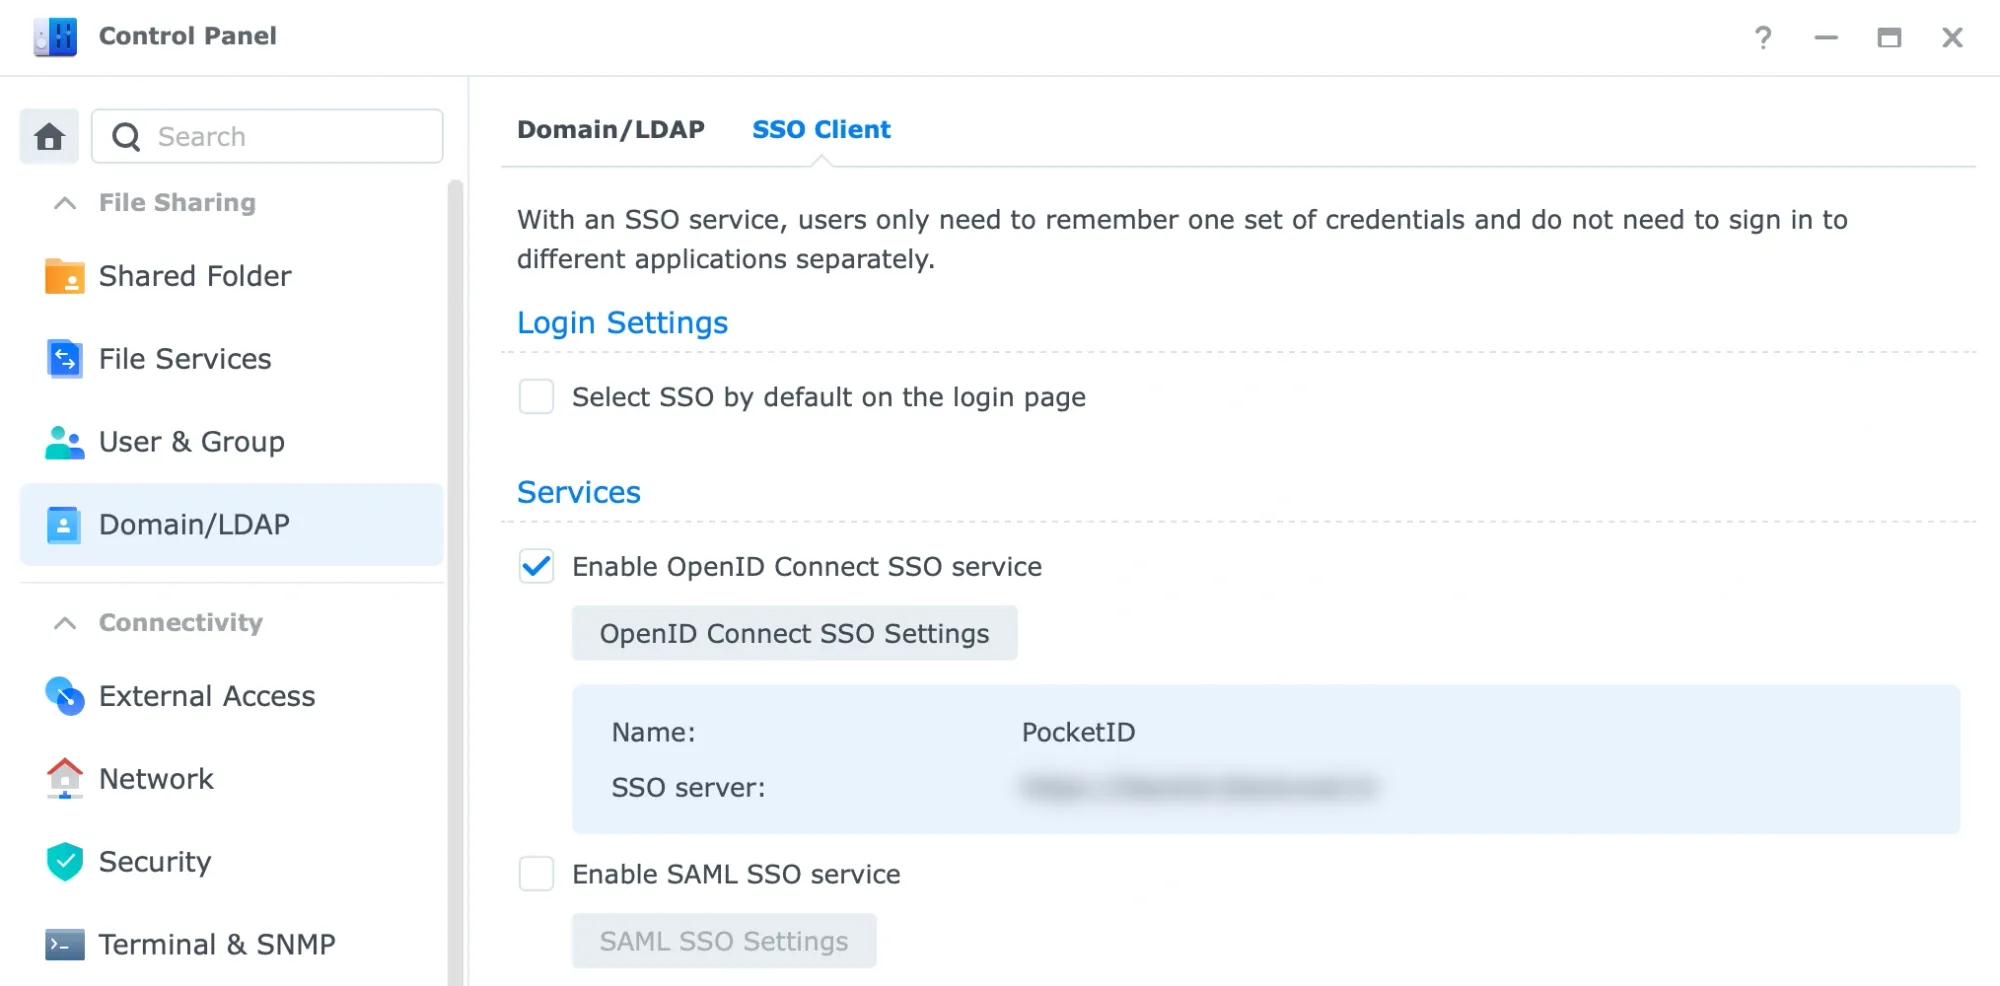
First we need to use the Control Panel > Domain/LDAP > SSO Client section. There under Services we activate the Enable OpenID connect SSO service and click the OpenID Connect SSO Setttings button.
- For the
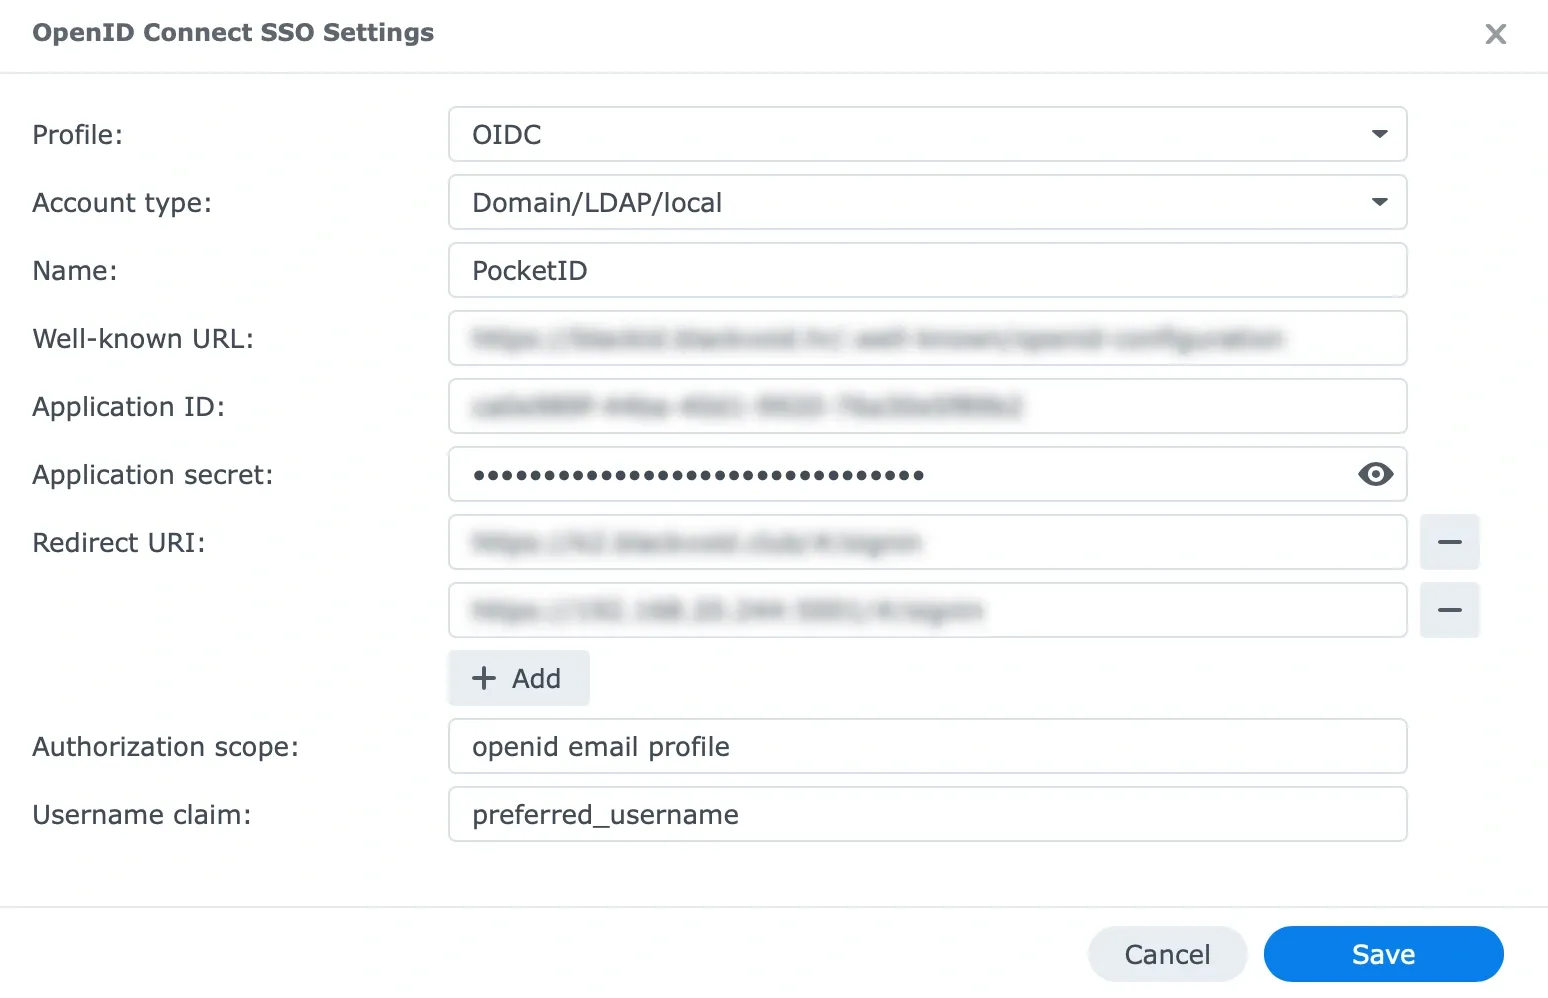
Profilewe choose theOIDC. - The
Account typewill beDomain/LDAP/local. Namewill be the same as your Pocket ID instance by defaultPocket ID- Next we use the
OIDC Discovery URLfrom Pocket ID into theWell-known URLfield. - Followed by
Client IDinto theApplication ID, andClient Secretinto theApplication secretfield. - The
Redirect URLwill be configured with the same callback URLs configured in Pocket ID. So for example:https://nas.domain.com/ - For the
Authorization scopefield we will useopenid email profileparameter, and finallypreferred_usernamevalue for theUsername claim
Save and apply the settings, and test out the loggin.
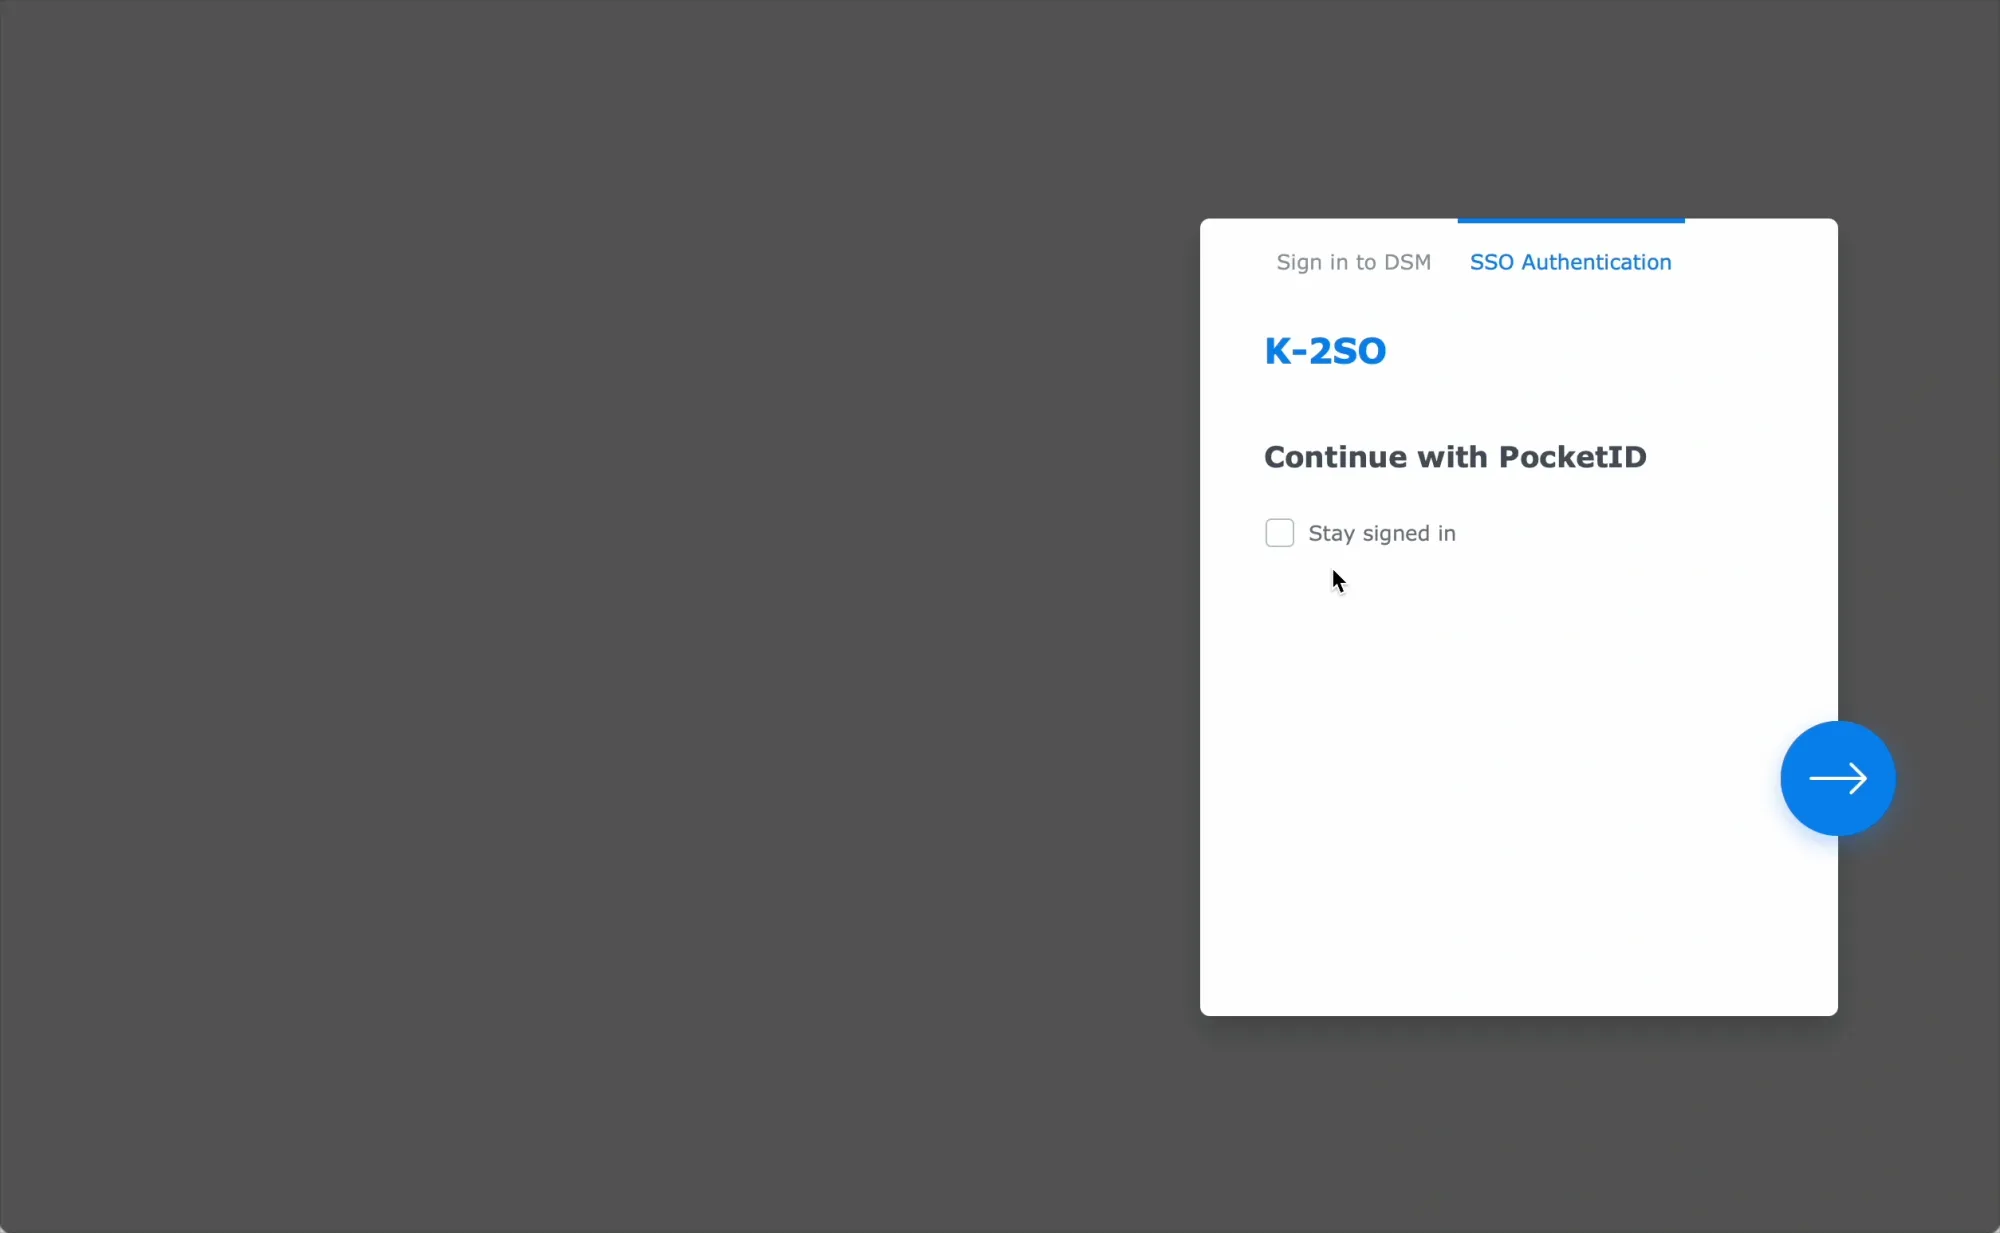


Single click and passkey will do the rest
If we are already logged into Pocket ID, simply clicking the blue login button will suffice. If not, a passkey challenge will occur, and successful authentication will log us into DSM.
In summary, we have a simple, self-hosted OIDC platform that provides a seamless single-authentication login option for numerous platforms, including Synology's DSM, thanks to the official implementation of this open authentication protocol.