Private Docker registry with Portainer

Table of contents
Securing your registry
Docker-compose
Reverse proxy
Pulling, tagging, and pushing images to your repository
Connecting registry to Portainer and basic operations
Intro
In case you are familiar with Docker as a platform you know that it can allow you to run many solutions on a Docker compatible host(s) by pulling images from the official HUB, and other registries that you have access to.
On top of this, when running a Docker host, you have the option to configure and run your own registry that will allow you to use it as your private image repository so that anyone with access can utilize it without the need to access the public ones at all. This is particularly useful if you want to close the repository for internal use only in a Internet isolated network.
In this article, I would like to show you how easy it is to run your own registry and on top of that, how you can connect it and present it inside the Portainer platform for easy access.
In order to follow along, you can use my NGINX and wild card articles to see how to configure a reverse proxy and get a free wild card certificate in the process.
Securing your registry
So what is a private Docker registry? Well, it is nothing more than yet another container that you will run on your Docker host. So if you already have a Docker host up and running, spinning yet another container will be very simple.
The most important thing you need to decide here is whether you want to keep it offline (the Internet) or not. If you decide to use it over the Internet then it might be a good idea to protect its access (upload and download of images) so that only registered users can perform those actions.
Because of this, in the article, we will start by hardening your future registry.
First, we will make a folder structure for the future registry container that will use via volume mappings. We will need two folders, auth and data . So in a folder of your choice, make these two subfolders (similar to the example below).
/volume1
    /docker
        /auth
        /data
After that log into your Synology NAS via ssh as the root user using the elevated prompt for your regular DSM account via sudo -i command.
Next, move into the auth folder and execute the following command:
docker run --rm --entrypoint htpasswd httpd:2 -Bbn <username> <pass> > htpasswd
Replace the <username> and <pass> with your desired value, and run the command. The result will be htpasswd file inside the auth folder with your user and encrypted password.
We will use this file as a means of authentication towards your registry that will be configured inside the docker-compose.
So the final folder structure will, at the moment look like this:
/volume1
    /docker
        /auth
            htpasswd
        /data
The content of the htpasswd file will look similar to this:
Username:$zDPKVqXf70iRKS2uOh0TKegL1AQLsYEgs.wmdt8RDbZNUs4!16snDjTbG . So the username of your choice, followed by the encrypted password.
Now that we have our account ready, it is time to spring up the container itself and configure it.
Docker-compose
As I previously stated this article will also include steps on how you can connect your registry with Portainer, but you can also use it before that to run the following docker-compose code to start the new registry container. With its feature called stacks you can type in or load up a compatible docker-compose and start the container as a result. Have a look at the link above if you have not done it before and then use the following code.
version: '3.5'
services:
  registry:
    container_name: registry
    network_mode: "bridge"
    image:registry: latest
    environment:
      REGISTRY_AUTH: htpasswd
      REGISTRY_AUTH_HTPASSWD_PATH: /auth/htpasswd
      REGISTRY_AUTH_HTPASSWD_REALM: Registry Realm
    volumes:
      - /volume1/docker/registry/data:/var/lib/registry
      - /volume1/docker/registry/auth:/auth
    ports:
      - 5000:5000
    restart: unless-stopped
As it is seen from the code snippet, we are using two-volume binds in this case. One going towards your previously created the /data folder where the uploaded images will live, and the other (/auth) housing the authentication file.
If you open your browser now and try to access your registry by visiting your NASIP address on that custom port, you will probably land on a white blank page after being prompted for a username and password. That is all fine and expected, as the registry image does not have a working UI. So far so good.
Now it's time to put your registry behind a reverse proxy and SSL cert for added security and protection.
Reverse proxy configuration
If you are like me and use the NPM NGINX container as your reverse proxy solution, then you probably already know what you need to do and how. In case you are not, and you are running some other platform, the principle is the same.
Create a new reverse host record and point it to your local NAS IP on the port you have configured (5000 by default). Be sure to apply a valid SSL certificate as accessing it over HTTPS will through an error in case you do not.
The result should be similar to this one: https://yourregistry.domain.com. Again, visiting that URL and authenticating against it will present you with a blank white page. All is good so far.
Pulling, tagging, and pushing images to your repository
To use your new registry, you will need to run docker commands against it. The first one will be the login command. Considering that this registry is protected, to interact with it, you will have to log in first.
Over ssh as root be sure to run the following command to authenticate to your registry: docker login yourregistry.com. Once you get Login successful you are good to go.
Tagging
If you have an image ready for upload (or a public one that you have downloaded), you will first need to tag it to upload it to your registry. To make that work, use the following command line:
docker tag blackvoidclub/midnight-commander yourregistry.com/midnight-commander
In this example, I am using my publicly downloaded image and tagging it with the name of my public registry name while keeping the same name of the image.
Pushing (upload)
Now that I have it tagged I will upload it to my registry. Be sure to be login or the upload will fail.
docker push yourregisrty.com/midnight-commander:latest
A similar output will be presented in the command prompt:
root@R2-D2:~# docker push yourregistry.com/midnight-commander:latest
The push refers to repository [yourregistry/midnight-commander]
416585854a71: Pushed
48f27885bee7: Pushed
latest: digest: sha256:0bf69e959f9c3f45b7ad0859ca973ba69b654fd4cc12375afe36ec762369a694 size: 739
So now, you have your first image uploaded to your registry. Well done. You can double-check your /data/ local folder and see the new content inside it. It will look similar to this:
/volume1
    /docker
        /auth
            htpasswd
        /data
            /docker
                /registry
                    /v2
                        /repositories
                            /midnight-commander
                                /...
If you see the content locally accessible, you have done it.
Pulling (download)
Pulling the image from your registry will be the same as pulling it from any other registry. Make sure that you are authenticated against your registry, and execute:
docker pull yourregistry.com/midnight-commander:latest
Again, a similar output will be presented in the command prompt:
root@IG-11:~# docker pull yourregistry.com/midnight-commander:latest
latest: Pulling from midnight-commander
95834d4850cc: Pull complete
b8674e8a62c9: Pull complete
Digest: sha256:0bf69e959f9c3f45b7ad0859ca973ba69b654fd4cc12375afe36ec762369a694
Status: Downloaded newer image for yourregistry.com/midnight-commander:latest
Connecting registry to Portainer and basic operations
Now that you have your own registry that works and is protected behind an SSL certificate and authentication, let's see how you can add it to Portainer in a matter of minutes and use it with all your Docker hosts that are administered by the Portainer platform.
Start by logging into your running Portainer instance and going to the Registries section.
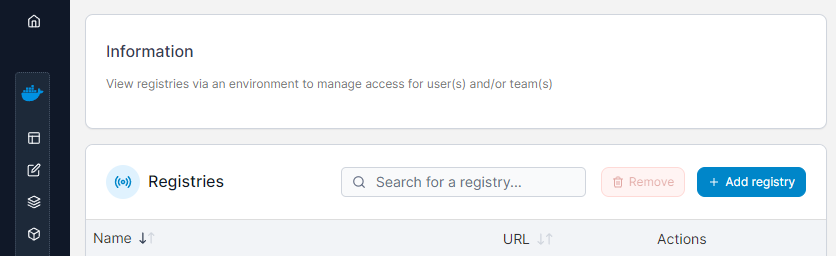
Click the blue +Add registry button and on the next screen select the Custom option.
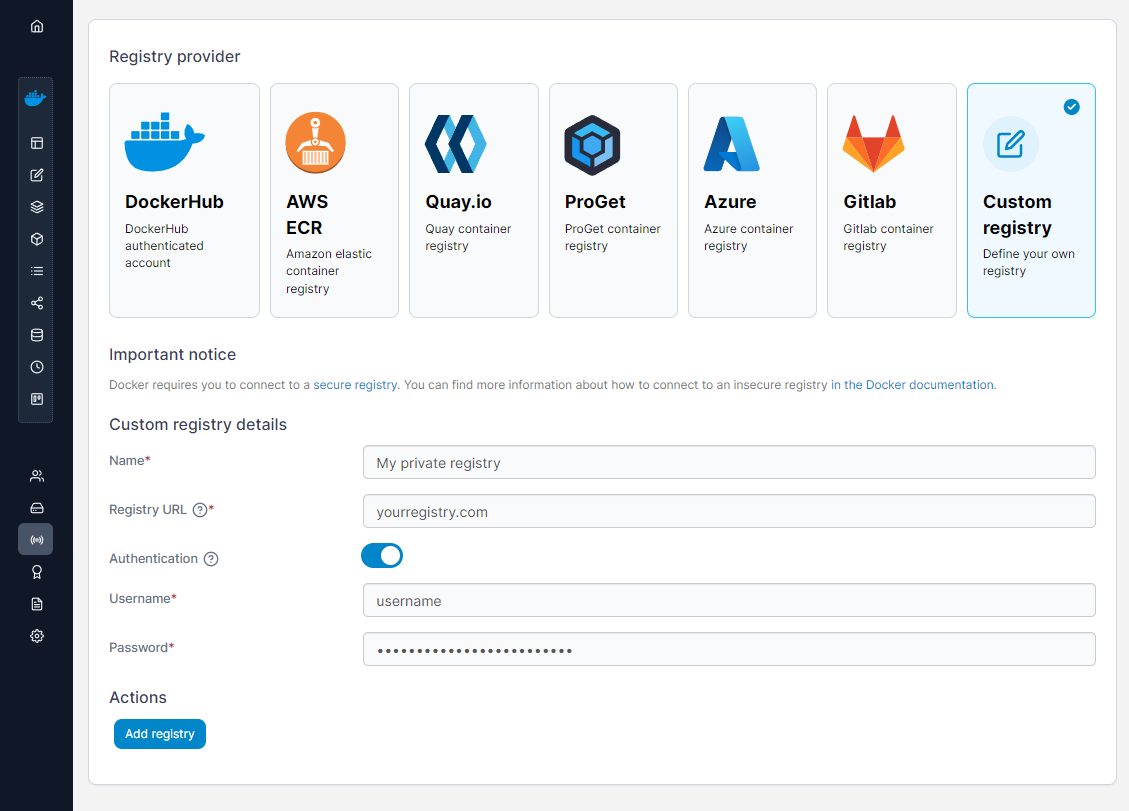
Select the Custom registry option, give it a descriptive name, your public URL, and the username and password that you have configured at the beginning.
Finally, click Add registry to add your repository to the list of existing repositories.
Going back to the main registries page you will see your private registry listed with all the others.

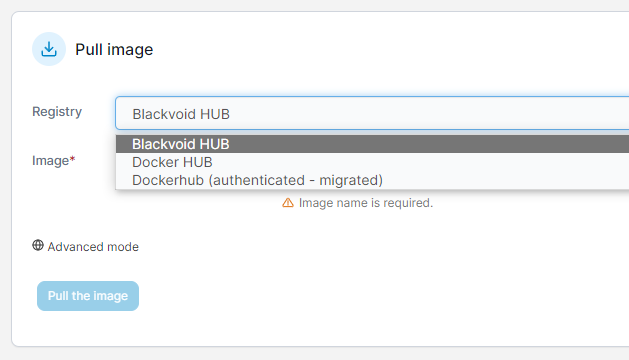
From this point forward, uploading and downloading images using Portainer will be as simple as selecting your registry from the drop-down menu and typing in the image name.
Hopefully, this has been informative and useful for anyone looking into getting their own secure Docker registry up and running while using it in a combination with or without the Portainer platform. As always, any questions, suggestions, or comments are welcome in the section below.


