Snapshot & Replication - Synology’s business backup and recovery tool

(2022-02-17)
What's New
- Supports configuring the number of concurrent tasks on certain models to better allocate system resources. (Learn more)
Fixed Issues
- Fixed an issue where the "Replication in progress" status was continuously displayed after replication tasks were stopped.
- Fixed an issue where users might be unexpectedly signed out from DSM when editing replication tasks.
- Fixed an issue where shared folders' snapshots were kept when users only chose to reserve LUN snapshots and snapshot settings during package uninstallation.
- Fixed an issue where replication tasks might fail when the "Replicate schedule local snapshots" option was enabled.
Let’s start with a question first. You do have backups right? I mean for everything? Not just your pictures and videos on your phone. I’m talking about documents, configurations, settings, online passwords, emails, you know, the IMPORTANT stuff.
Well know that we know that you don’t (shame on you), lets's see what Synology NAS can do for you in terms of keeping your important data safe. Specifically, I will focus on a more business end of the spectrum and talk about snapshots today.
Keep in mind that this does not necessarily need to be a business topic because as long as you have a NAS that supports the snapshot package there is no reason not to use it.
Also, this is another, separate package and scenario, that has nothing to do with my previous article: 3-2-1 > Active Backup. There I talked about an Active Backup for Business package (that also doesn’t mean it's for business use only!) and showed a few methods of how you can use that tool to keep your data safe.
SNAPSHOT?
Now, what is a snapshot and how is it different from your usual copy backup that you transfer your data on a USB stick or NAS? Well, let's run this through an example. Suppose you are infected with a modern version of a malware, a cryptovirus. What will happen is that all your data will be encrypted and if your USB drive that you have your backup on (or your NAS for that matter) is plugged in your computer (or accessible on the network), chances are your data will get encrypted and that will be it.
The only way to get it back is 1) paying the ransom to get the unlock solution (don’t do this!) or 2) restoring from backup. Now, if that is your only backup, then you are done, right? The same thing applies to your NAS. If your data is stored on your NAS and that folder gets encrypted it's game over. Unless you have a proper backup.
Most people think that running all your data on a RAID array set up on your NAS is backup. IT IS NOT! RAID is not a backup, it's just a redundancy solution so you don’t have to stop working if one drive for example dies (and they will). Having all your data on your NAS without a proper backup of that same data is just the same as keeping it all on your computer. Period.
So, I already scared you enough, and still no word on what snapshot is. Well, here it is. What if we take that same crypto incident but this time if your data gets encrypted you can just go back in time and restore an early version of that same file good as new? Great right? Well, let's see how that works and what you need to make that happen.
Restoring from a backup is always stressful and people don’t like it. Well, it definitely beats not having a backup at all, right? Well with Synology backup tools, it was clear that the intent behind it all was that there was no need to stress out over losing a file or restoring it. It's just there when you need it.
Unlike backing up your computer data on your NAS (so having a version on your computer AND on the NAS), the snapshot method is useful in cases when you have a running version of your data on your NAS and you wanna protect that version from getting lost or corrupted in any shape of form.
When would this be useful? Well, let's say that you are running a database on your NAS, or lots of documents that are edited of a NAS. In any case, changes to those files are done on the client-side of things but then saved back on the NAS where they “live”. If anything happens to them, again, game over, unless you have a backup of those files. This is where most users get in trouble. They keep that data on the NAS (multiple disks, RAID, etc) but in fact, if that’s the only place that you have that data on, you are taking a huge risk.
Snapshot and replication package
With the introduction of the BTRFS file system in DSM, Synology has changed some of its backup apps and offered some new ones. One of them is Snapshot & Replication
This tool can do two things as stated by its name. Create local snapshots of your data, and replicate that data (separate function) to a compatible destination as a backup.
Before I go any further, Snapshot tool has specific requirements that need to be in place before you can enjoy a quick and fast backup restore when you mess things up.
First, your NAS needs to have a compatible CPU in order to support this package (you can check the compatibility page here: https://www.synology.com/en-global/dsm/packages/SnapshotReplication), and second, as stated before, you will need to run the BTRFS file system on your NAS, as appose to EXT4 as an alternative.
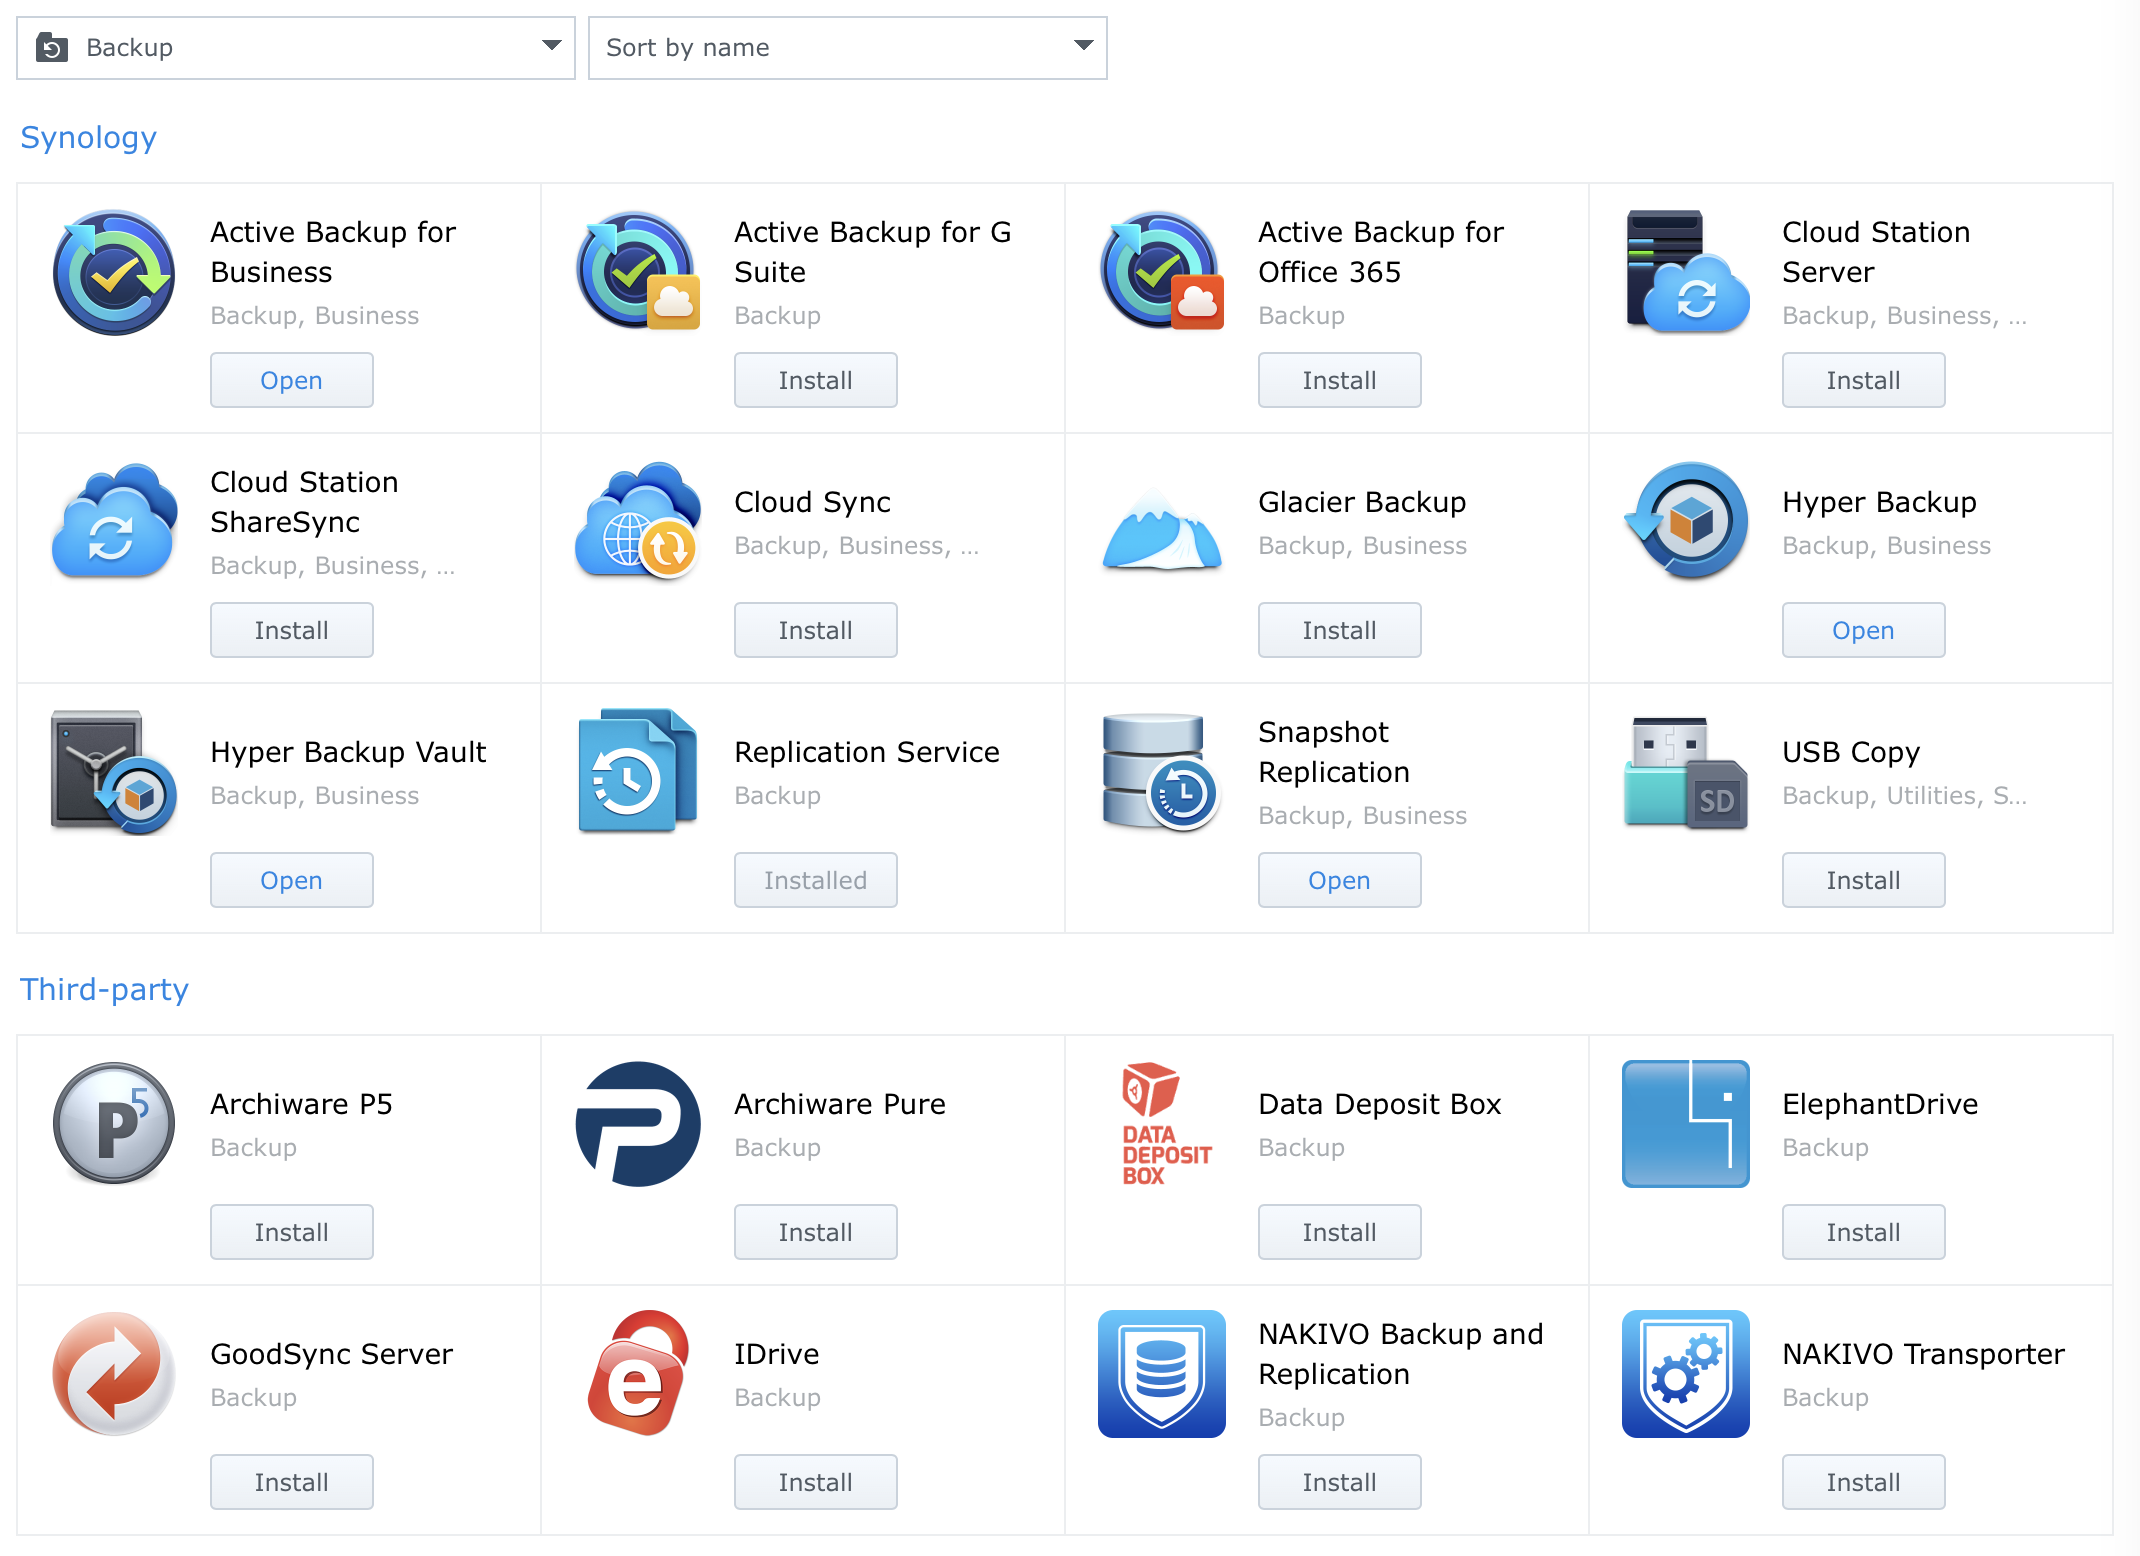
With those two requirements set, you can open up Package Center and look for Snapshot & Replication package in the Backup section.
As soon as you install the package and open it, you will be ready to start making local snapshots or any shared folder or iSCSI LUN that “lives” on a BTRFS volume as well as make separate replication tasks towards a compatible NAS.
IMPORTANT LIMITATIONS
Be aware of the following limitations when it comes to using Snapshot and Replication tool
The maximum number of replication tasks varies depending on your Synology NAS models. Please visit Synology's website for information about applied models.
XS/XS Plus series
Maximum number of shared folder replication tasks: 64
Maximum number of LUN replication tasks: 32
Maximum number of replication tasks in total: 64
Plus series
Maximum number of shared folder replication tasks: 32
Maximum number of LUN replication tasks: 16
Maximum number of replication tasks in total: 32
Value series
Maximum number of shared folder replication tasks: 16
Using snapshot
There are two options that you can do when it comes to snapshots. Creating a one-time snap or a scheduled one (or both). In any case, when you move to the snapshot section of the app, compatible shared folders will be listed.
Select the shared folder you wanna take a snapshot off and use the Snapshot or Settings button on the top. Each will open up a dialog box with more or fewer options that you can configure and set.
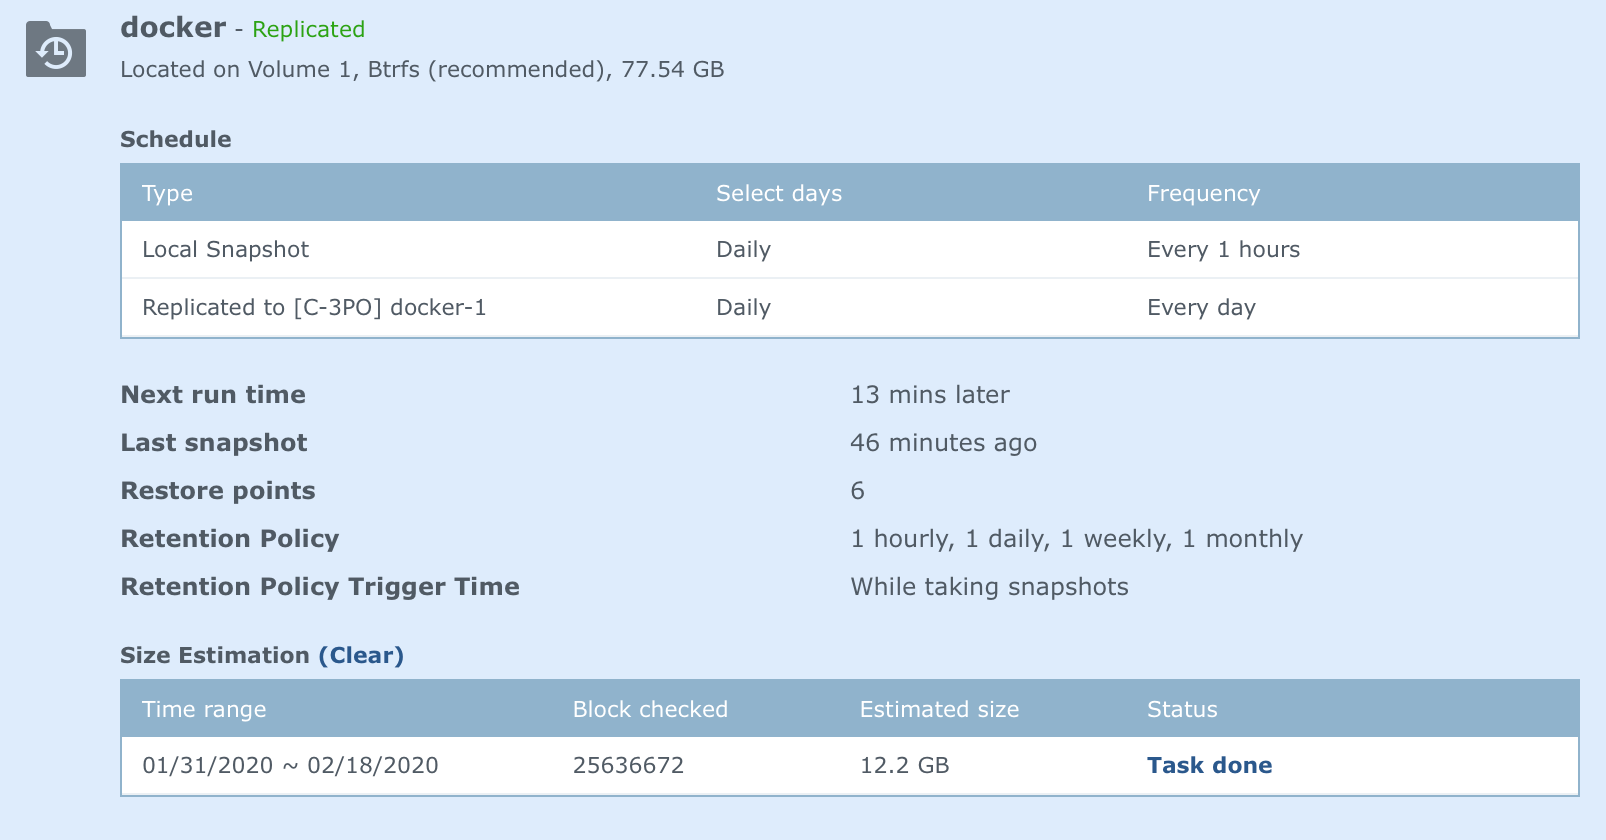
If you decide to make a local scheduled snapshot, then use the Settings button to open up a dialog window that will offer schedule, retention, and some advanced option.
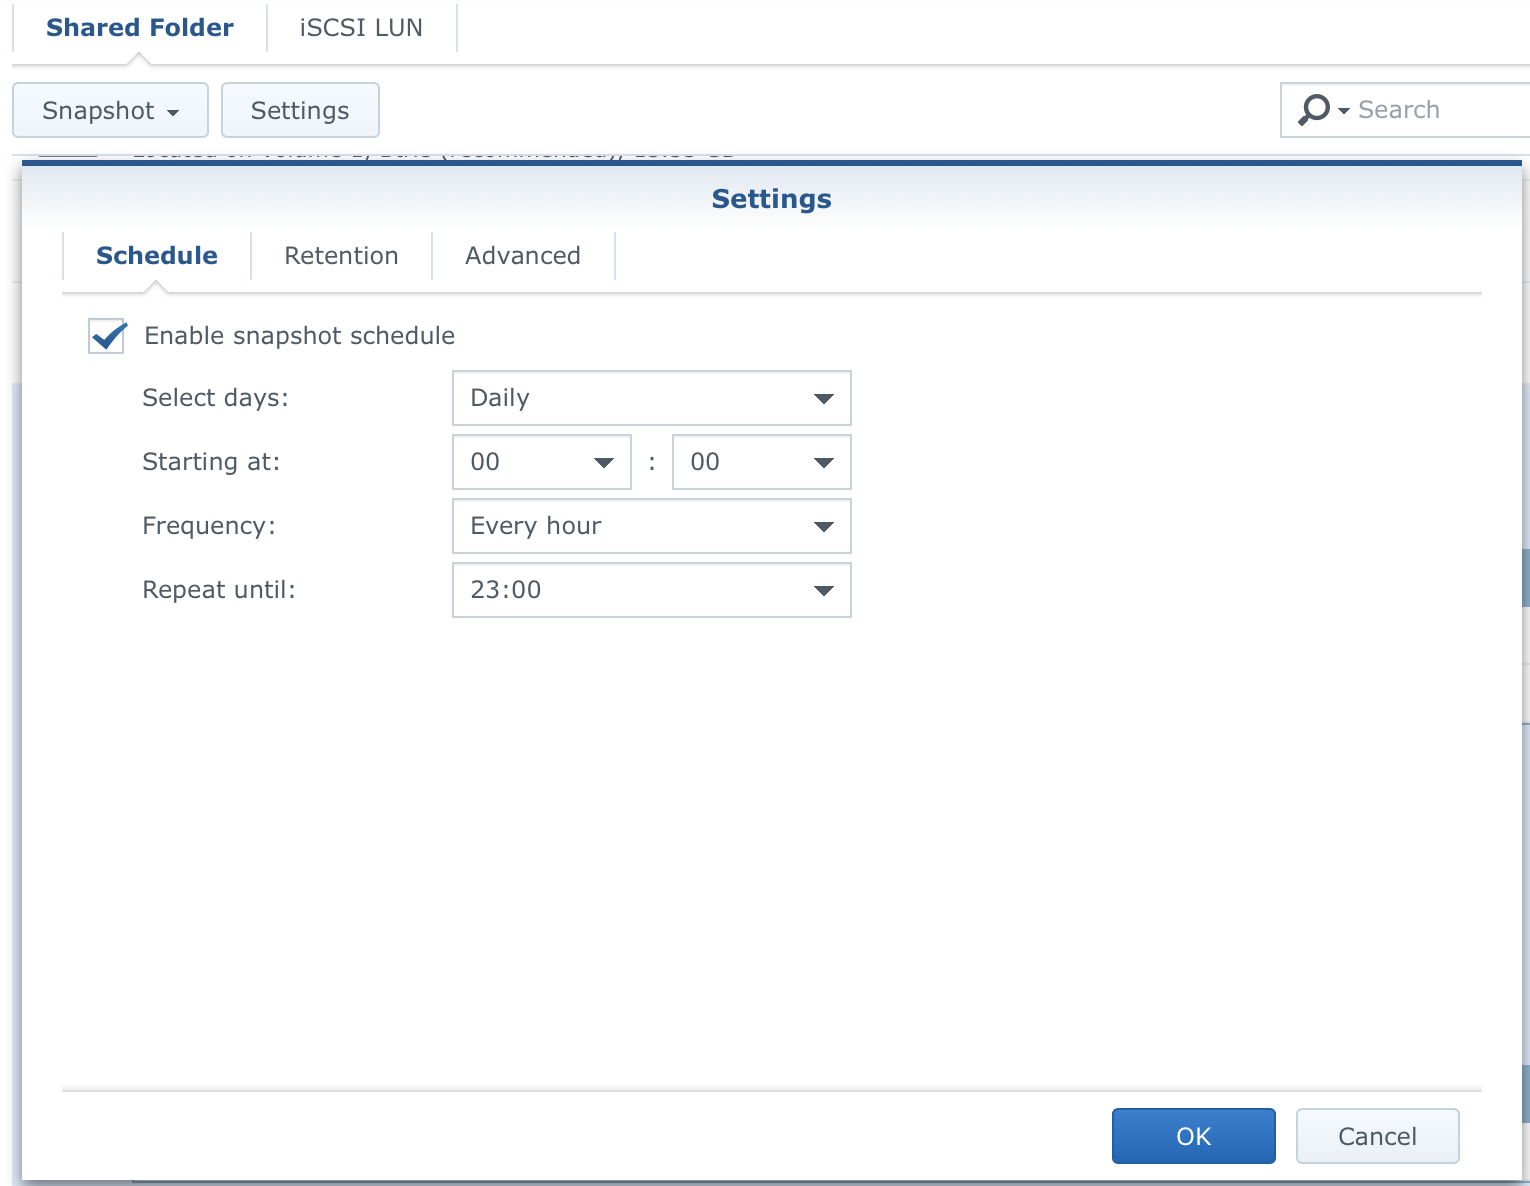
The main thing here is the Retention tab and its configuration. The reason is that you can set a specific number of snaps (hour/day/week/month/year). Keep in mind that even if there are no major changes, snaps will take up space on your NAS.
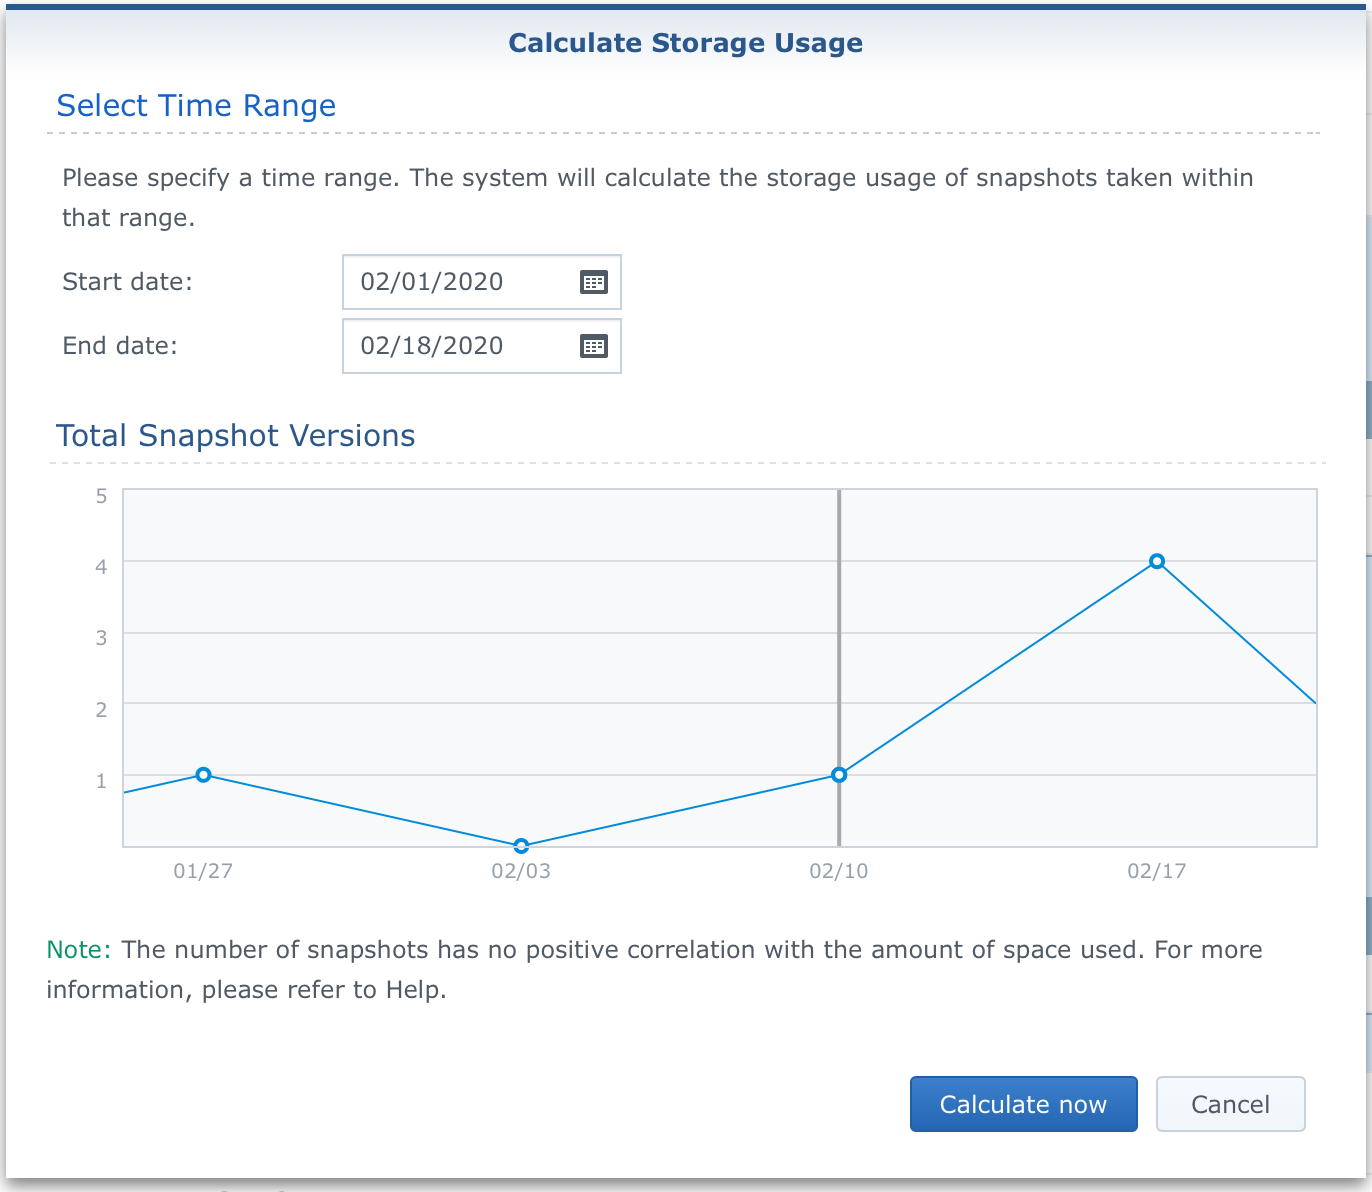
Also when a snapshot is completed you can simply expand the view and see all the data in one place.
Now that we have seen how to make a snapshot, let's see how to use them in case you need fast recovery.
Open up Snapshot of Recovery section inside the main window, and select the protected shared folder that you need to recover. Depending on where you are, you will have either Recover button (via Recovery section), or Snapshot > Snapshot List menu (via Snapshot section). In any case, you will be presented with the same window.
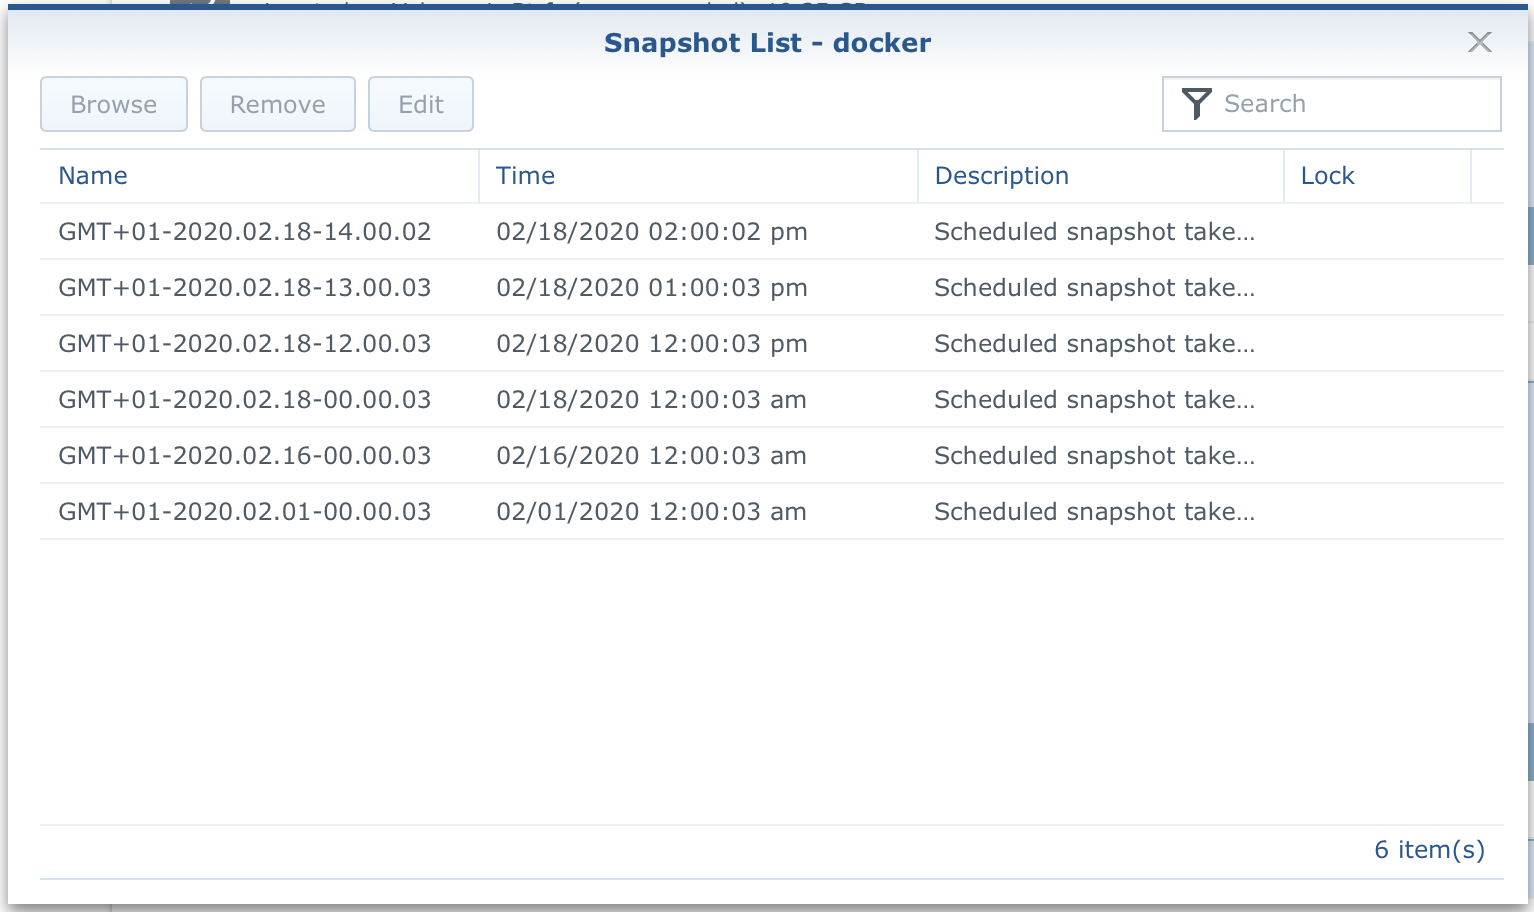
As we can see on the image, there is a list of all available snapshot points. Simply select one and click Browse. DSM will open up File Station and unhide a snapshot folder for that specific shared folder, that will list the state of all the data for that point in time.
All that is left now to do is copy the content to its original location and you are done! That was easy, right?
Ok, but what if you have a large number of files and folders inside that shared folder and the damage is so great that it's best to just wipe it in place with complete content from a specific point in time?
In that case just use the Recovery section, select the shared folder and use the Recover button. In the list window, select a point in time, and from the Actions menu select Restore in-place. Done. One more option that you can do from the same menu is clone that content with a new name on a separate location. Those two actions are best used in cases when you work with a large number of files. In case you have to handpick several files out of thousands, File Station browse options are your best bet.
Using replication
If you are in a situation where you can use the replication part of this great package read on. As I said several times before, using Snap and Replication does require specific requirements and in case of replication, you need a Synology NAS with this package installed and a BTRFS file system. On top of this, you will need network visibility between your source and destination NAS.
Setting up a replication destination is easy. On top of snapshots, you can (at the same time) replicate that same shared folder and its content to a remote NAS and pull data from there in case your primary NAS is not accessible for any reason. There is also a failover option in case the NAS is really dead or not accessible on the network.
So, select the Replication section, and click the create button. This will open up a wizard. You will see that you can also replicate locally and remotely.
Remote replication is what will protect your data in case something physically happens to your NAS. The good news is that this can be done inside your LAN as well as over the internet (encrypted of course) in case your target NAS is on a remote location.

If you are running this over the web, make sure that all the needed ports are open and forwarded on your destination side so that replicas can work as intended.
After you have set your destination server and credentials, all that is left to do is to pick what shared folder you wanna replicate with this given job, set a schedule (optional and you can edit settings and retention later on) and retention policy and you are done!
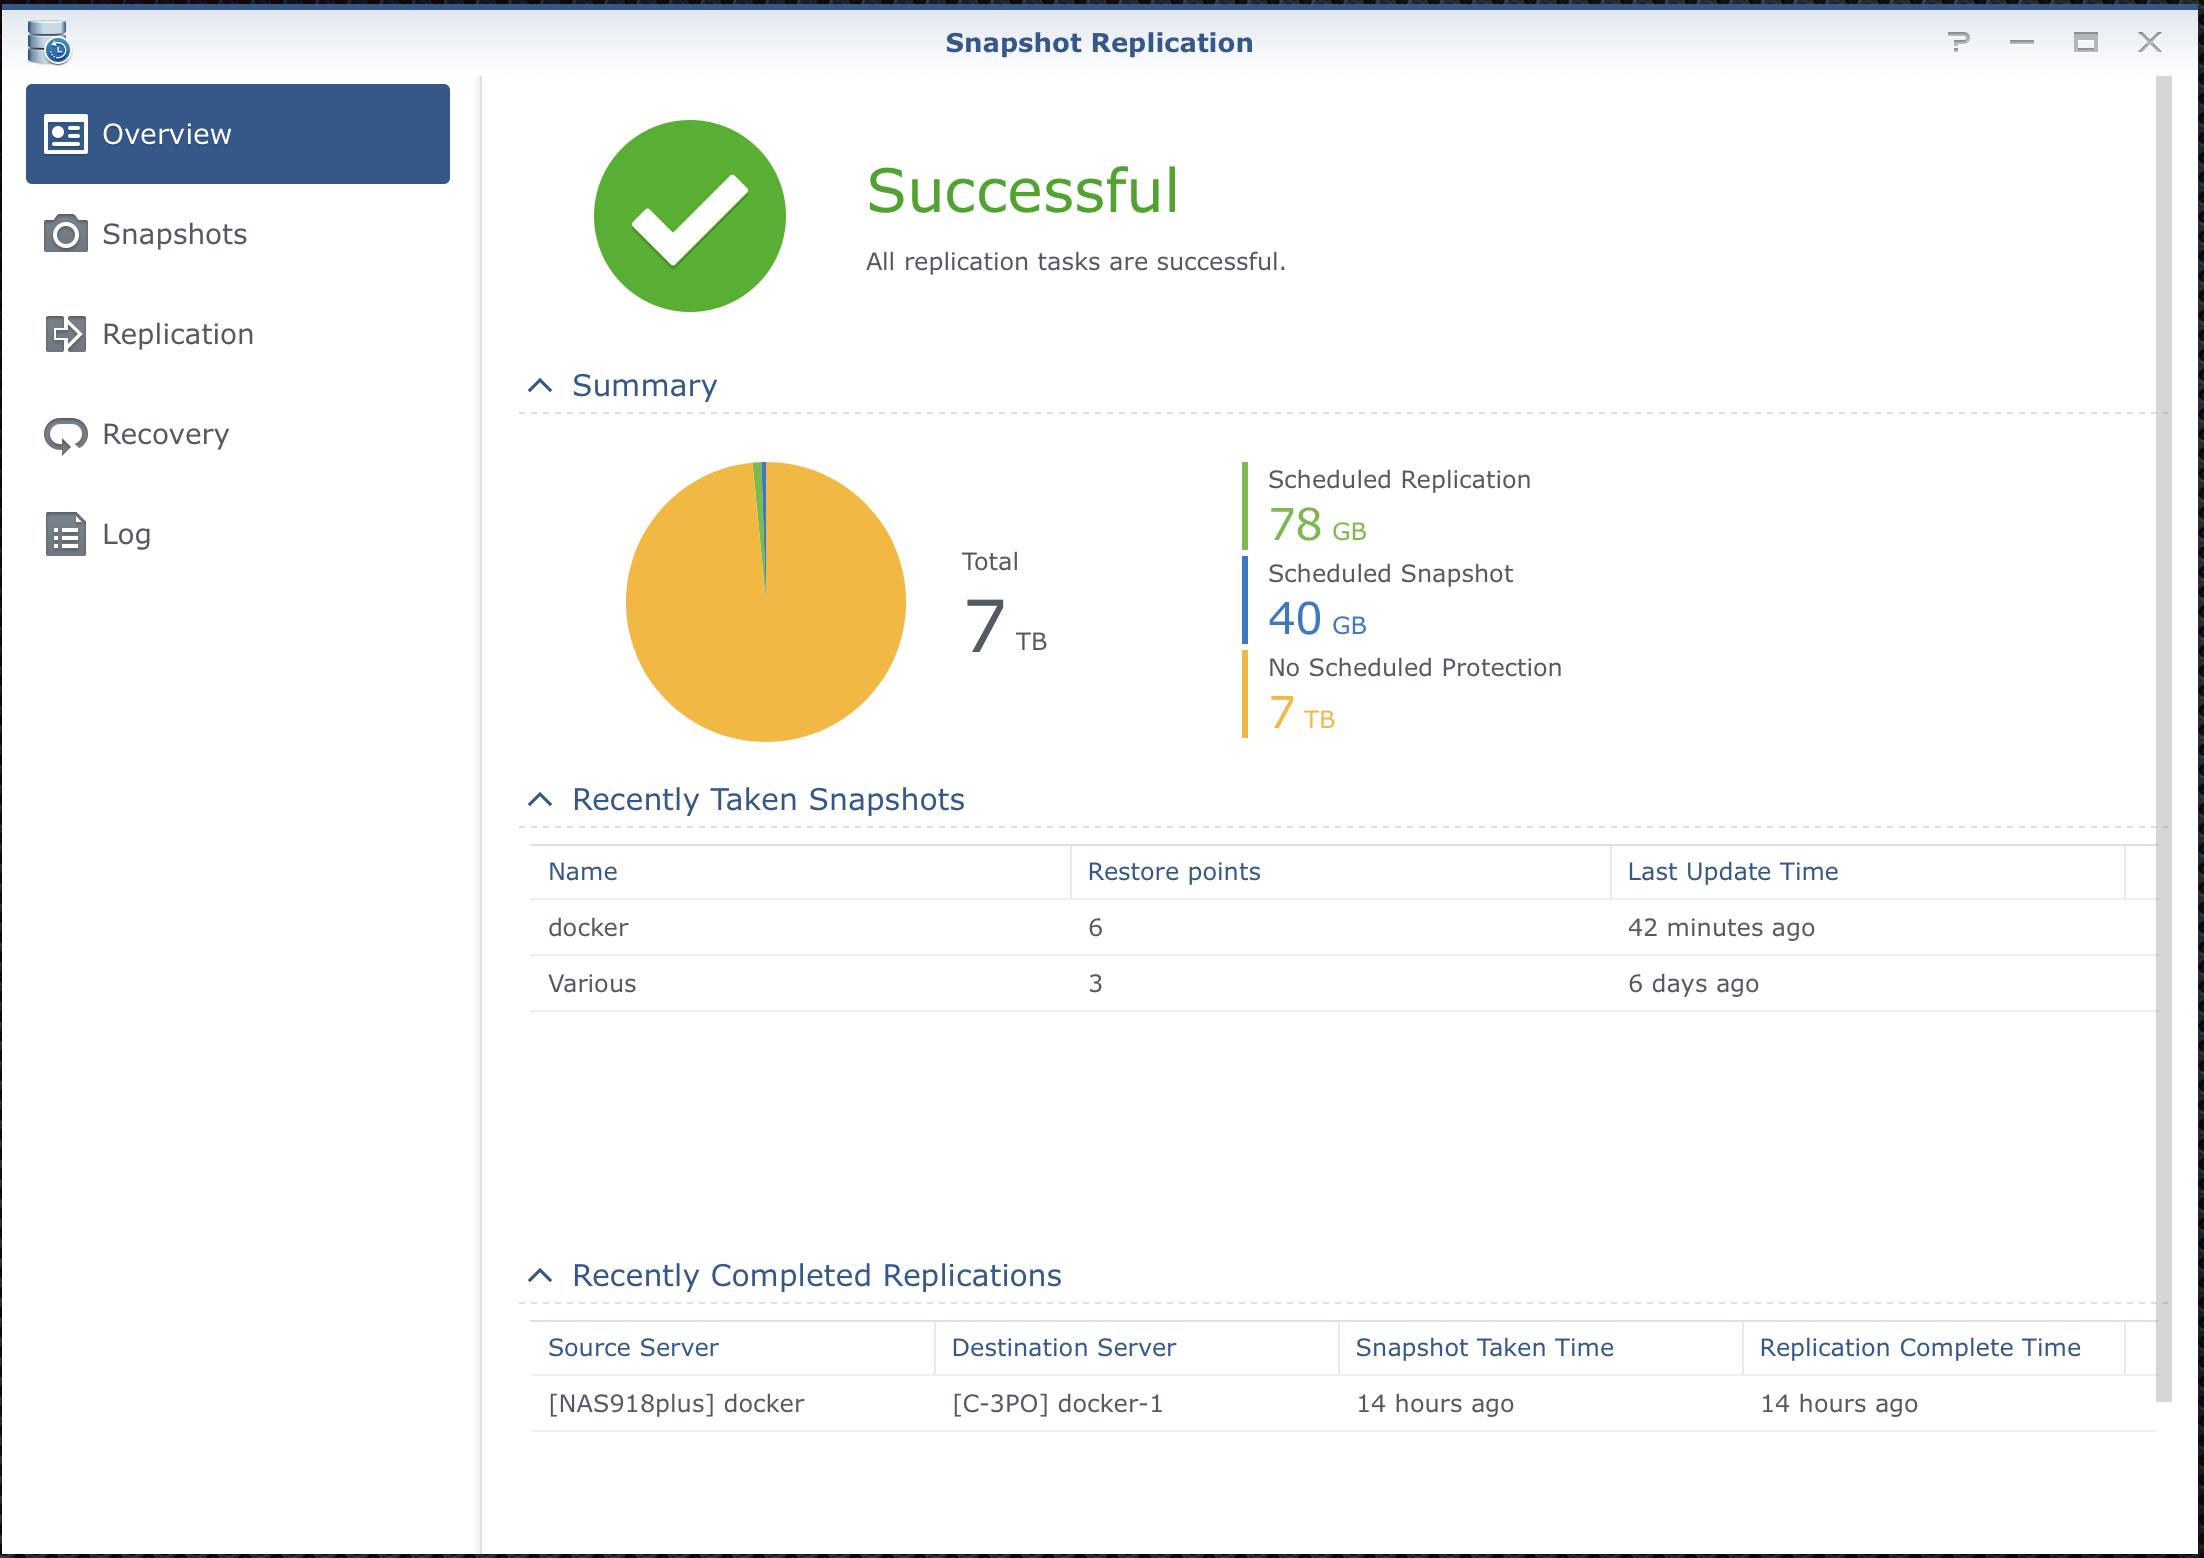
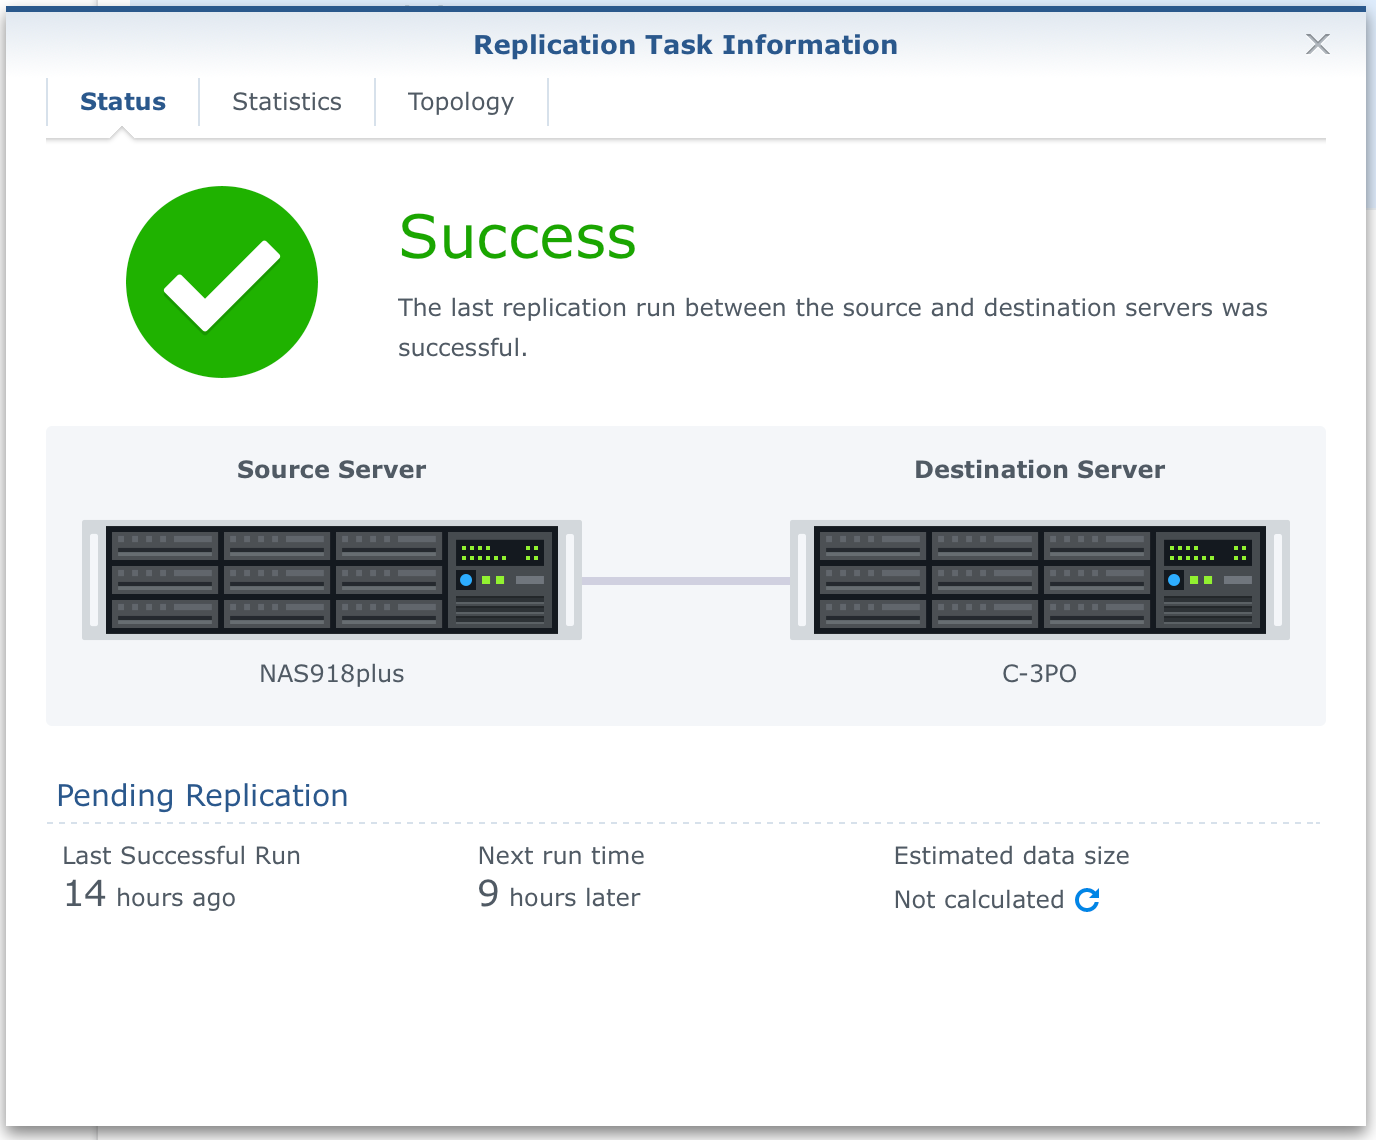
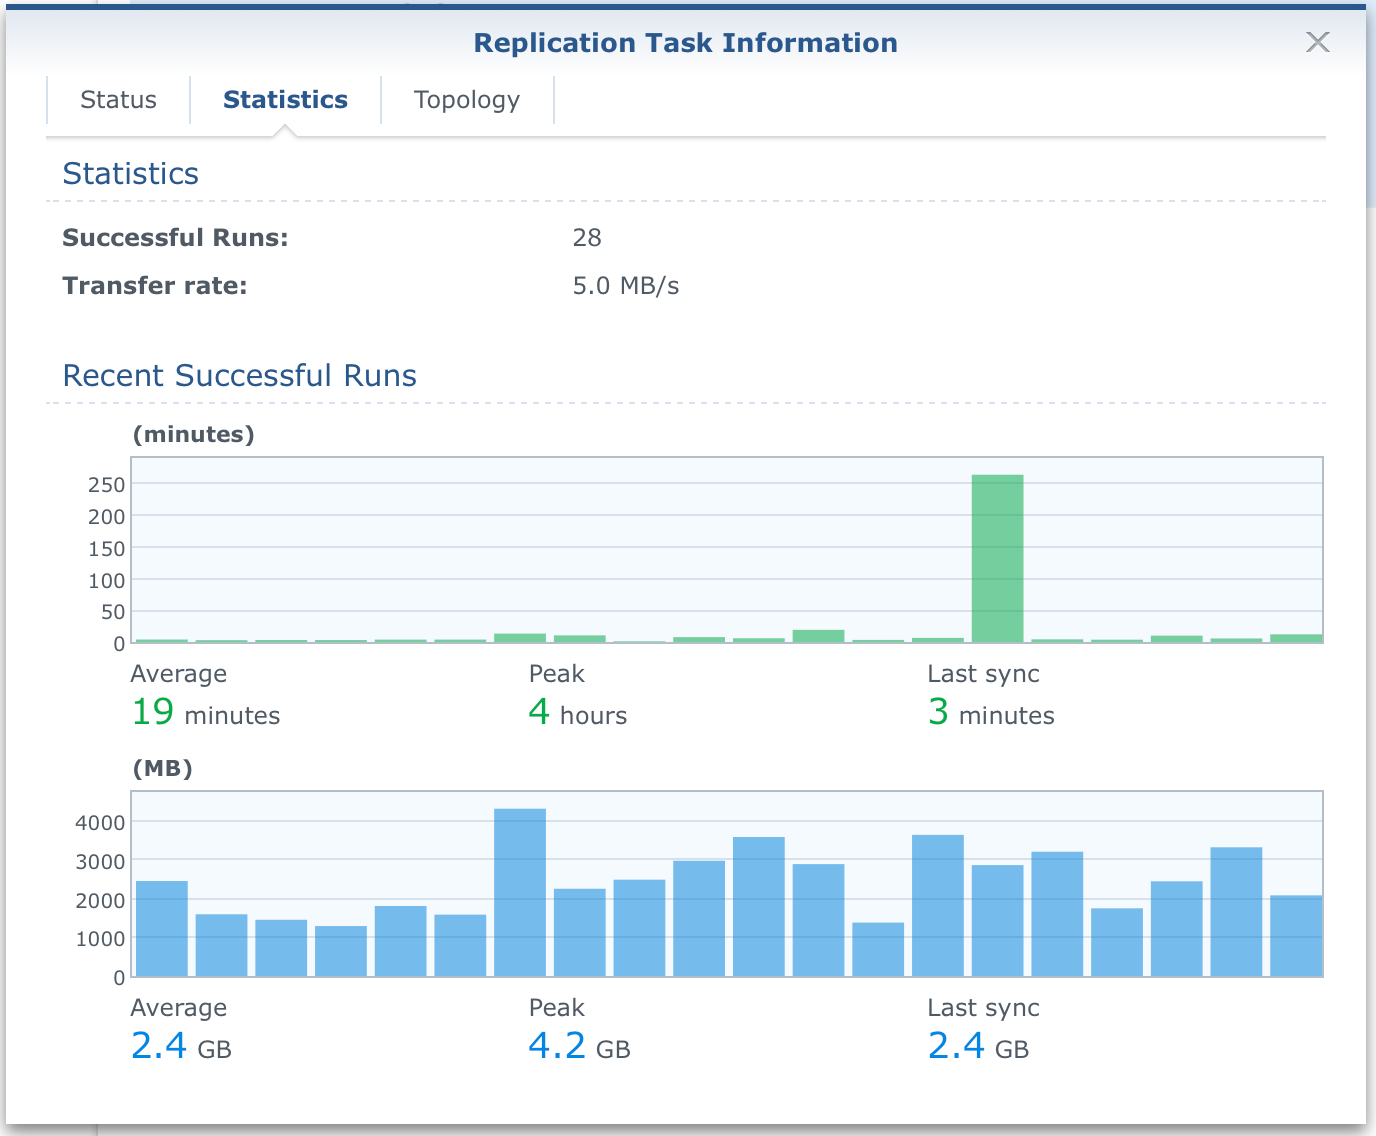
Replication tasks also have a nice little task information dialog where you can see some statistics on a specific job.
So all in all, personally I think this is a great way to have a fast and secure way of resorting to your data without using the slow classic backup restore. Keep in mind that this method of backup is useful for dynamic files that change often as opposed to large media files that you almost never change (well that will depend on the business you are running). Not that large media files are not someone bread and butter, but the idea behind snapshots is to keep your active, most important content protected from accidental damage, corruption of any kind, and to have a way to restore previous versions as fast as possible without the need to hook up any external drives (with outdated backups), wait for the backup to complete and then, in the end, realize that you don’t have a version of a backup that you want.
In most cases, people lose a lot of time just because their backups are not up to date and the only thing you want when a disaster strikes, is to get back on track. Snapshot and Replication might be just the thing for you.
Hopefully, this was a useful read and will give some idea of what a compatible Synology NAS and its Snapshot and Replication backup package can do for you. As always, ask for comments and criticize in the comments below.
Replication recovery methods
We have already seen how to recover from a local snapshot, but how does it all work when you are in a replication model?
To make use o remote replication you will have two options. Switchover and Failover.
Switchover can be used when you have both "sites" (NAS device) up and running fine. At any moment you can decide to switch the main NAS role to the secondary NAS for whatever reason.
One example might be that on your main side your folder that is a replication needs to be maintained in some manner and you need to have your users continue to use the data, so you switch over to the other site.
Failover on the other hand will/can be used in cases when your current main NAS is down or inaccessible for whatever reason. In that case you failover to your secondary location to continue to use the content.
An example of this would be in case there is a major problem with your NAS volume, drives, or the NAS itself.
Now that you know the difference, let's see how to recover in case you need to fail over to your secondary NAS.
First log into your NAS2 and in the Snapshot Replication app initiate a failover from the Action menu.

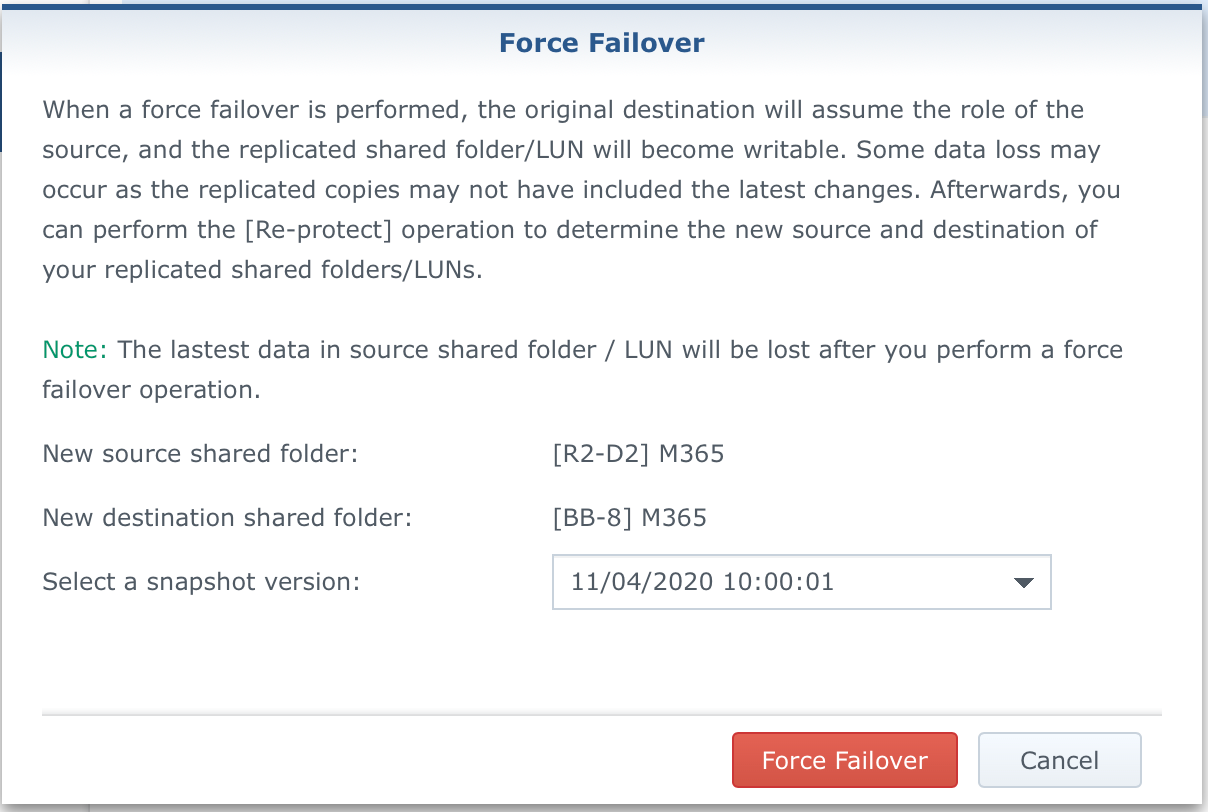
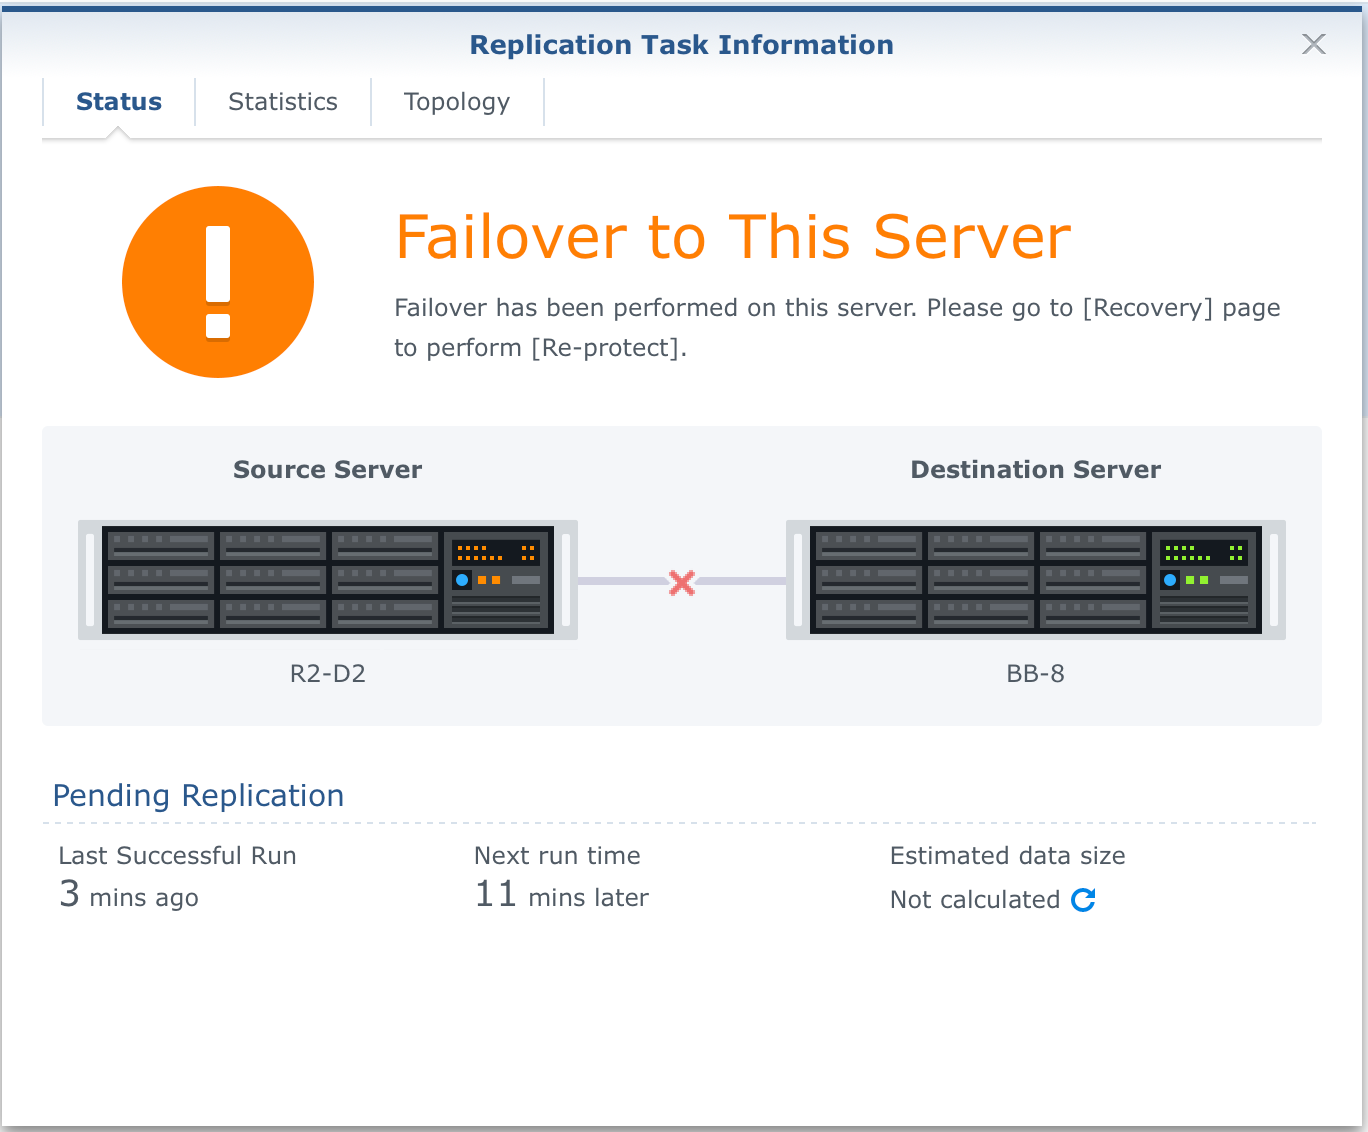
Despite the image above, failover is complete and successful. You simply need to re-protect your new destination (NAS2) to make it a new main replication point.
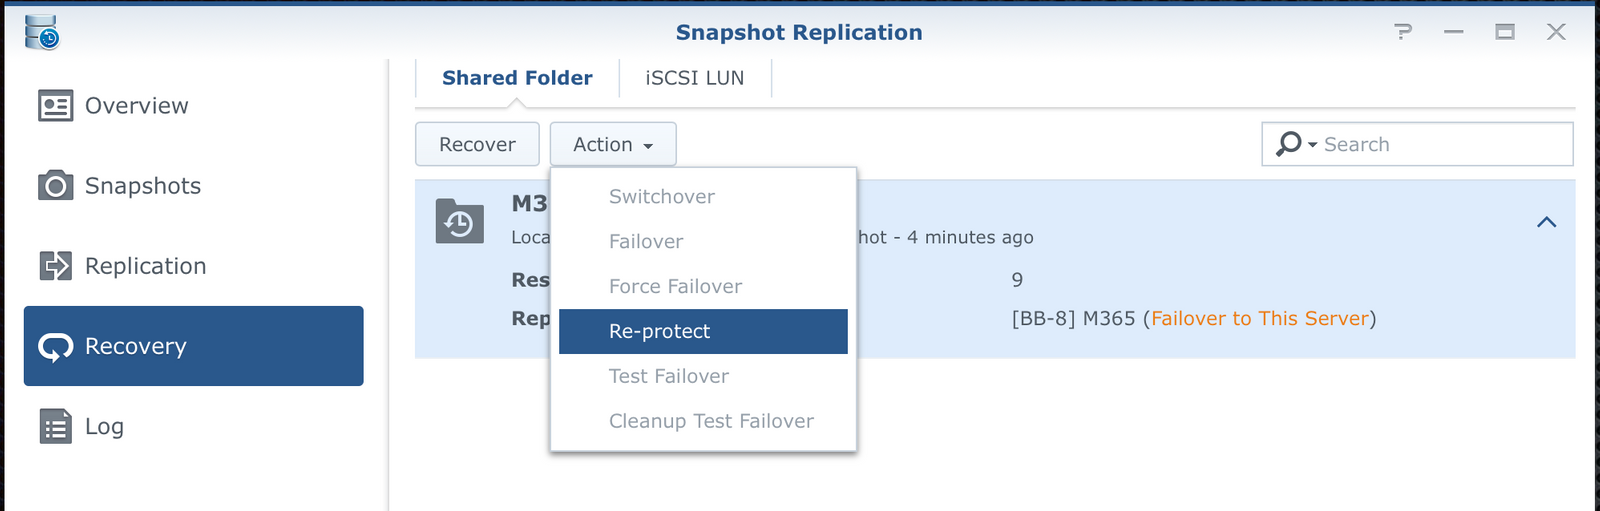
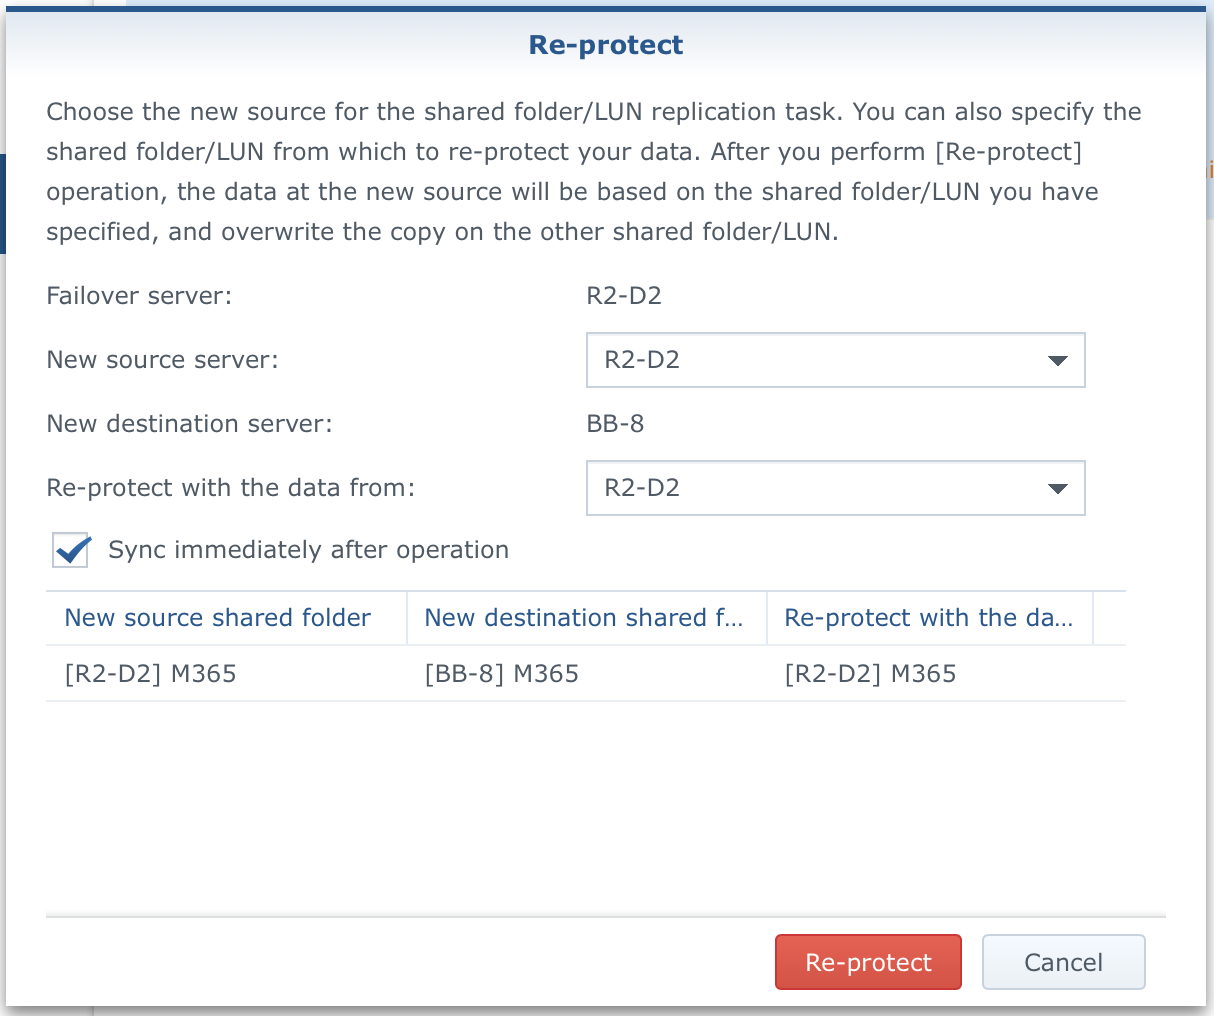
So now we have decided to use NAS2 and its snaped data as the new source NAS and source data for this replication task.
There you have it, NAS2 is now the new "master" device that will have a copy of your data until you repair the damage on NAS1.
Afterward, you can recreate the replication task from NAS2 to NAS1 and start fresh.