VPN, or how to access your data securely, the right way

Here is the official press release:
Taipei, Taiwan—September 22, 2021—Synology announced today that its VPN server solution for Synology Routers, VPN Plus, has transitioned to a permanently free licensing program.
"We first launched this program to support businesses worldwide during the initial phase of the COVID-19 crisis. Fast forward 18 months and the trend is now irreversible. Working from home has become the new normal," said Rebecca Lin, Product Manager for VPN Plus at Synology Inc. "We think our users should continue to enjoy full free access to all the best VPN technologies that Synology has to offer. That is why we are announcing forever free licenses for all previously paid features of our premier VPN server solution, Synology VPN Plus."
Under the new program, new and existing owners of Synology's RT1900ac, RT2600ac, and MR2200ac wireless routers can activate perpetual Client VPN Access and Site-to-Site VPN licenses at no additional cost, forever.
In this article, I will talk about setting up a VPN service on your NAS. There are two ways you can set up a VPN service on your NAS. One is a VPN server, and the other is a VPN client.
Having your NAS open to the Internet is always a risky situation and using a VPN to get to your local data without the need to expose your NAS via a number of ports to the Internet is nothing new. VPN has been around for decades.
What confuses most people is the difference between vpn server and client. So what is VPN in the 1st place?
VPN 101
VPN stands for Virtual Private Network. This means that it will allow you to connect from a remote location to your home or business and use any services, data, or devices like you never left. So why is this better than just simply accessing your data via the Internet on an exposed port? Well, the big difference is that VPN traffic is encrypted, and best of all you can access your resources the same way as you would if you have a local connection.
Server vs client
Now, what's a VPN server and client in all of this? A server is a device that will coordinate and maintain your private connection via VPN protocol, and a client is a device that will initiate a remote connection to the server. So for example, your NAS can be a VPN server (just as much as your router or any other device in your network that can run a VPN server can), and your phone, tablet, remote computer, etc, are clients.
Make no mistake your NAS (just like any other mentioned device) can also be a VPN client that's connecting to a remote VPN provider. Now, why would you wanna use that? In case you wanna use specific services that are not available to you in your country or simply wanna block ISP tracking your Internet usage, you could use VPN to "cover your tracks". More on this later.
In order to make this work, there are steps that need to be configured (one time) and followed.
In this article, I will explain both cases. We will start with using your NAS as a VPN server in order to connect to your home or business and access your resources that are not otherwise accessible via the Internet, and then, we will see a scenario where you can use that same NAS as a VPN client in order to protect your whole local network (and devices) and block any tracking from ISP side (also this will allow you to get certain content that might be inaccessible otherwise).
NAS as a VPN server
One thing to mention here before I continue. If you wanna connect to your home or business you will have to have a static IP address (that you will later on use) or configure a DDNS service if your IP address changes from time to time. Some Internet providers change their user's IP addresses on a daily basis, so having a DDNS is a must.
In order to use your NAS as a VPN server, you first need to install a VPN Server package from the Package Center. After installing it you can open it up and start configuring.
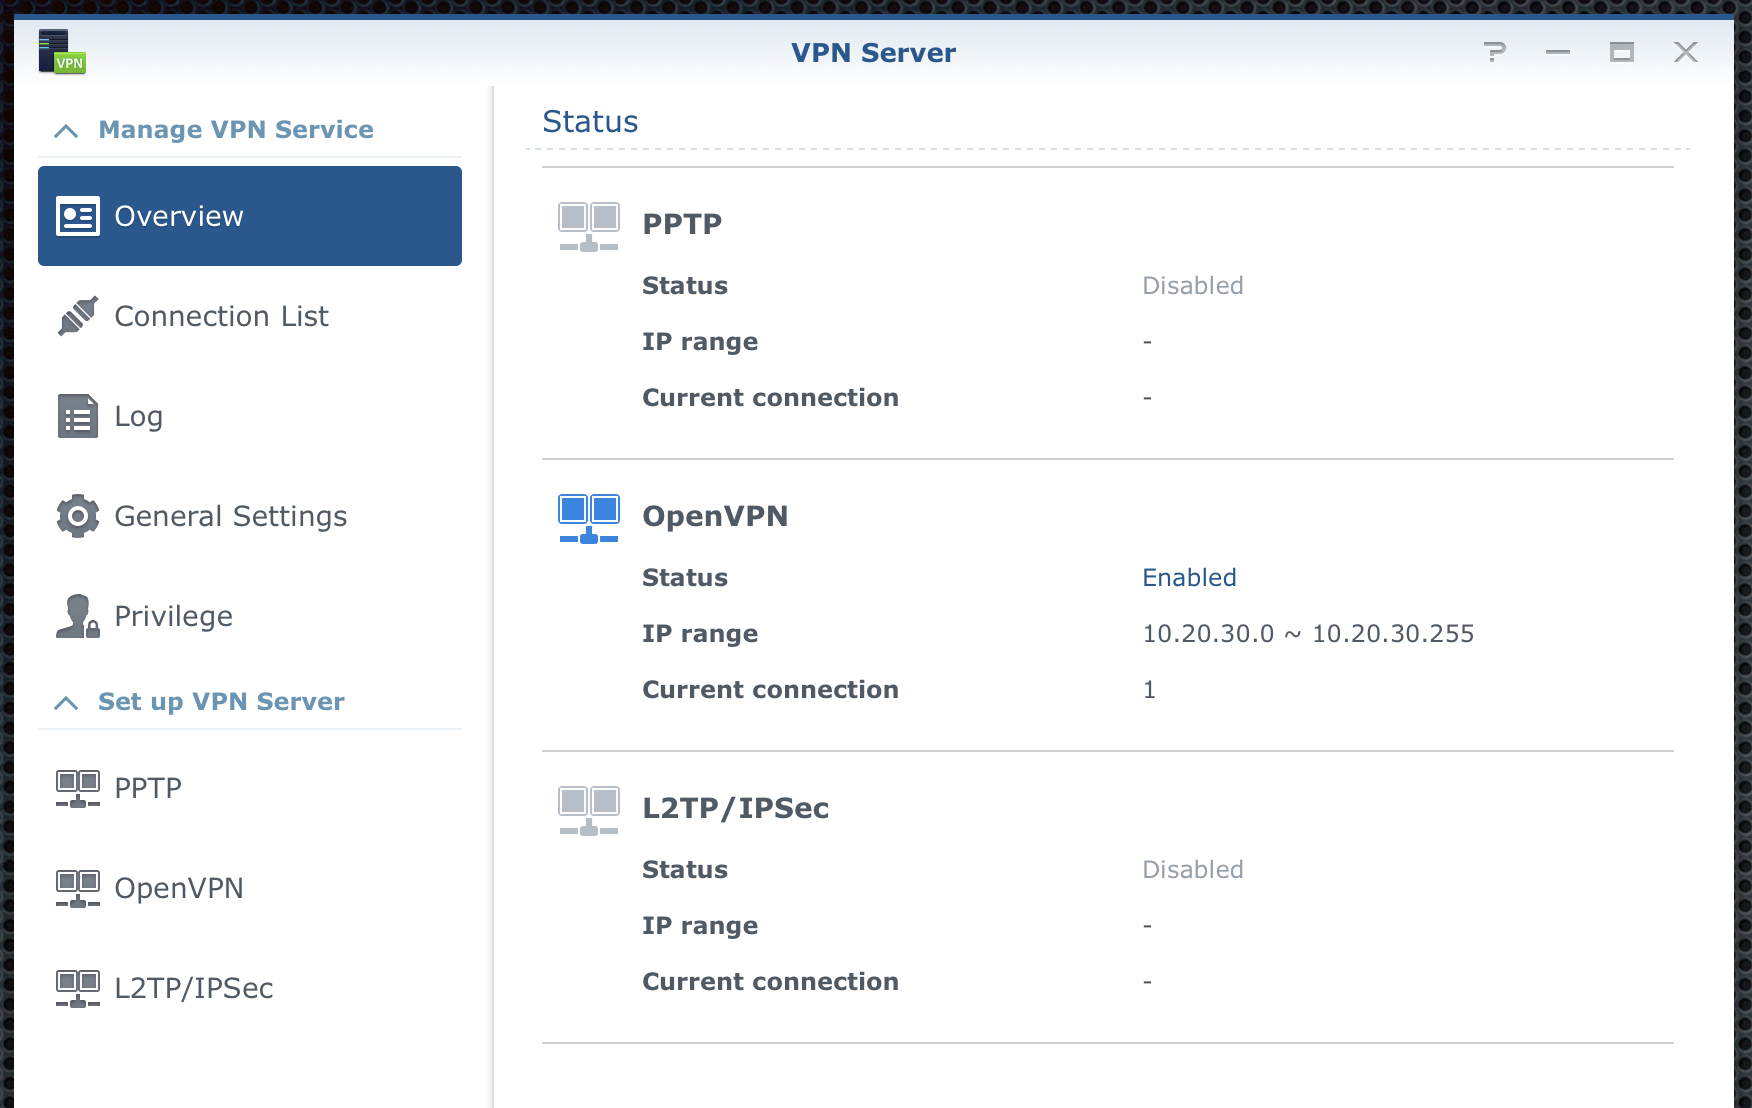
There is 3 protocol that you can use. PPTP, OpenVPN, and L2TP/IPSec.
As I said before, I will focus only on OVPN from this point forward. We start by going to the OpenVPN section in the bottom left corner.
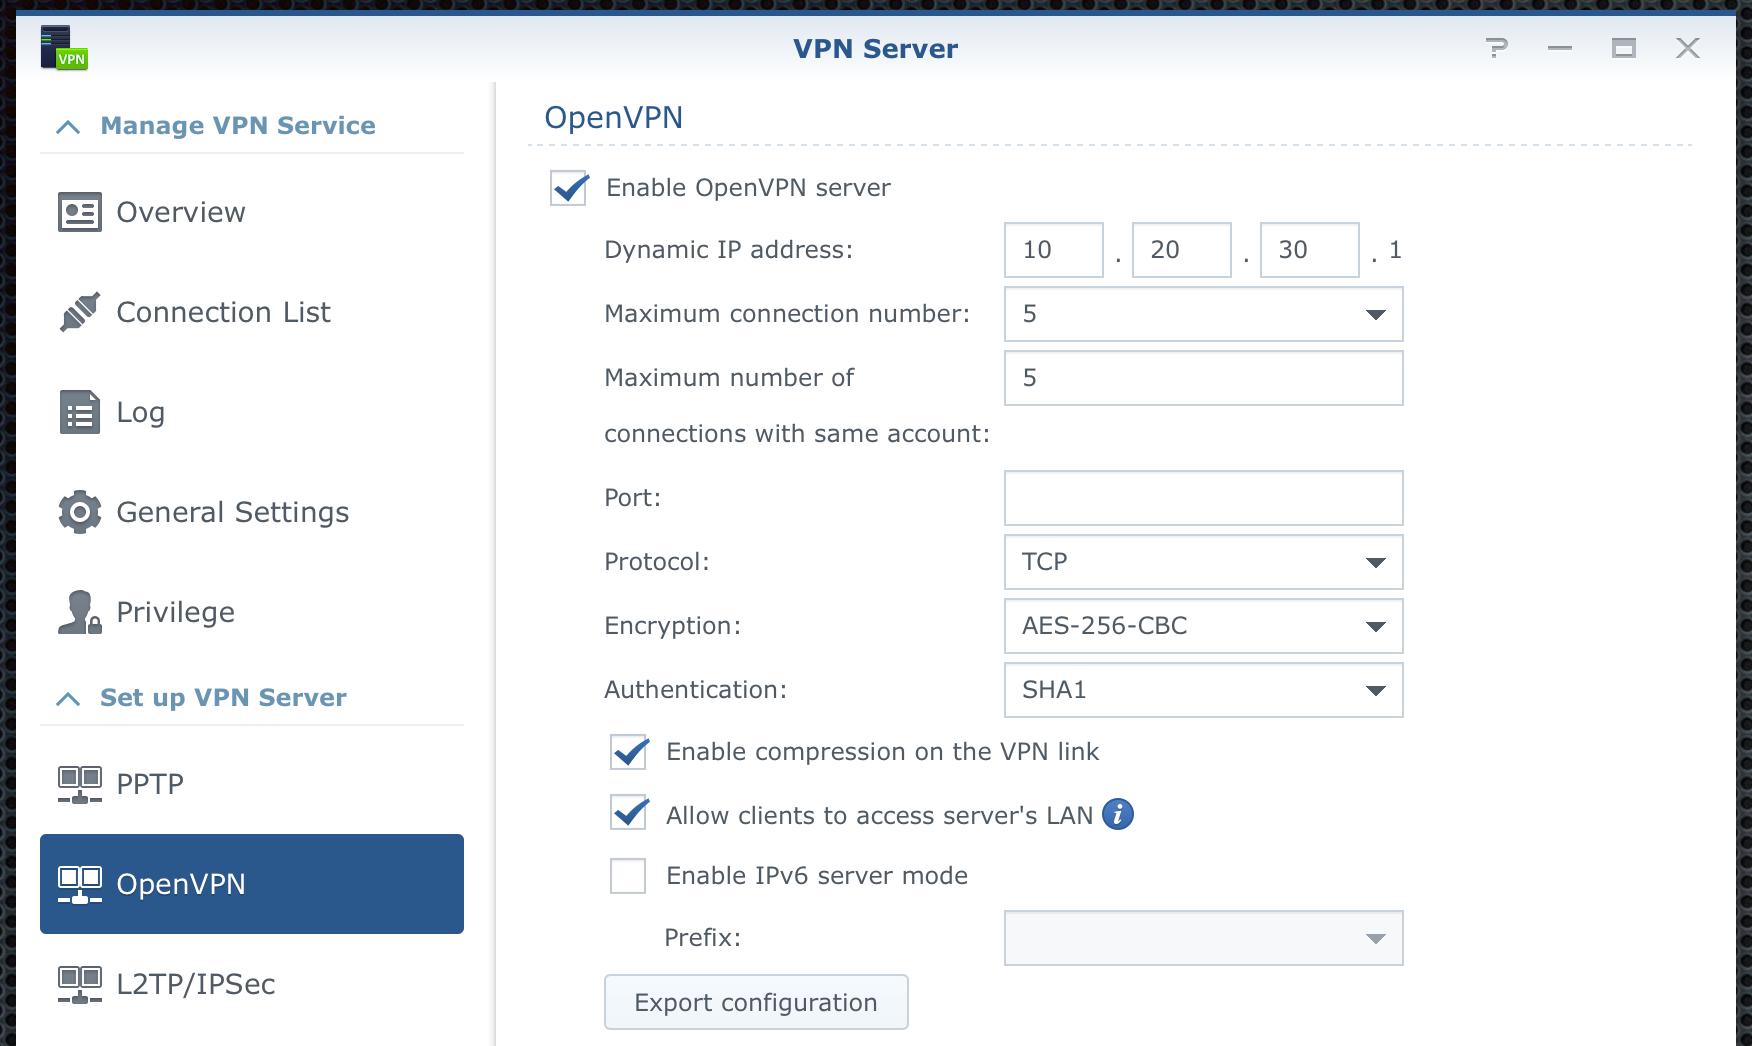
First, tick the checkbox to activate the settings and then configure them to your needs. Make sure to NOT use the same network class or subnet as your local network. You can use any other but do not overlap them. The VPN server will make sure that (if you chose to do so) allow you access to your local network and devices (there is a checkbox for that).
Most settings are easy to understand but I will focus on a few of them. Port and Protocol are 2 things that need attention here. By default, VPN will work on UDP 1194 protocol/port combination. The simple reason for UDP is speed, let's leave it at that. The reason why I use it via TCP is that the locations that I use VPN from most often, block any Internet UDP traffic. Luckily, TCP traffic is much more open. Saying that you will also need to verify that you can actually use specific ports and protocols in order to make the connection. In the Port section, I have a custom port that I know is open from my VPN client-side, so that I can initiate the connection.
Once you have decided on the port and protocol, choose the encryption and authentication. This will depend on your client-side as well. So you will have to play a bit here.
Before the final step (but this is something that you can change later on depending on your user needs), is to configure users that can/can't use a VPN server. Switch to the "Privilege" tab, select what users can use what protocol, and click the "save" button on the top. Now switch back to "OpenVPN"
Finally, click the "Export configuration" button on the bottom to get the needed files that will have to be imported into your VPN client.
Now that you have your configuration You will see one .ovpn file and several (2 to be exact) .crt files.
The first thing that we need to do now is open up the .ovpn file in a text editor to make a change.
Once you have opened the file, in the 4th line you will change the IP_ADDRESS to your external (static) IP address or use this place to enter your own DDNS public name. For example:
remote something.synology.me your_custom_port_number
One more thing that you can do here (well you can do a lot, but I will mention one) is that you can force your entire VPN client network traffic to go inside this secure tunnel and not use a split. What this means is that all your Internet and local communication will be tunneled towards your VPN server.
To make this work you can make one more change inside your .ovpn file. Line 20 reads like this:
#redirect-gateway def1
Change it by removing the # character from the beginning, like so:
redirect-gateway def1
That's it. Now that you have completed your changes and you have a file that's pointing to your VPN server, you are ready to import that file inside your VPN clients (desktop or mobile).
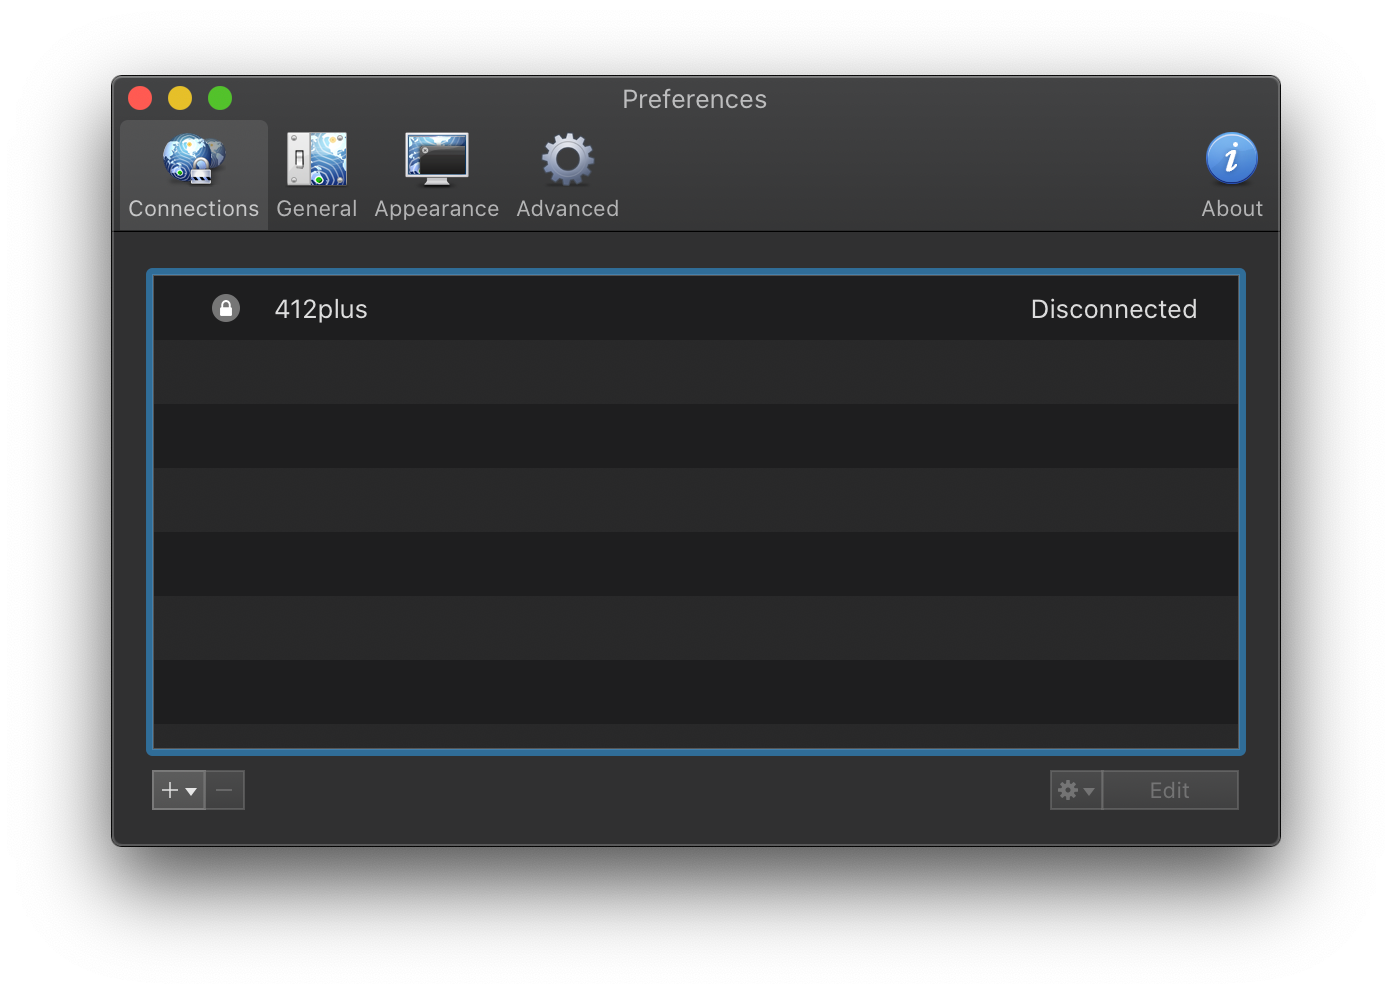
For a desktop client, I use Viscosity. It's a paid client that works both on Mac and Windows OS. There are alternatives that are free and work just as well. Viscosity has a bit more functions but in general, any open VPN client will do.
Depending on your client of choice, after you have imported your configuration file, you are ready to test it out.
Once you initiate a connection you will be prompted with a username and password. In this case that will be the username and password for the DSM account, considering that the VPN server is running on your NAS.
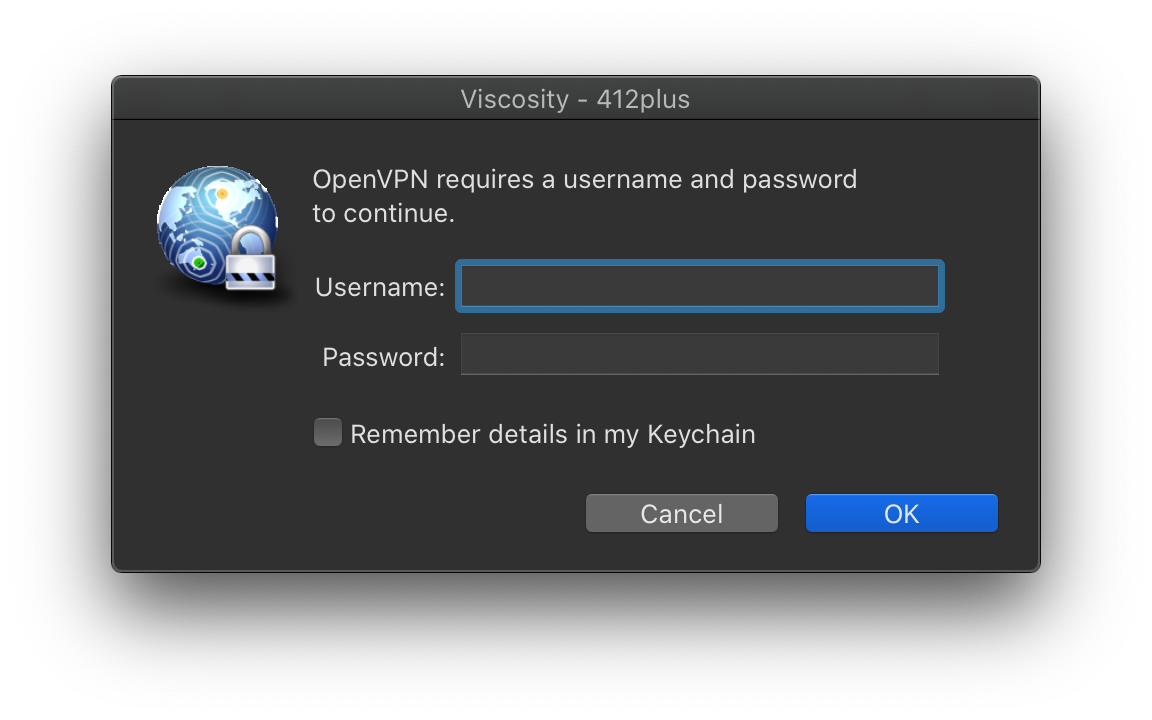
After you enter your user name and password, the client will initiate a connection. If everything is in order you will connect to your VPN server, otherwise, you can check the logs for errors.
Most common here is wrong username/password, network problem, or port not open on the client and/or server-side. Double-check those first.
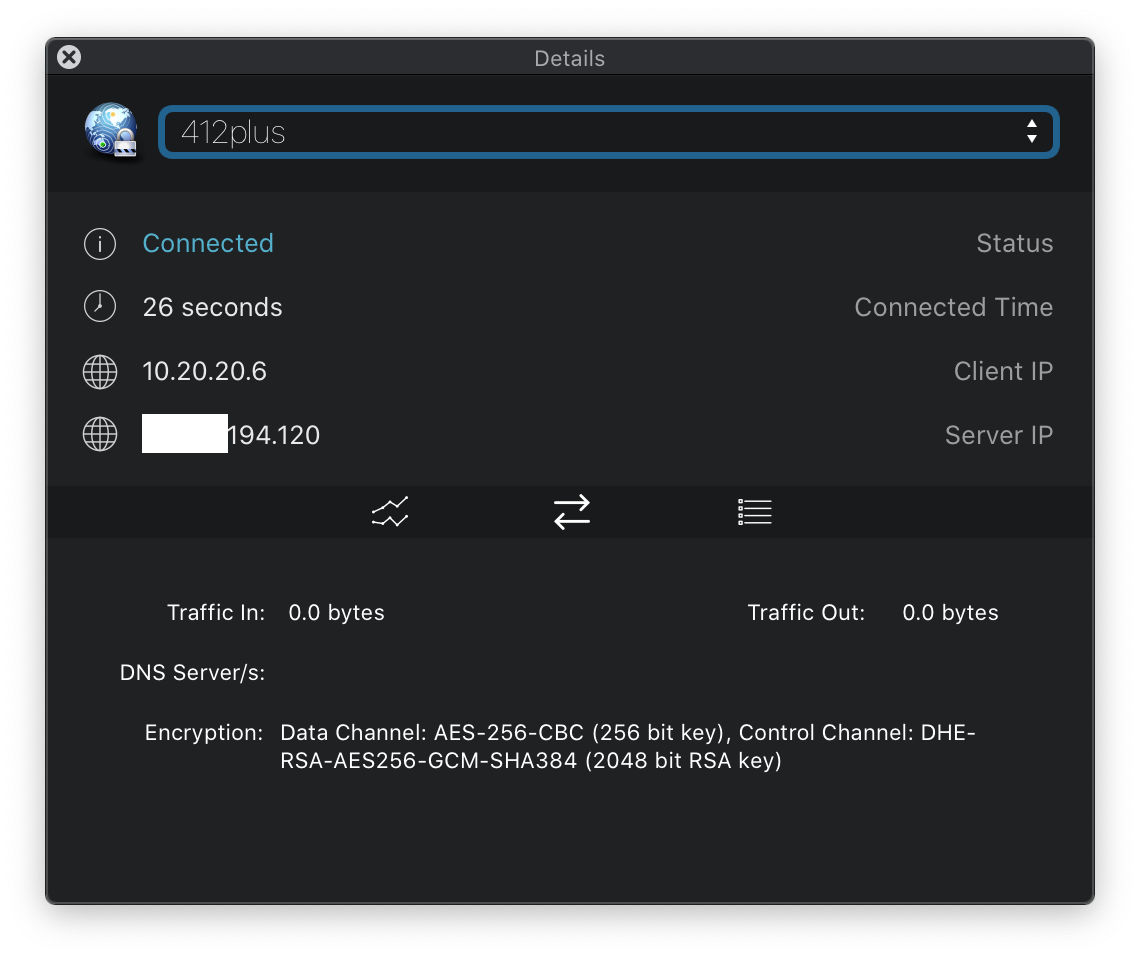
Now that you have connected to your home or business from a remote location you can use any services or get to any data needed just like you would if you were on that location.
NAS as a VPN client
One more way you can use your NAS is as a VPN client. To make this work, as said before you will need to use a VPN server provider. There is a ton of them out there. Some are free, some are not, some track you, some don't. Personally, I use NordVPN and it fits my needs.
The method described here will, in most cases, be the same for any provider. Again I will use the open VPN method.
If you are wondering why would I make my NAS as a VPN client and not just use my default computer, or phone instead the answer is this. There is some traffic on my NAS that I wanna keep encrypted but on top of that I can use then that same NAS as a gateway for all my local devices and still have my traffic encrypted.
Why? Well, not all devices have a compatible VPN provider app for example. Most providers offer 6 concurrent VPN connections, so what if you have more than 6 devices that you need at one time?
So with a single active connection, I can cover my entire LAN and its devices that encrypt all outgoing and incoming Internet traffic.
First, create an account with your VPN provider of choice. Then download the ovpn file for the server that you wanna use. Most quality providers will offer a large number of VPN servers all over the world. So, depending on where you wanna terminate your connection (where you wanna pretend to be) you will have to use that specific server ovpn file to connect.
Now that you have a valid account, and a server connection file, log into DSM and open up Control Panel > Network > Network Interface
Click "Create > Create VPN profile" to start the wizard.
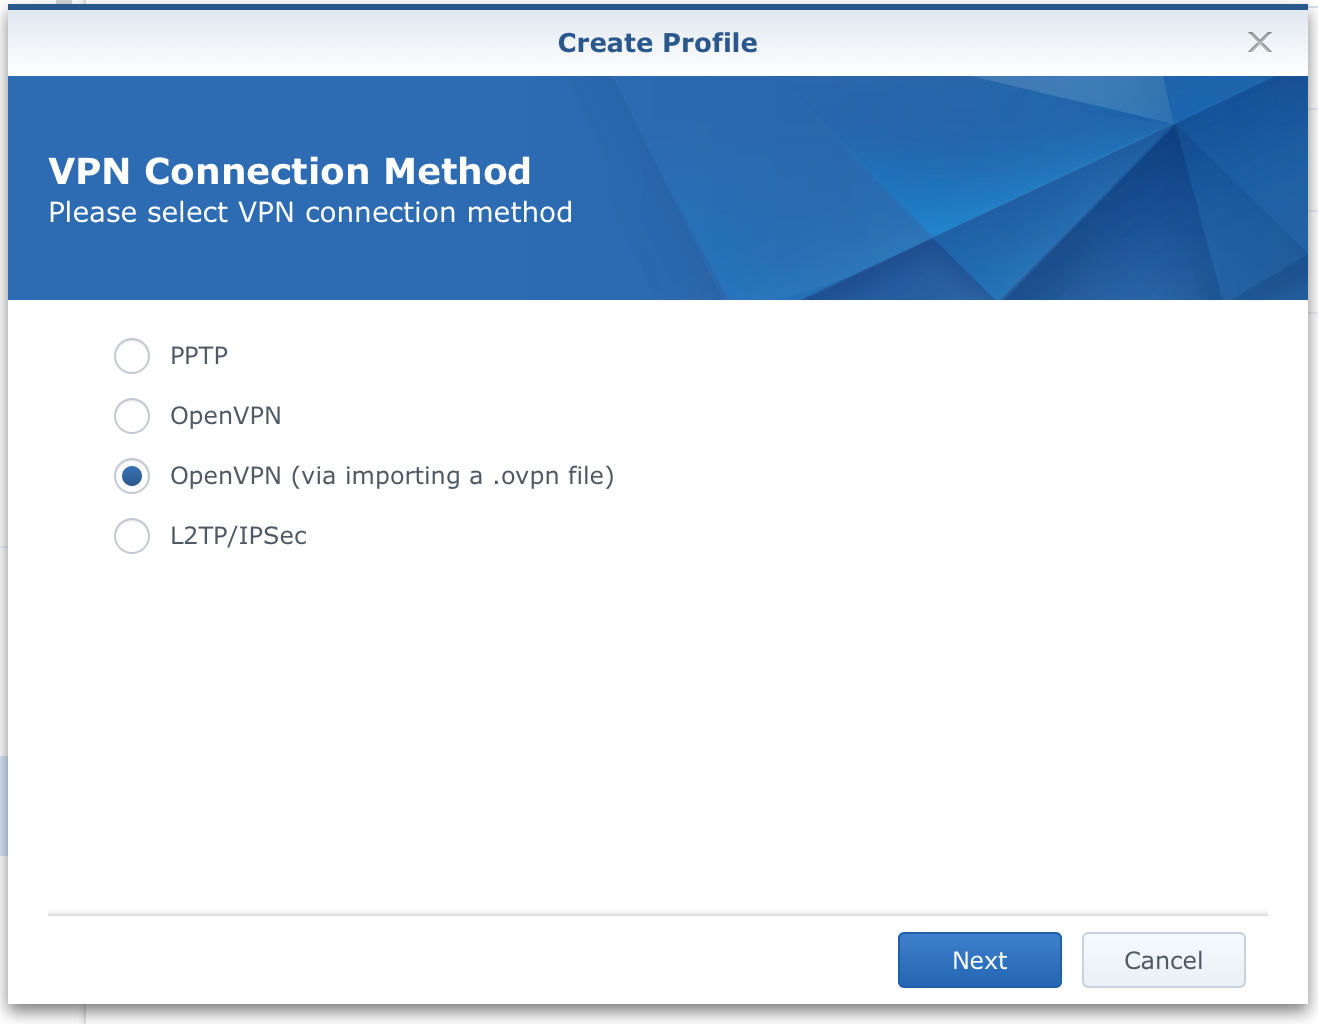
The 3rd option will be the one that you need to select in order to get everything set up the way it's meant to be. Click "Next".
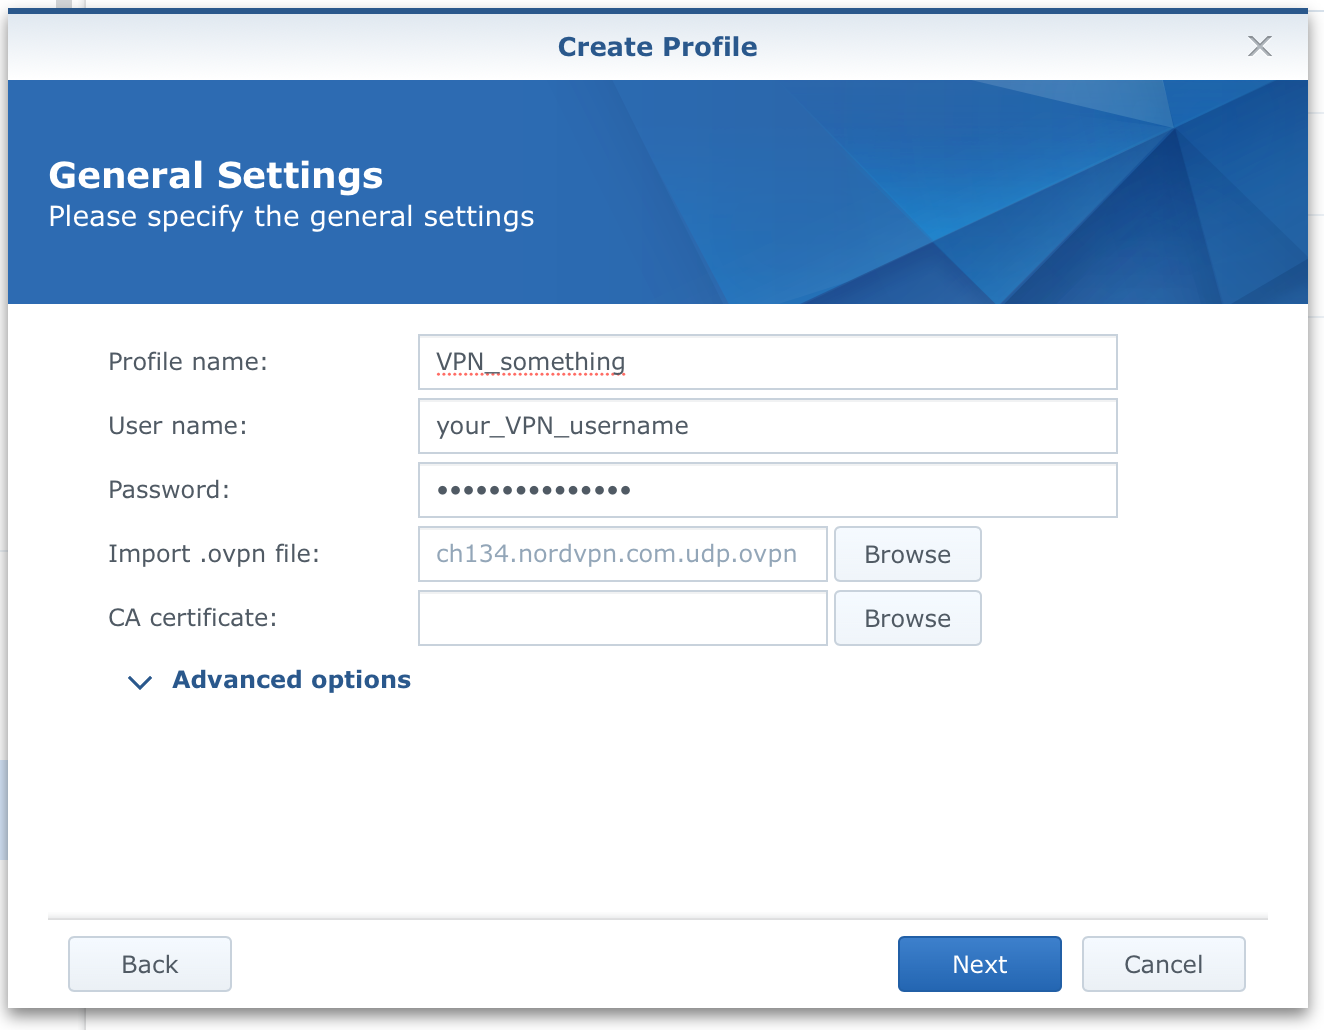
Now create the profile. Enter a name (because you can have multiple VPN profiles), username, and pass for your VPN provider and click the "browse" button to select the ovpn file. In most cases, nothing else is needed, but if your provider has specific instructions, then follow them and use the "Advanced options", otherwise, click "Next".
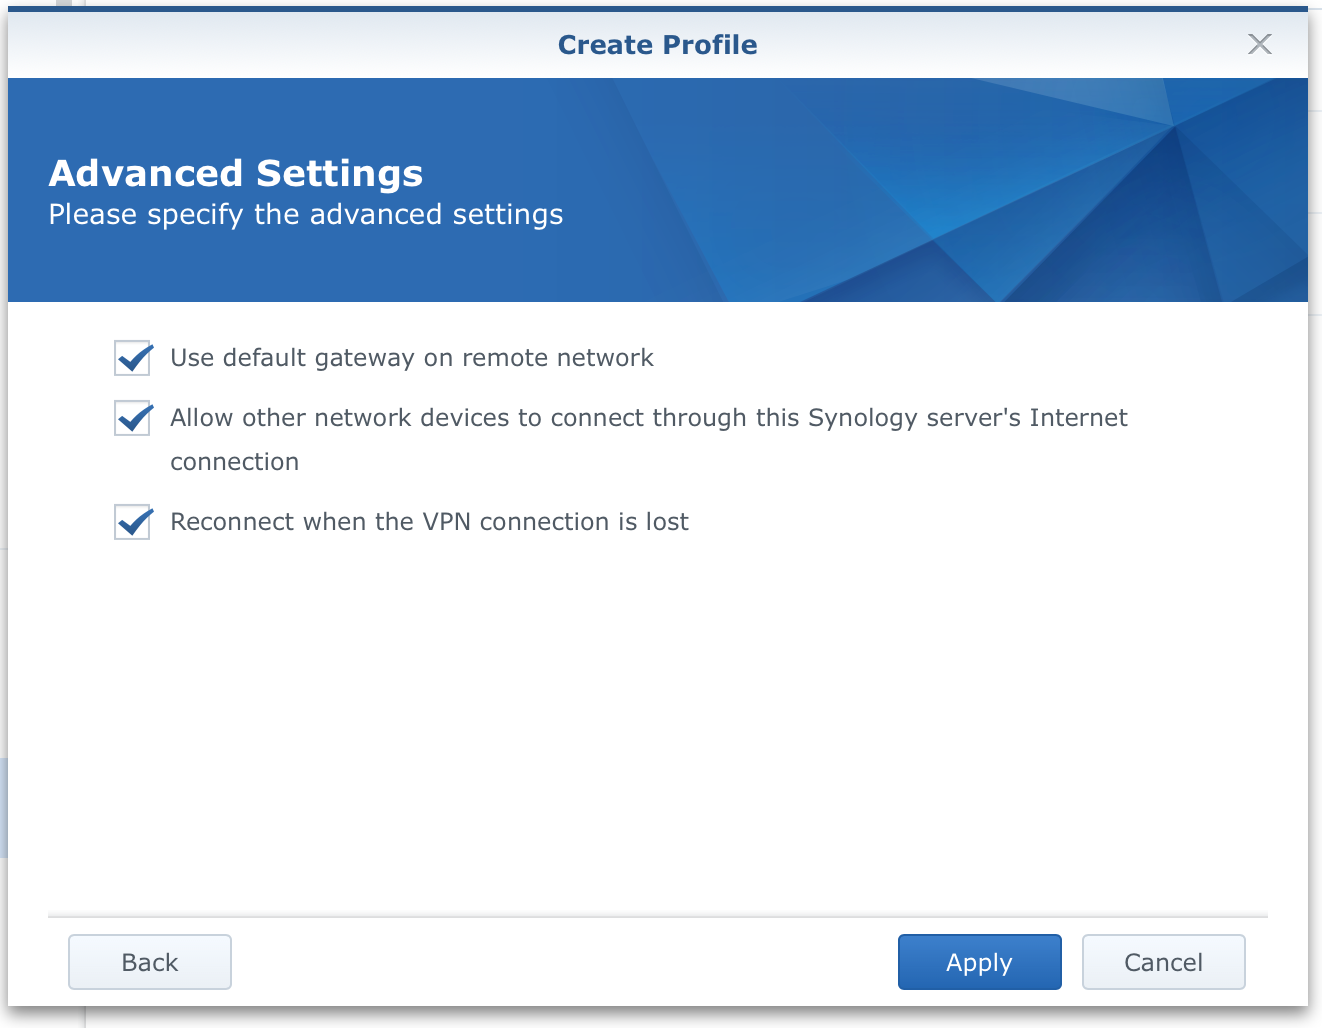
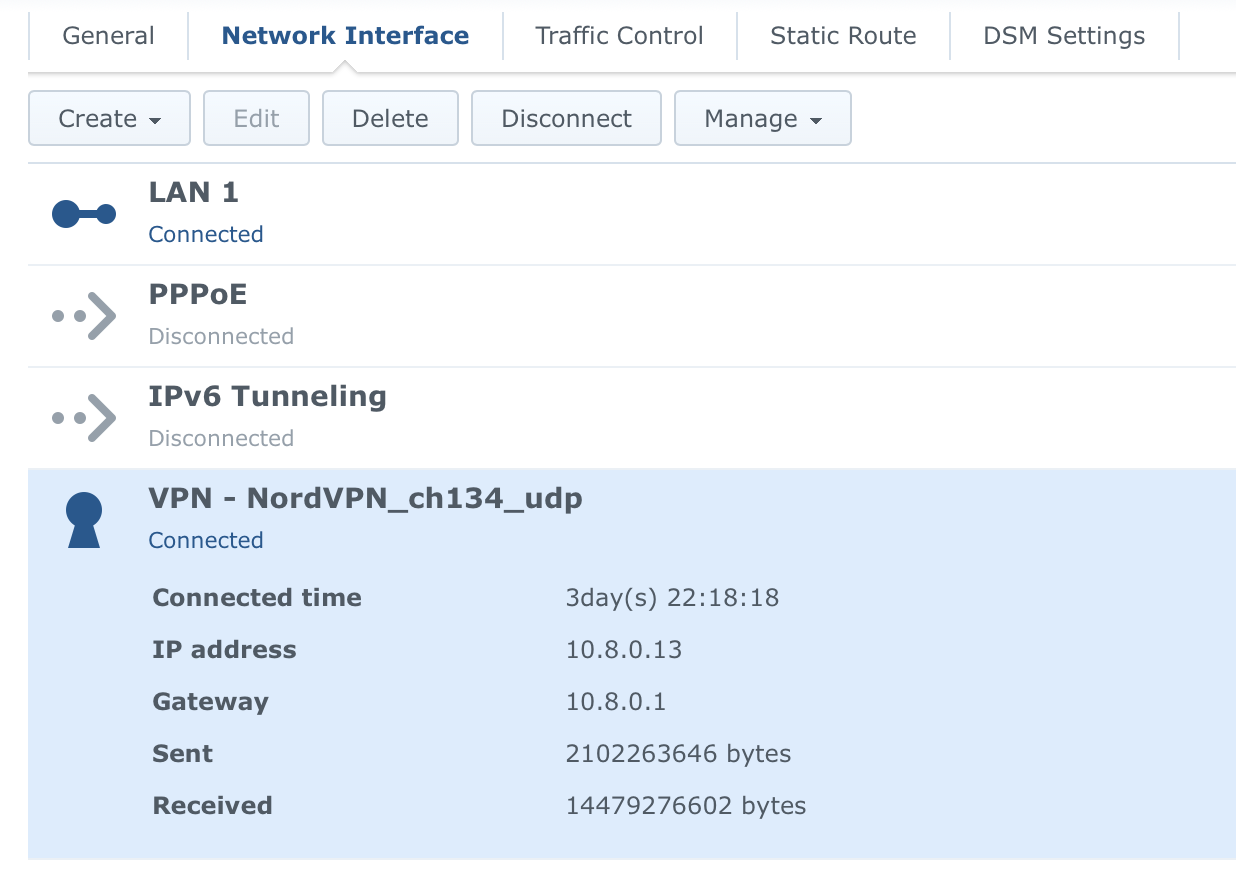
Finally, check all the boxes and click "Apply". Now you have a new VPN profile in your Network section. Select it and click connect. After a few seconds, you should get visible information that you have an established connection.
That's it for the first part. Any traffic towards the Internet on your NAS is not inside the tunnel. But how do we get all the other LAN devices there as well?
There are two ways to do it. One is to change each LAN device to use your NAS as a gateway and another is to set your router gateways setting to your NAS IP address. That way, all your devices that are using your router as a way towards the Internet will actually be routed to your NAS 1st and then they will be pushed towards the Internet via an active VPN tunnel. Complicated? Ok, let's break it down.
Let's describe how access to the Internet usually works. You have a router that's connected to the Internet, and you have network devices connected to that router.
LAN device > router >(unencrypted communication) > Internet
Simple right? Ok, so what we want is that your LAN devices get to the internet via a VPN tunnel that's active on your NAS. So the route will look like this:
LAN device > NAS VPN connection > router > (encrypted communication) > Internet
To make this happen just use your computer/mobile/tablet network configuration and enter your NAS local IP address as a gateway/router setting.
In macOS for example, open up System Preferences > Network and in the Router field enter your NAS IP address. That's it! Apply the change and enjoy encrypted Internet access.
Just as an example from my router statistics, you will notice that the top 2 applications/categories are Unknown or VPN, meaning, "we can't see what's going on there".

Well, that's it for now, if you have any questions, suggestions, or critics, feel free to ask in the comment section below.