DSM push notifications with webhooks

Intro
Notifications are important and we need them all the time. The same applies to information coming from your NAS or better yet DSM. Personally, I have been using Pushover for all my needs when it comes to push notifications.
Be it DSM 6 or 7 you can use Pushover as your "push provider", but with DSM 7, Synology has implemented support for webhooks. If you are a user of Discord, Mattermost, Rocket Chat, or Synology's own Chat, then you probably know that you can push notifications into those chat platforms using incoming webhooks.
For this example, I will use Rocket Chat as a platform of choice, as I use it daily, and getting notifications on my phone/watch will be also backed up by notifications using webhooks.
So the idea is to get DSM notifications for any major event that would be logged in the Log Center to be pushed to my chat platform.
Configuration of incoming webhook inside Rocket Chat
The first thing you need is of course a running Rocket Chat instance (use the link above to get it going), in order to be able to configure the incoming webhook from another system.
Once you are up and running, head over to Rocket Chat Administration > Integrations and click the +New (blue) button to make a new integration.
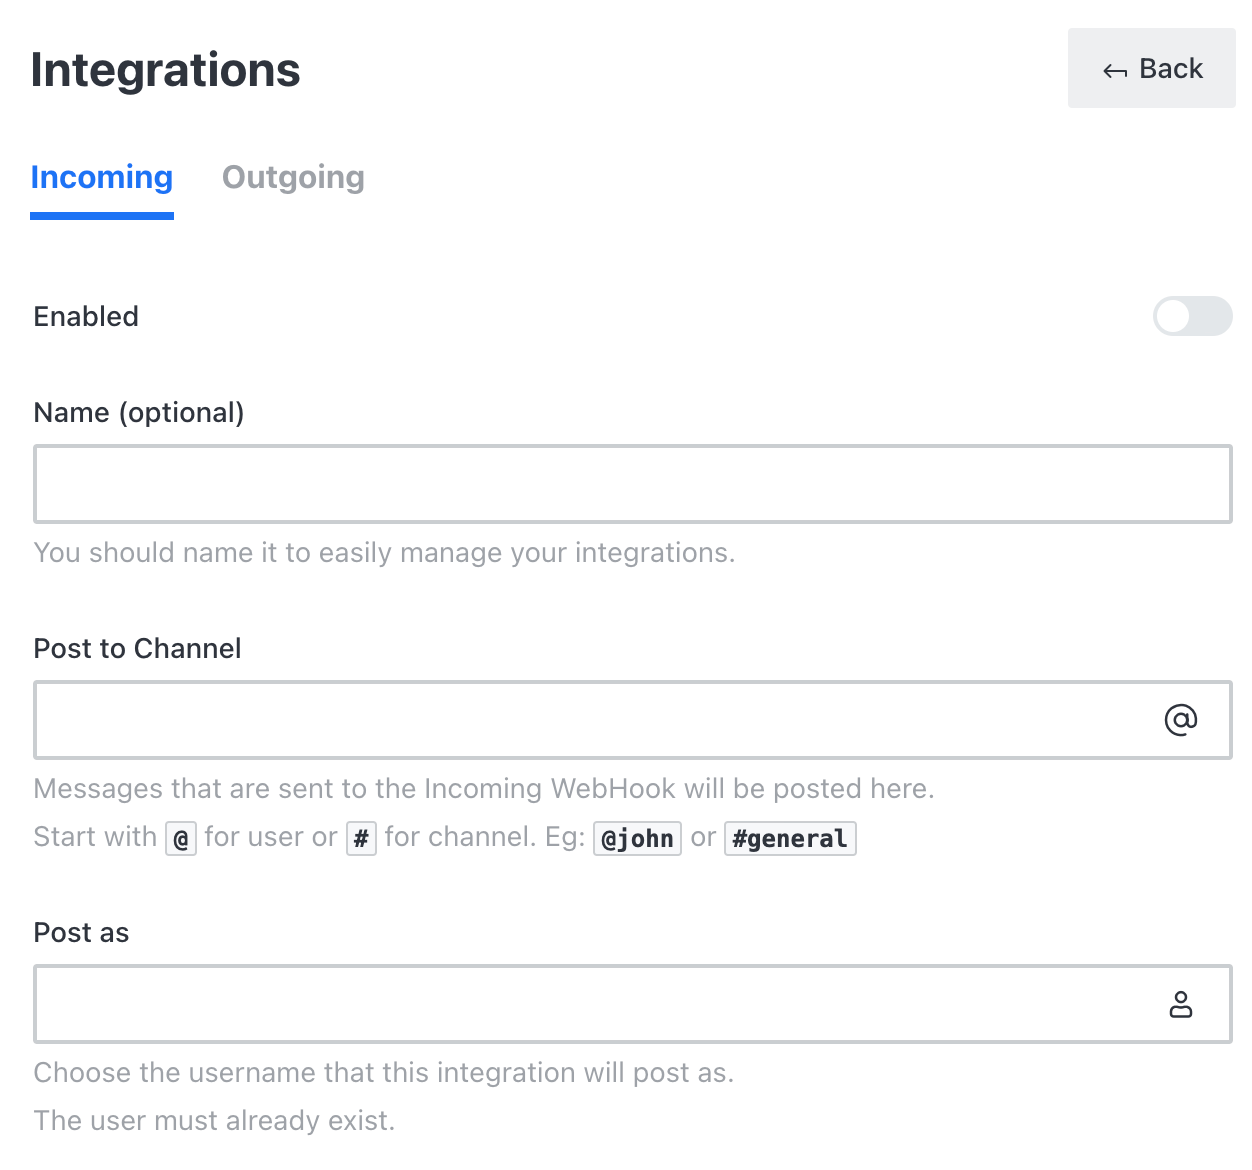
You will be creating the new incoming integration so be sure to have the first tab selected.
Enter the name of the webhook (any descriptive name you want), the channel you have in your Rocket Chat ( #notifications or something along that line), and a user account that will execute and post the message (this is Rocket Chat user).
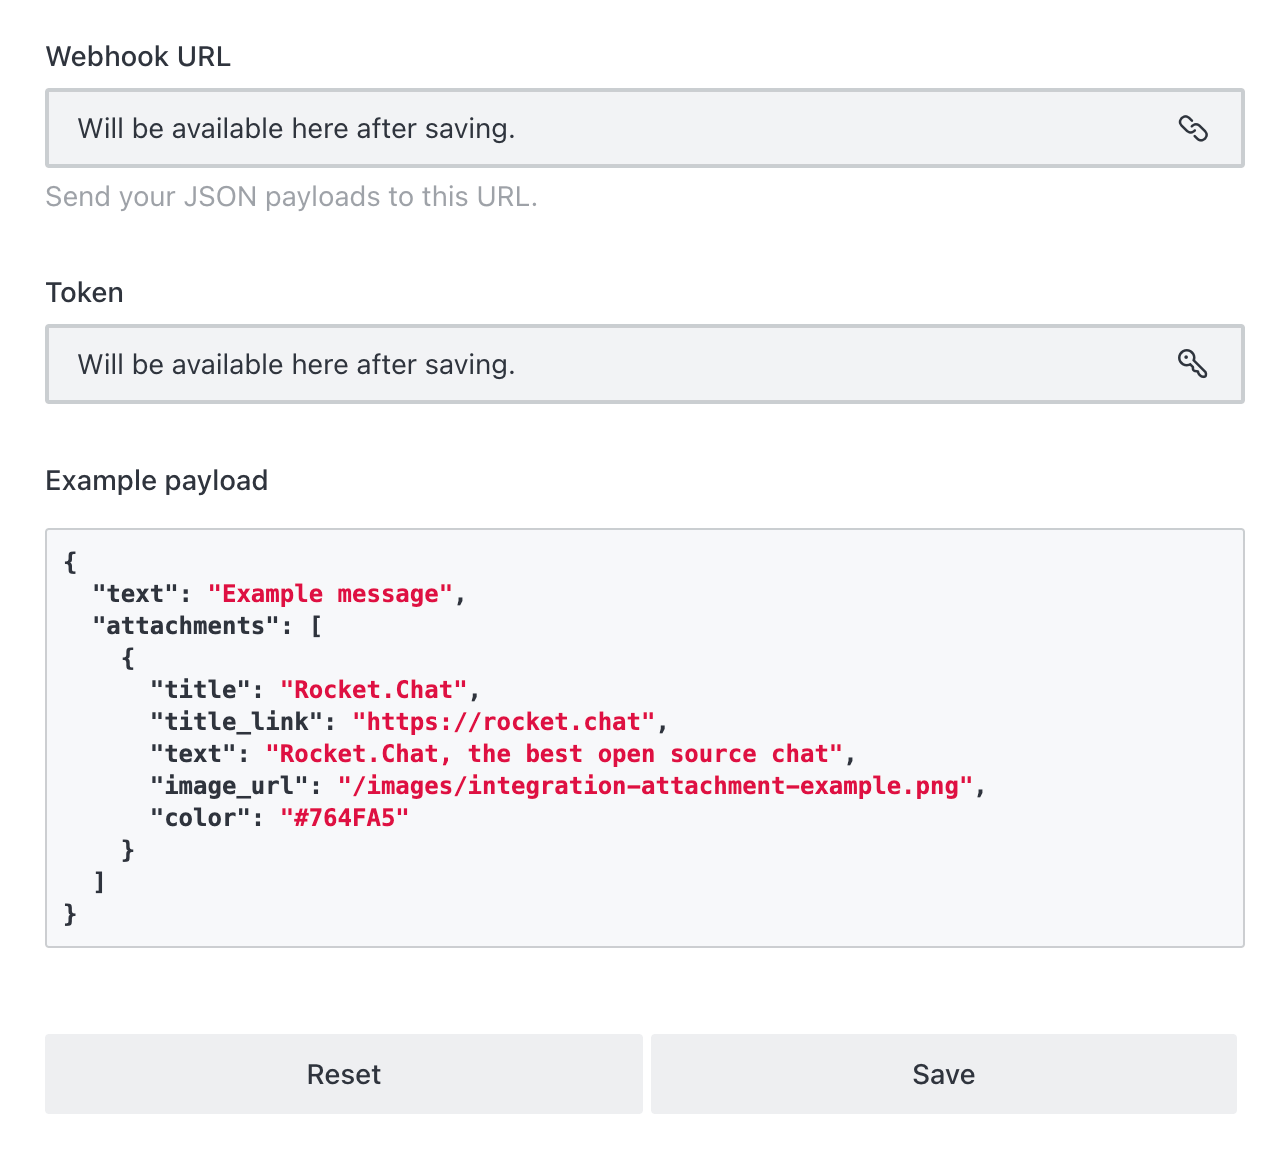
Once you have done that, scroll to the bottom and save the changes. This will now generate the webhook URL that you will use inside DSM in the next part of this article.
Finally, do not forget to activate this rule by using the Enable toggle on the top of this window (first image, upper right corner). This is very easy to miss, as you can configure webhooks and have them active or disabled however you want.
The URL will look like this example: https://rocket.domain.com/hooks/xxx...
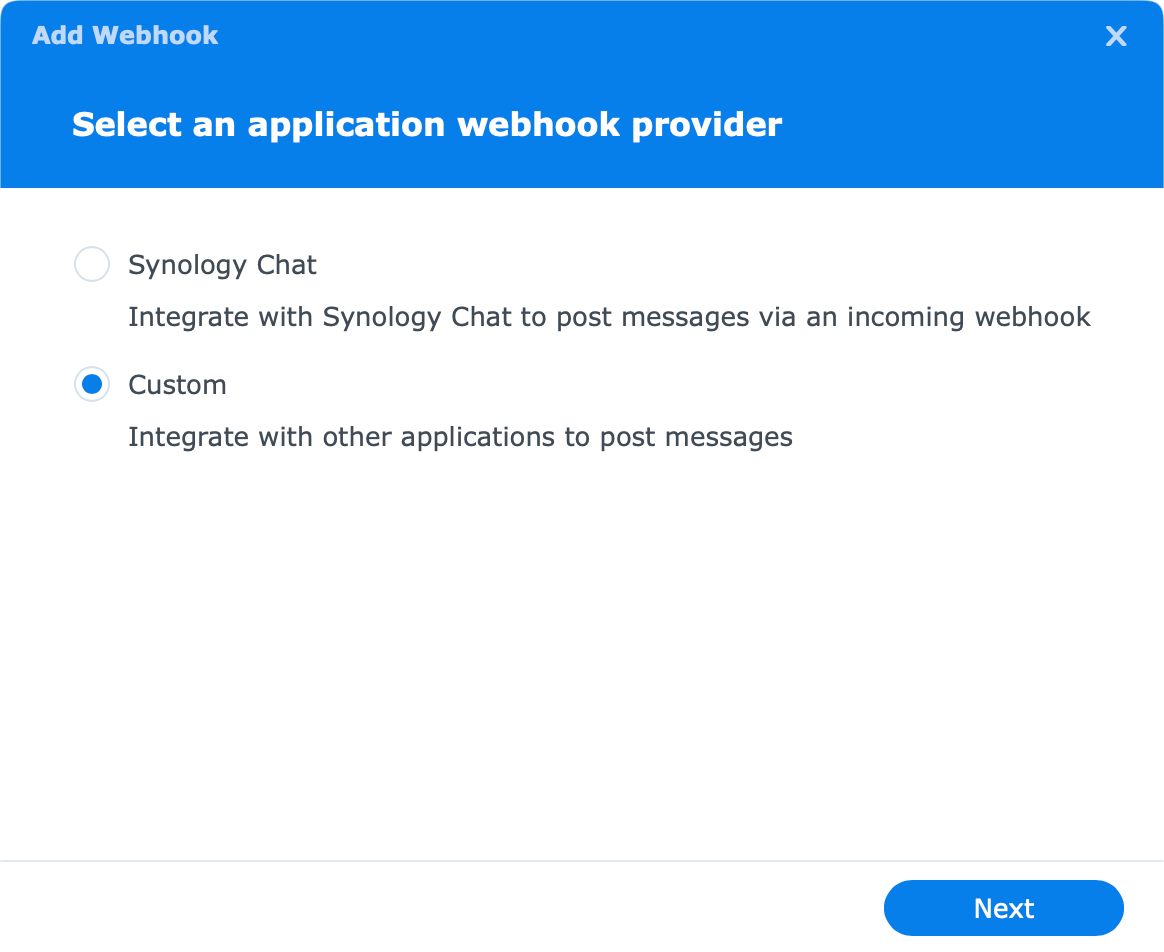
Configuration of webhook on DSM side
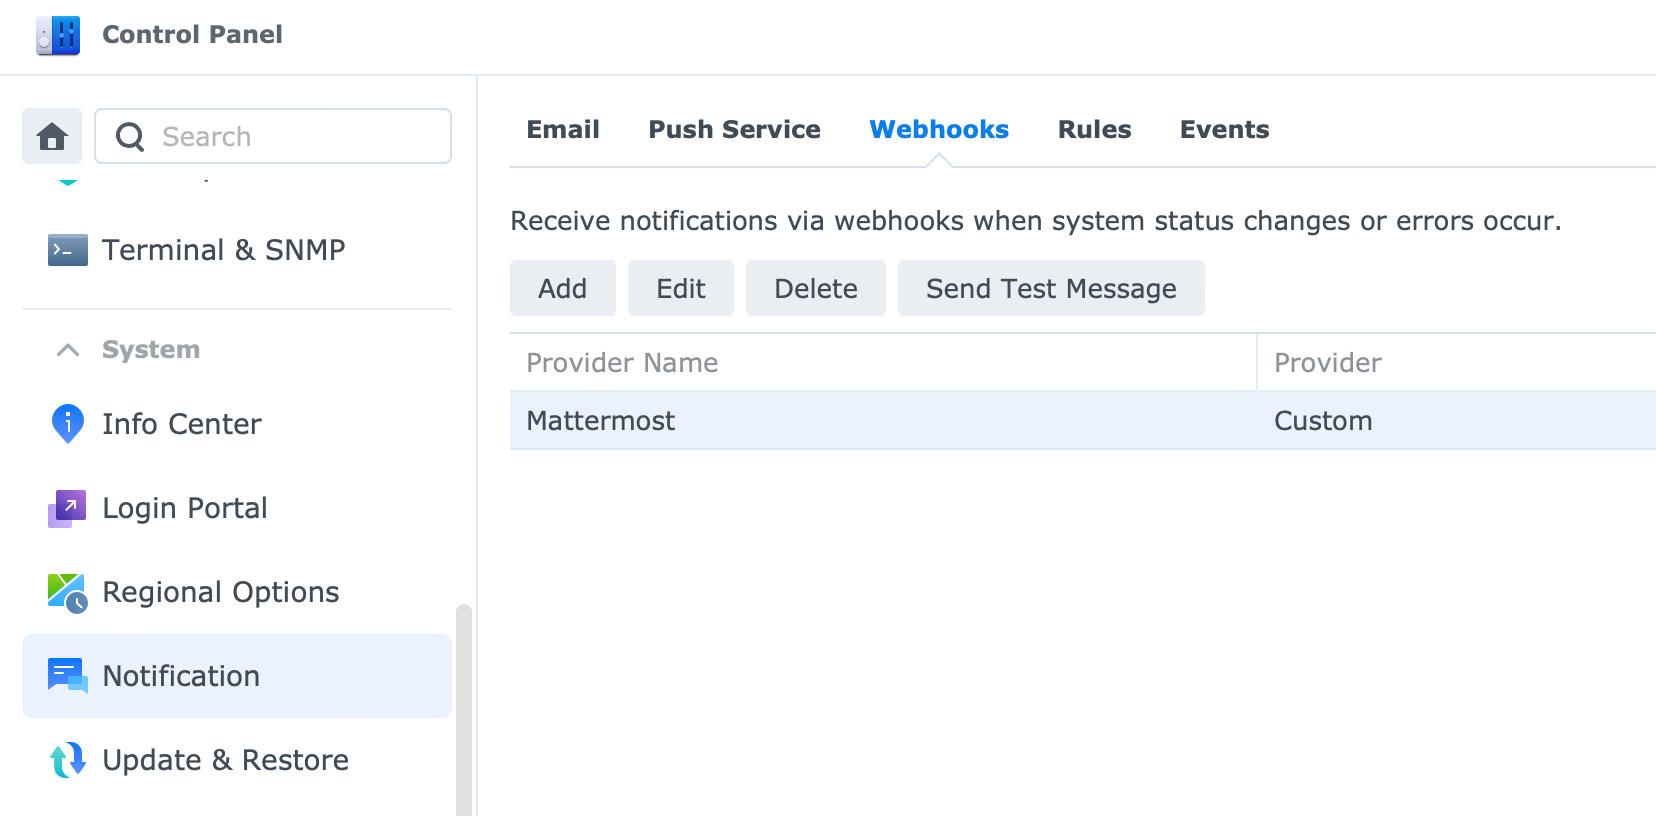
Now that we have prepared the Rocket Chat side, it is time to configure the DSM push webhook settings to work with it. Head over to Control Panel > Notifications > Push Service (tab).
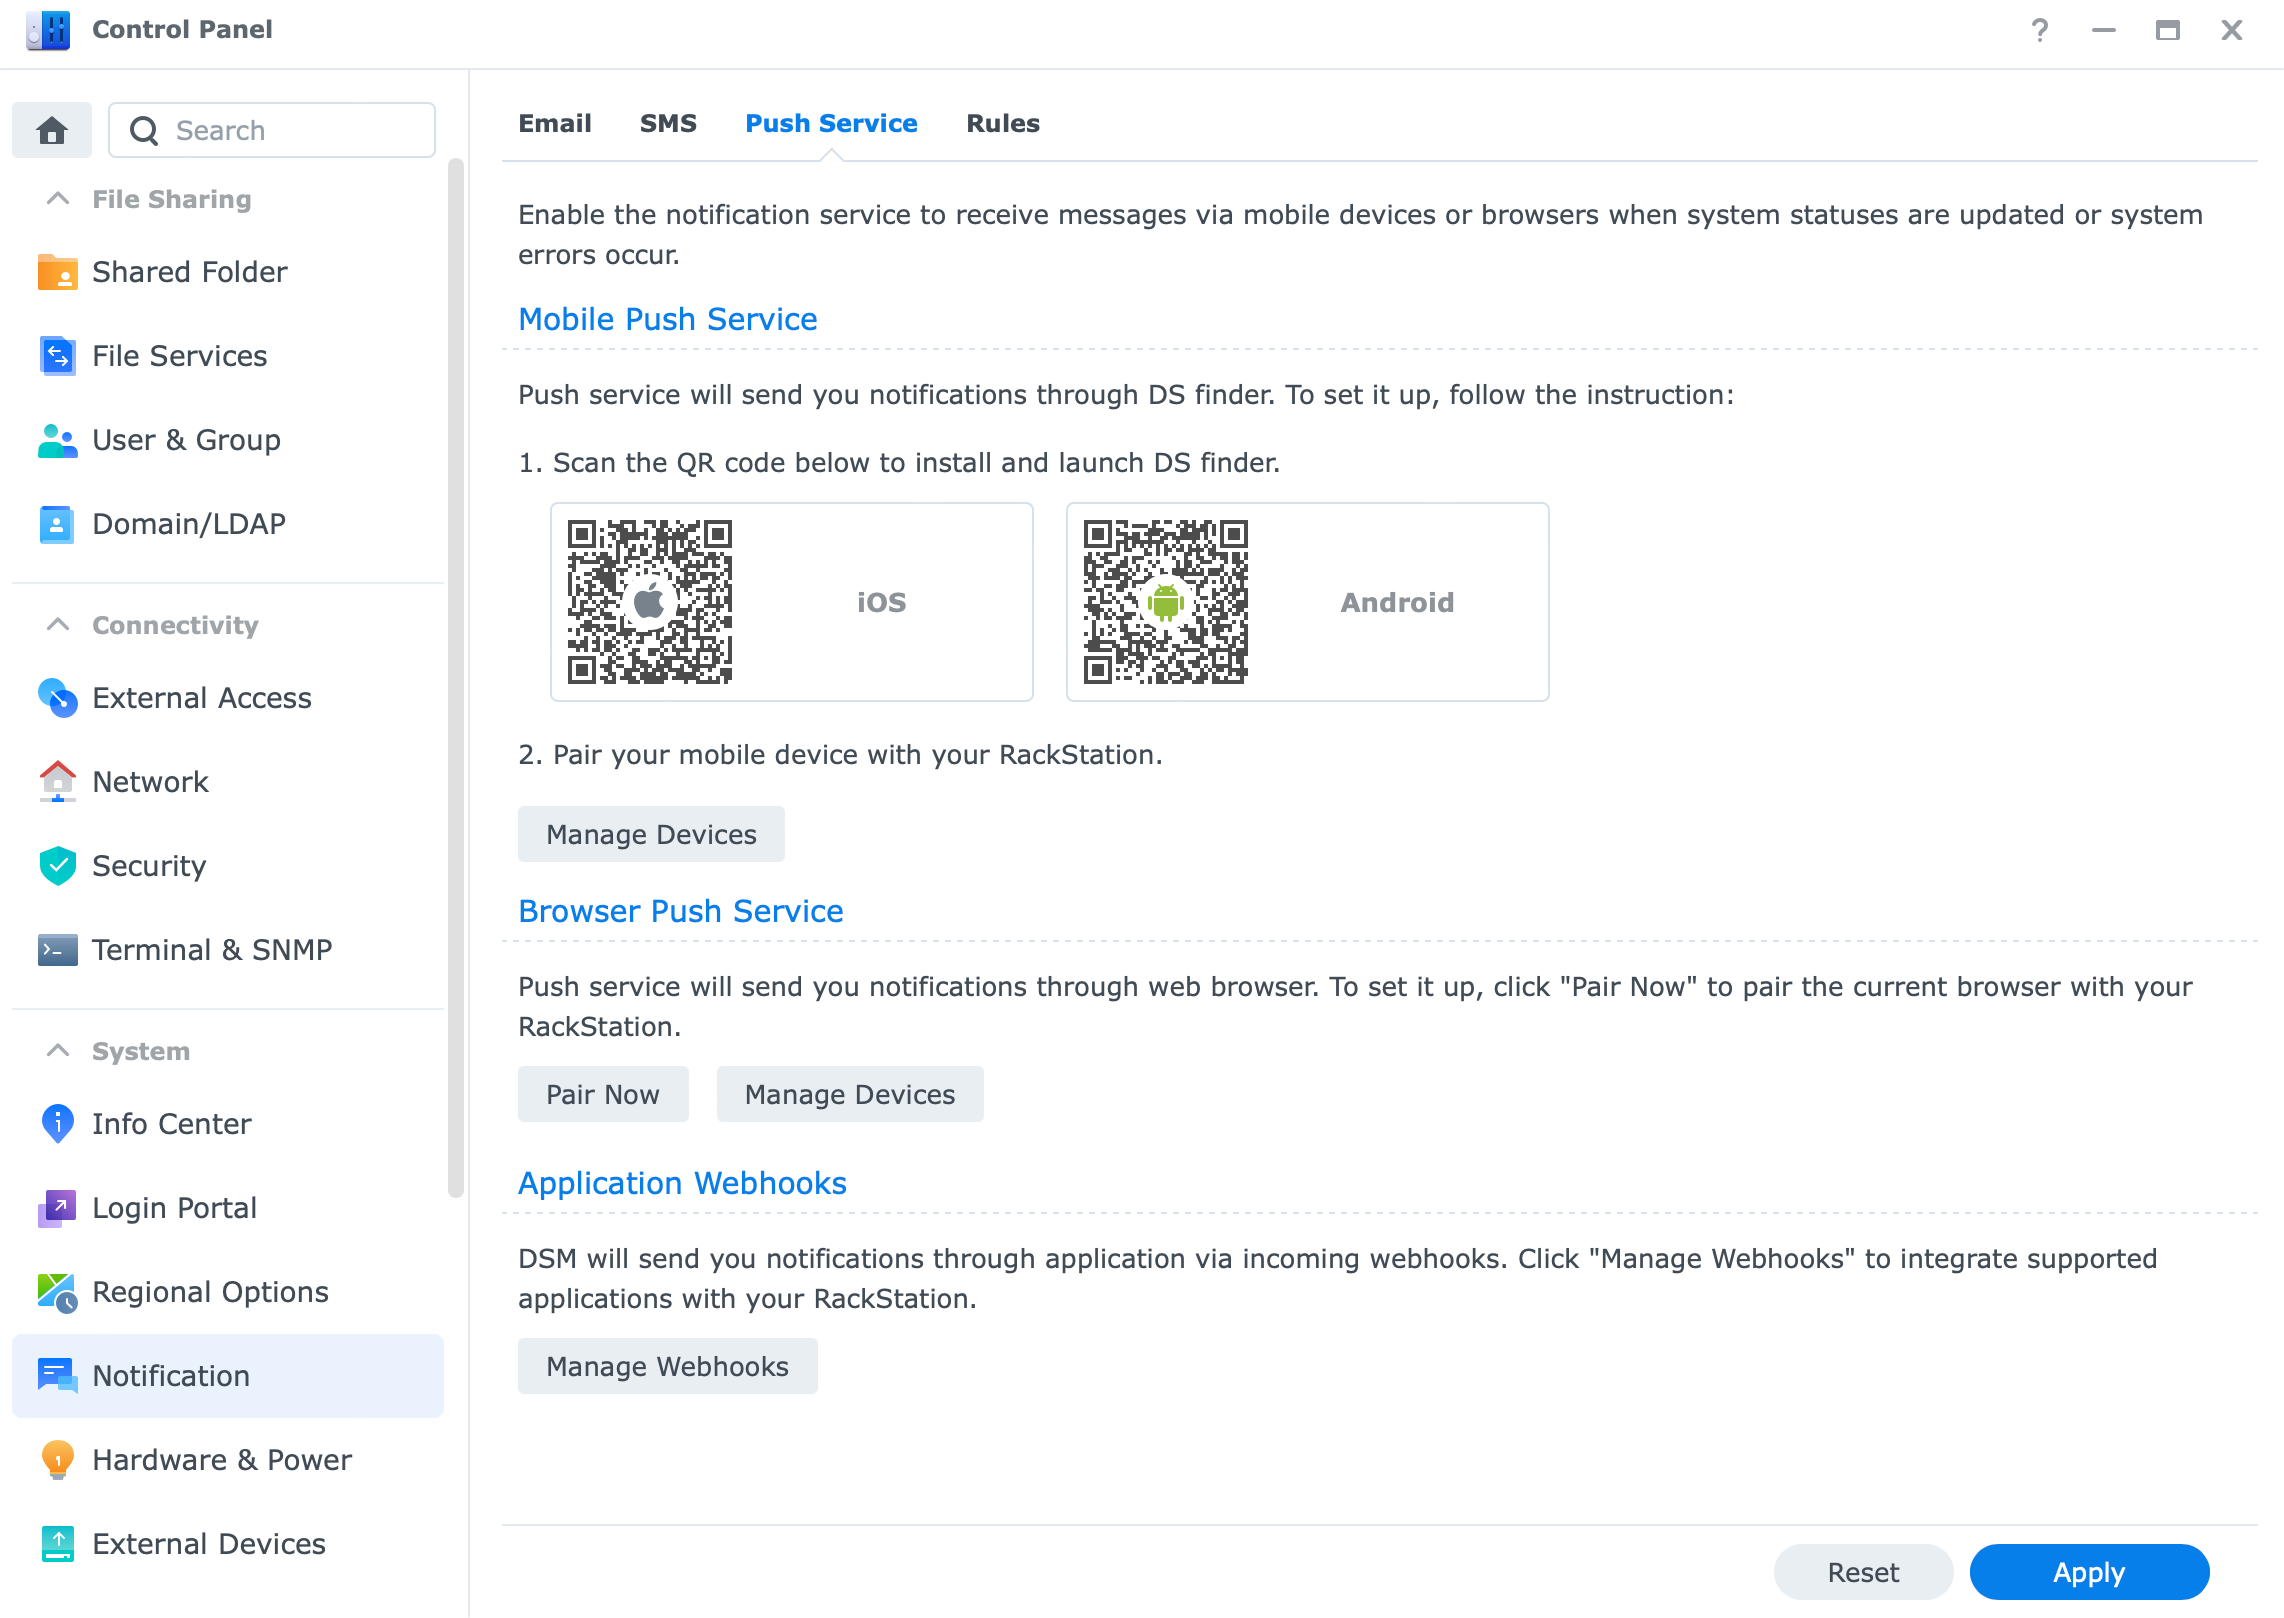
On the bottom, you will see the Application Webhooks section and a Manage webhooks button. Click it to open the dialog box.
Configure the webhook as follows:
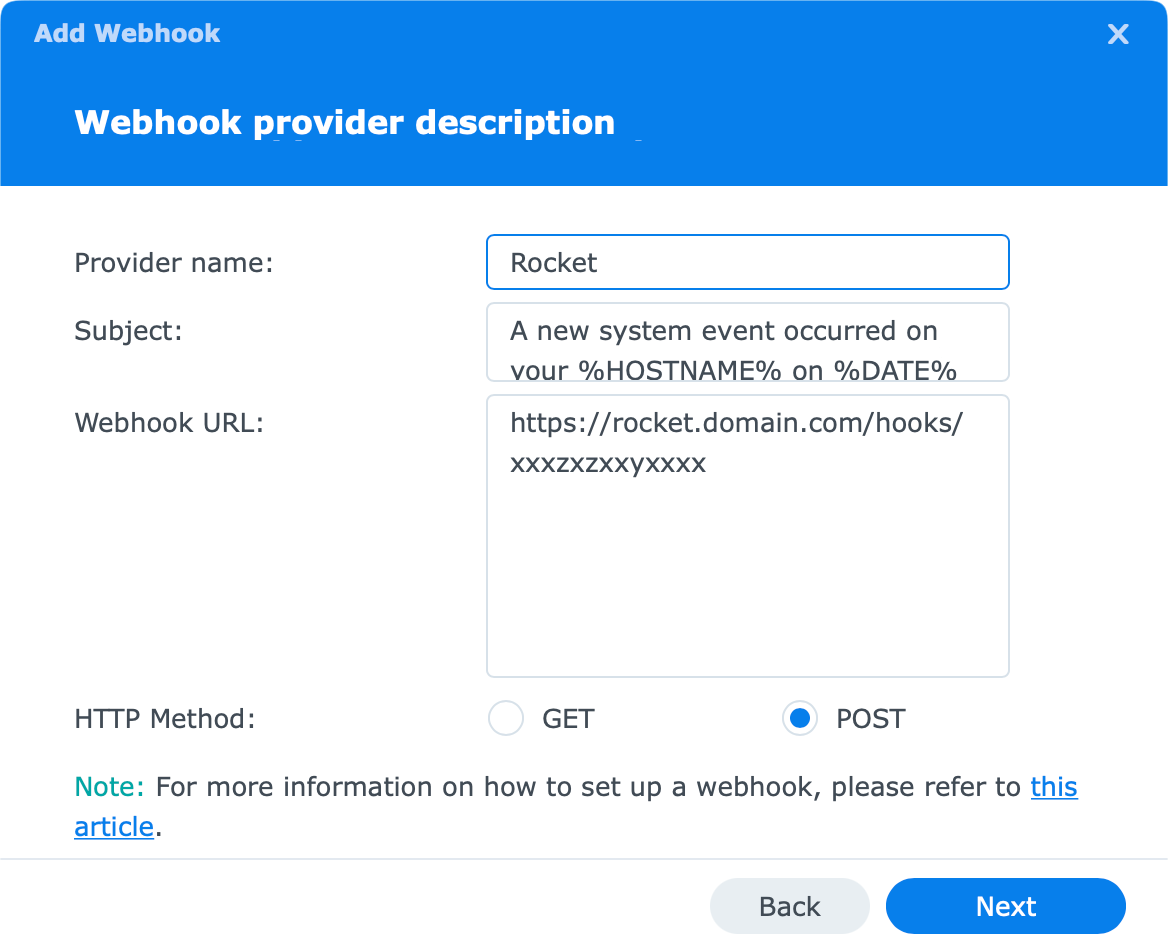
As a provider name you can enter whatever you want, and do not modify the subject line in any way. Finally, copy the webhook URL that you got from Rocket Chat.
Finally, select POST as your HTTP method. After that move on to the next step.
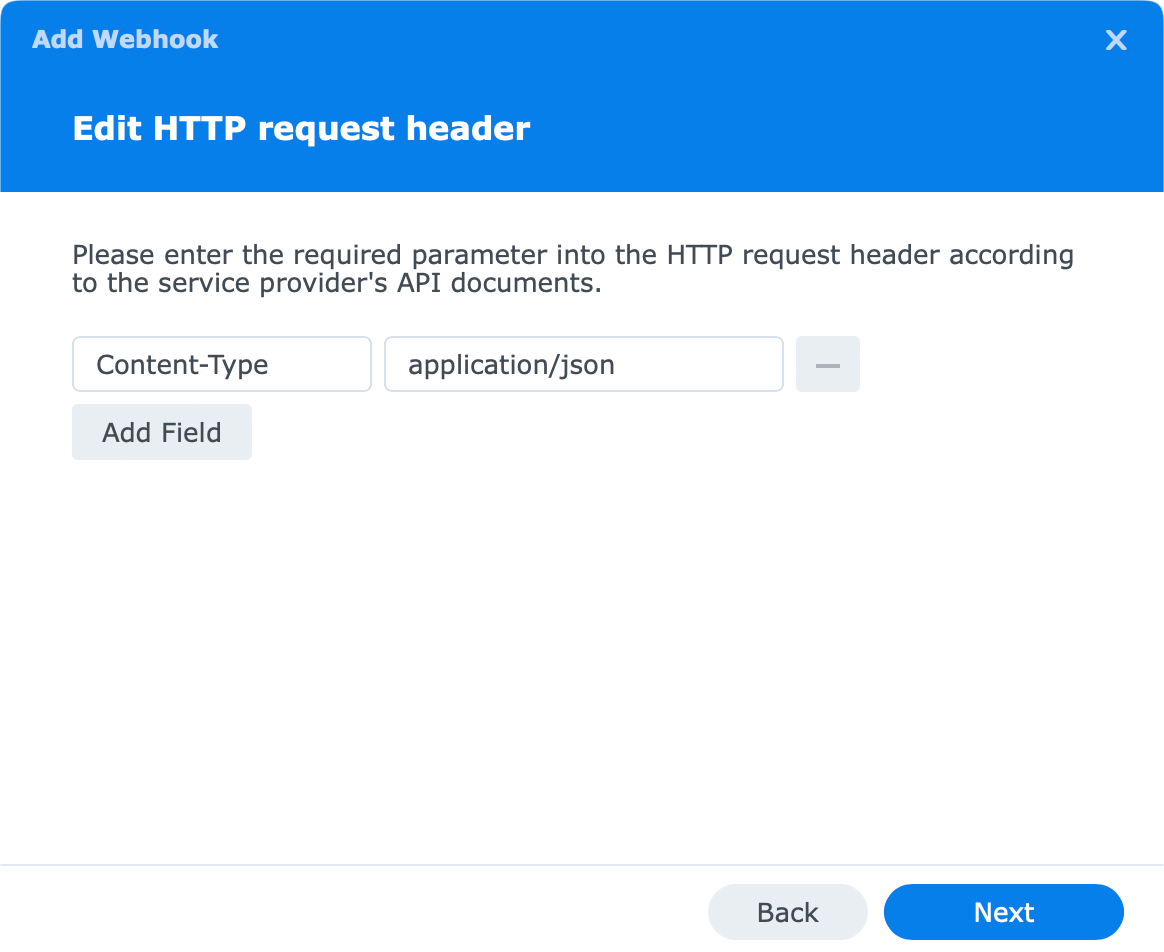
Rocket Chat when it comes to headers uses Content-Type with this exact value, so in this case, you don't have to add or enter anything, just move to the next step.
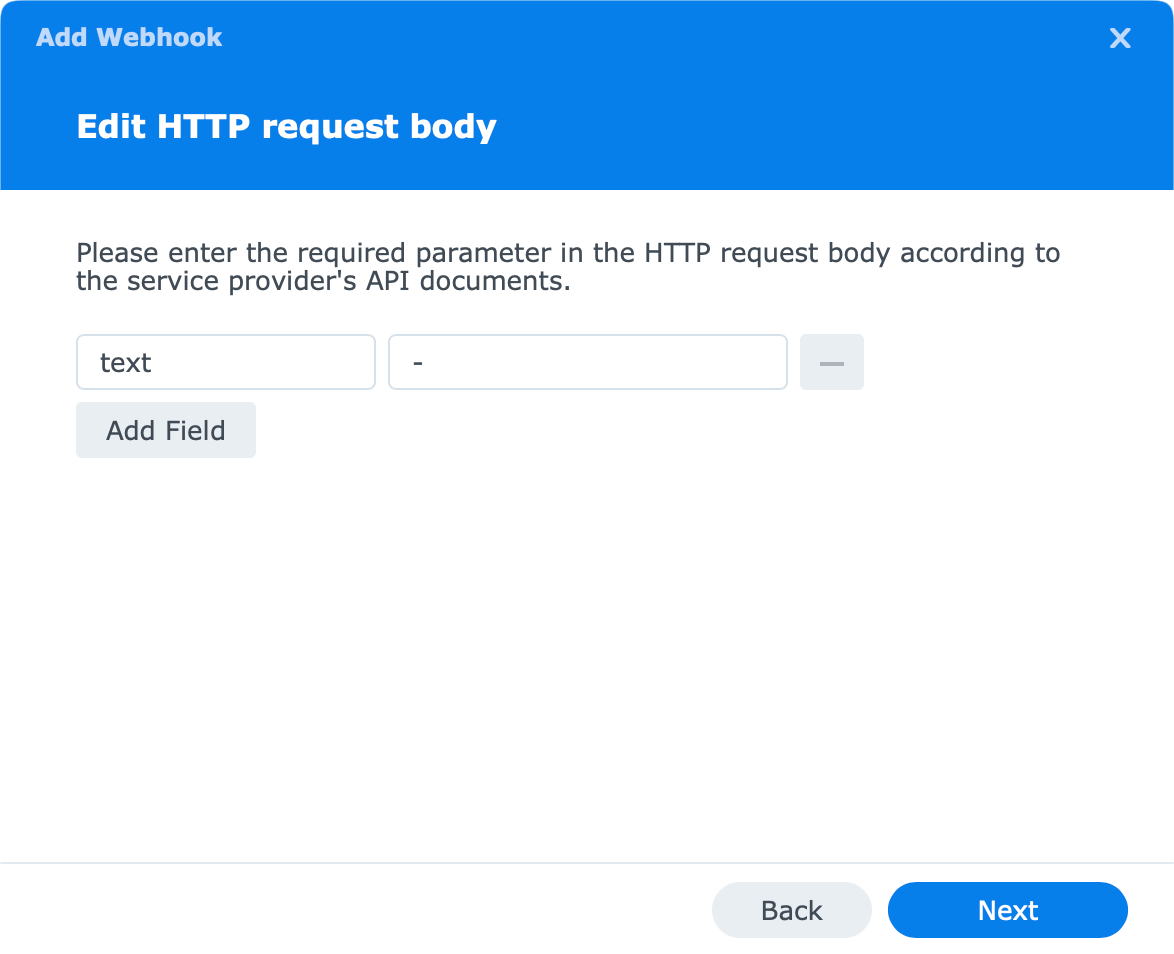
For Rocket Chat we do need to add a single field that will contain the body of our message. Enter text as the parameter and - as its value. Nothing more is needed so on to the final step.
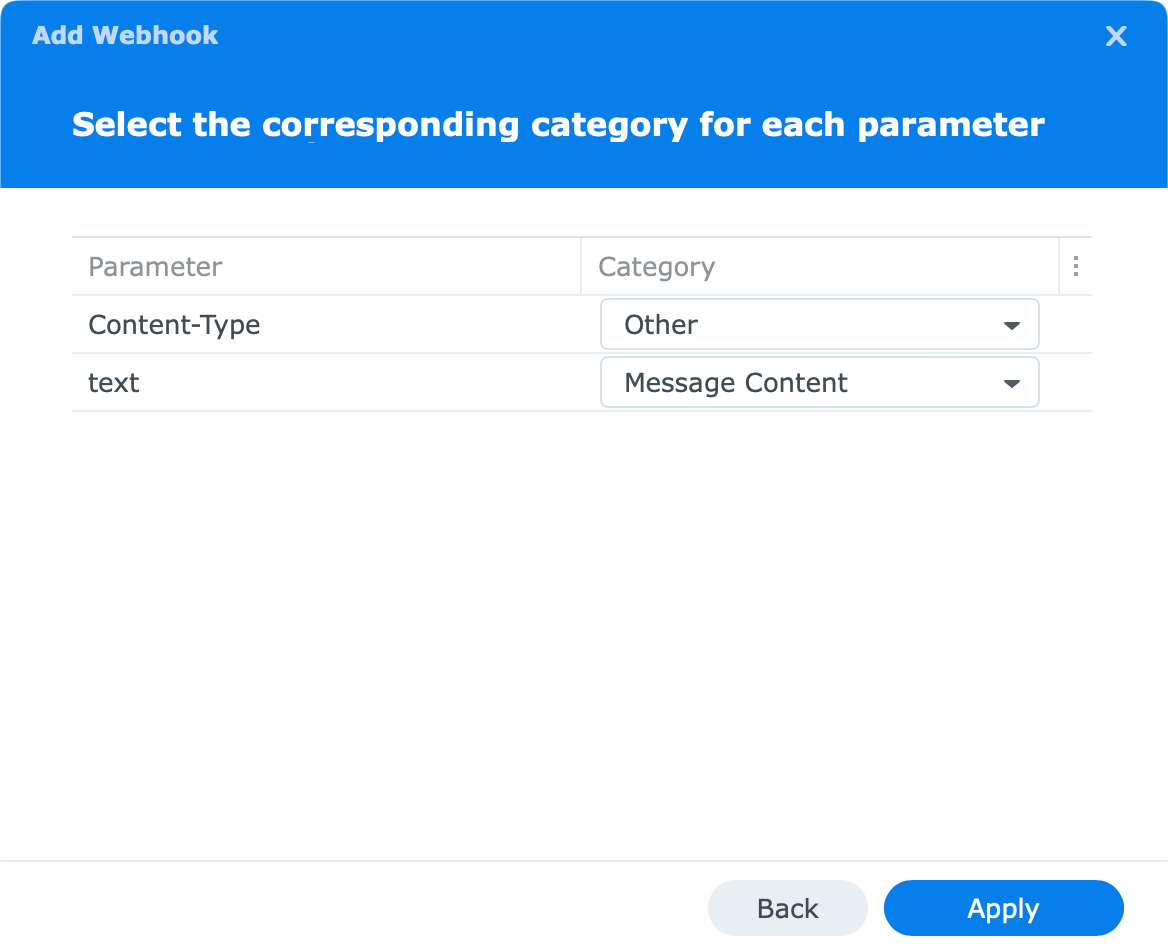
In the final step make sure to map the Message Content category to our text parameter. After that is done, click Apply and you are done.
Testing the webhook
Now that we have everything configured, you can use the Send Test Message button in order to see if your webhook works. If all is well, you will get similar results in your Rocket Chat channel.

That's it, now you can get your DSM 7 powered NAS notifications inside your Rocket Chat UI without the need to use other push services or fill up your inbox with emails.
The benefit of webhook push notifications unlike classic push notifications is that they will remain in your history as part of the channel, so you can filter and search them as needed.
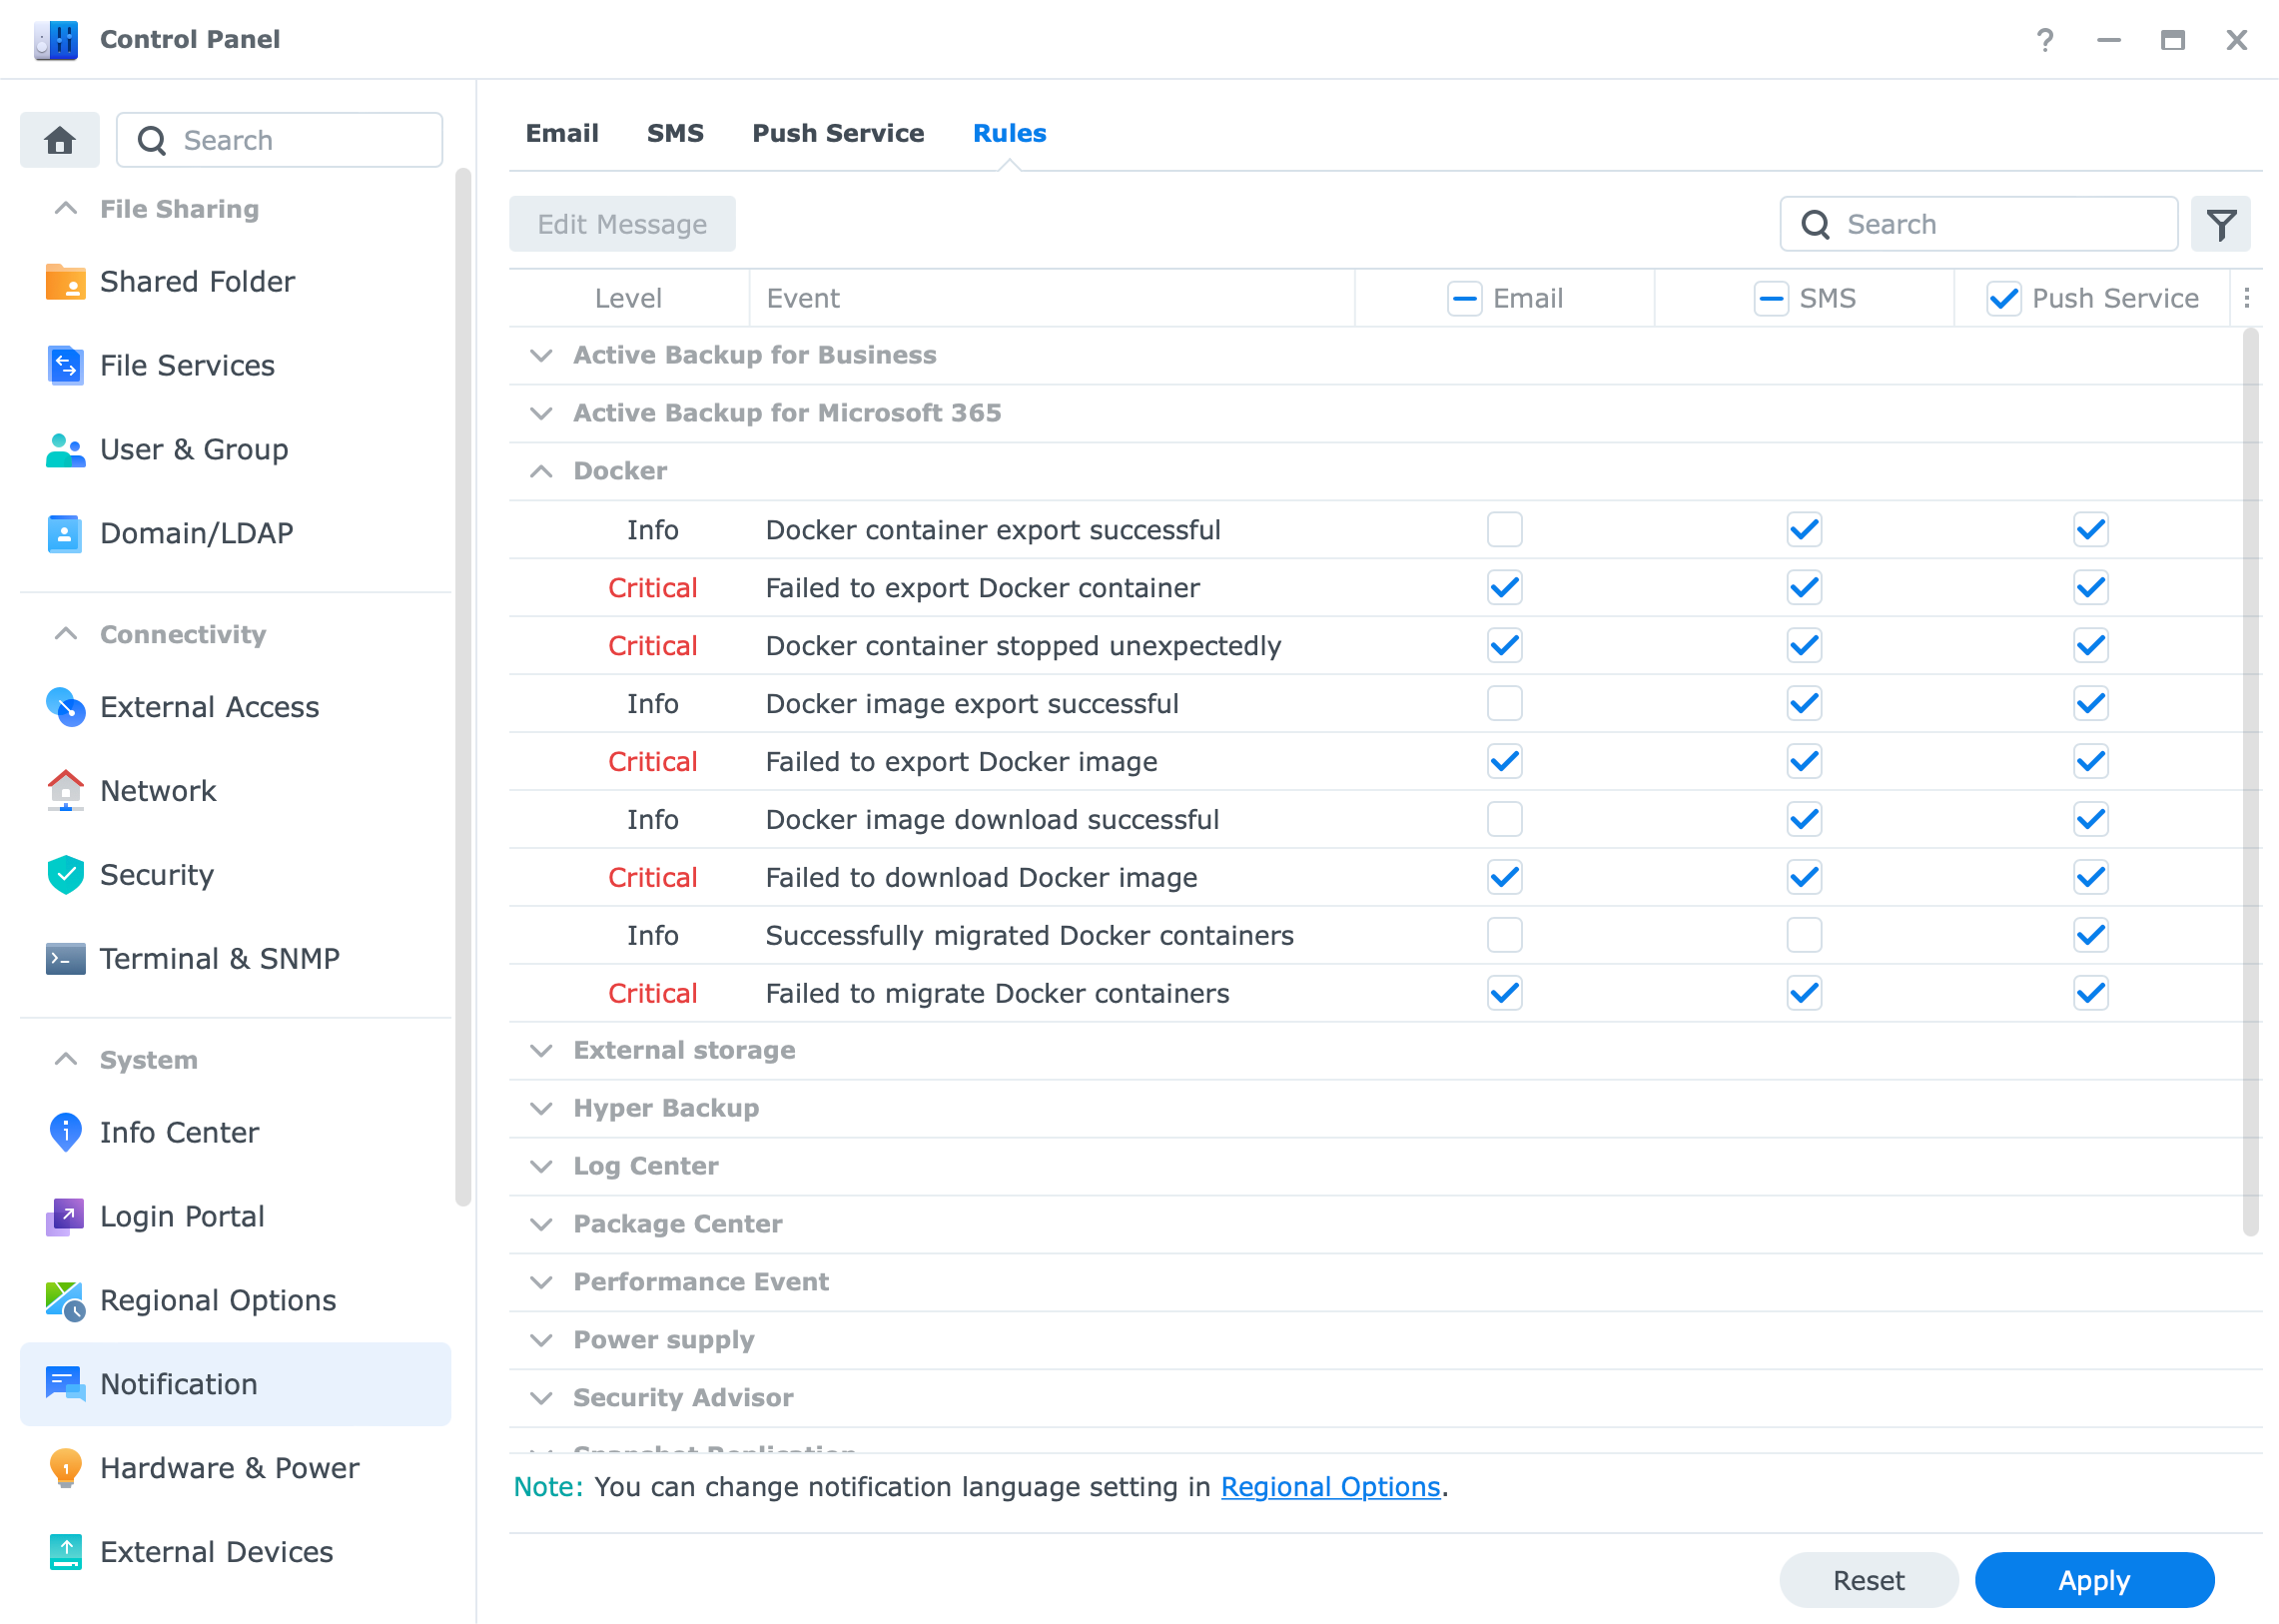
Finally, use the Rules tab inside the Notifications section to select what exact notifications you want to receive via the push method.
Configuration of incoming webhook inside Mattermost using DSM 7.2
Same as with Rocket Chat, we need to have the Mattermost chat instance up and running. Once we do, we can use the main menu and open up Integrations.
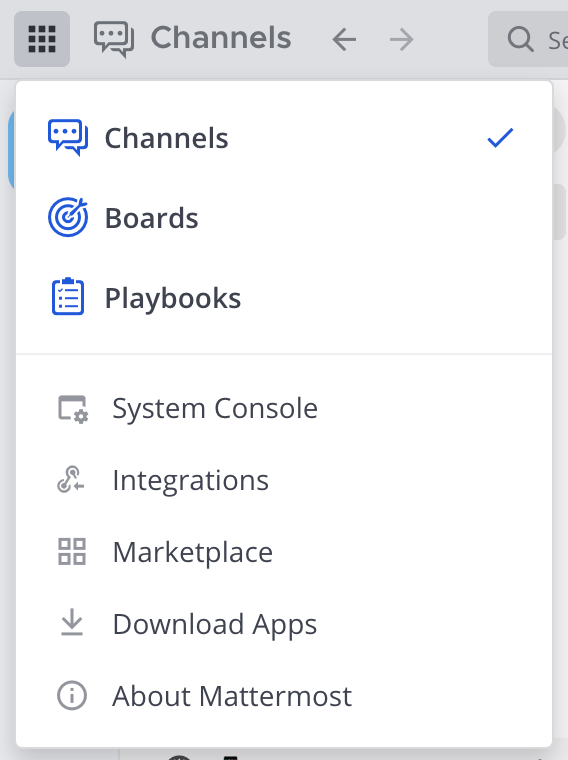
Inside, we will see several options and the one needed for this is again an Incoming webhook option. Select it to continue configuring.
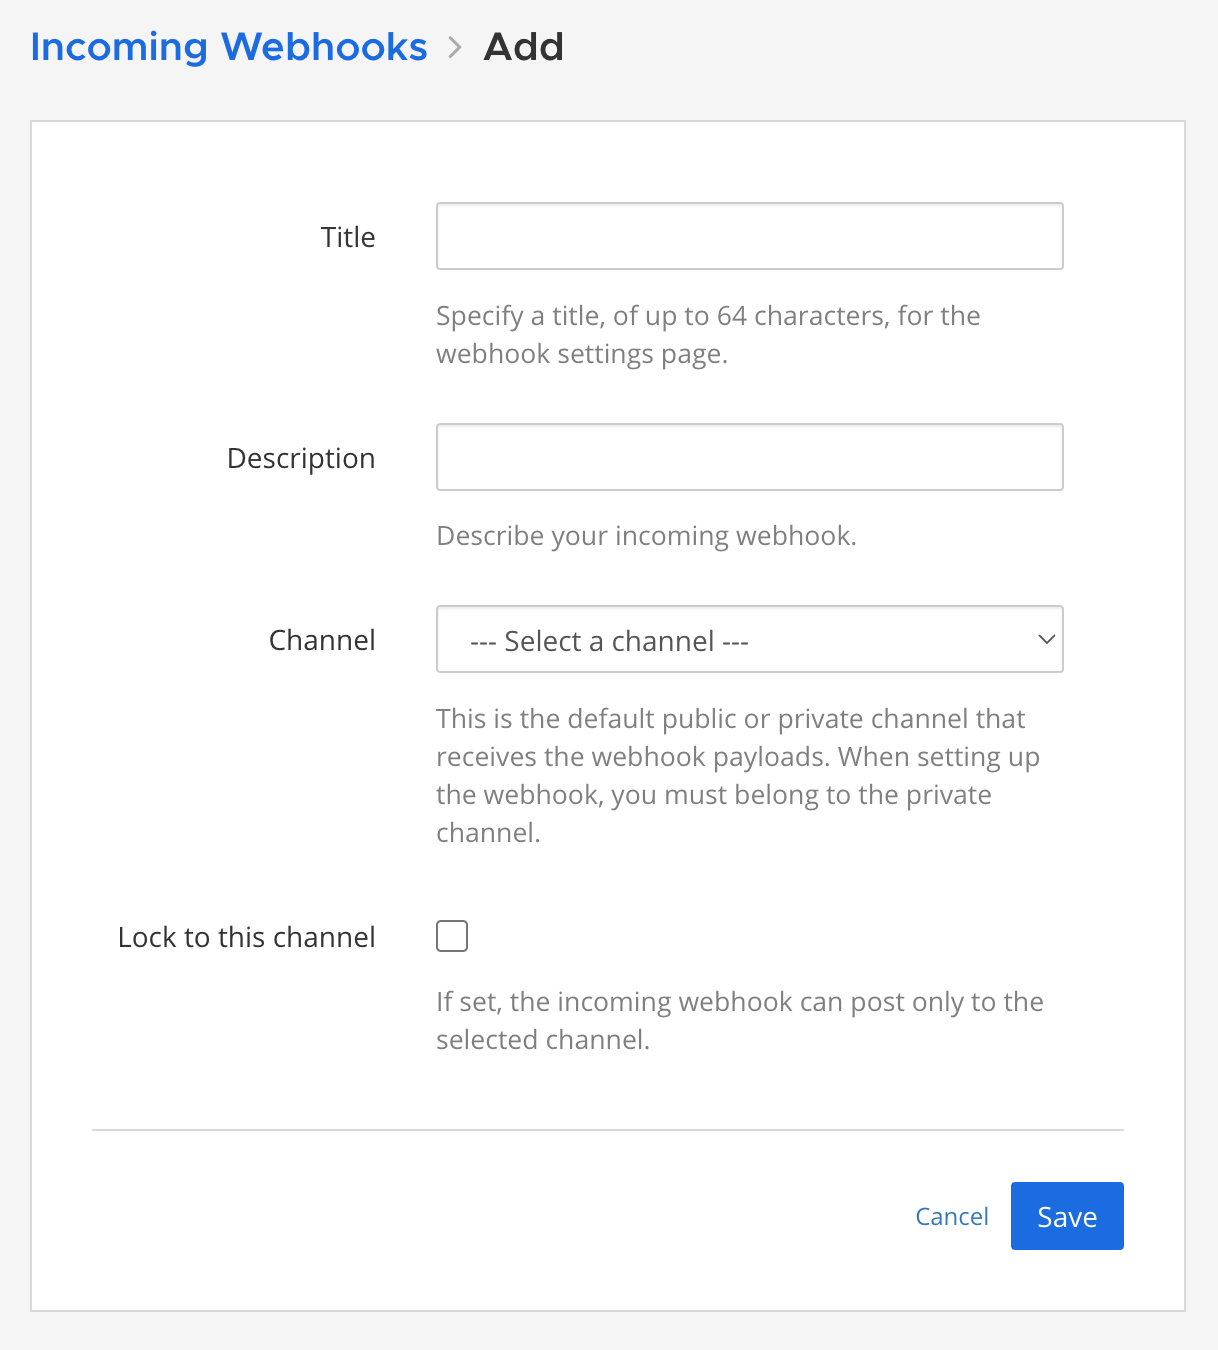
We need to enter the Title, as well as the Channel where the webhooks will land. This can be either a private or a public channel. Finally, we click the Save button that will return us to the incoming webhook window and list the URL that we will use inside DSM push configurations.
The URL will again be in a form of a public link similar to this: https://chat.domain.com/hooks/lvopuenldbl231nkj43ll59bnq
For now, we are done, as with RC, we move into DSM in order to configure the generated URL.
This example will be based on DSM 7.2 as certain changes have happened since DSM 7.1 in terms of UI changes and some new features, but nothing directly related to webhook integration with Mattermost. That being said, similar steps can be used with DSM 7.1 and they should work just fine.
Just like in DSM 7.1, Notifications in DSM 7.2 are still inside the Control Panel.
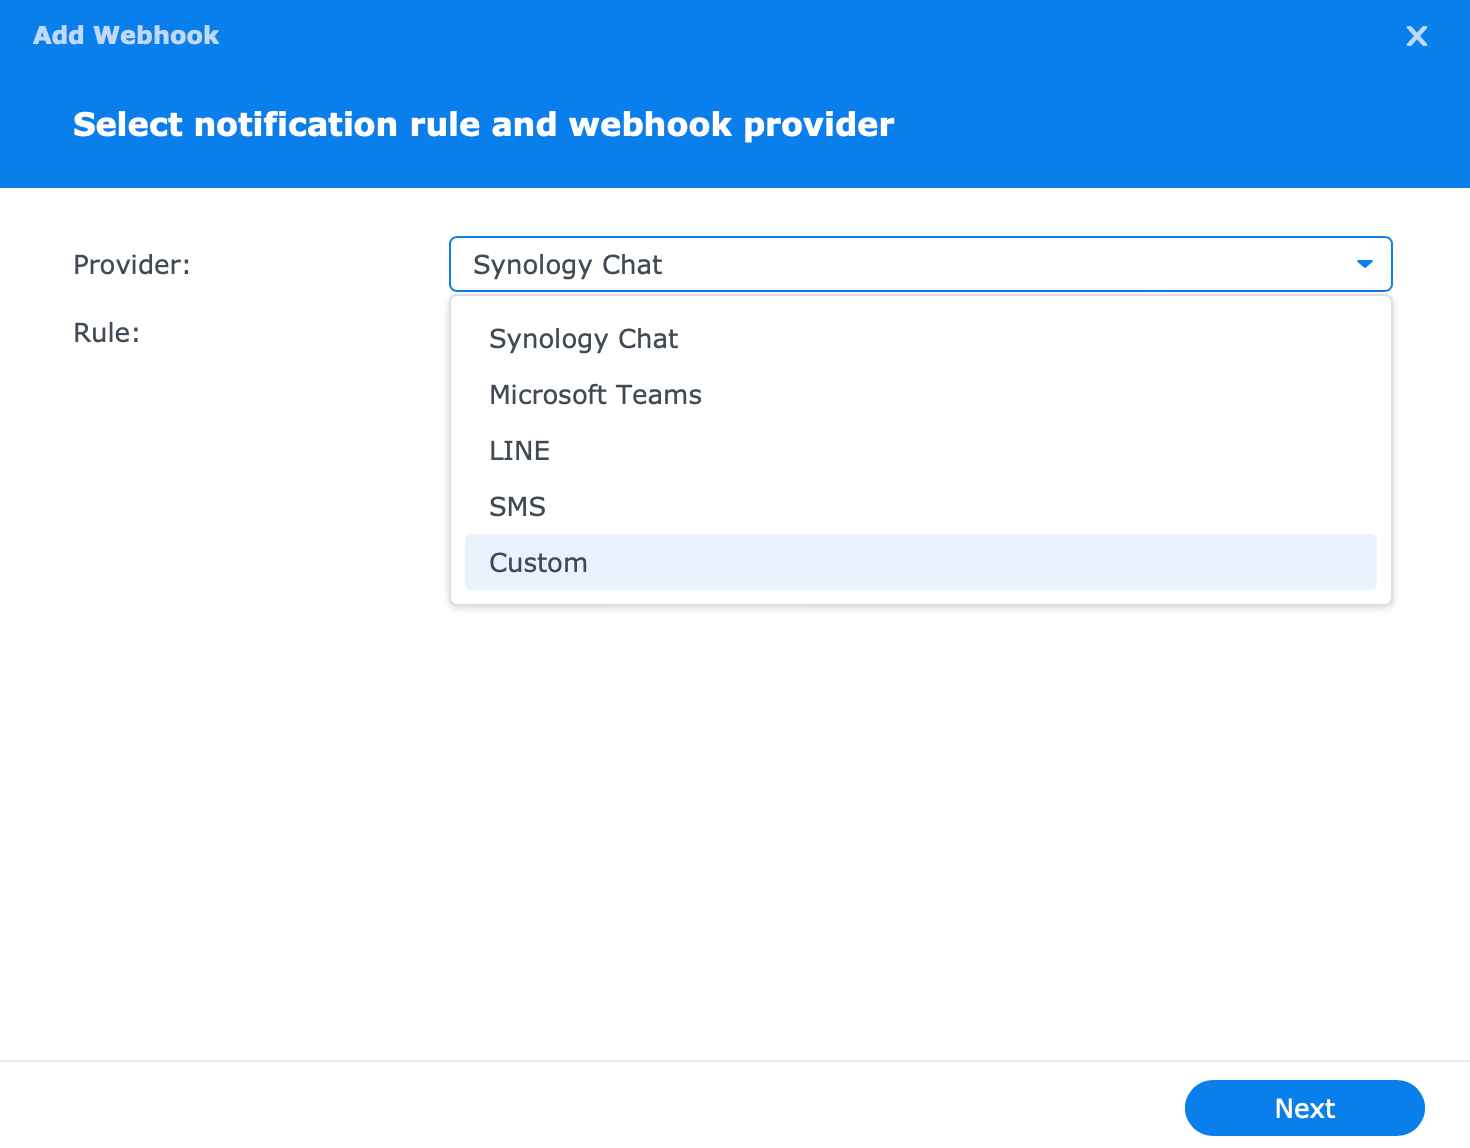
Clicking the Add button will start the wizard as expected but this time there will be several more options to choose from. Regardless, we need to select the Custom option on the bottom to make this work with Mattermost.
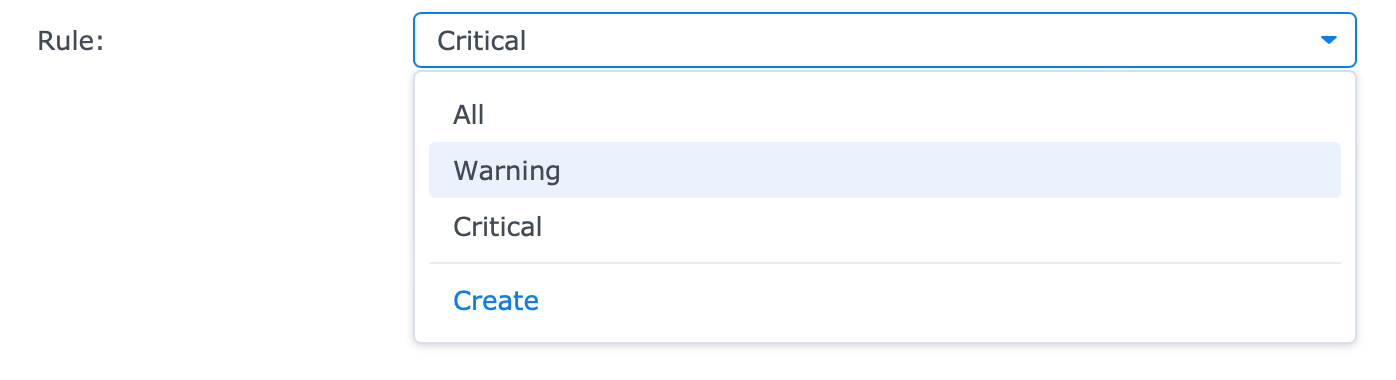
DSM 7.2 has added the rules option as well. Directly linked to the tab of the same name we now have the option of creating our own rule and selecting options that matter to us the most. This is a personal preference so I will leave that for you to decide what to select/create.
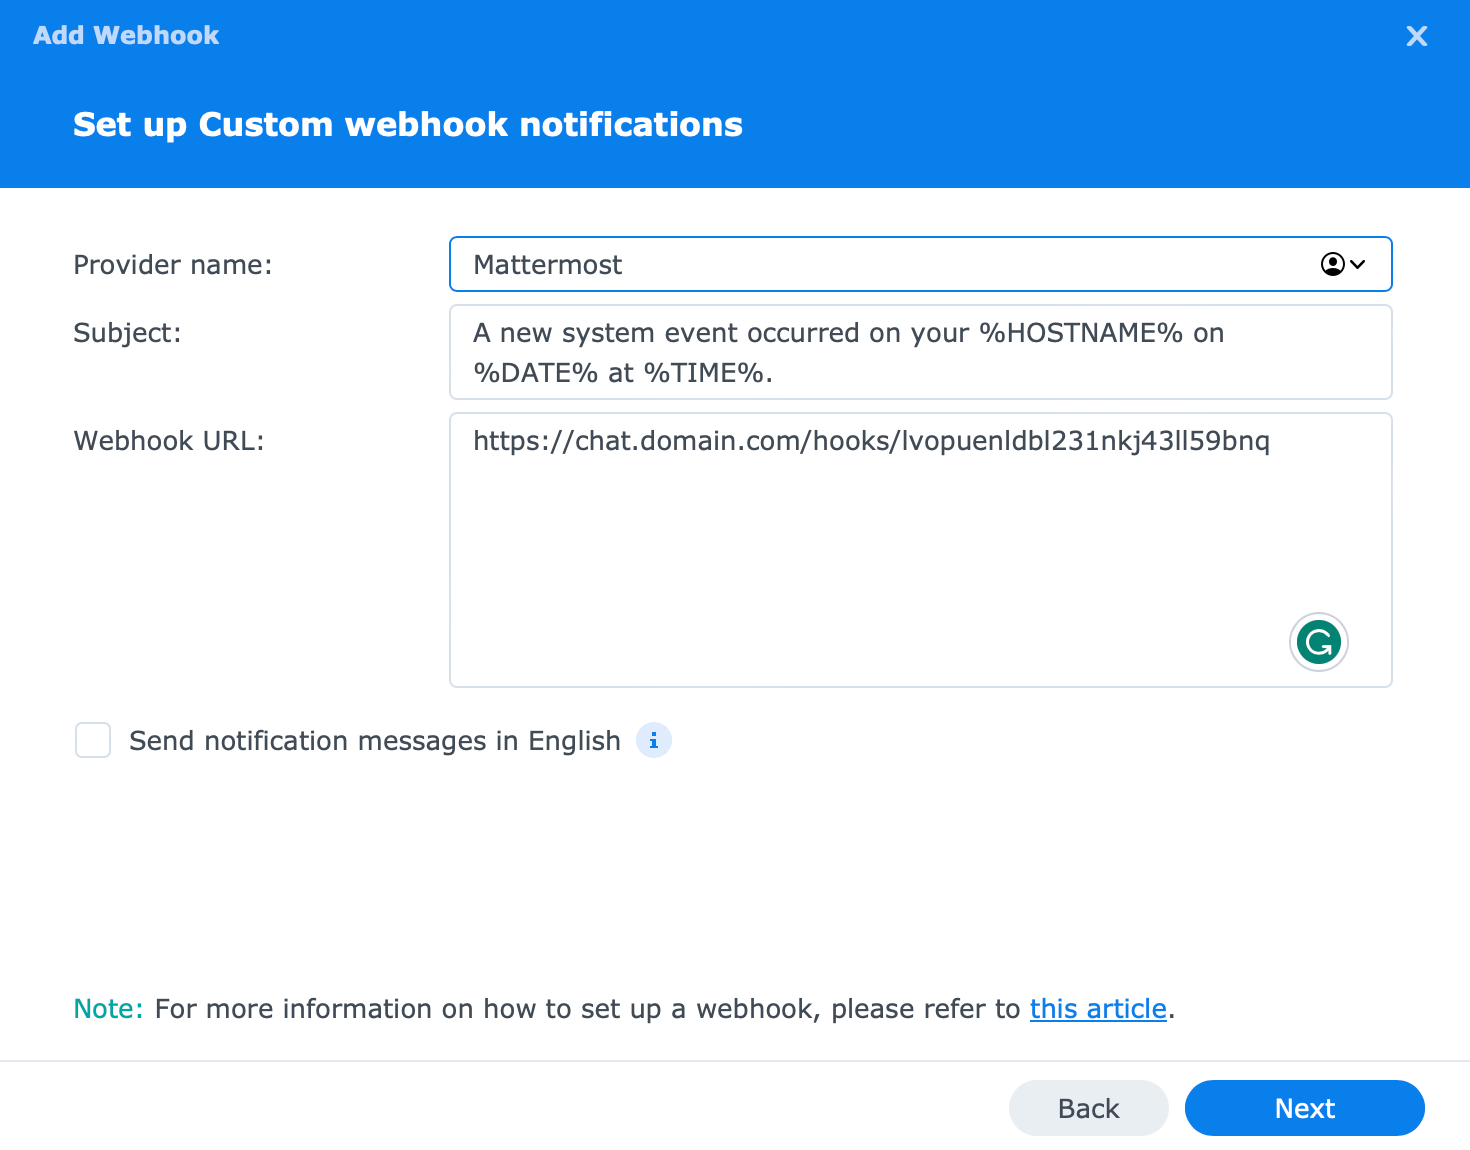
In the next step, we need to give this future webhook a name and the URL that was generated for us by Mattermost.
The final step of this process is the webhook payload configuration. Considering that the Mattermost documentation is up to date and very clear on this, the settings that are needed to allow DSM to send push notifications using webhook are the following.
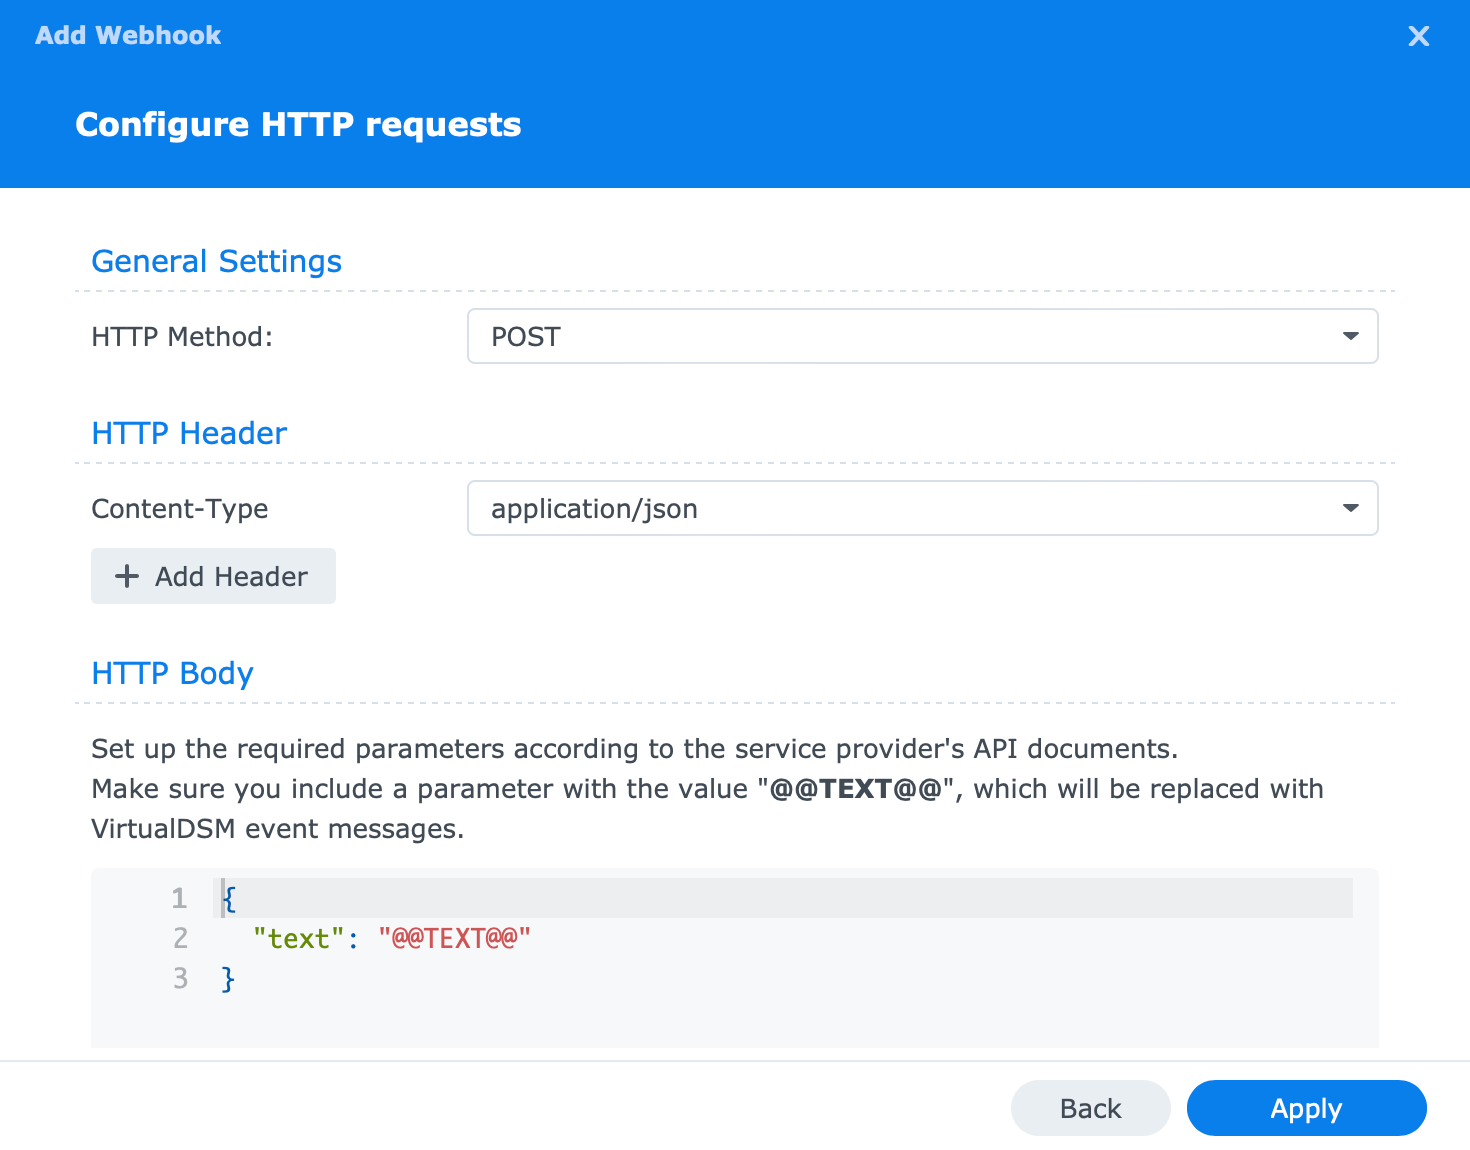
We need to configure the HTTP Method as POST as we want to send the date outside DSM OS. For the HTTP Header we configure the content type as application/jason as that is what Mattermost expects. Following that, the HTTP Body will be configured for us in terms of a single "text" variable. This is good as we do not want to change anything here if we want to get the full text of any message that DSM will send us.
Once that is all done and sorted, we click Apply and that's it. We can use the Send test message button inside the webhook window to see if the notification will land in Mattermost.
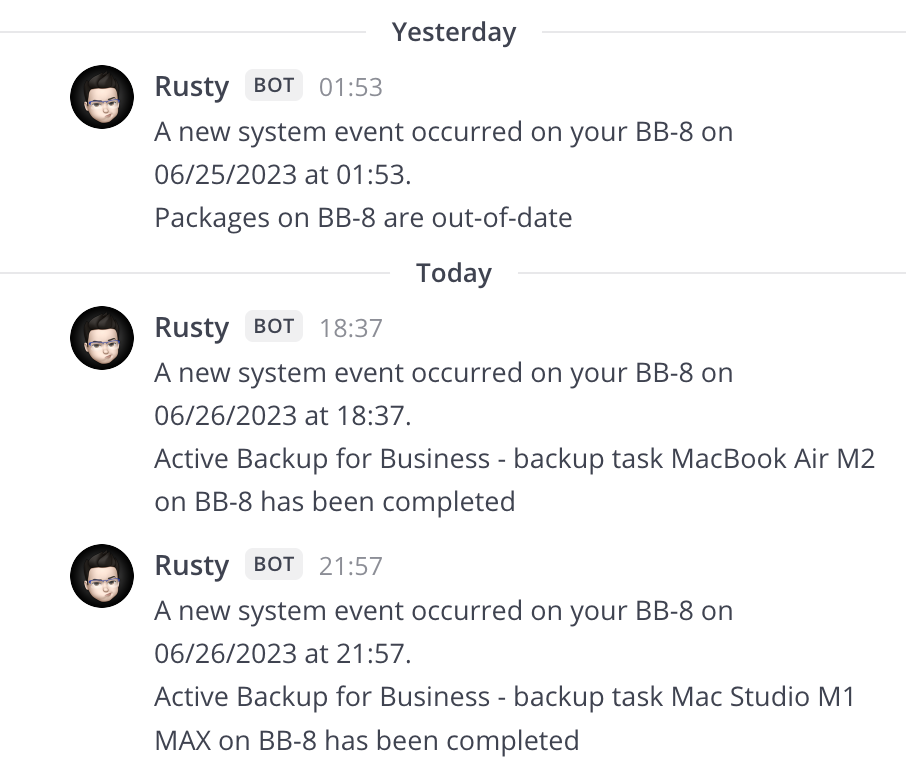
The image above is an example of how notifications from DSM 7.2 look inside Mattermost coming in via webhooks.
Hope this will come in handy, and if you have any questions, suggestions, or comments, leave them down in the comment section.


