How to join a Mac in Microsoft Active Directory?


If you came here wondering the same questions, I have some bad news. I haven’t been able to join my test Mac into my MS ADDS. Yet.
The reason for this article is to cover all the steps that were taken so far regarding testing and Kerberos configuration, etc, in an effort to bind a macOS based device into a working Microsoft ADDS.
Why join a Mac into AD in the first place?
Now, this is a valid question. All in all, joining any directory service such as ADDS by Microsoft will not benefit as much as a full-blown Windows PC. Reasons? I will not get into it now in this article but there are many. Keep in mind that accessing network resources in a Microsoft domain can be archived without the need to be a member of the domain. Of course, if you need domain credentials to access those resources you will have to join, so there, that is one reason to do it. As much as there are pros and cons this depends on your company policy and it is best to leave it up to you and your needs.
So what are my needs? Why am I so determined to make this happen? Short version, Office 365. Long version? Keep reading.
So our company, as many others as well, has decided to move part of our services off-premise and into the cloud. Office and email to start. To make this work, of course, we had to sync our Active Directory into the could as well, and now that that is all done, we can start using our O365 (so all Office apps (Teams included) and email) in the cloud. Simple. The problem now is that we are a 99,9% Windows-based company and with only 10 or so macOS based devices. So, if you want to run O365 version you can run it only on devices that are members of the domain (this is true for your scenario just to be clear). What this means is that any device that is not a current, active, member of the domain, will not be able to use any of O365 services.
Finally, we come to the point of this article. How to join a macOS based device into a Microsoft AD? Considering that there are a ton of articles, videos, and tutorials on how to do this why am I posting this one then? And on top of it, it is not a success story. The reason is simple. I want to document all the steps that I have tried and tested to make this happen so that If you run into some problems you might save yourself a few hours/days of trying different options and configurations.
Prerequisites
Before you try and go down this path some things need to be in place for this bond to happen.
- Running and functional ADDS setup
- Functional DNS (forward and reverse lookup zones)
- Time sync has to on both your domain controller and your mac clients
- Network “visibility” on ports 389, 88, 53
- No firewalls in place that might cause any problems
I will skip the part of setting up a domain but be sure that you can add and authenticate into that domain with a windows based device before going forward. This way you will know that there are no major or minor problems with the domain itself as well as your ADDS and DNS.
Adding a mac to your domain will require some modifications and configuration upfront before you start clicking away.
Mac settings and configuration prerequisites
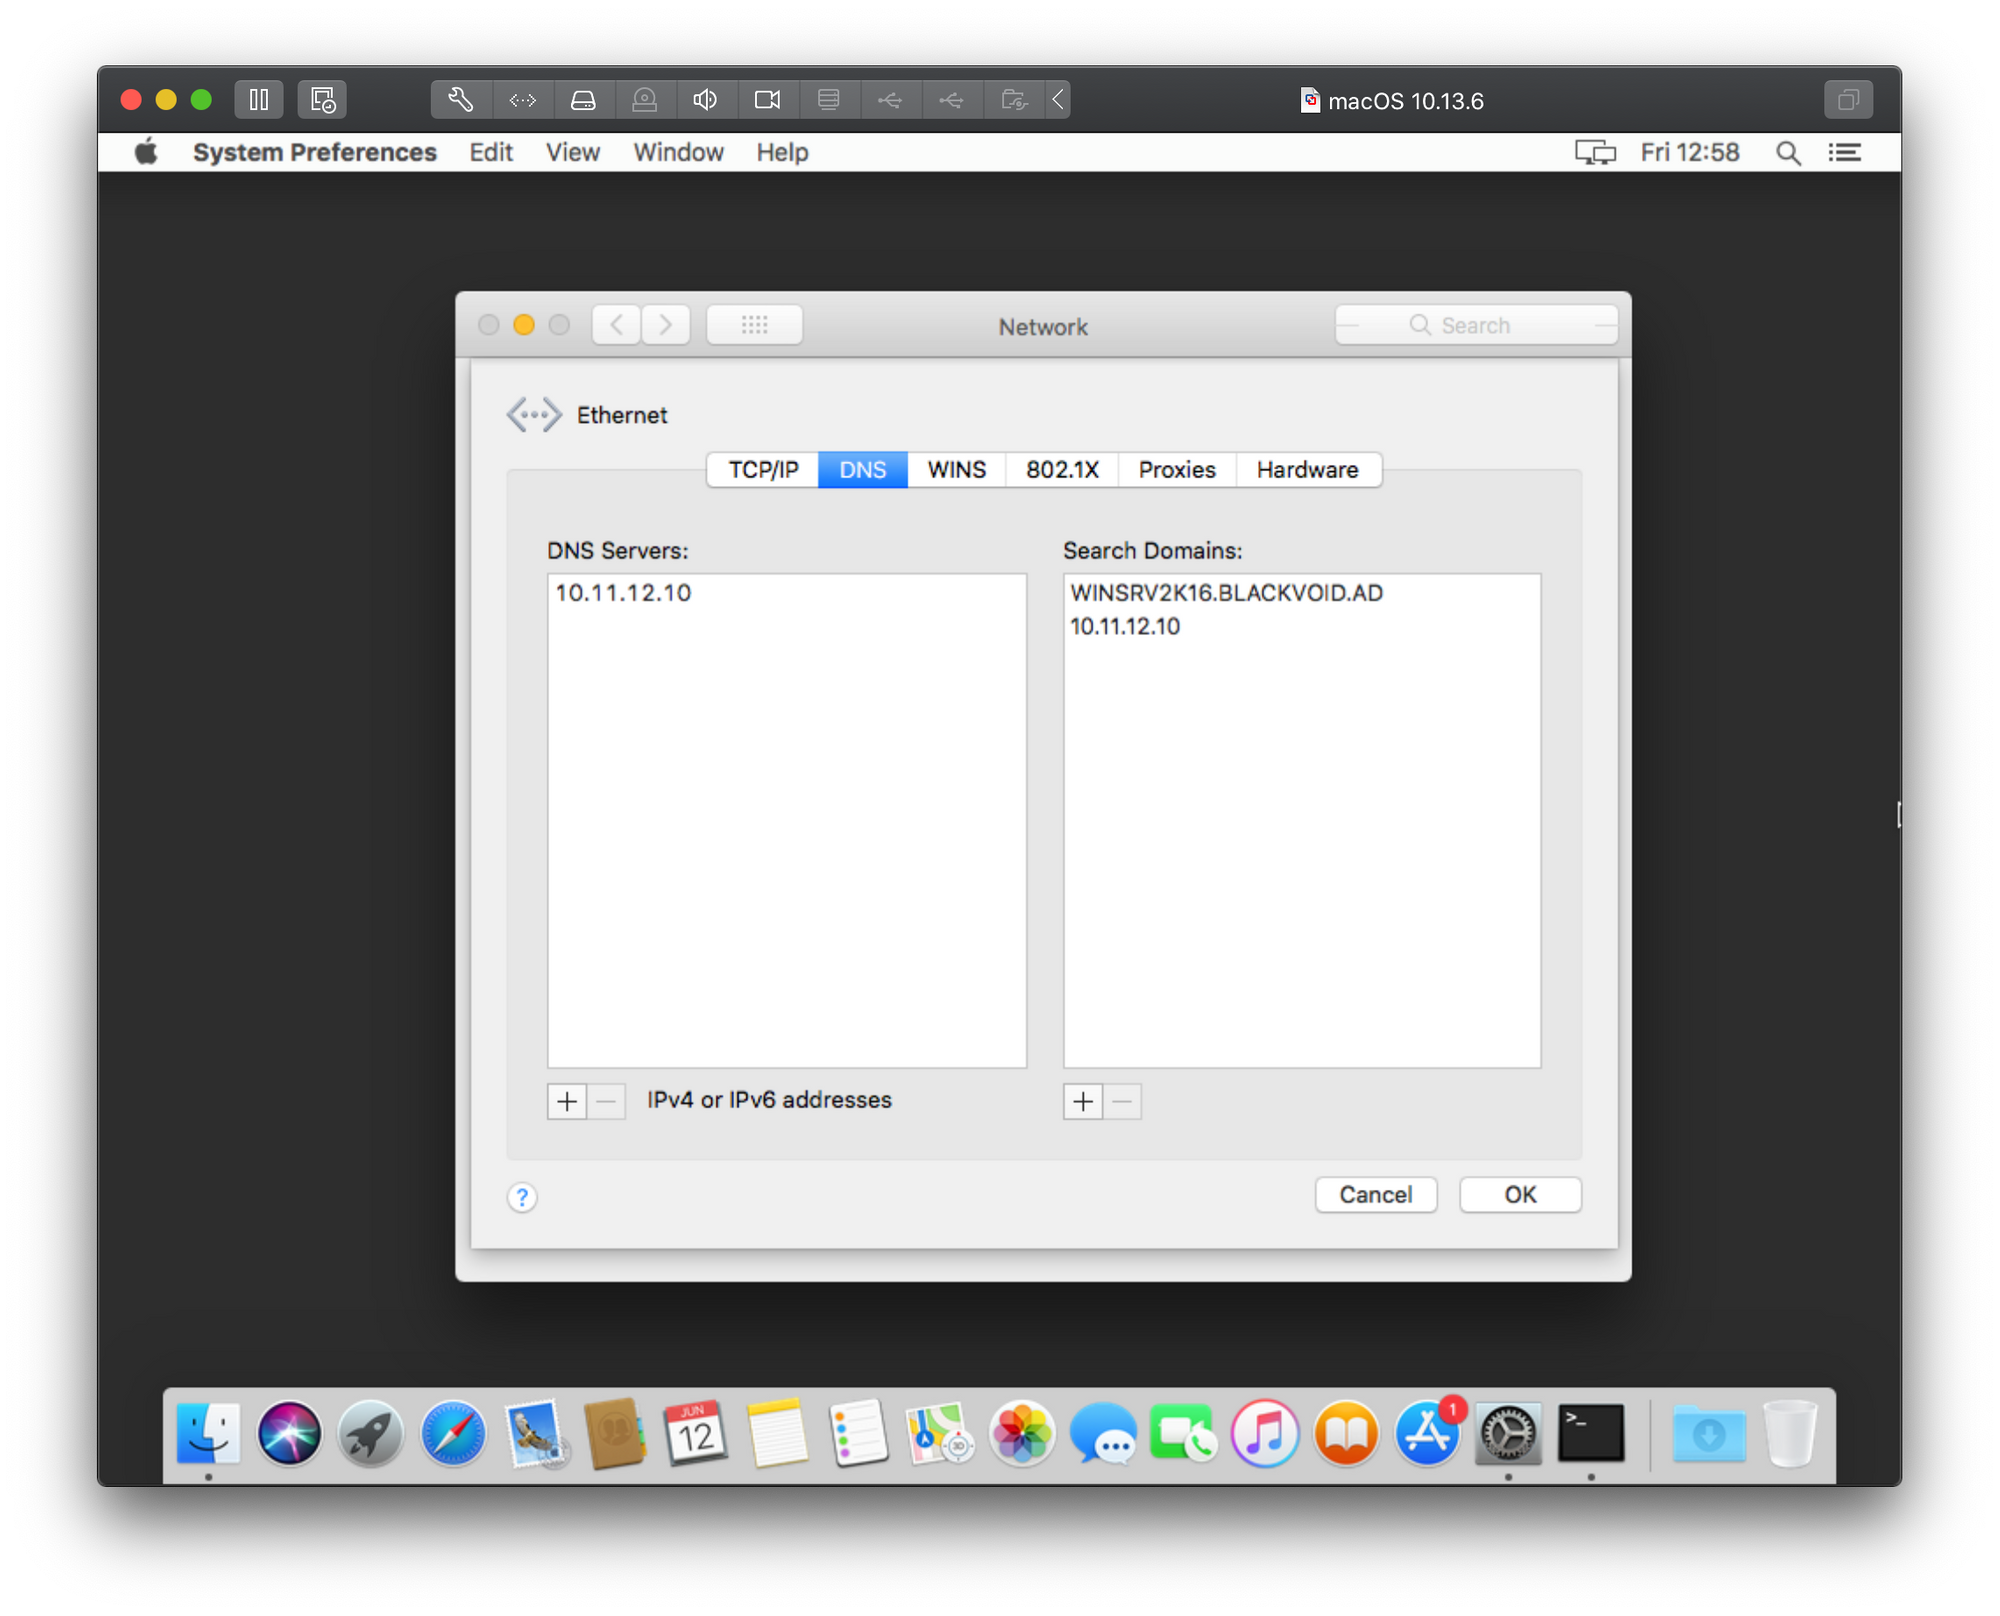
Be sure to have network visibility with your domain and DNS server (if its a single server then both roles are there). Change your network IP address to match your Active Directory subnet so that your Mac and your server that talk to each other without any problems. To do this open System Preferences > Network.
Here you can change your IP, subnet mask, and move into advanced settings as needed.
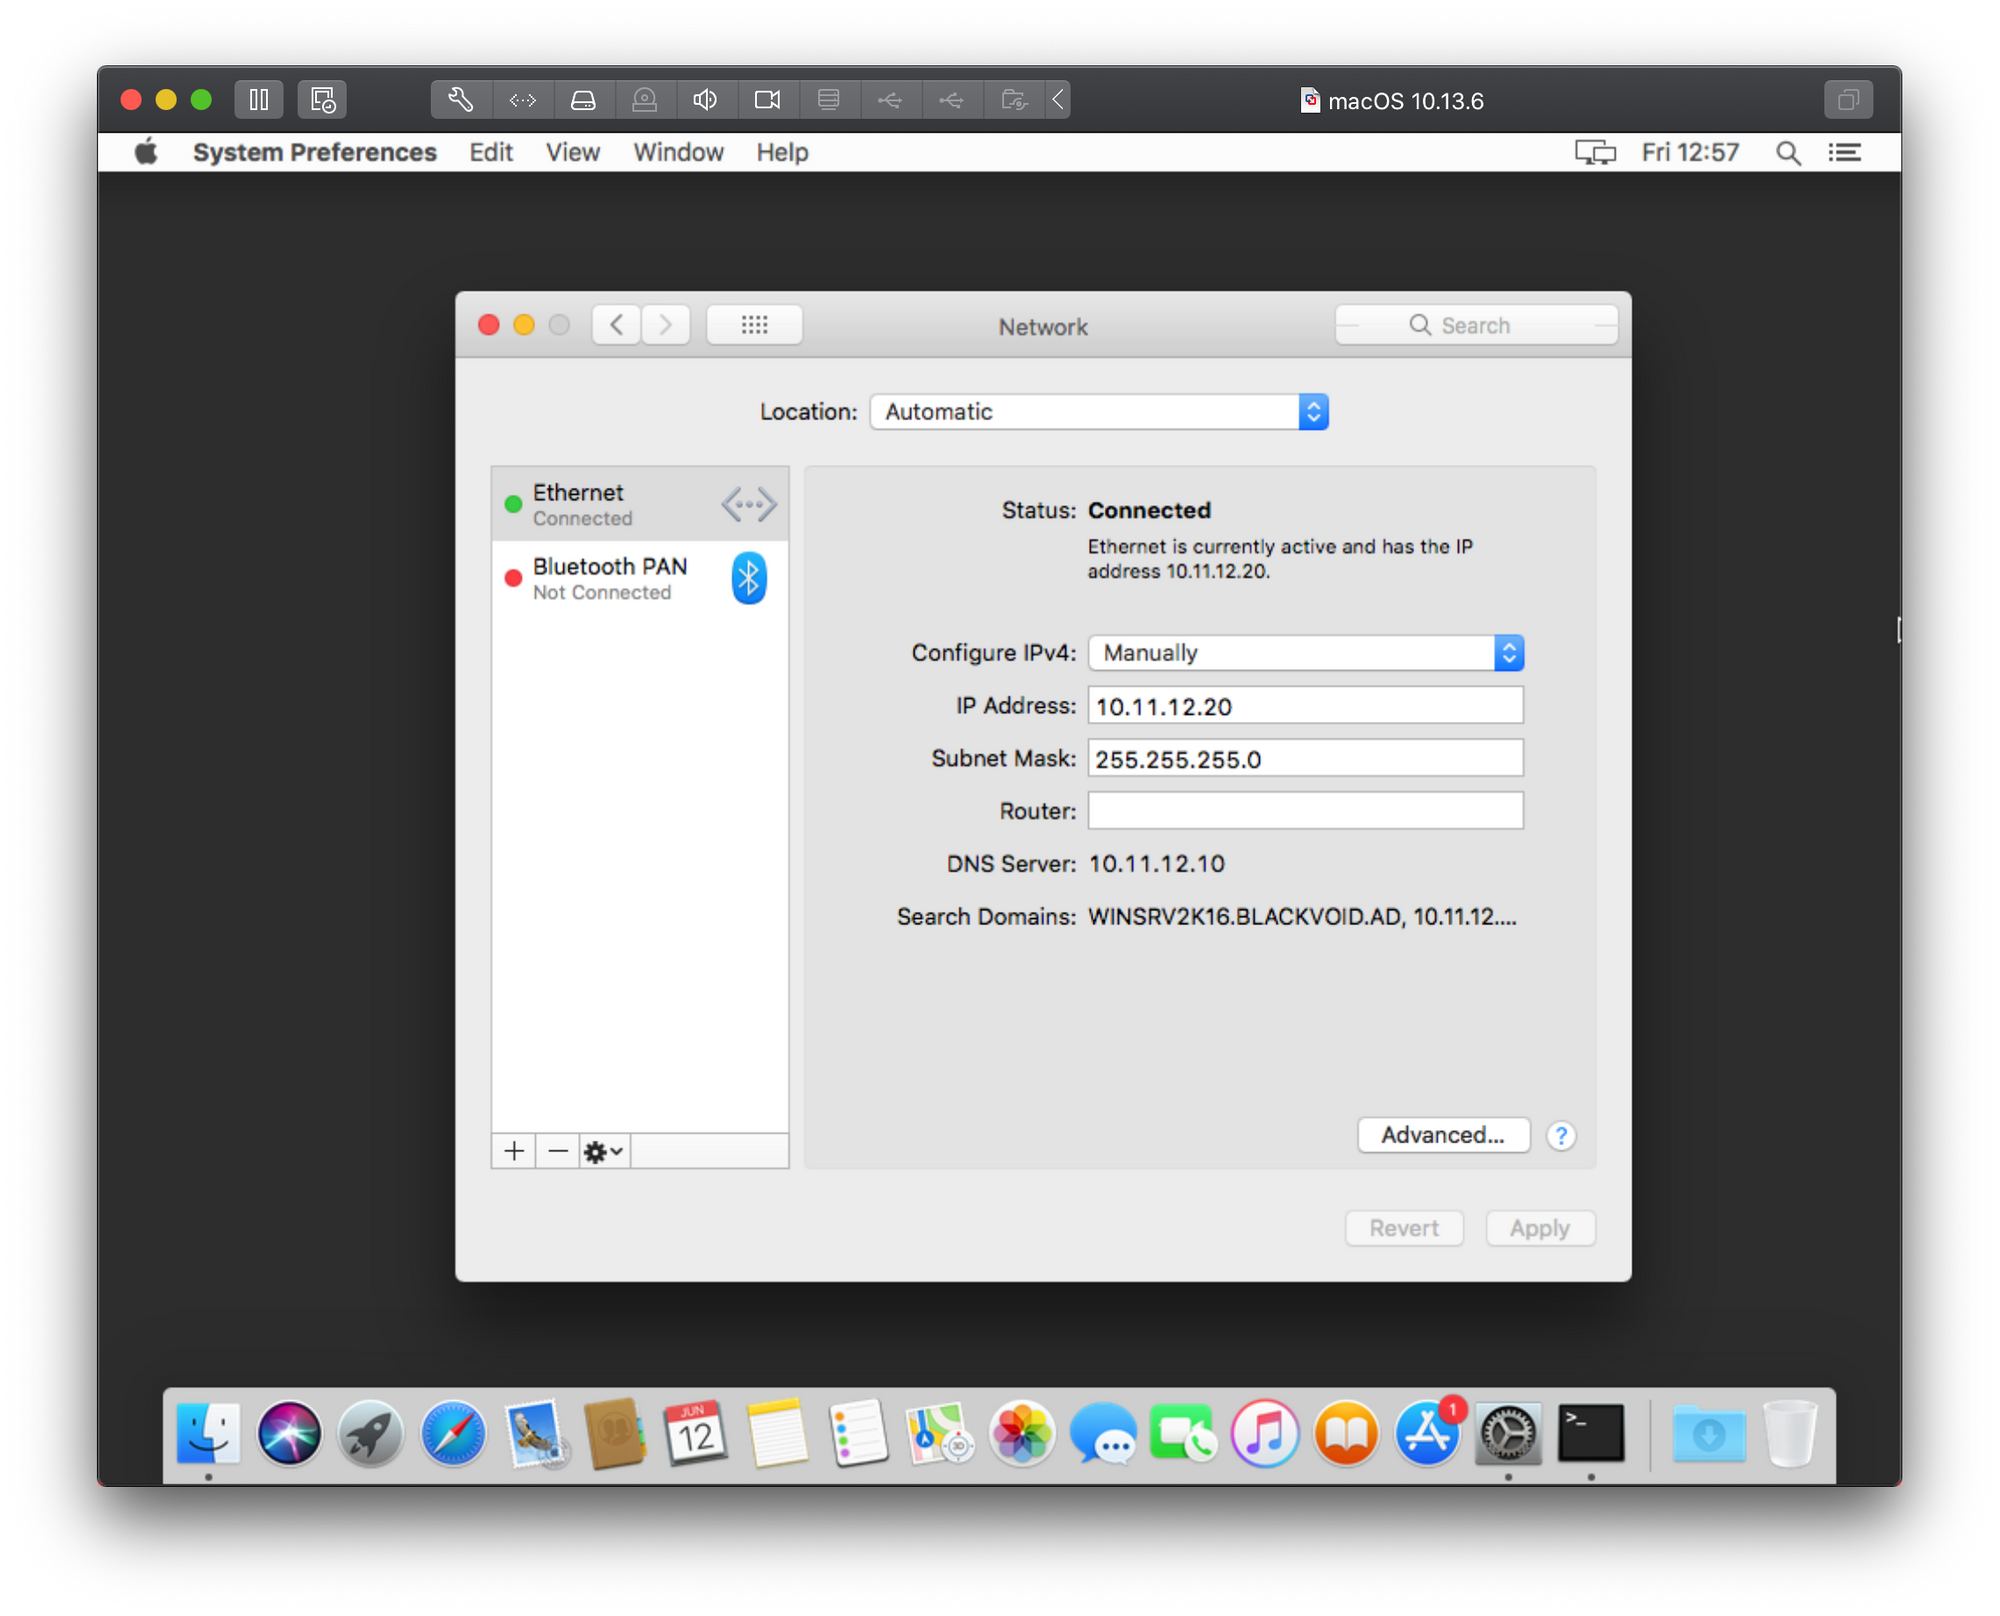
Now that we have configured a static IP address for your mac client, be sure that you can talk to your server. Open up Terminal application and simply use
ping yourServerIPAddress
to see if there is any communication going. If there is, great, if not, be sure that you have entered a correct IP address and that your mac and server are actually on the same network, to begin with.
NOTE: Also take down all Windows firewalls on the server-side as they can be the reason that you are unable to communicate with your server
Time to join
To join your mac into a domain you can do it via terminal or via System Preferences. Let’s see how this will look via user interface first.
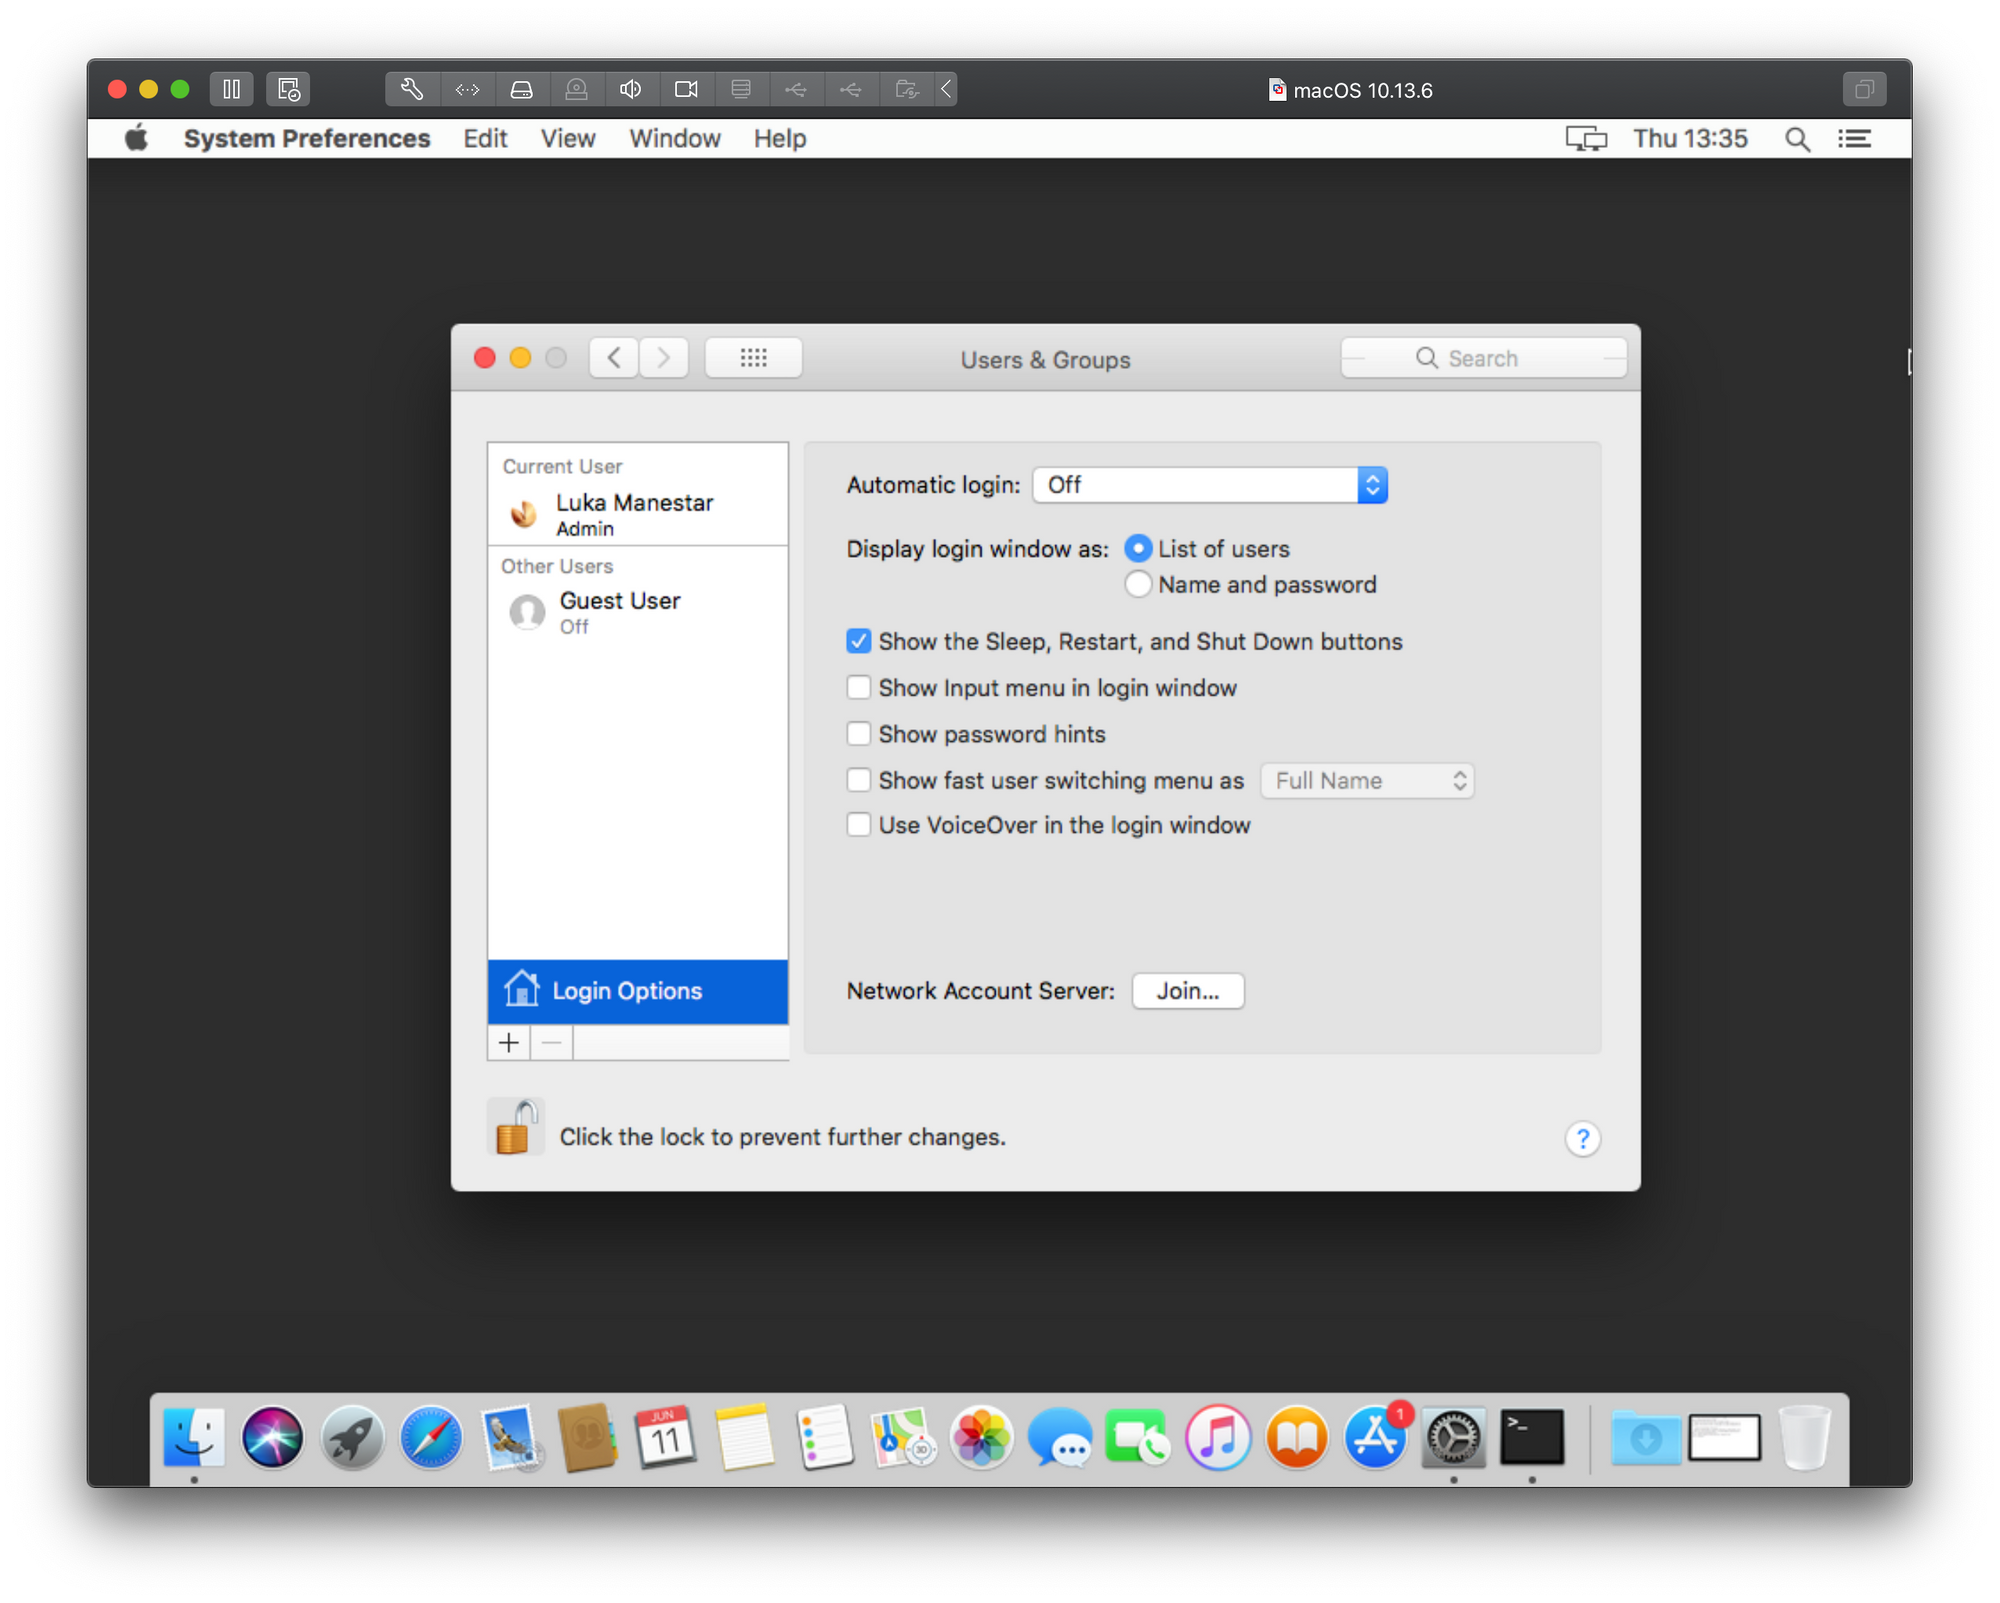
Again, open up System Preferences and go to Users & Groups. Click the lock icon in the bottom left, authenticate with your mac local account and now click the “Login Option” button.
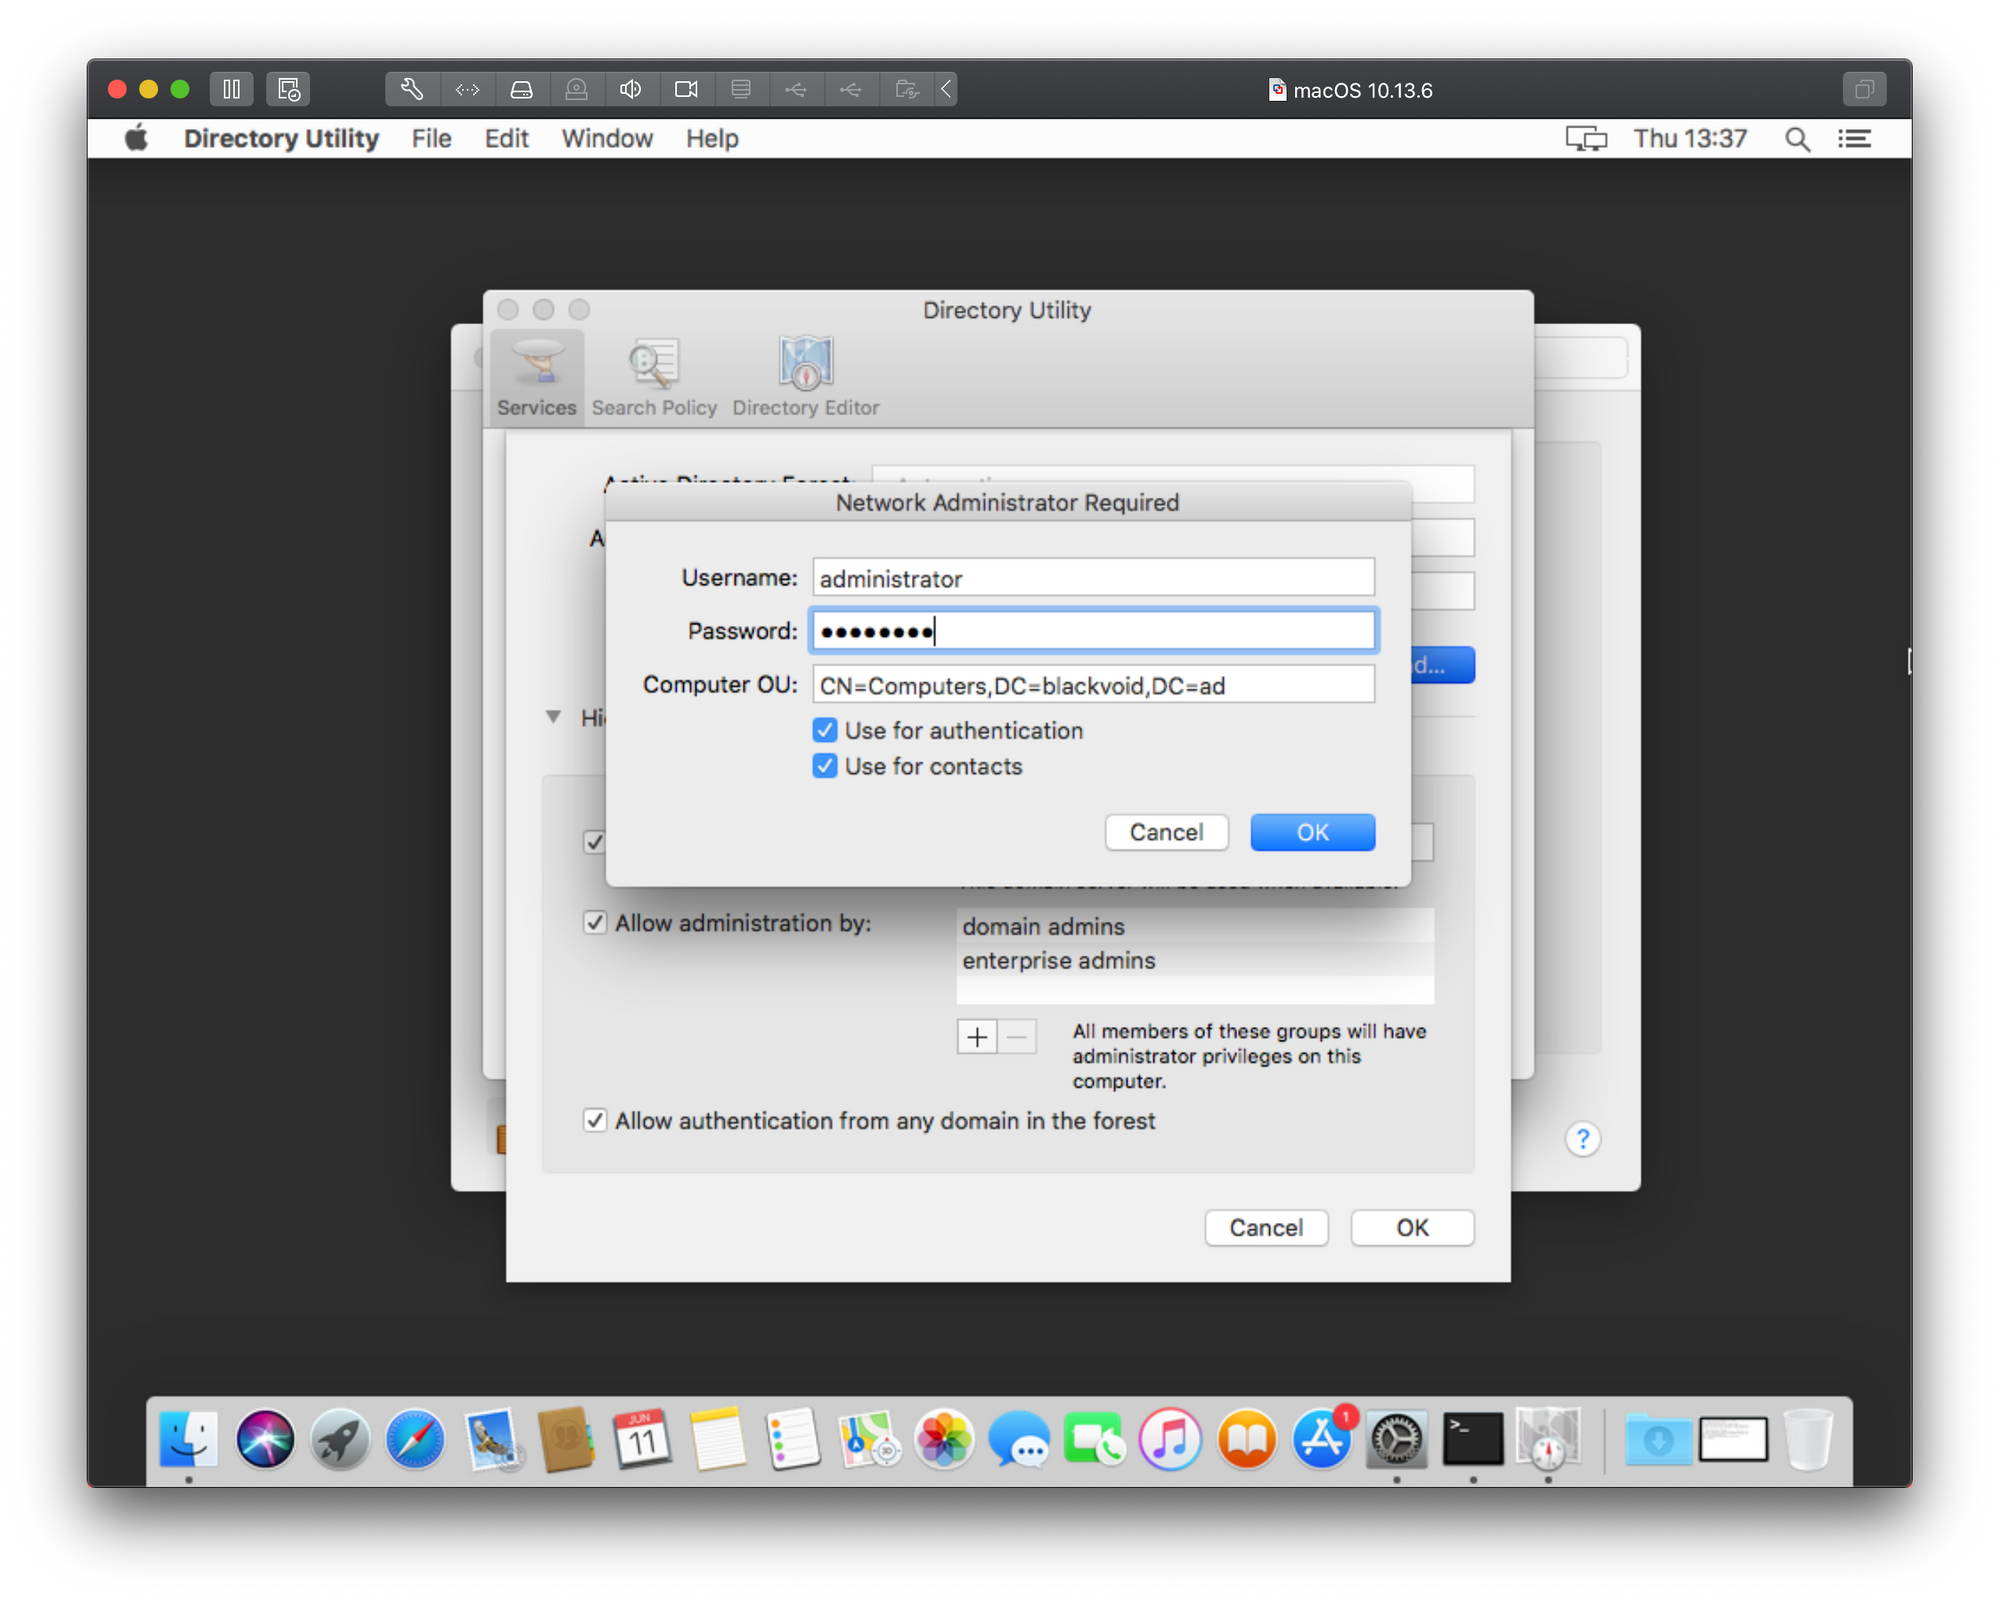
As you can see there is a the “Join” button on the right side. Click that and let’s move forward. In the Server parameter field, enter your domain controller IP address or its FQDN (myserver.mydomain.something for example). In the picture below I have decided to use its IP address.
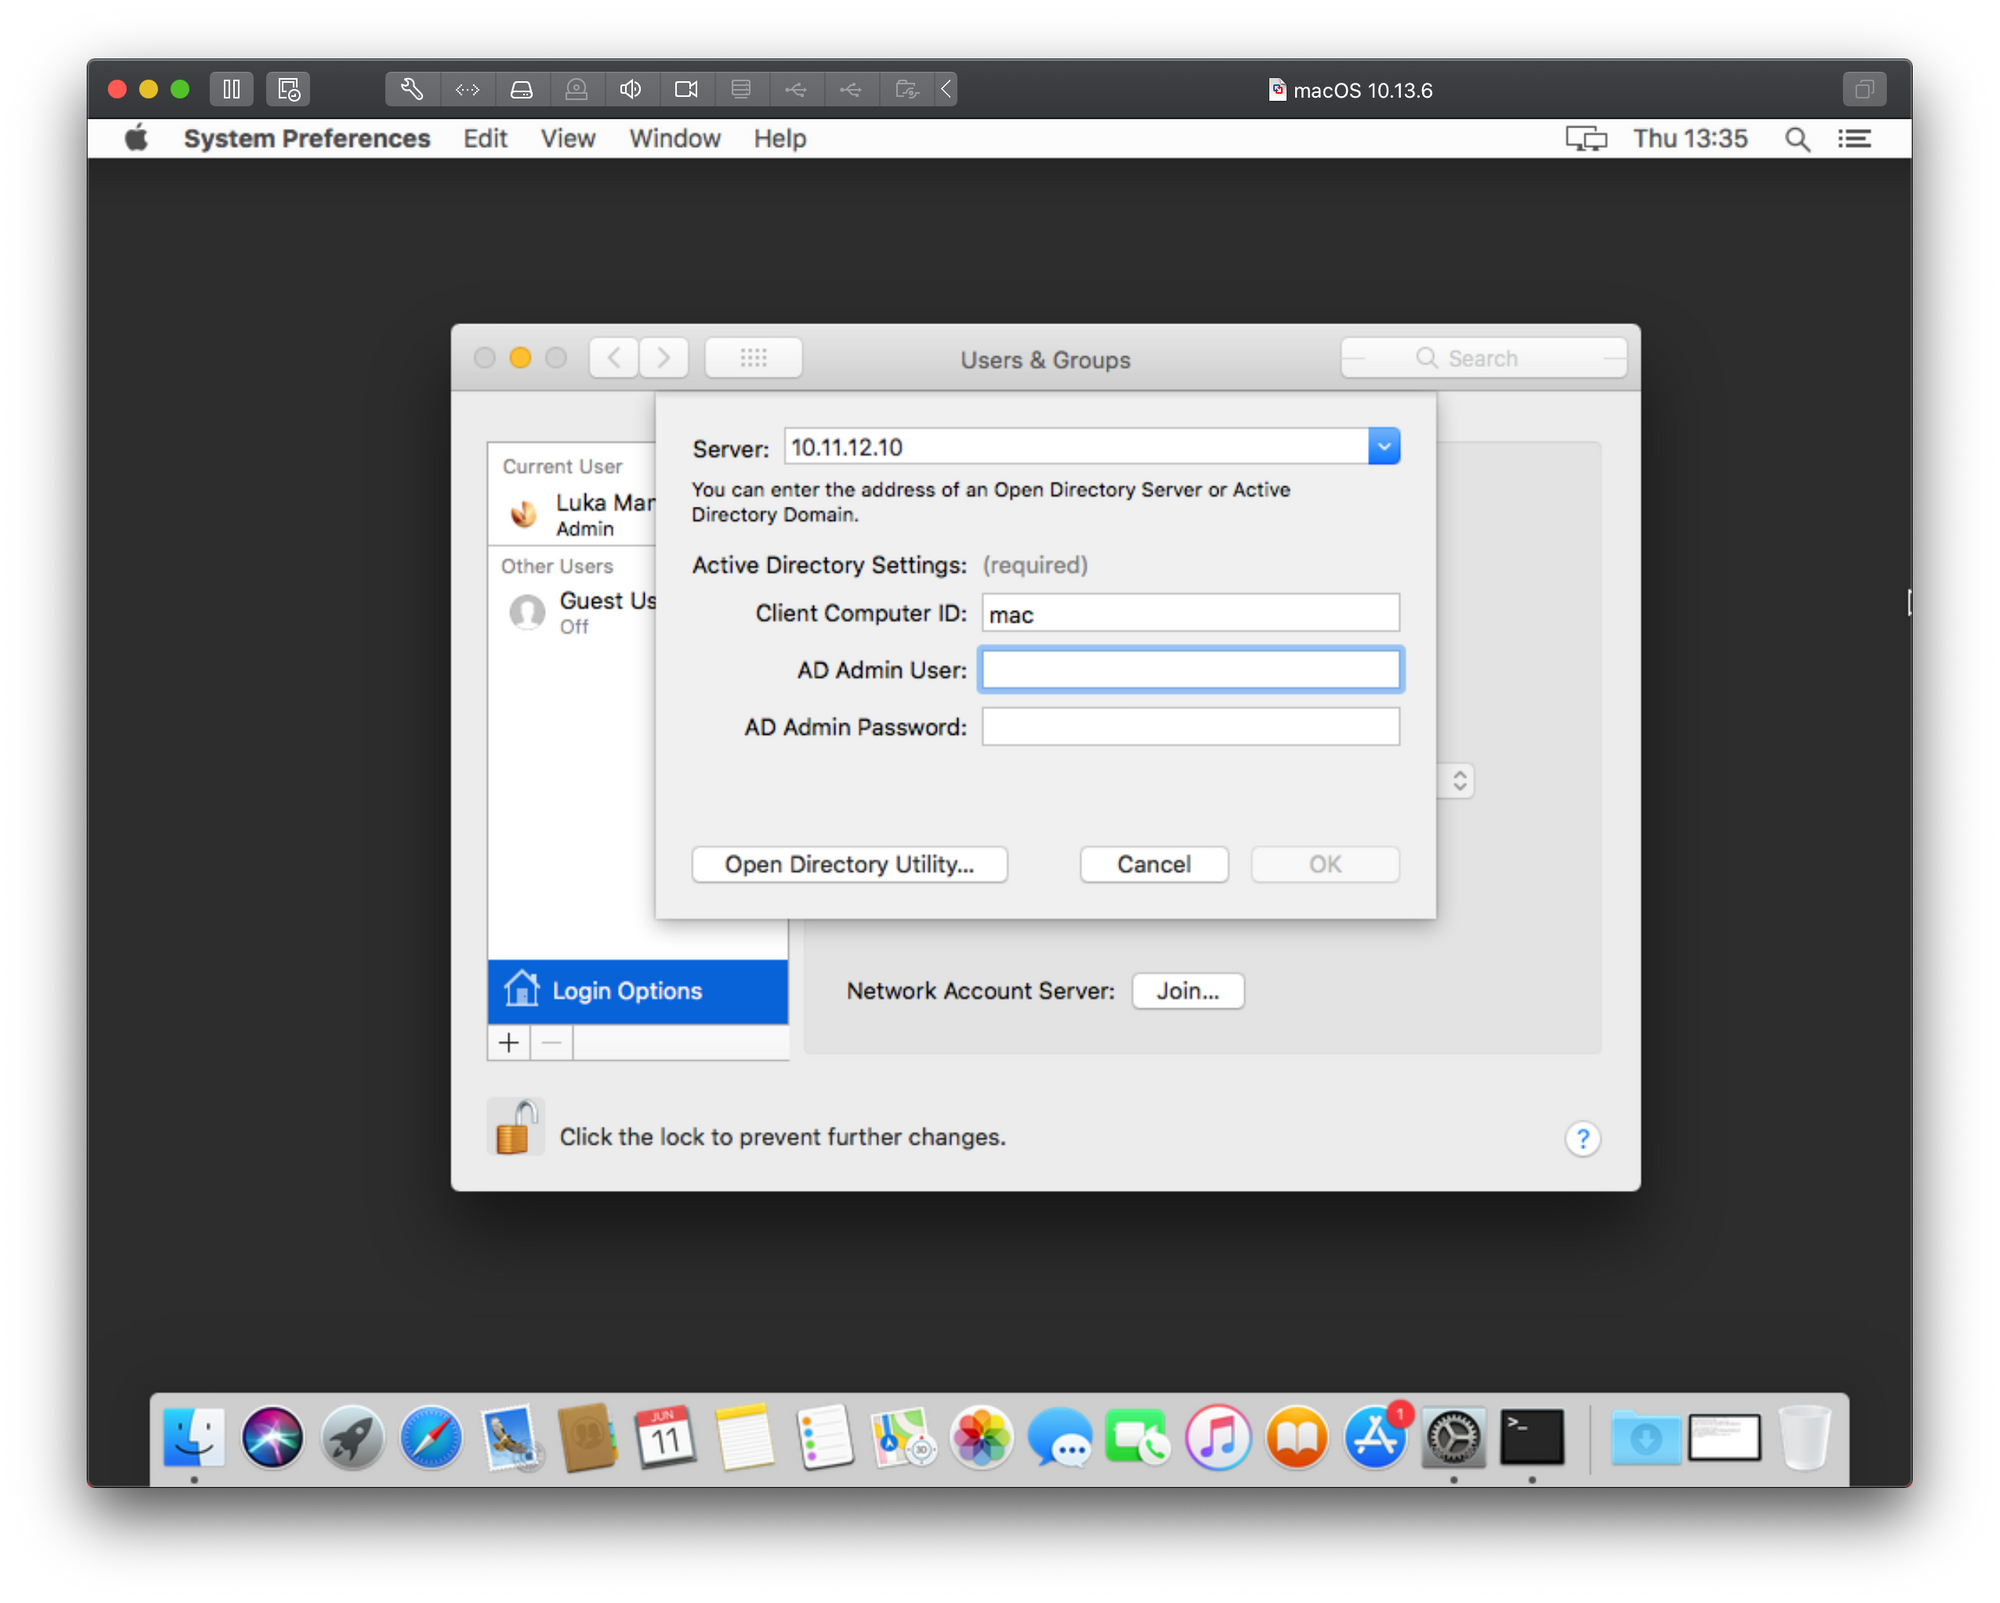
As soon as you finish typing its name or IP, it will expand to offer your 3 things. Your computer domain name (populated), your domain user account that has sufficient permissions to add objects to the domain (main administrator account can be used here for example) and that users password.
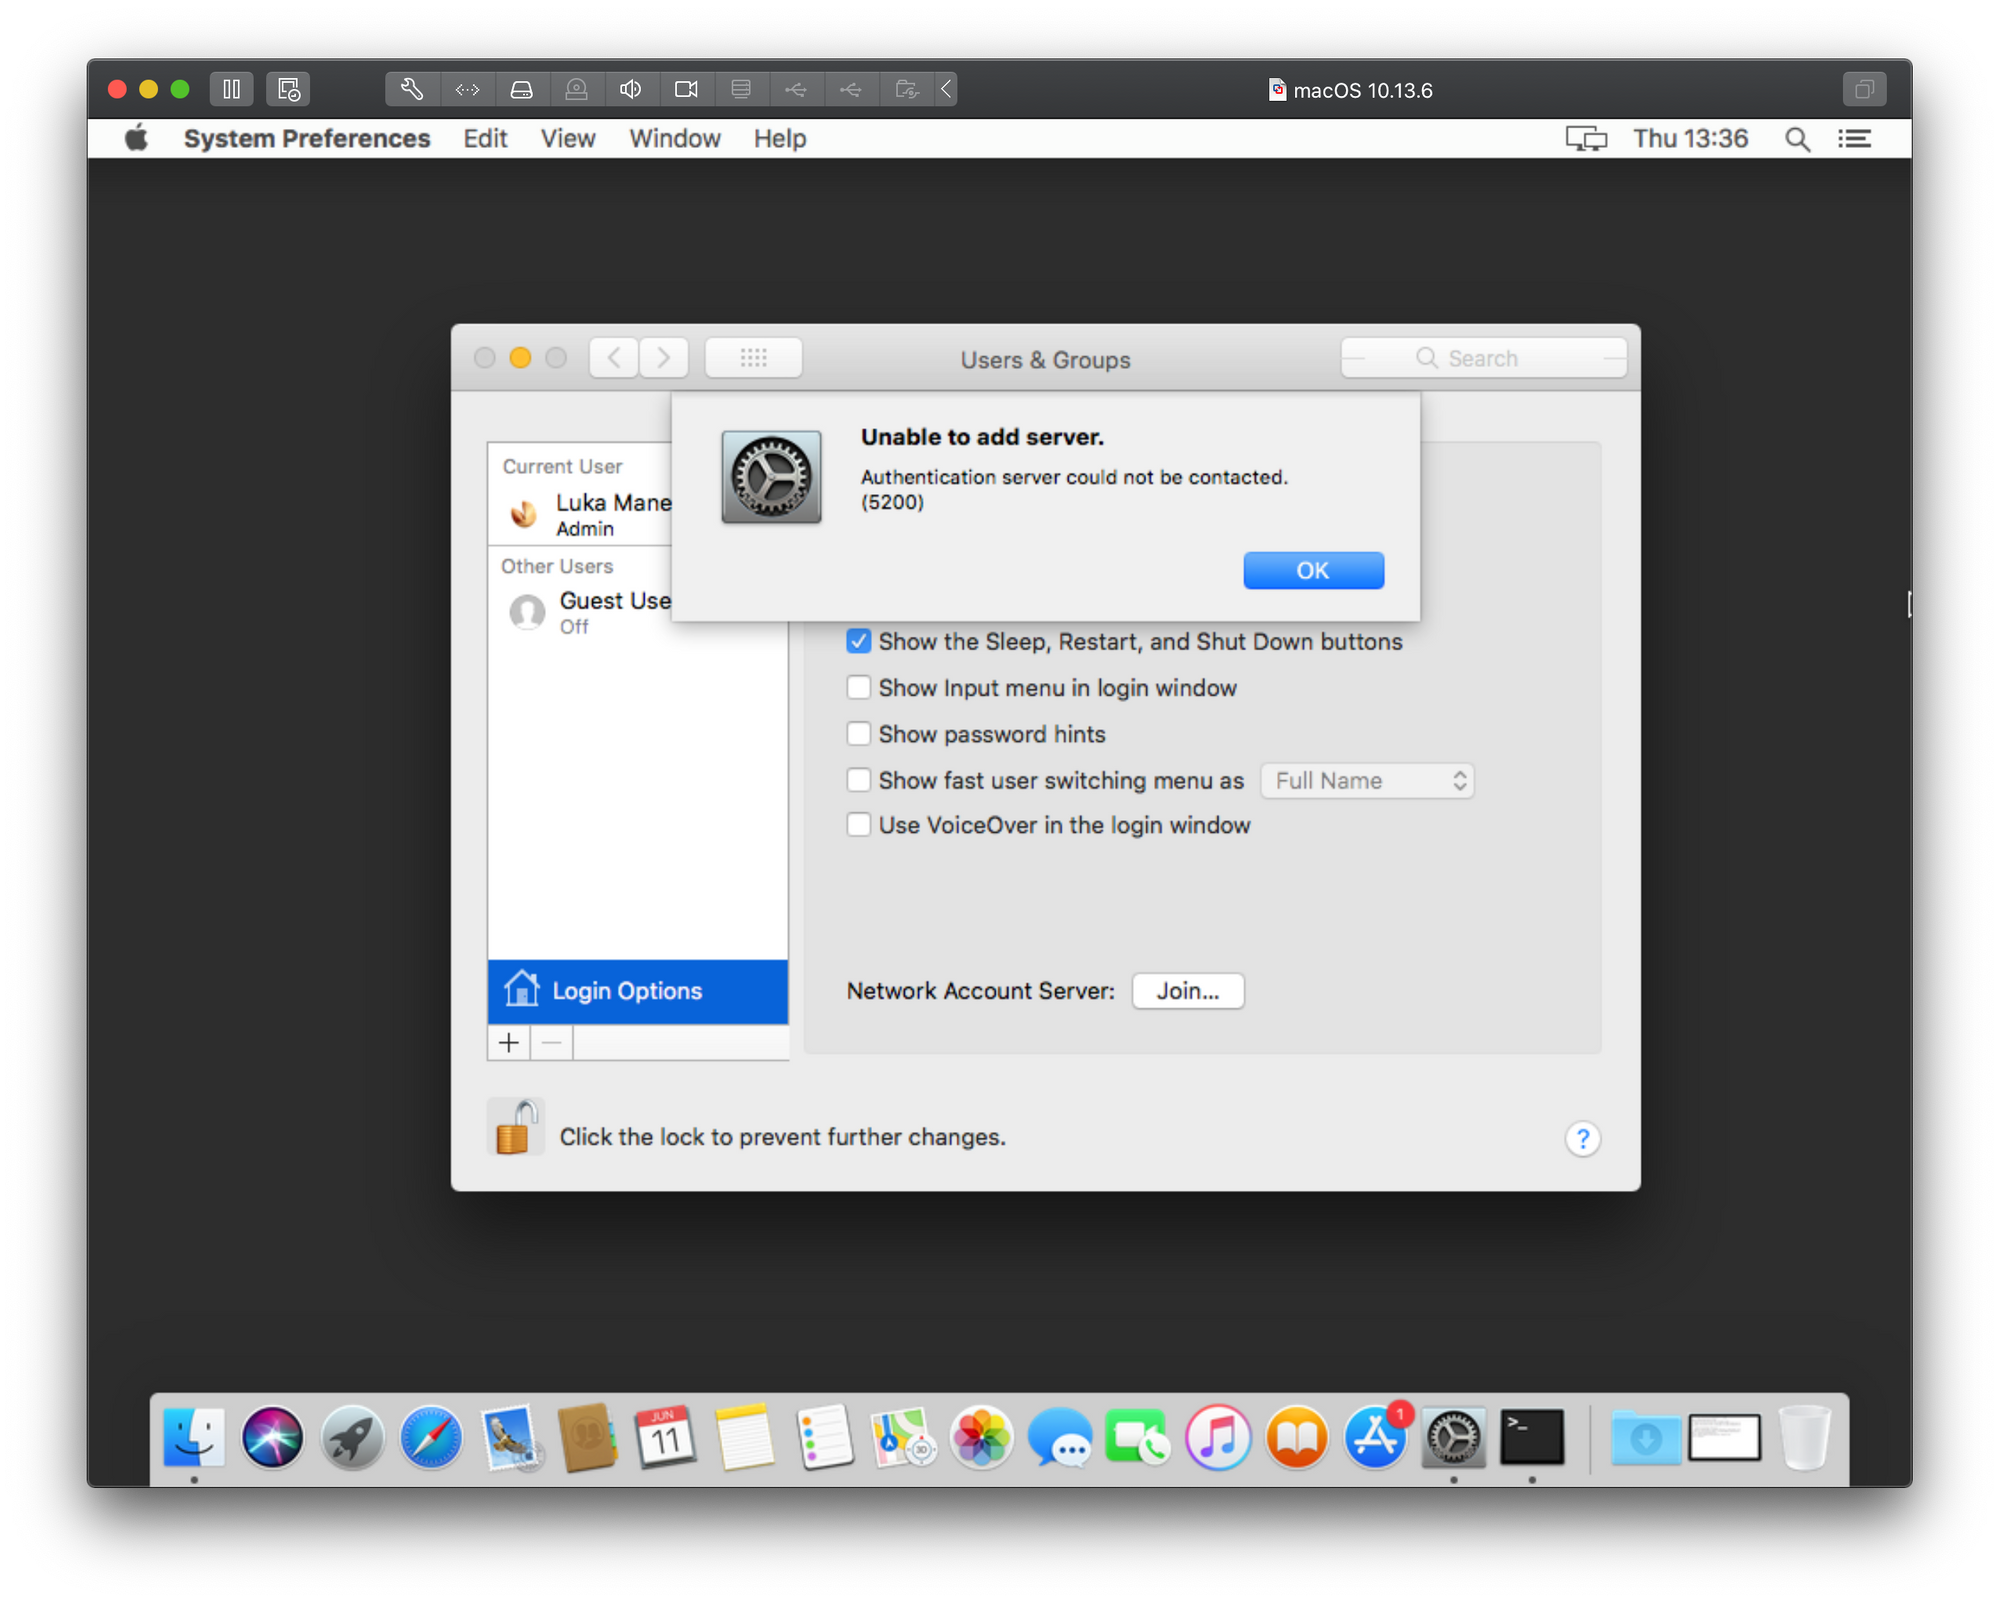
If all is well and configured clicking OK button will complete the procedure in matter of seconds and you will get a confirmation that your Mac has joined the domain. But if it doesn’t work you will get any number of errors, so let’s see those.
Unable to add server - Authentication server could not be contacted (Error 5200)
This is the probably the top searched error on the Internet when it comes to adding your macs into a domain.
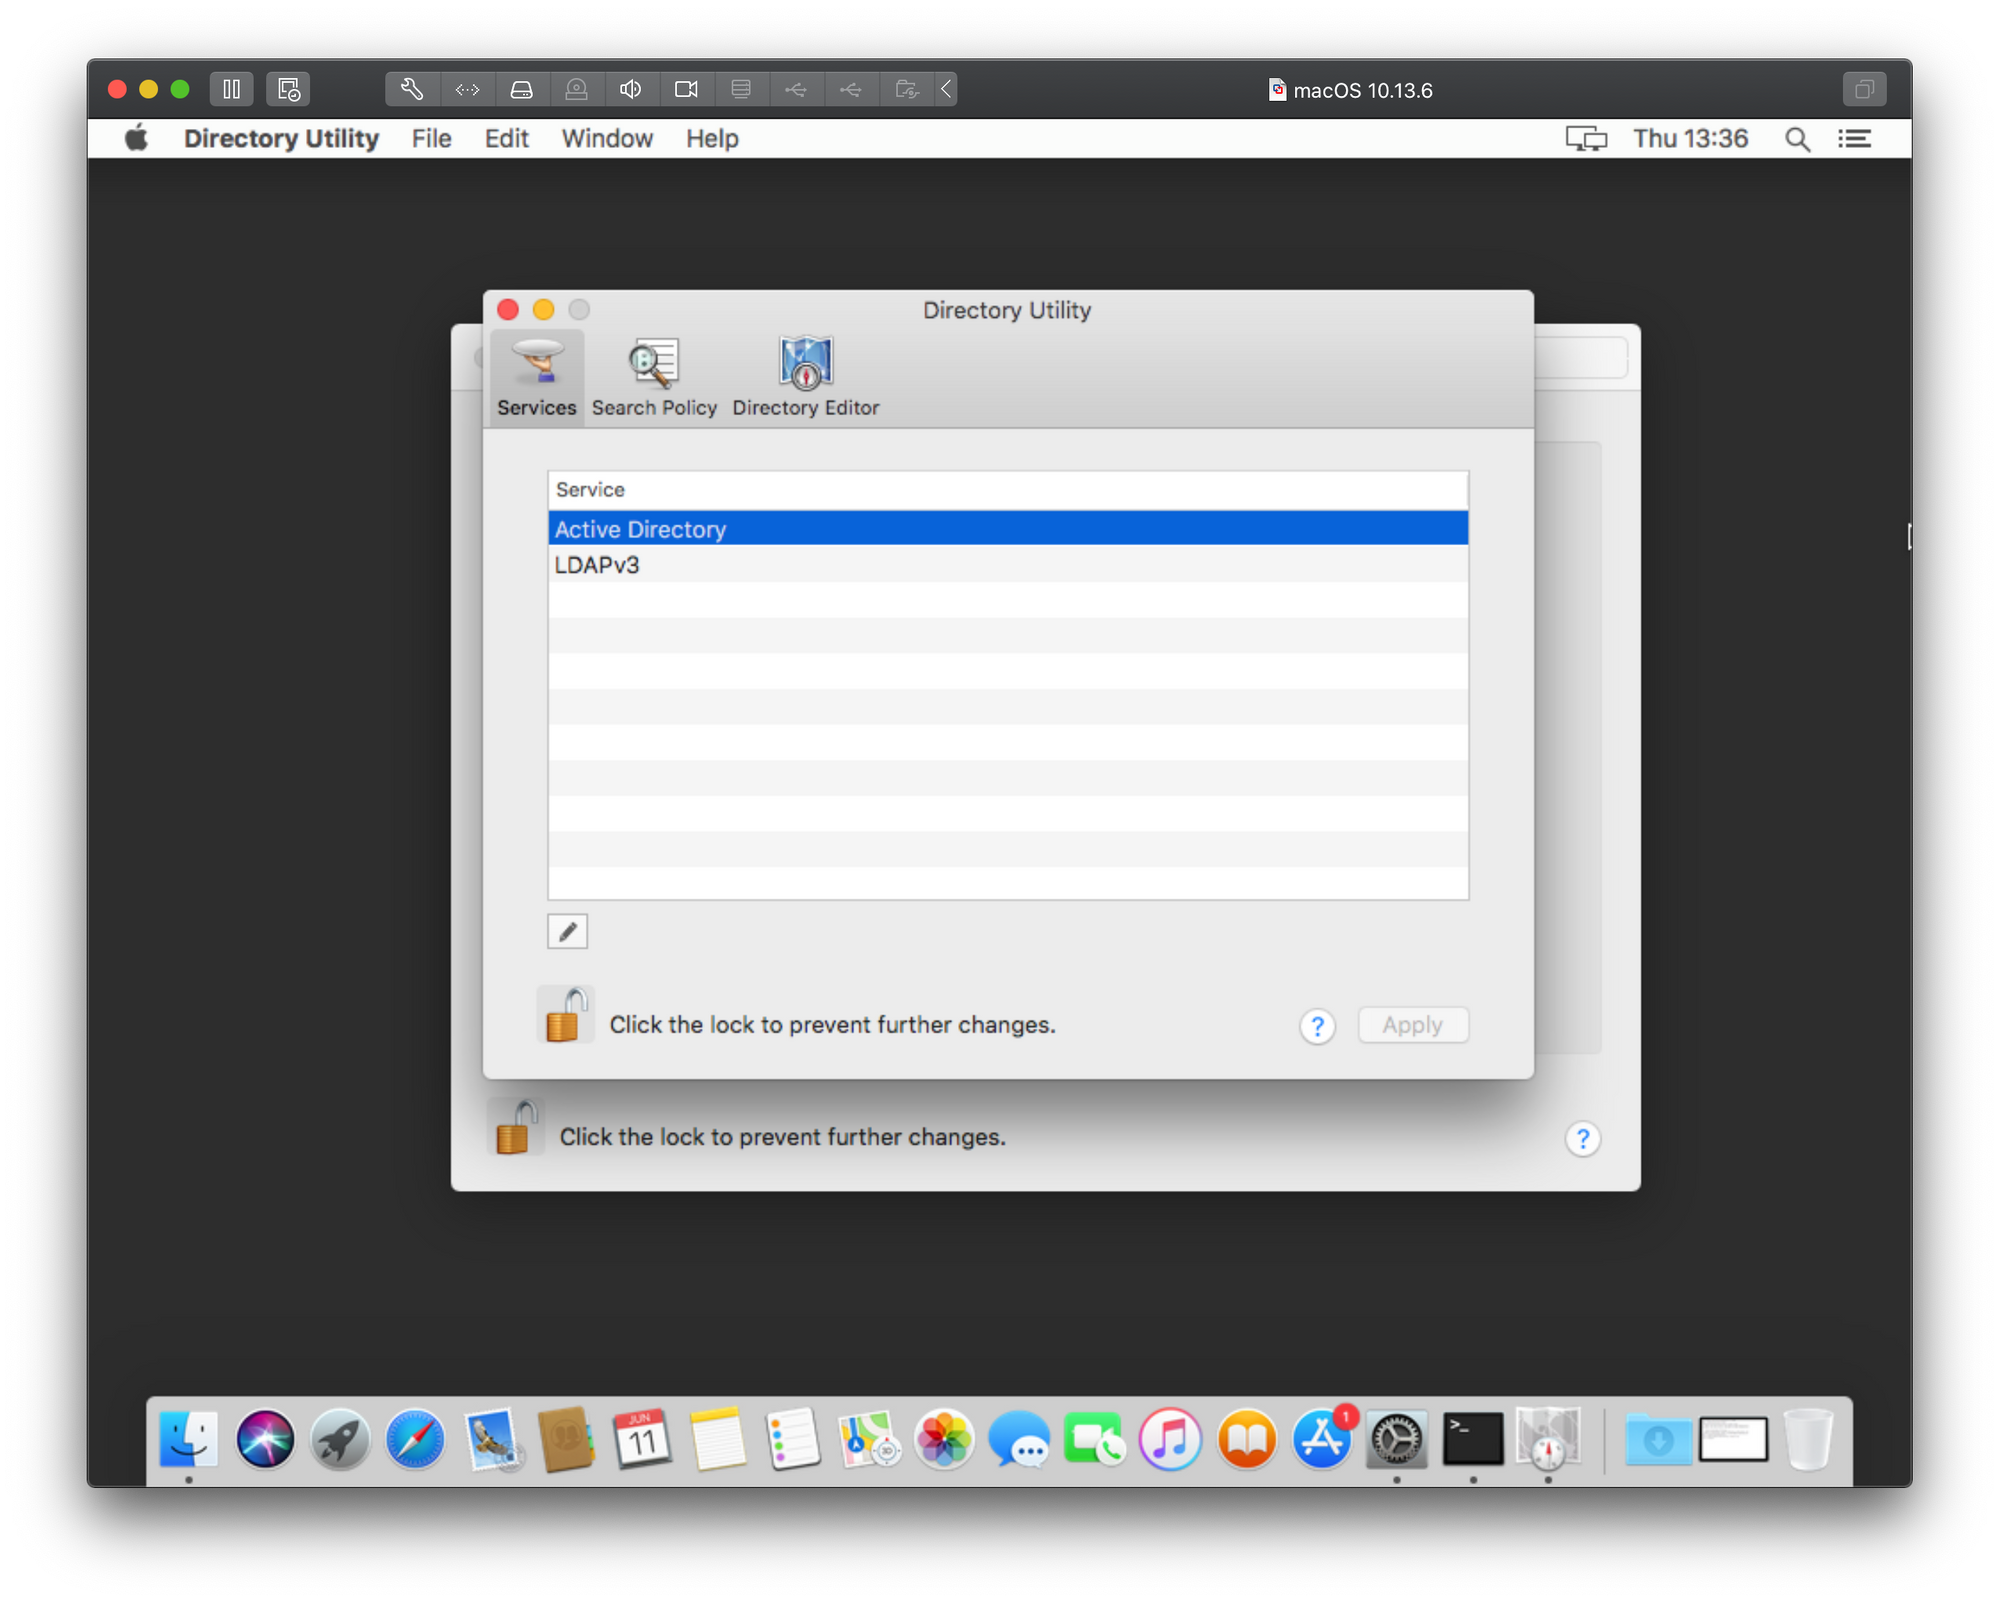
Considering that the image does not offer too many useful details, You might think that adding your Mac using the Directory Utility app will help. It won’t. Before we provoke the same error from a different angle lets see how to actually add a Mac using the long way around that will also offer some additional options.
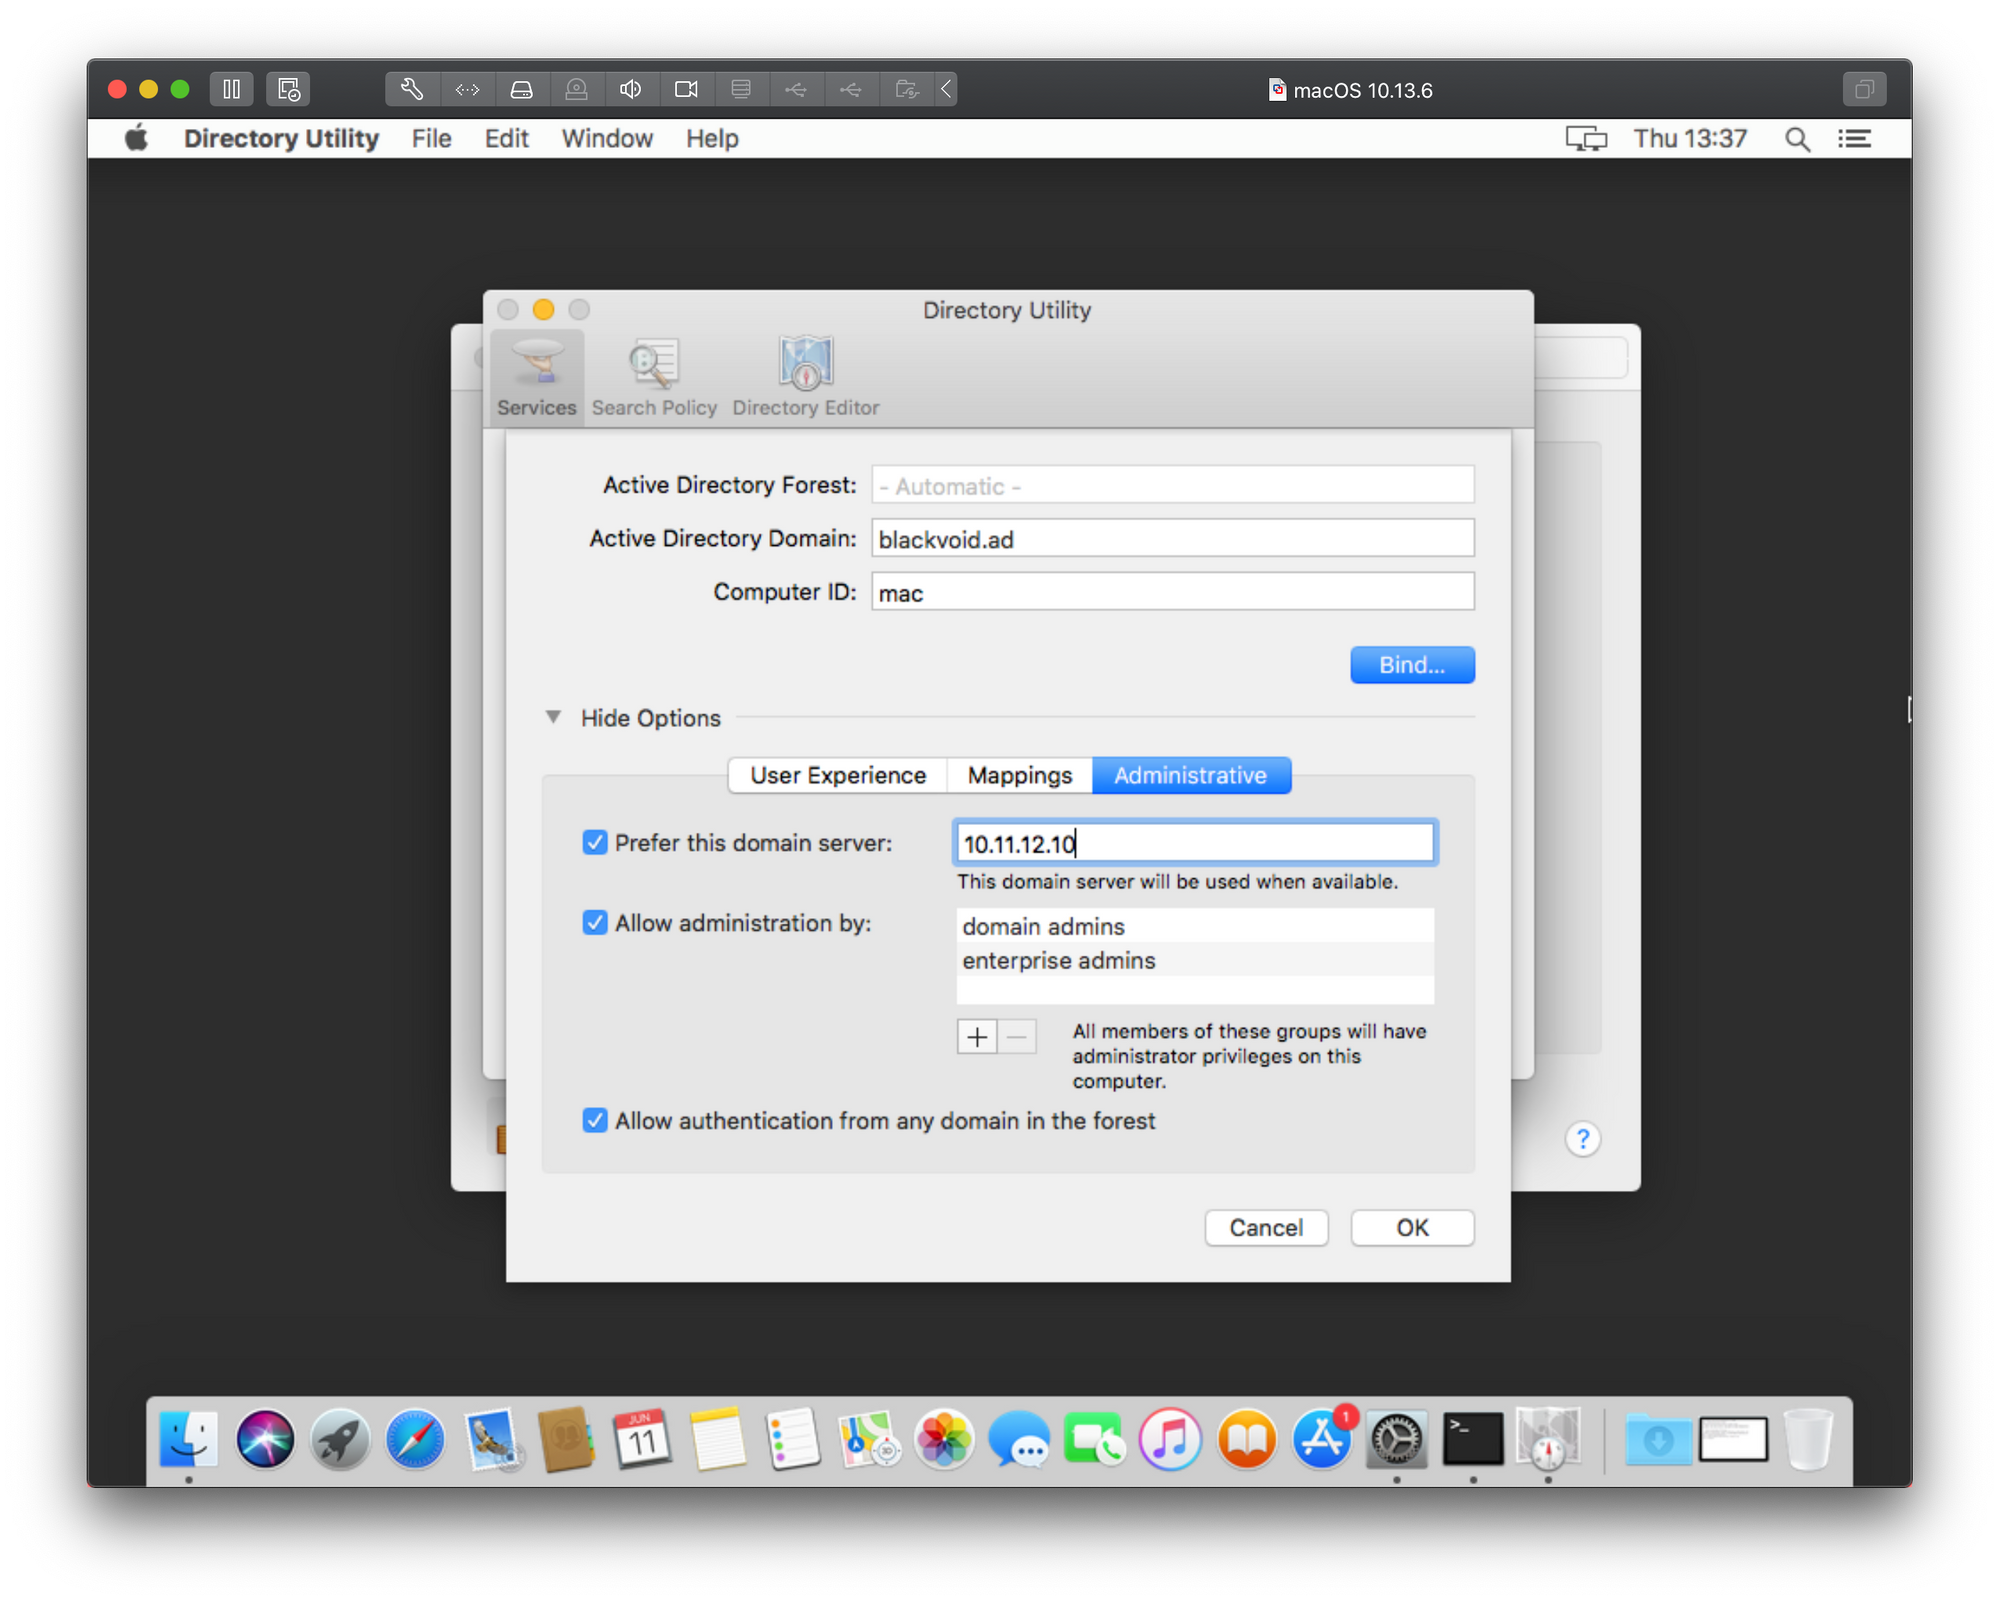
If we go back to the point of clicking the Join button under Users & Groups and instead of typing in the IP address in the server field we open Directory Utility using its button, we will have a number of options. In the next 4 images, I will type in the description what needs to be done in order to add your mac to the domain.
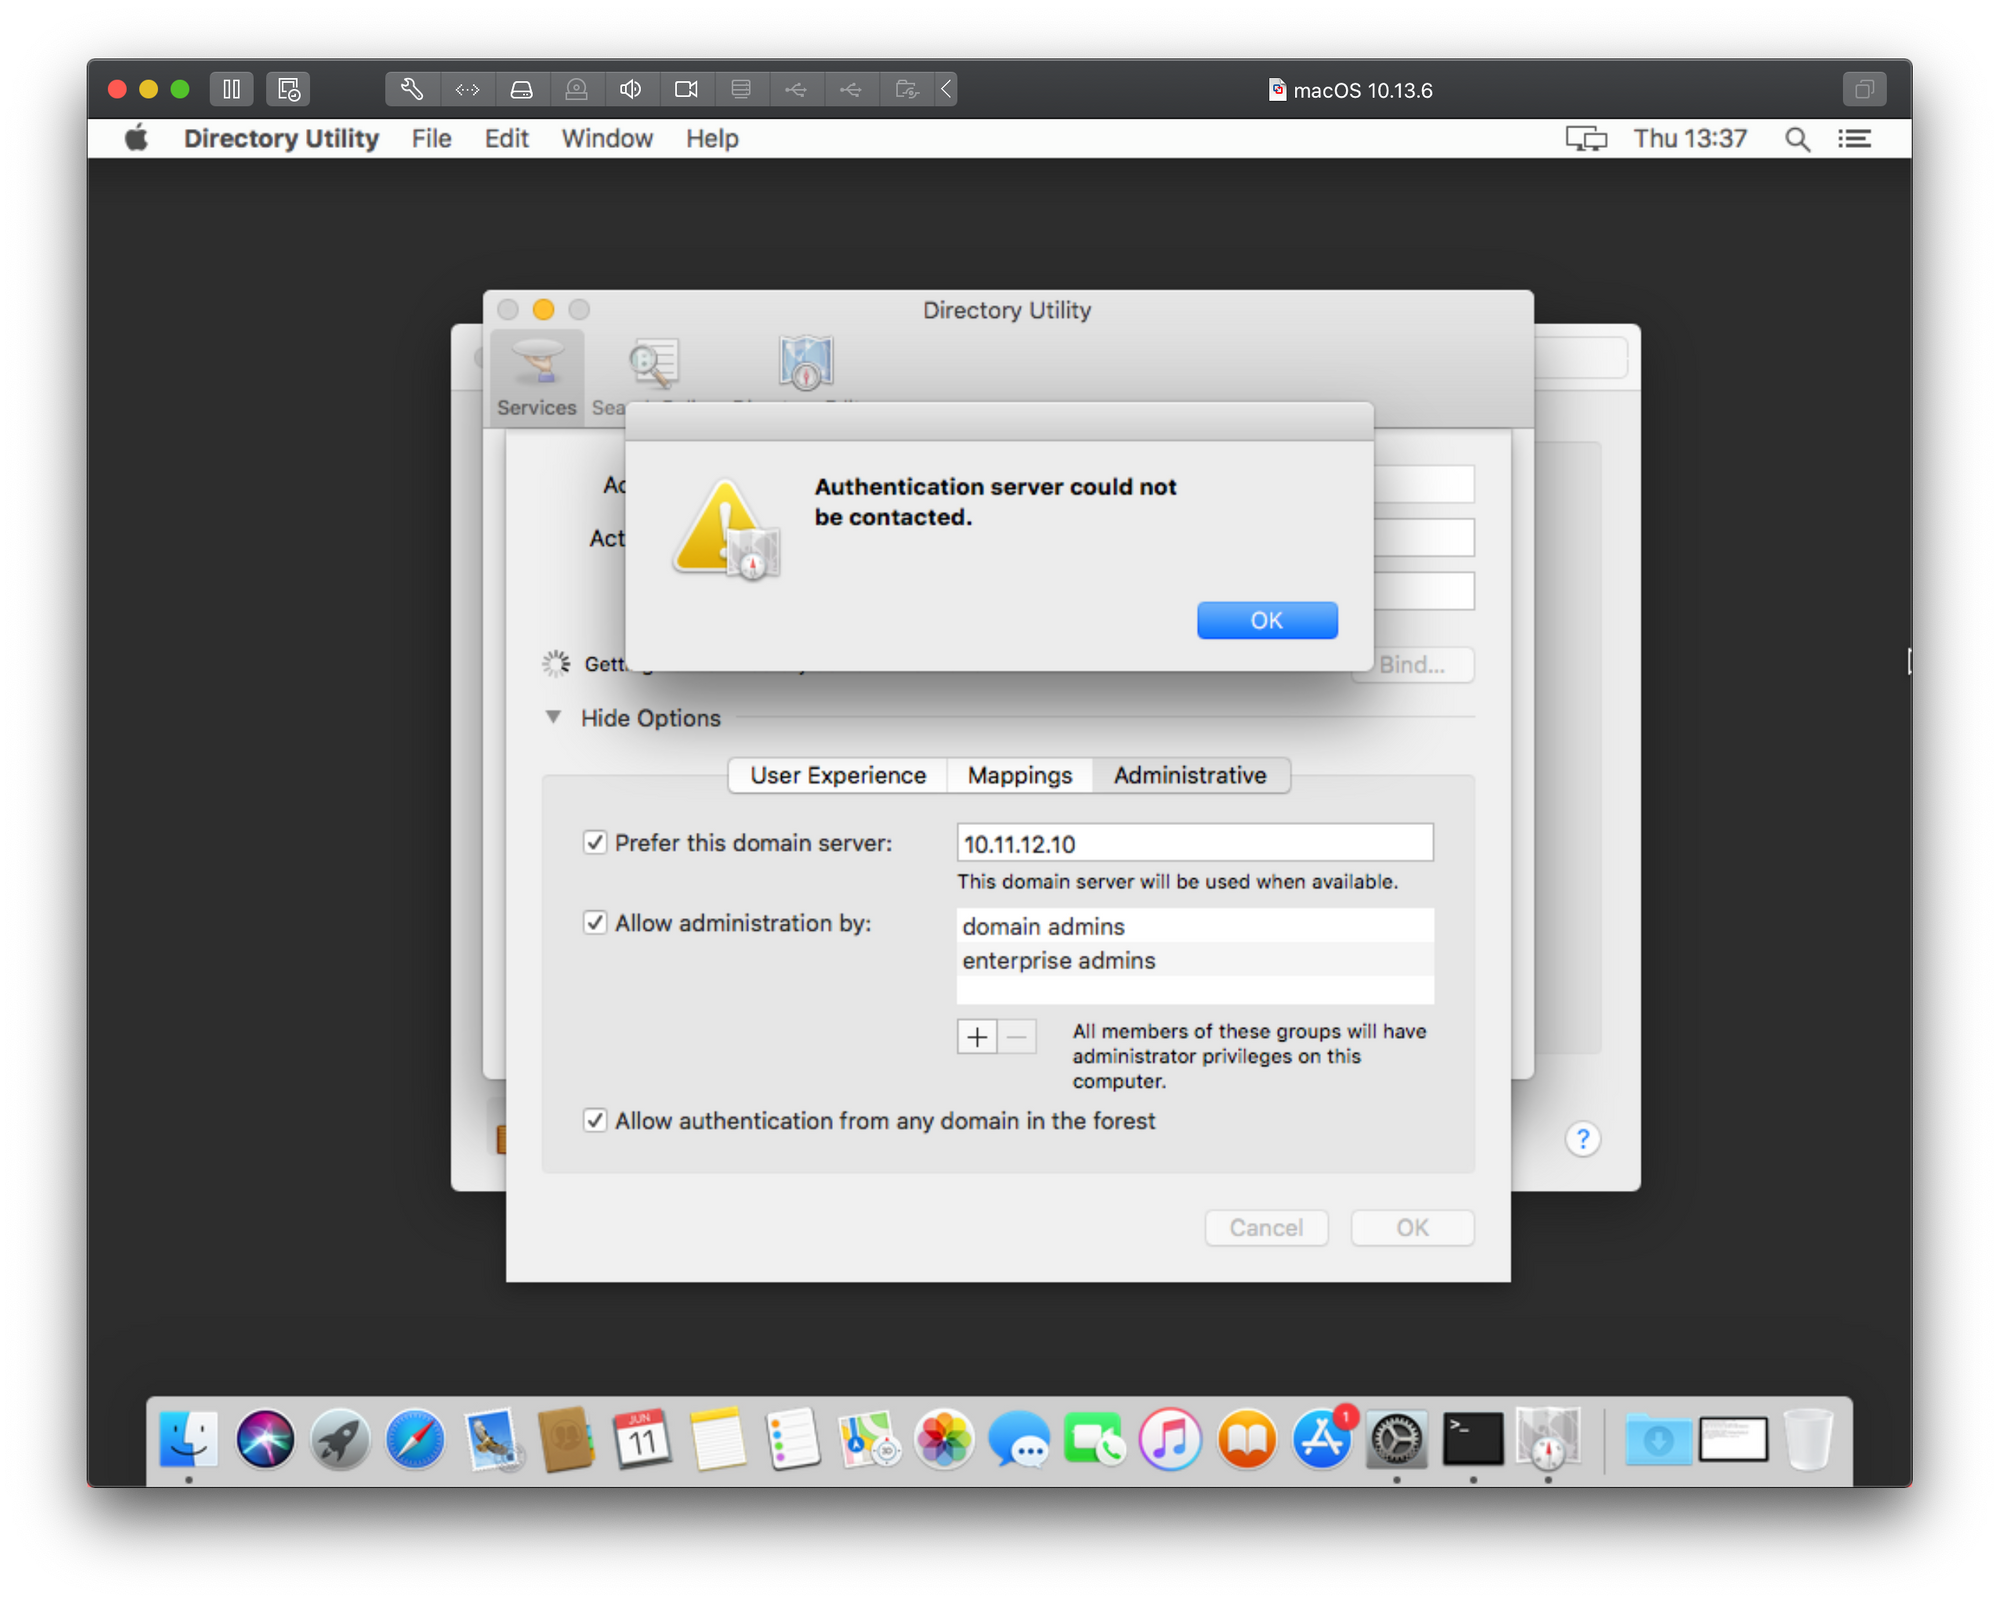
As we can see there is the same result only in a different popup window and with even less information on top of that. Just great right? Well to get around this and actually get some more information we will need to consult the Console. Before you start the bind process again using the steps above, open the Console app on your Mac. This is a real-time console that will register anything happening on your Mac at any given time, including errors.
Now repeat the steps and as soon as you get an error switch to the Console and scroll back until you find opendirectory in the Process column.
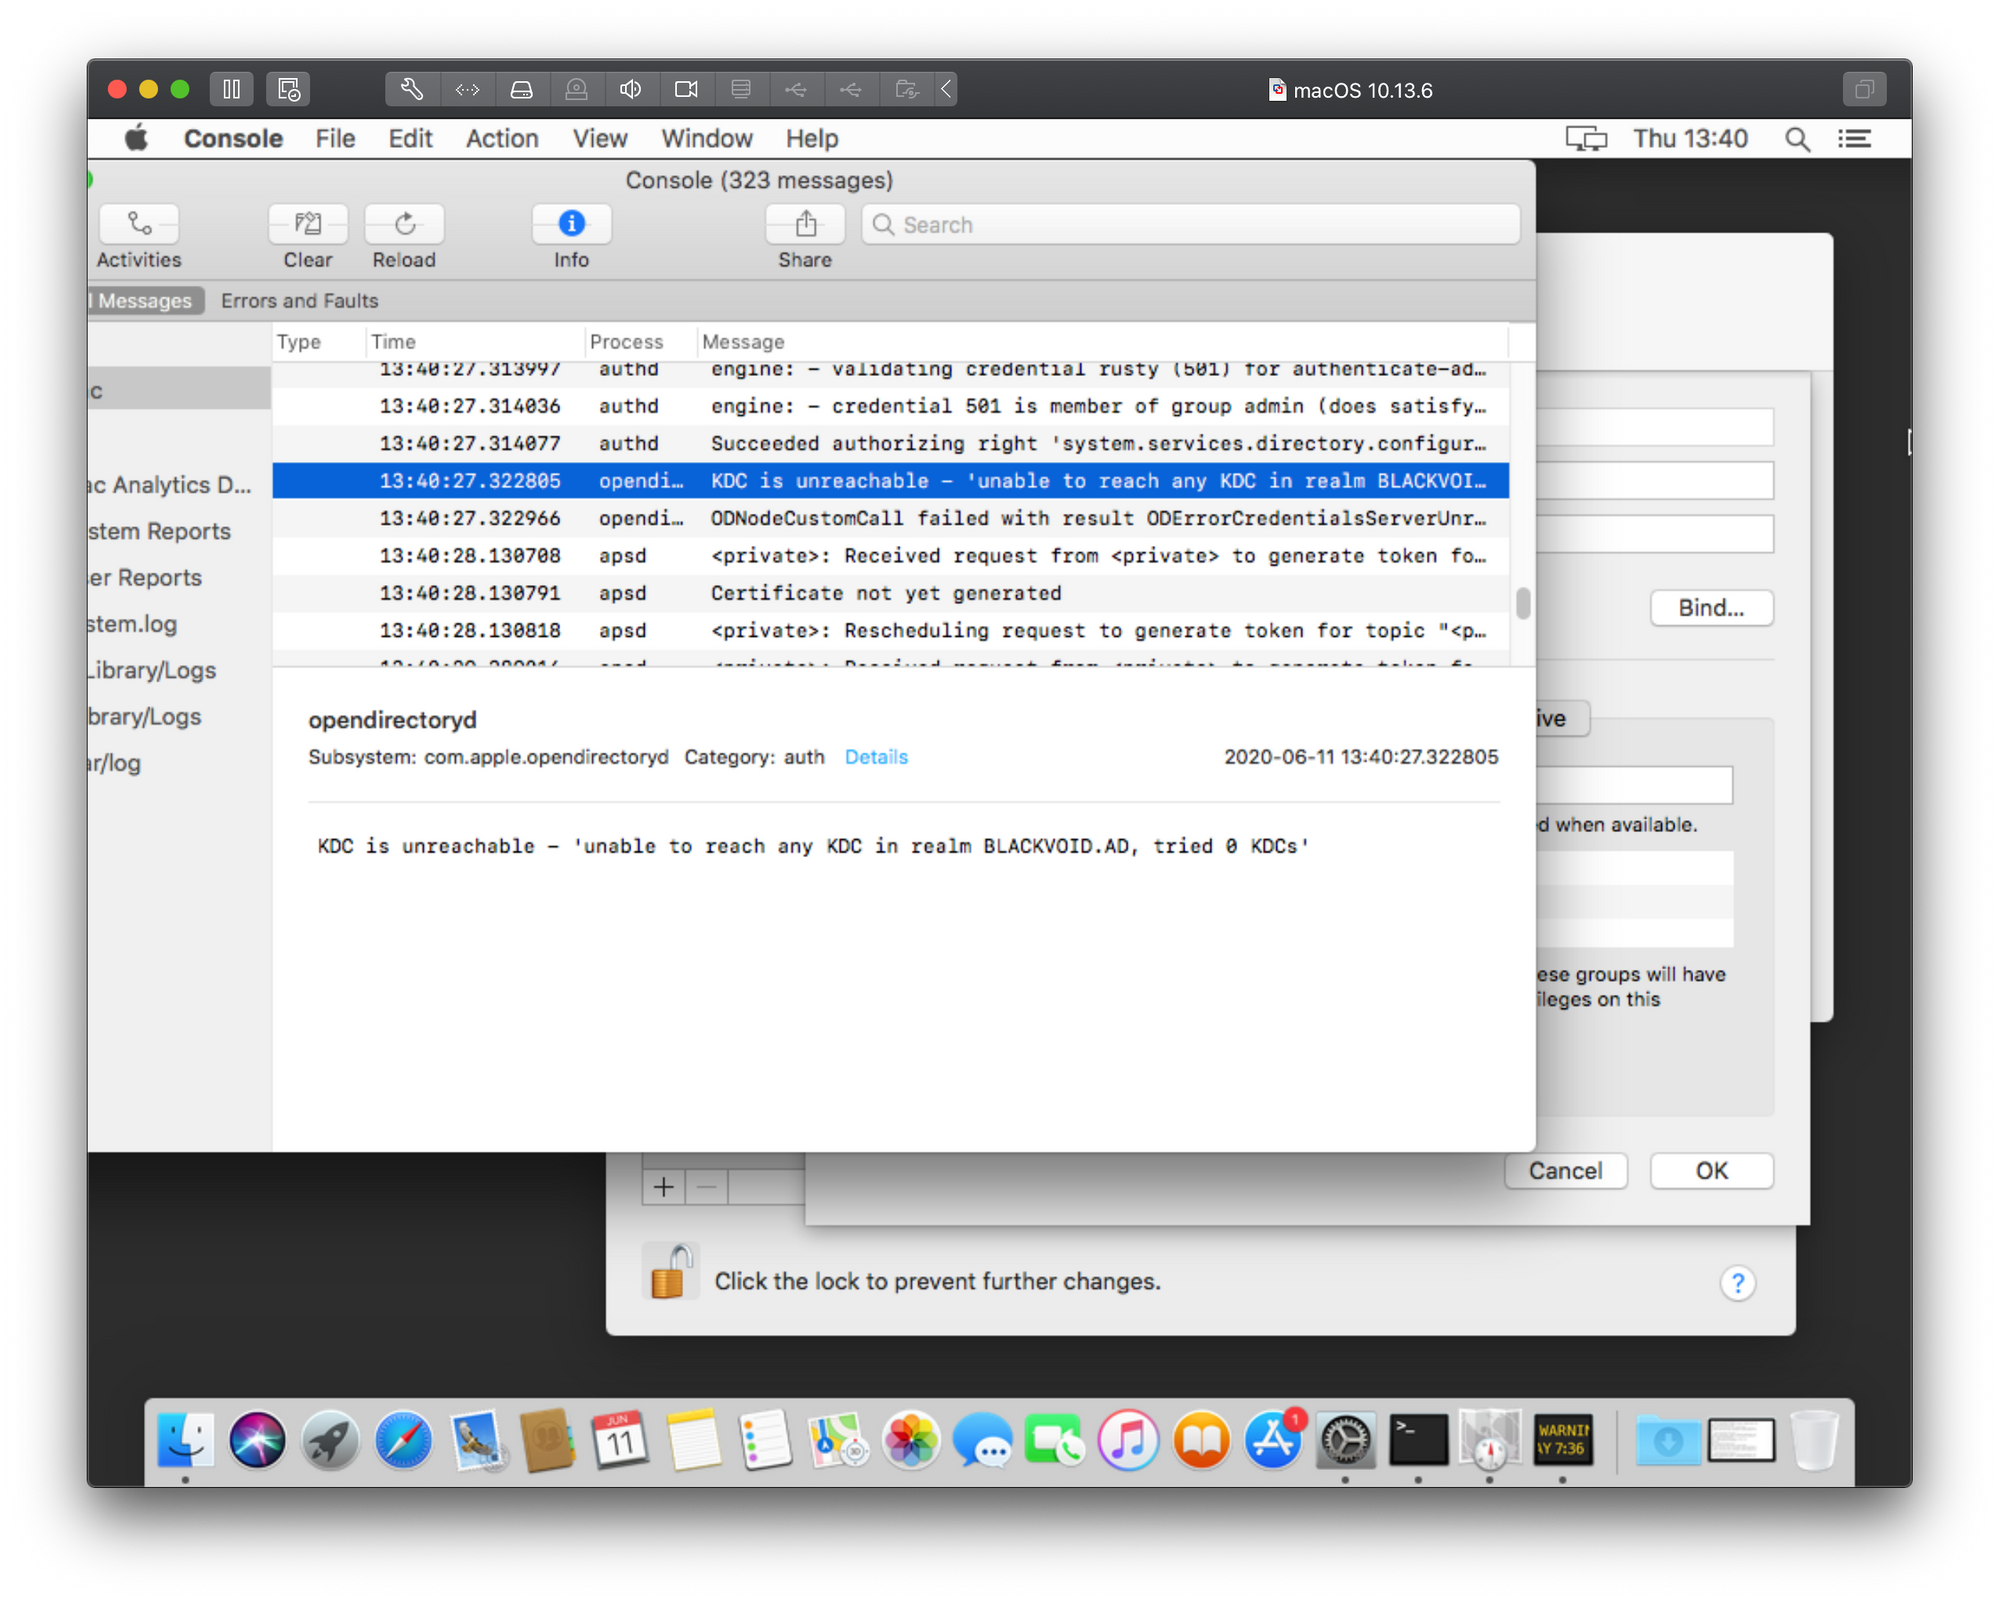
As the image shows, our 5200 error is actually translated to this:
KDC is unreachable - unable to reach any KDC in realm YOURDOMAIN, tried 0 KDC.
Well, now at least we have something to go on. What this error means is that your mac is missing a Kerberos config file that it is trying to read to locate valid domain realms to authenticate against. Why it needs that is beyond me, but unlike a full blow windows pc, this is something that needs to in place.
The location of the file is /etc/krb5.conf. More info on this here: https://github.com/Microsoft/vscode-mssql/wiki/How-to-enable-Integrated-Authentication-on-macOS-and-Linux-using-Kerberos
What needs to be done is create a file in /etc (if its missing) or edit it.
sudo vi /etc/krb5.conf

[libdefaults]
  default_realm = DOMAIN.COMPANY.COM

[realms]
DOMAIN.COMPANY.COM = {
   kdc = dc-33.domain.company.com
}
NOTE: Domain must be in ALL CAPS!
If we try to add our machine to the domain we will see that there is no longer a 5200 error! Great. Hopefully your journey ends here. If not, keep reading.
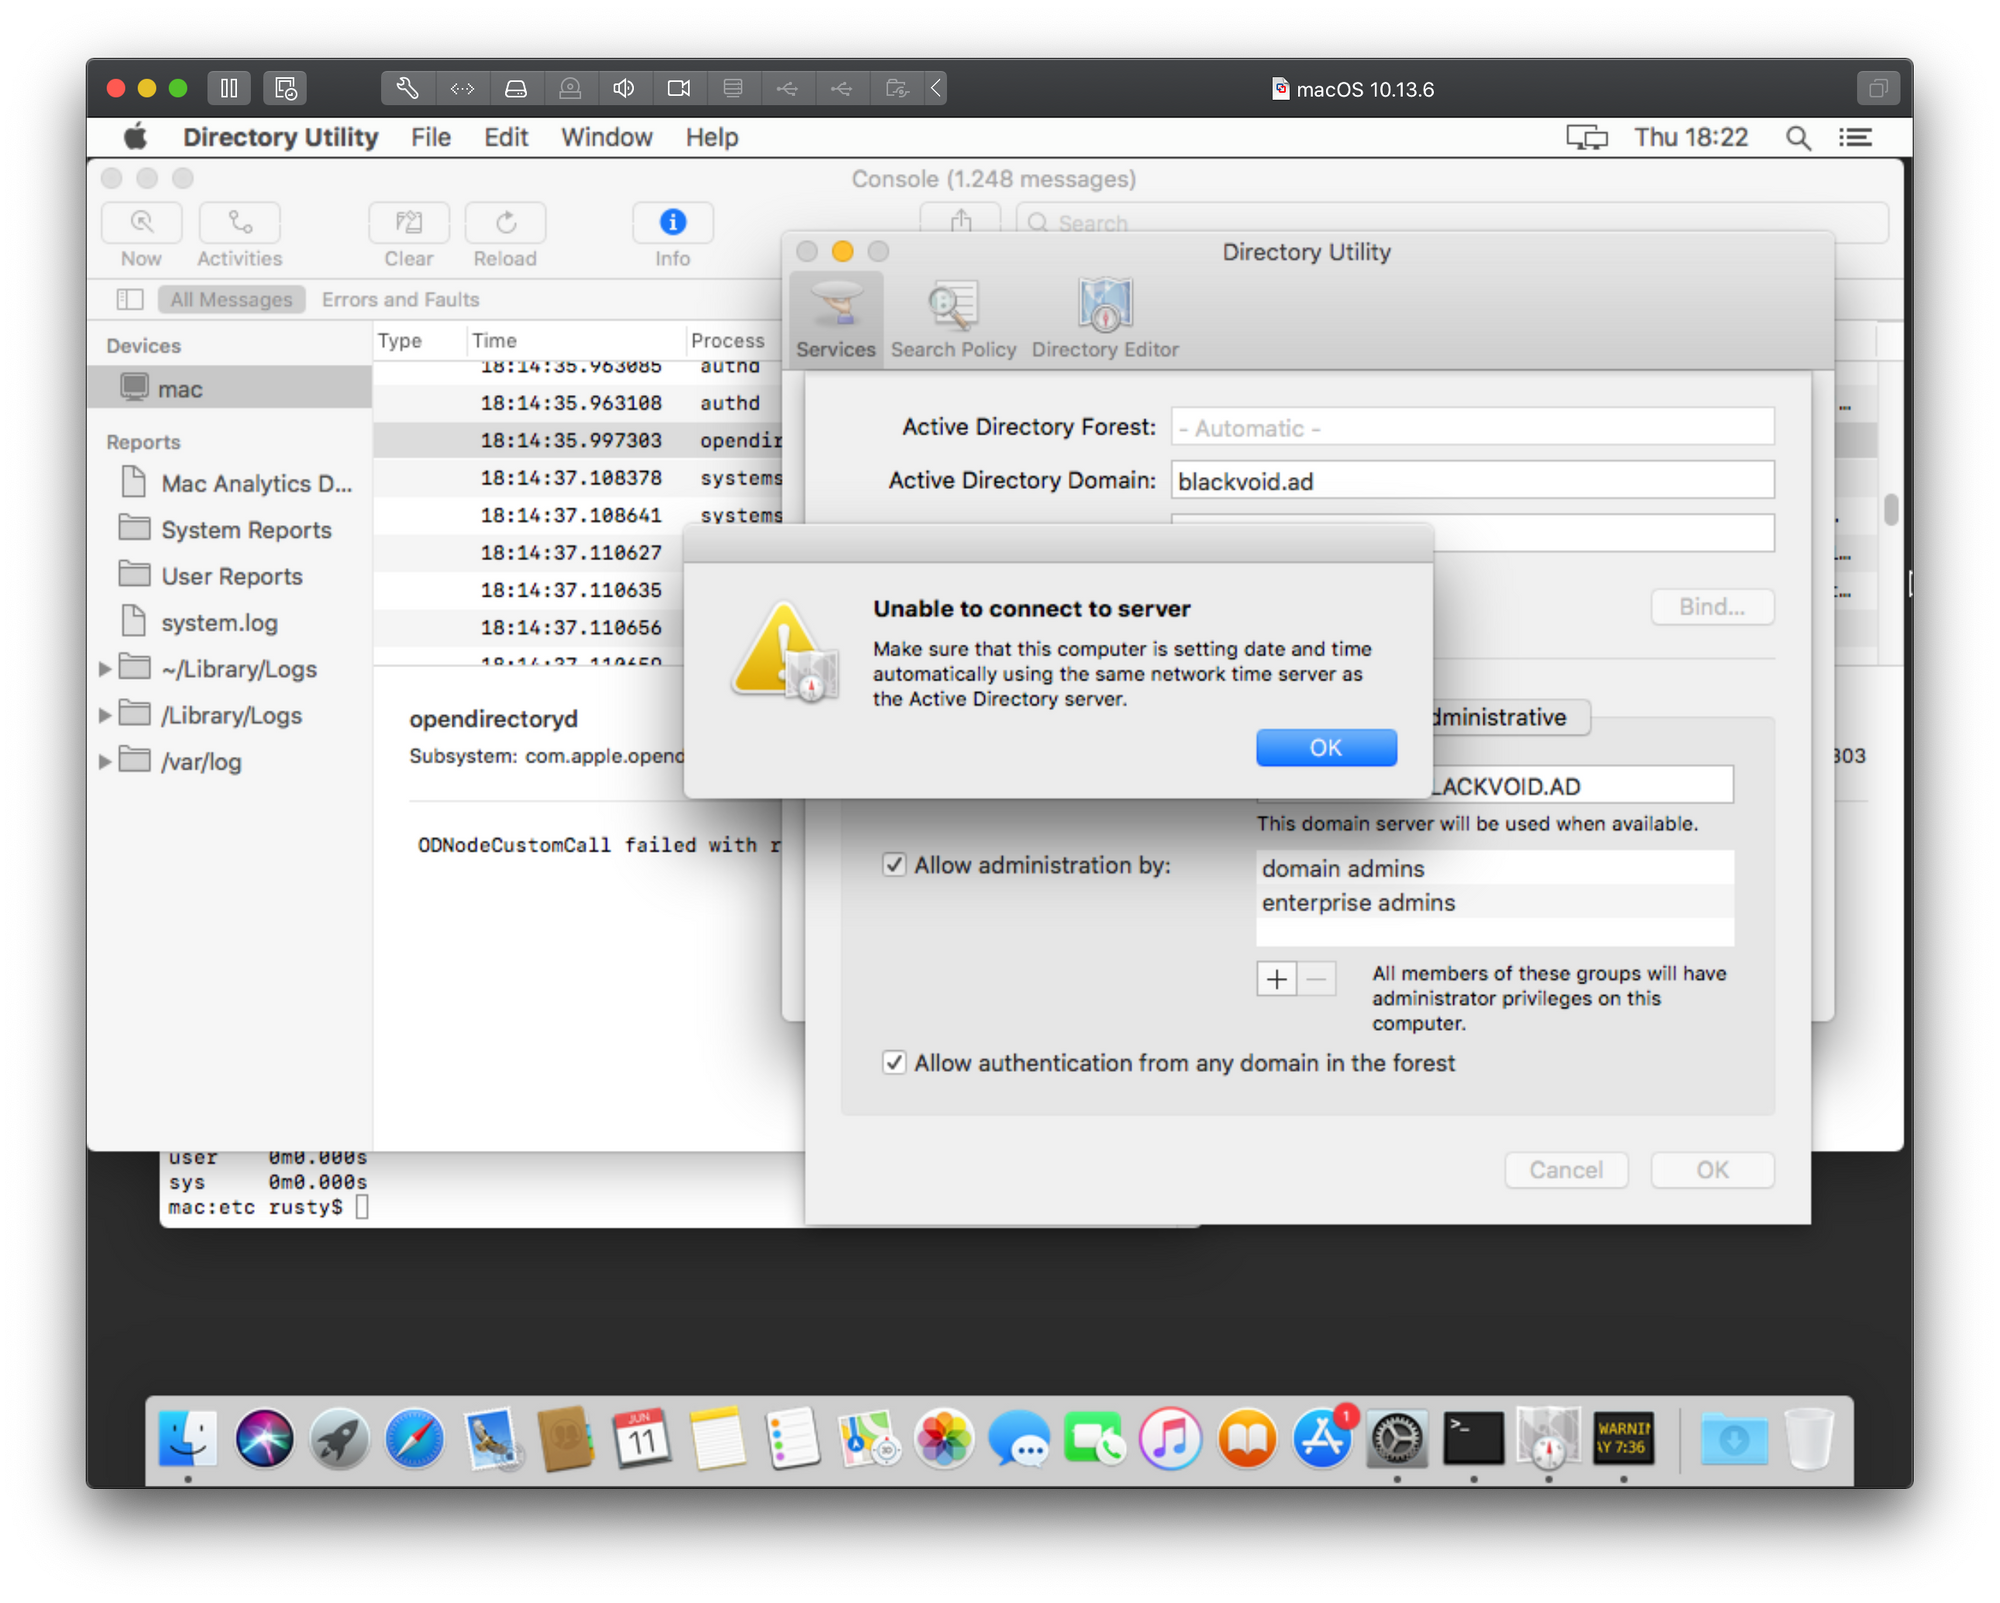
Unable to connect to server - Make sure that this computer is setting date and time automatically using the same network time server as the AD server
This error can pop up also using the Directory Utility panel and as much as its pointing us in the direction of an error it is still not clear if this is correct or not. In my case, the server and Mac device are in sync regarding time so the problem is not there. Just to point out, if at any point, your Mac ends up being over 5 min our of sync regarding time with your domain controller, you will not be able to join at all, or if your device is already a member of the domain your users will not be able to log on until you fix the time gap.
So at the moment, this is where I am. Stuck in time. Just to finish up with a terminal-based bind example and how this particular error reports in the same.
Bind via Terminal
In order to add a Mac via terminal you can use dsconfigad command. Start Terminal and type the following:
dsconfigad -prefered yourserver.YOURDOMAIN.SOMETHING -a nameOfYourDevice -domain YOURDOMAIN.SOMETHING -u administrator -p 'yourDomainPassword'
In the case of this Unable to connect to server error, you will get this message in the Terminal app: “Node name wasn't found. (2000)”. Now, this is something that just like error 5200 is in a million places and for the most part, time difference is the main problem and solution for this error. However, in my case, this is still an open investigation. I will keep looking into this and write back any more errors or hopefully a solution to this little endeavor.