Standard Notes - Docker self-hosted alternative for all your note needs

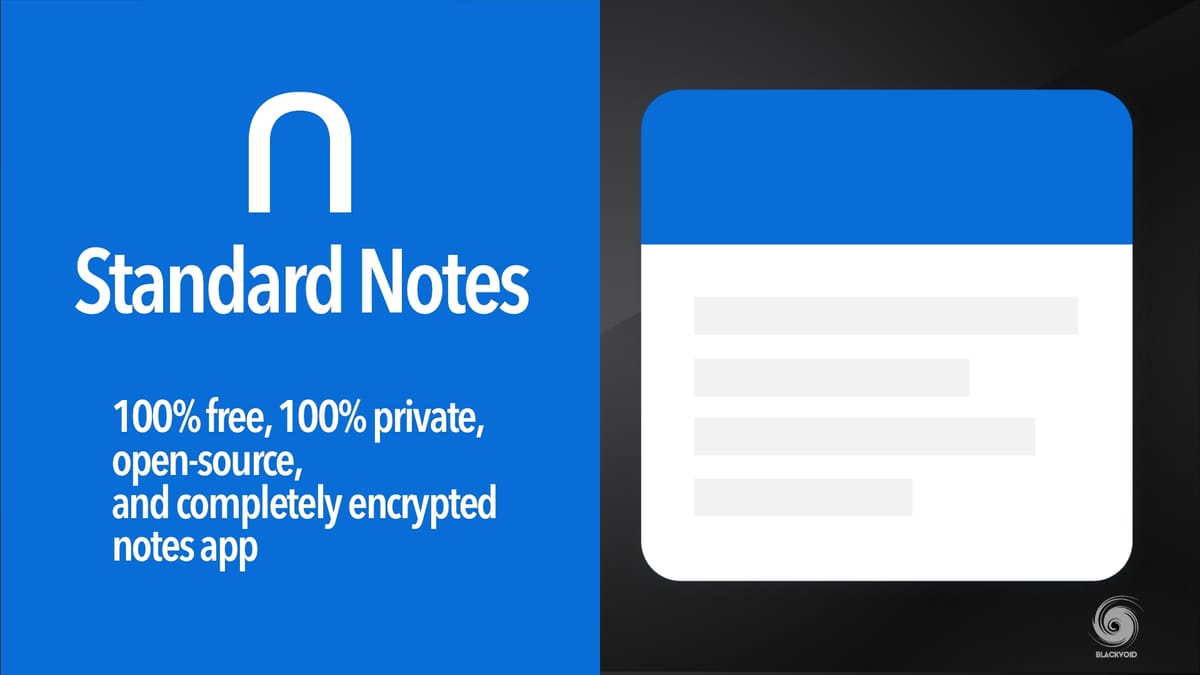
Table of Contents
Requirements
Docker configuration (MYSQL and SN)
Configure reverse proxy access for secure HTTPS access
Connect your SN instance to official SN apps
Extensions - boost up your SN instance
Extensions gallery not loading inside a web browser
WebApp - host your own WebApp SN instance
FileSafe - encrypt your attachments
Not another one of those notes apps am I, right? I mean we have Synology Note Station, a globally popular Evernote, Apple Notes, Bear app, and a million others, so what makes Standard Notes special?
Notes? Who needs a notes app...?
Before I write a bit about why this article should make sense, in case you are not interested in what I have to say and are looking for the know-how of running this on your own Docker (Synology) platform, jump down to the "Requirements" section.
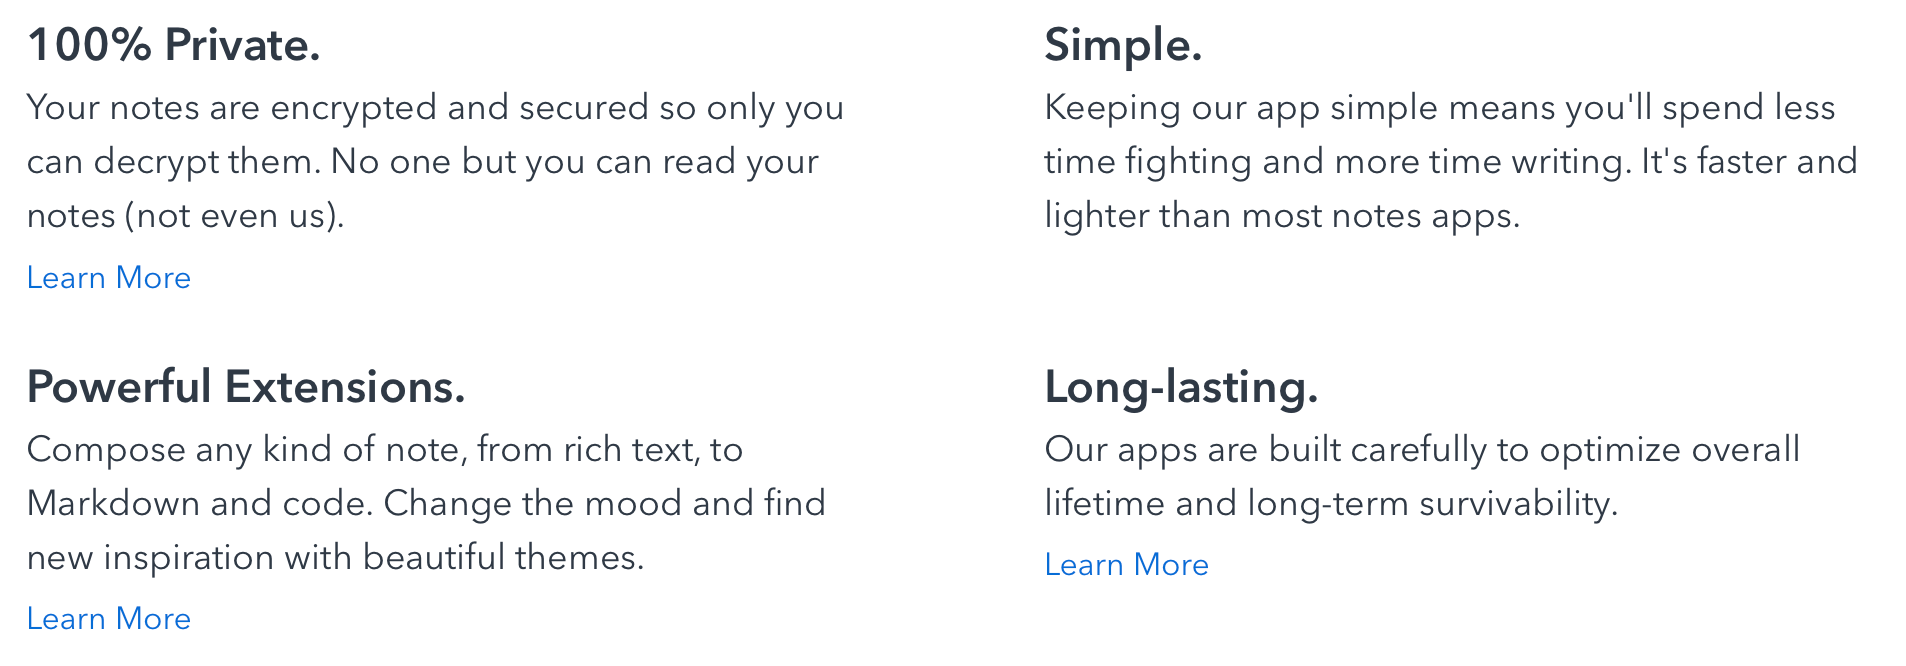
As you can see from the images above, SN offers a lot. From a modern minimalistic look to a full mobile and desktop app, along with 2FA support, FaceID, and super fast sync service that just works.
You can host it yourself, preserving the data 100% on-site, access it anywhere from a web browser app connected to your server. Brilliant, just as Bitwarden setup is for passwords.
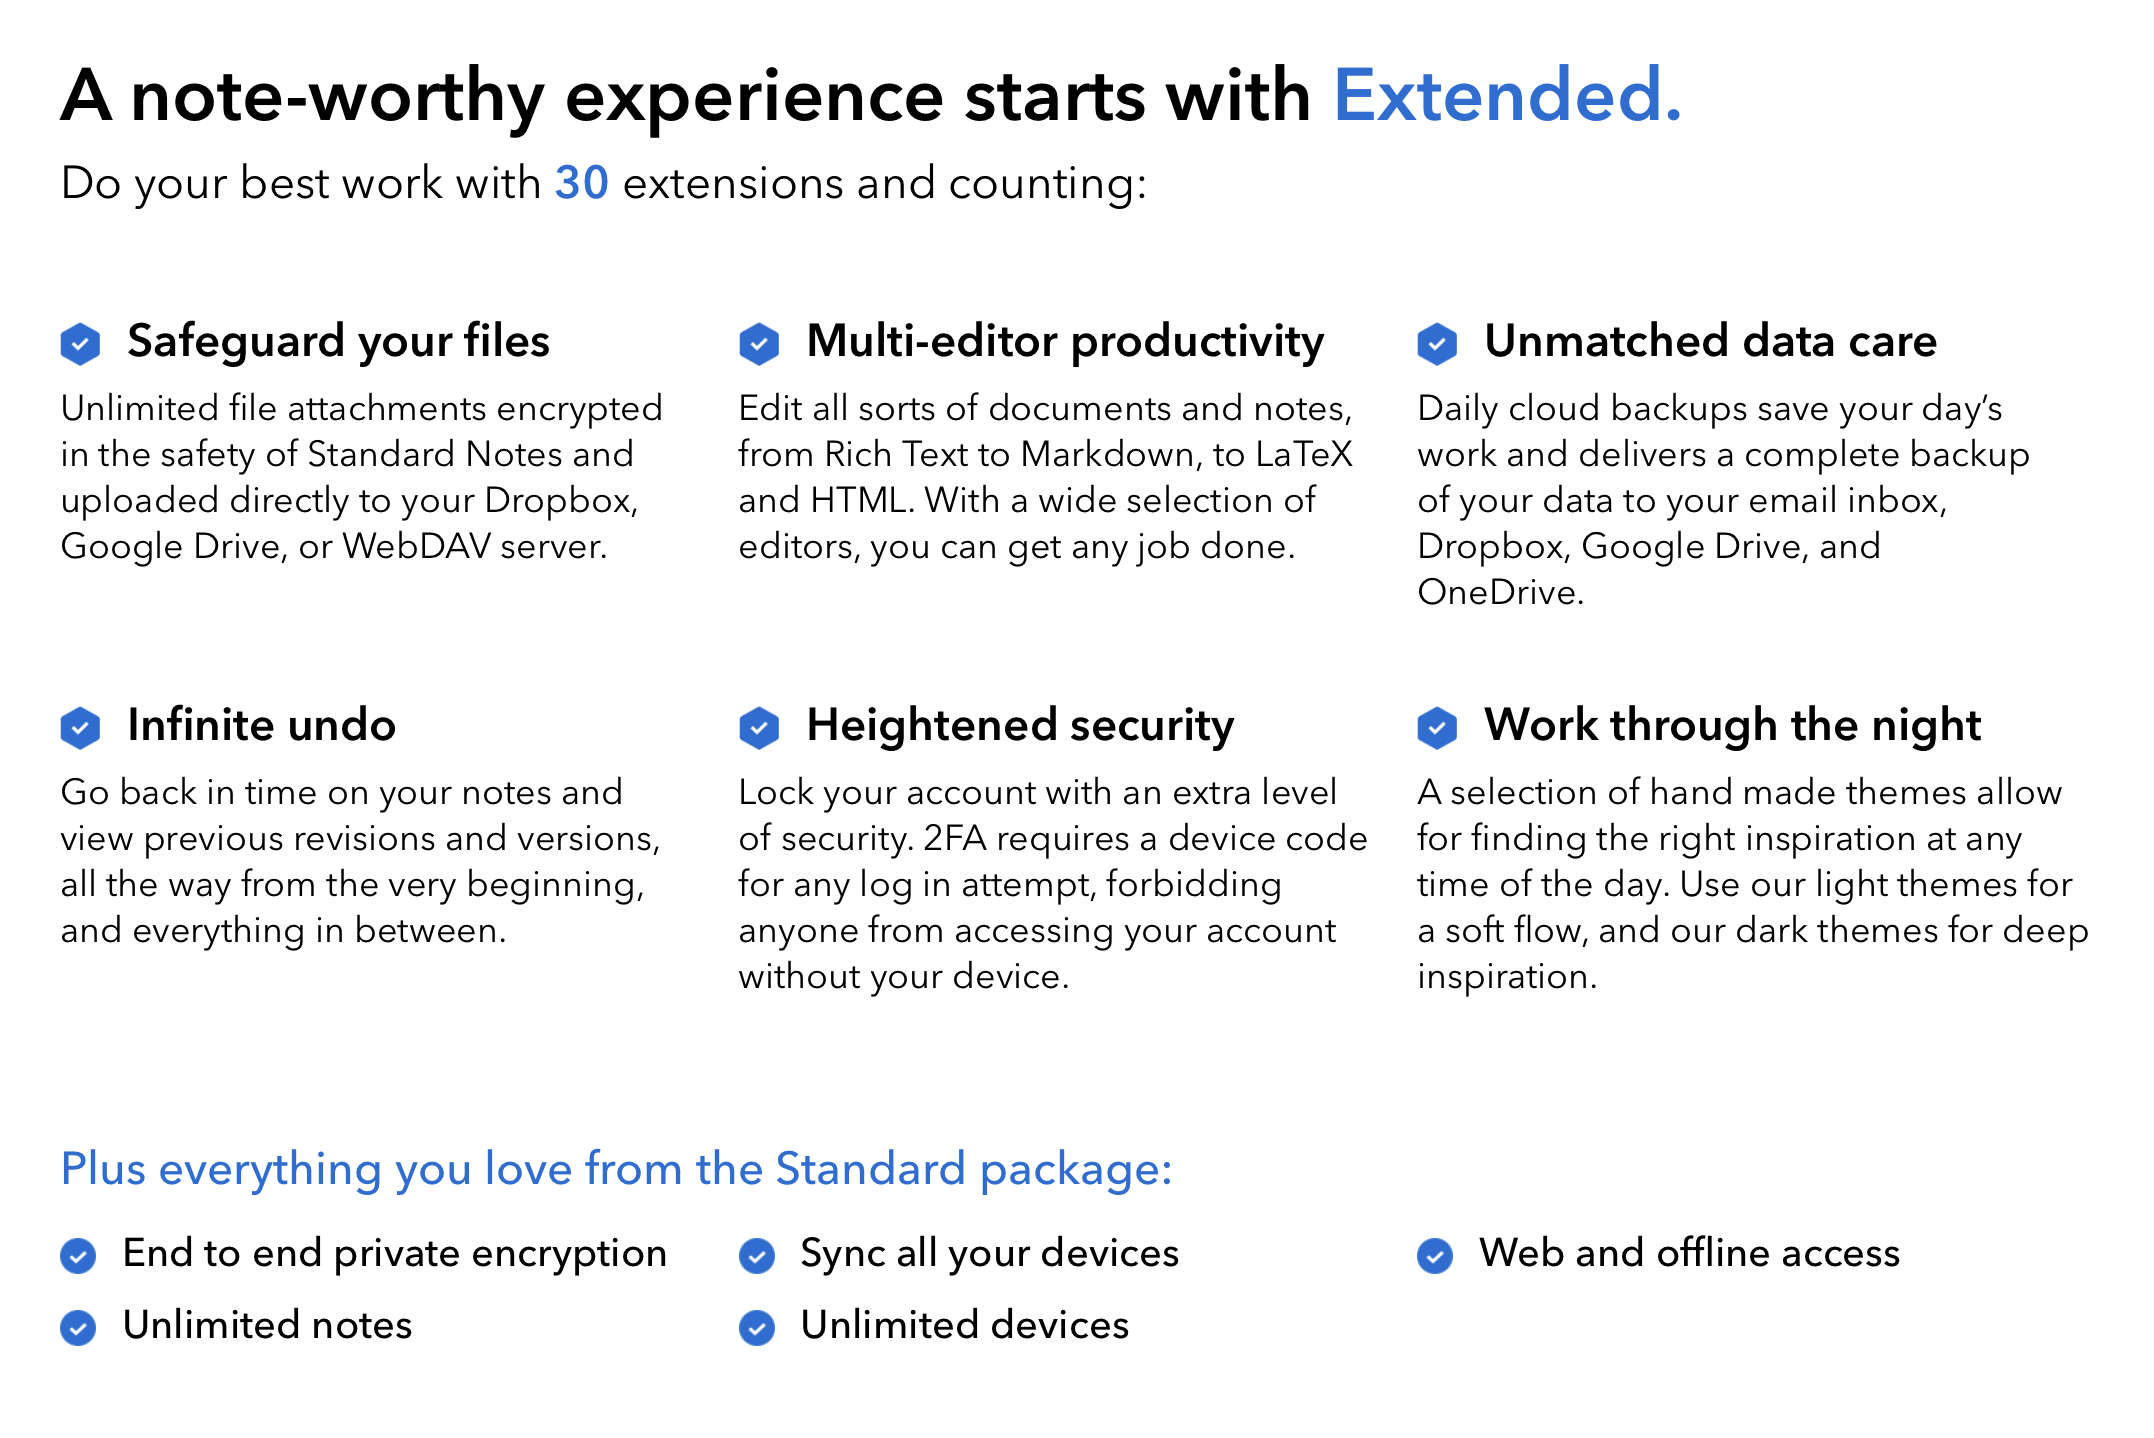
SN offers also a paid solution unless you don't feel up to it hosting it yourself and offers about 30 extensions at the moment to make your instance even more powerful than a simple notes app.
With its spartan looks and features, out of the box, you get a free note-taking app with sync. More than enough for the majority of people. If you are looking a bit more, like support for markdown, code, themes, 2Fa, etc, then you will need to either pay a small monthly fee or host them yourself.
This article will show you how to make it all happen and run it inside Docker on your Synology NAS along with (also free and open-source) all extensions that SN offers.
Before I get into all that just a few words why bother with this scenario in the first place. Well, I like to self-host apps and services that I use daily. There are some great solutions out there (better then some paid I might say so), so why not? If you need to use a service that is open-source, private, and free, really, why not?
For a long time, I have been using Synology Note Station since it came out years ago. I was never too happy with it and I made a switch from Evernote to it long before Evernote started its new policy. With Note Station, it made sense to self-host my notes on my own NAS. From a functional standpoint, NS was always missing things, and as time goes by it looks like Synology has forgotten about this app. The Mobile version was not updated in ages and new features are not coming along as well. Just like in my RocketChat vs Mattermost article comment section, I was asked why the Synology Chat app was not mentioned, or why am I not using it at all, but rather some alternatives? The same applies here. Why not use a solution that is not connected to any HW or SW brand specifically and on top of that you can run it anywhere you want?
Now, do I need a note app? Well, in a way I do. Personally, after jumping from Note Station I have started looking for a more feature-rich solution. Landed on Bookstack. Yes, no article on this one, but truth is, this is not a note app, it's a wiki/documentation platform. Plenty of those around as well. Even though it doesn't have a mobile app, it is mobile friendly (to some level) but I use it mostly while working on my iMac anyways.
Still, when it comes to notes I have used a number of those over the year and all of them had something missing in the big picture. Well, looks like the search is finally over.
The belly of the beast
So what am I looking for in a notes app?
First, self-hosted and open-source. Free tag is usually associated with open-source but it also depends. In the case of SN, all functions are indeed free and possible to self-host. Mobile friendly with a possibility of biometric protection. Nowadays with all the data leaks, keeping things private and locked is kinda the main thing right?
The option to extend functions and secure and stable development is also very important if nothing else then because I don't wanna jump ship each year. Finally, the option to import notes from another platform (not very important). In the case of SN, this works with several competitors but with mixed results.
SN checks all the boxes and more, so let's see how to set it up and use it as your new, private, and secure platform for all your note needs. Keep in mind that some functions that other apps have, SN lacks and vice versa, so before you get into it and declare it your new uber note app, be sure to test it beyond this article and make your own decision.
Requirements
- Owned domain with a valid SSL certificate
- 1(2) domain alias that will be used via reverse proxy configuration to access your instance (another one if you will self-host the extensions, this is optional)
- MYSQL instance up and running with access to it to create a database and its user
- Root SSH access to your NAS
- Knowledge of installing phython3 and its addins via command line
Docker configuration (MYSQL and SN)
I will start with the SQL container considering that it is the place where all the SN data will live. Before we start to build on the app itself, we need to have SQL prepared.
Keep in mind that SN deployment can be done with running a docker stack (app + a dedicated MYSQL instance), but this article will cover running it on top of a shared MYSQL instance (running other DB's for other apps).
If you already have an MYSQL instance running on your network you can skip this step, if not, follow along.
STEP01 - Download MYSQL repo and phpMyAdmin
Log into your NAS via SSH (Terminal macOS app, or PUTTY on Windows for example) and elevate your access to root using the `sudo -i` command.
ssh yourNASuser@yourNASipAddress
Enter your password and then elevate to root with this command:
sudo -i
hit return and re-enter your password and you should be logged in as root.
Now download the MYSQL repo using this command line:
docker pull mysql:latest
Prepare a local folder on your NAS to host MYSQL data files. For example in `/volume1/docker/mysql`.
Run the following command to start MYSQL container:
docker run -d \
--name some-mysql \
-v /my/own/datadir:/var/lib/mysql \
-e MYSQL_ROOT_PASSWORD=my-secret-pw \
-p 3306:3306 \
mysql:latest
This should give you MYSQL instance running on your NAS on port 3306 (or any other if you have changed the left value in the port section.
Next, we need a web UI to administer the MySQL instance. This will be done using the phpMyadmin container.
docker pull phpmyadmin/phpmyadmin:latest
and now configure it and run it against your MYSQL instance:
docker run -d \
--name phpmyadmin \
-p 80:80 \ change the left value to a custom port if you wish/need to
-e PMA_PORT=same port as your MYSQL instance \ (3306 for example)
-e PMA_HOST=yourNASIP \
phpmyadmin/phpmyadmin:latest
Now open your web browser and to `http://yourNASIP:port` and you should land on your phpMyadmin page.
Login as root with the password that you have defined for your MYSQL container. From here you have a functional MYSQL instance that you can use.
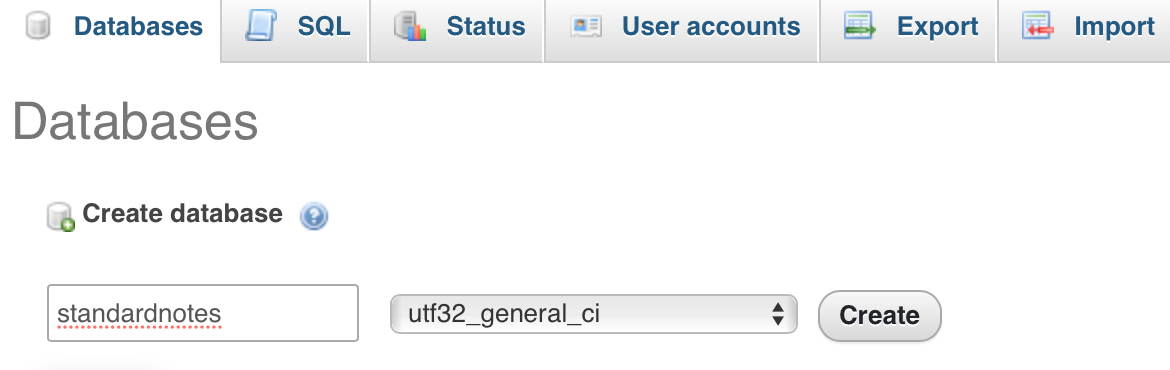
STEP02 - Configure the Standard Notes MYSQL database
Log into your phpMyAdmin and create a new database for SN. Chose the name you want, but be sure to use utf32_general_ci collation for the DB!
Next, we need an account and permission on our DB. Switch to the Privileges tab and on the bottom, select Add user account.
Set your username, password, and host (you can leave % to mark any host) as well as grant privileges on the bottom.
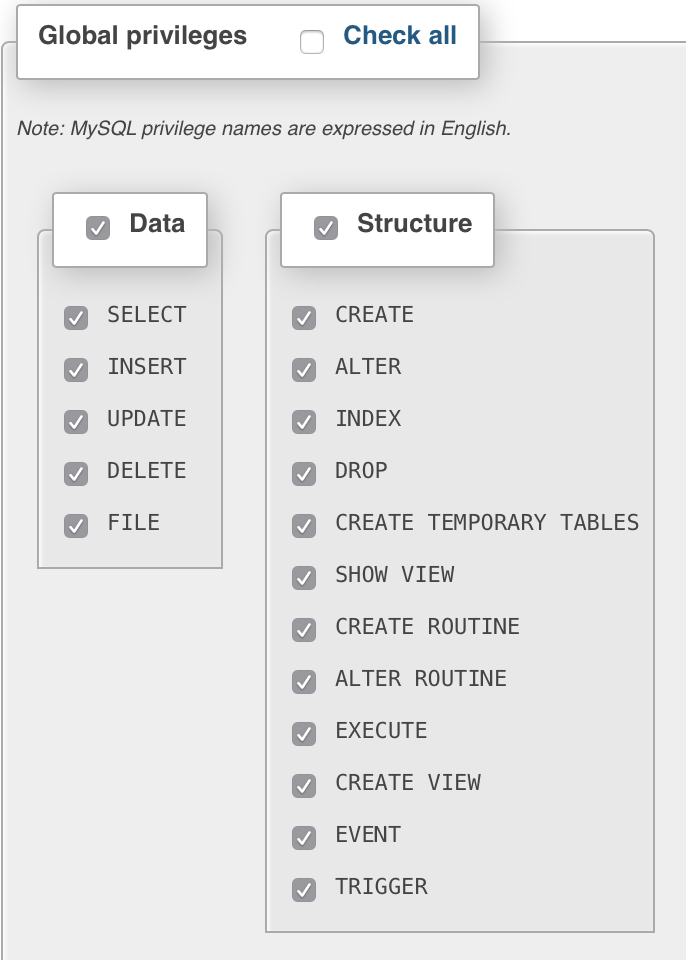
Once all that is done, click the Go button on the bottom right and you are done with the SQL side of things.
STEP03 - Standard Note standalone repo stack
The most important part of this whole setup is this step. With the current repo that Standard Notes is running at the moment, standardnotes/standalone, we will set up a "stack" of containers that are needed to get this up and running.
There will be 6 (well 7 if you count the DB container that we already set up) containers that will result from a single docker-compose file (stack).
Also, we will let these containers run in an isolated docker network so there will be no need to change too many elements. Let's start.
STEP03.1 - docker-compose.yml file
Create a folder on your NAS that will house all the .ENV files including the compose YML one. Something like: /volume1/docker/standardnotes/
Inside that folder save the docker-compose.yml file for the standalone setup that you can find here: https://github.com/standardnotes/standalone/blob/main/docker-compose.yml
Changes in this file that need to be made:
latest tag for the standardnotes/xxxx images. There could be various problems in doing so, so best to use the specific versions that are up to date here, in the current compose file. The rest remains the same. image: standardnotes/syncing-server-js:latest
image: standardnotes/api-gateway:latest
image: standardnotes/auth:latest
image: redis:latest
If you have created the DB set up in the previous step, then be sure to remove this section from the compose file:
  db:
    image: mysql:5.6
    environment:
      MYSQL_DATABASE: '${DB_DATABASE}'
      MYSQL_USER: '${DB_USERNAME}'
      MYSQL_PASSWORD: '${DB_PASSWORD}'
      MYSQL_ROOT_PASSWORD: '${DB_PASSWORD}'
    ports:
      - 3306
    restart: unless-stopped
    command: --default-authentication-plugin=mysql_native_password --character-set-server=utf8 --collation-server=utf8_general_ci
    volumes:
      - ./data/mysql:/var/lib/mysql
    networks:
      - standardnotes_standalone
So, remove the whole db section. If you haven't made it or don't want to run a separate DB container then leave the compose file as it is!
Next, we will need three (3) .ENV files in that same local folder that you have created.
STEP03.2 - .ENV (main configuration file)
Grab the sample file from here: https://github.com/standardnotes/standalone/blob/main/.env.sample
Rename the file from .env.sample to .env. Remember, the file has no name just the ENV extension. As such, it might not be visible unless you have the "show hidden files" option turned on.
Changes in this file that need to be made:
AUTH_JWT_SECRET=auth_jwt_secret

EXPOSED_PORT=3000

DB_HOST=db
DB_REPLICA_HOST=db
DB_PORT=3306
DB_USERNAME=std_notes_user
DB_PASSWORD=changeme123
DB_DATABASE=standard_notes_db
EXPOSED_PORT variable is the port number that you want to change depending on what port you want your server running on. For this example, it's 80, but you can change it to any port you want.
To generate the secret variables you can use a command-line from your NAS via SSH:
openssl rand -hex 32
Run that command for each of the secrets/keys needed!
STEP03.3 - api-gateway.env (configuration file)
Now we need another ENV file from this location: https://github.com/standardnotes/standalone/blob/main/docker/api-gateway.env.sample
Save that file in your local folder and rename it from api-gateway.env.sample to api-gateway.env .
There are no changes needed in this file.
STEP03.4 - auth.env (configuration file)
Finally, we have one more file from this location: https://github.com/standardnotes/standalone/blob/main/docker/auth.env.sample
As before, rename it to just auth.env, save it to your local folder and edit the following:
JWT_SECRET=randomValue
LEGACY_JWT_SECRET=randomValue
PSEUDO_KEY_PARAMS_KEY=randomValue
ENCRYPTION_SERVER_KEY=randomValue
You can use the openssl rand -hex 32 command again in this case.
That's it when it comes to preparing the files. Let's recap:
- create a local folder on your NAS that will have the following files inside it:
- prepare the docker-compose.yml file
- prepare the .env file
- prepare the api-gateway.env file
- prepare the auth.env file
STEP04 - Start the stack
Log into your NAS via SSH if you haven't already, and elevate to root with sudo -i.
Run the following commands one at a time in order to download the images:
docker pull standardnotes/syncing-server-js:latest
docker pull standardnotes/api-gateway:latest
docker pull standardnotes/auth:latest
docker pull redis:latest
Now position yourself inside the local folder with the files and run the following command:
docker-compose -p "standardnotes" up -d
You can change the name of the "project" or "stack" if you want. In this example, I have used a common name to have them grouped under a single stack called standardnotes, but you can use a different name if you want.
This command will download all the images needed (if you haven't done that so far) and start up the containers as well as create the network. Something similar to this:
Creating network "standardnotes_standalone" with the default driver
Creating standardnotes_js_auth-worker_1              ... done
Creating standardnotes_js_syncing-server-js-worker_1 ... done
Creating standardnotes_js_api-gateway_1              ... done
Creating standardnotes_js_cache_1                    ... done
Creating standardnotes_js_auth_1                     ... done
Creating standardnotes_js_syncing-server-js_1        ... done
Once you are back at the command prompt, you are good to go. It will take about 10-30 seconds to set the database and get the whole setup up running, and to be sure that you have it all running OK, simply open your browser and go to this address:
http://yourNASIP:EXPOSED_PORT_VALUE/healthcheck
So, use your NAS IP address and for the port use the EXPOSED_PORT variable that you have set in the main .ENV file.
The result of this URL should simply say OK if everything is OK, and you are good to go!
docker-compose -p "standardnotes" downdocker-compose -p "stack_name" up -d command to update.Configure reverse proxy access for secure HTTPS access
Now that you have a working instance of SN time to publish it to the web. If you are certain that you will not need to access your notes on any device outside your LAN you can skip this step.
If you do want to access your notes from any device anywhere in the world you will have to add them and configure them using reverse proxy settings inside the DSM control panel application portal section.
For more details on how to configure any docker container via reverse proxy and bind it to a valid SSL certificate, read it here.
Connect your SN instance to official SN apps
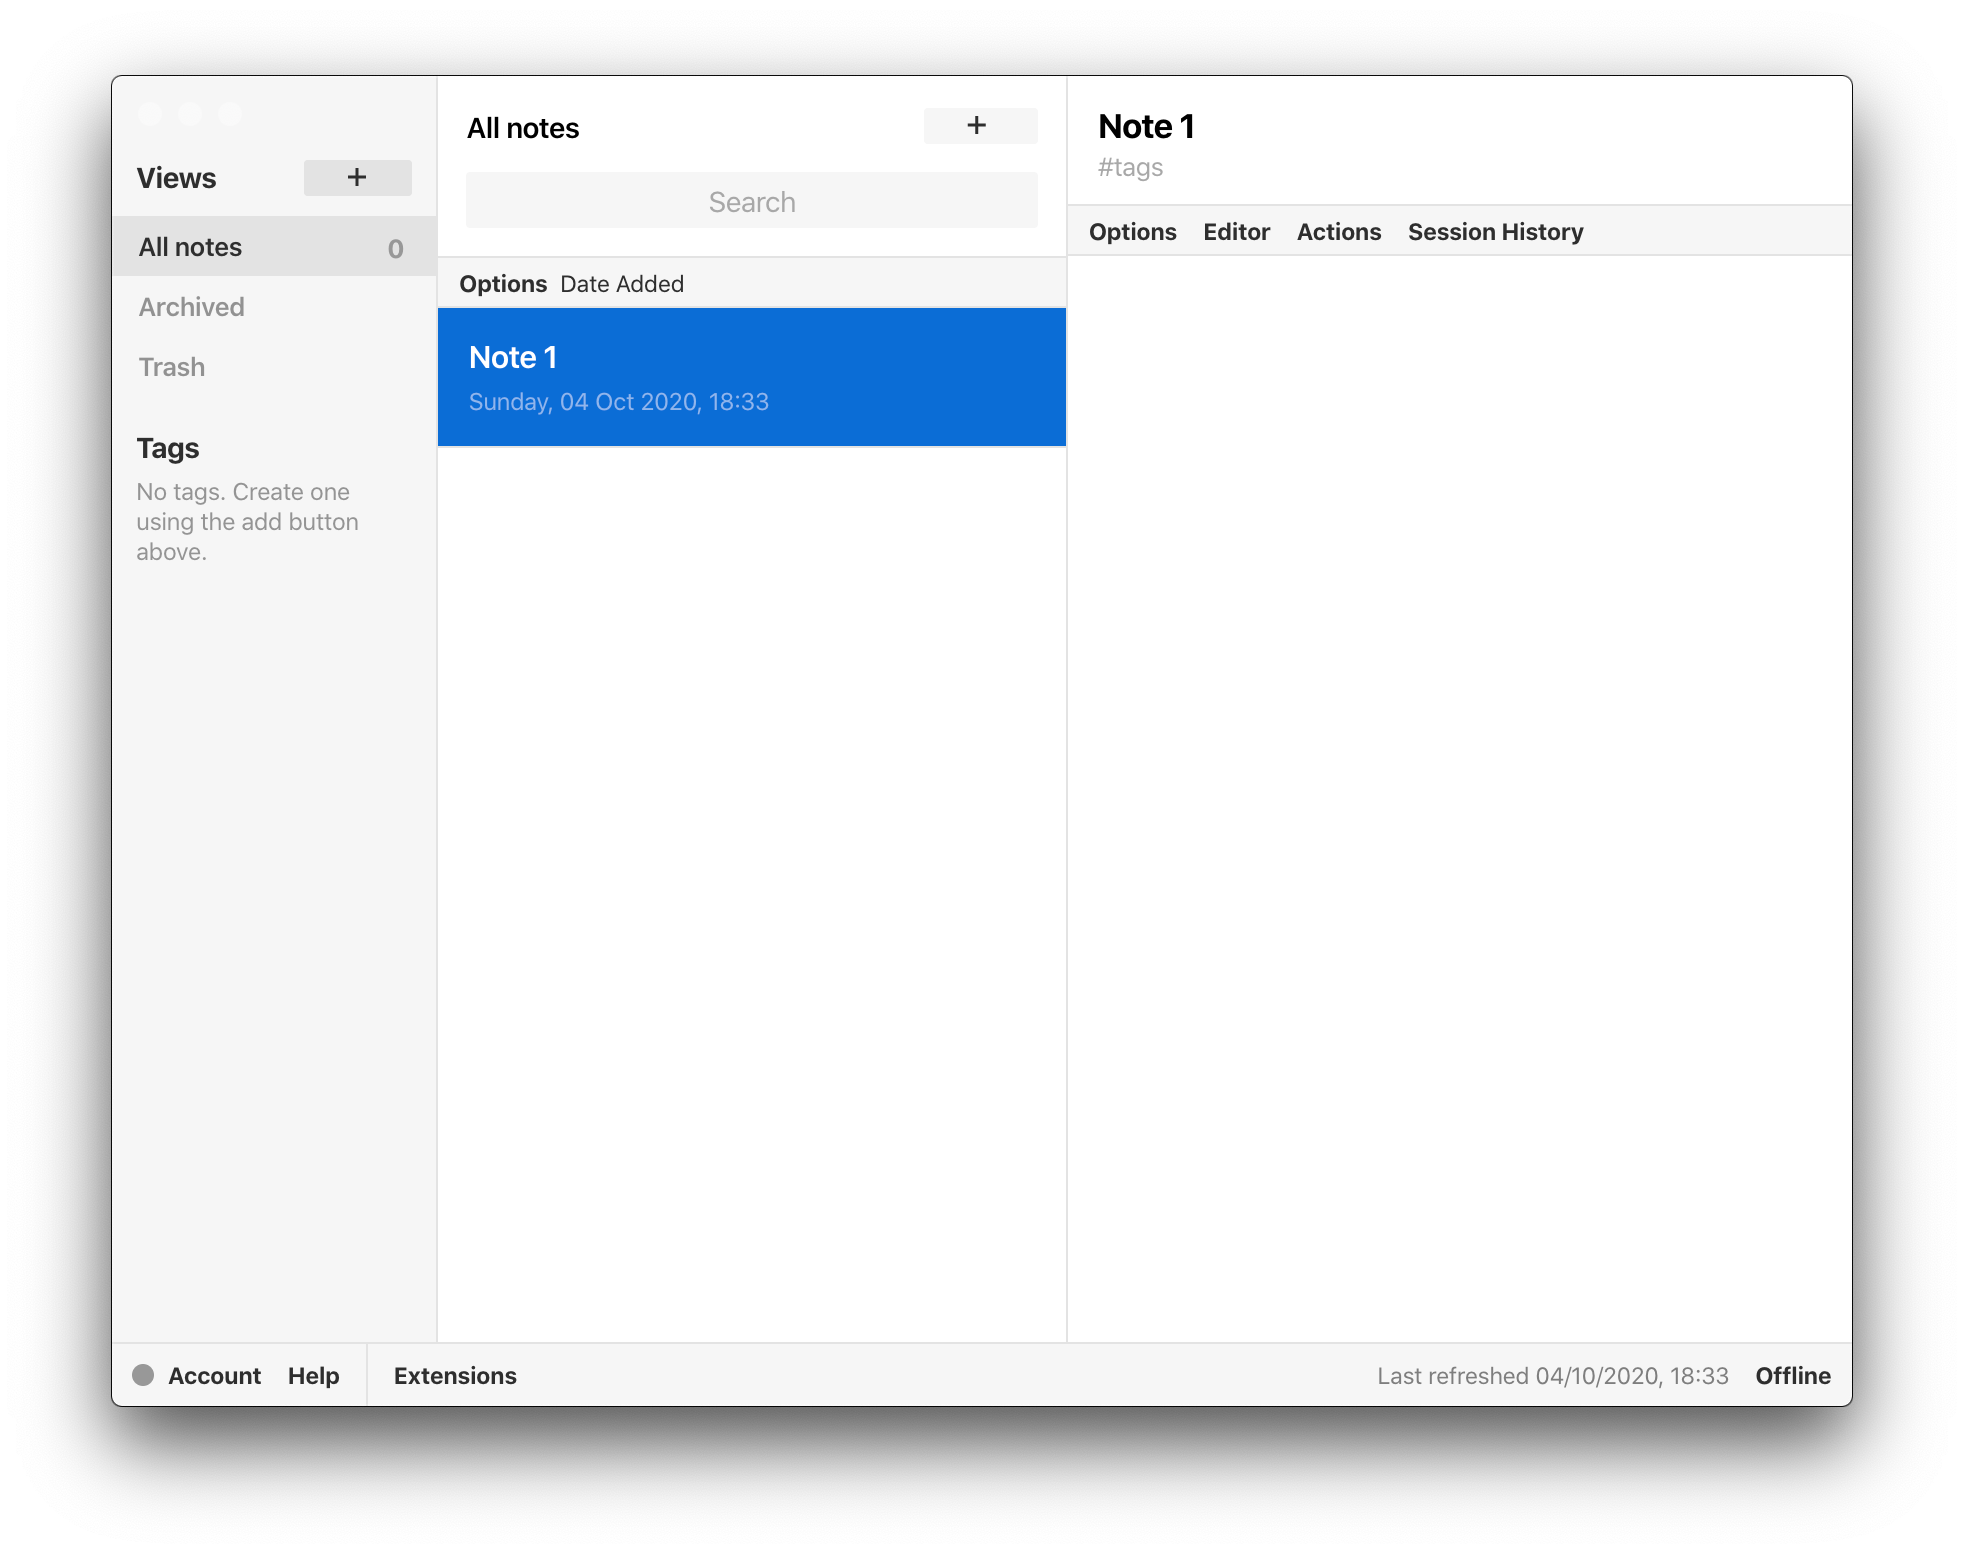
After you have configured (or not) your SN instance it is time to finally connect it to official apps. The process is the same for all apps so I will demonstrate it on a desktop app. At this time you will also register your first account.
STEP01 - register an app with your instance
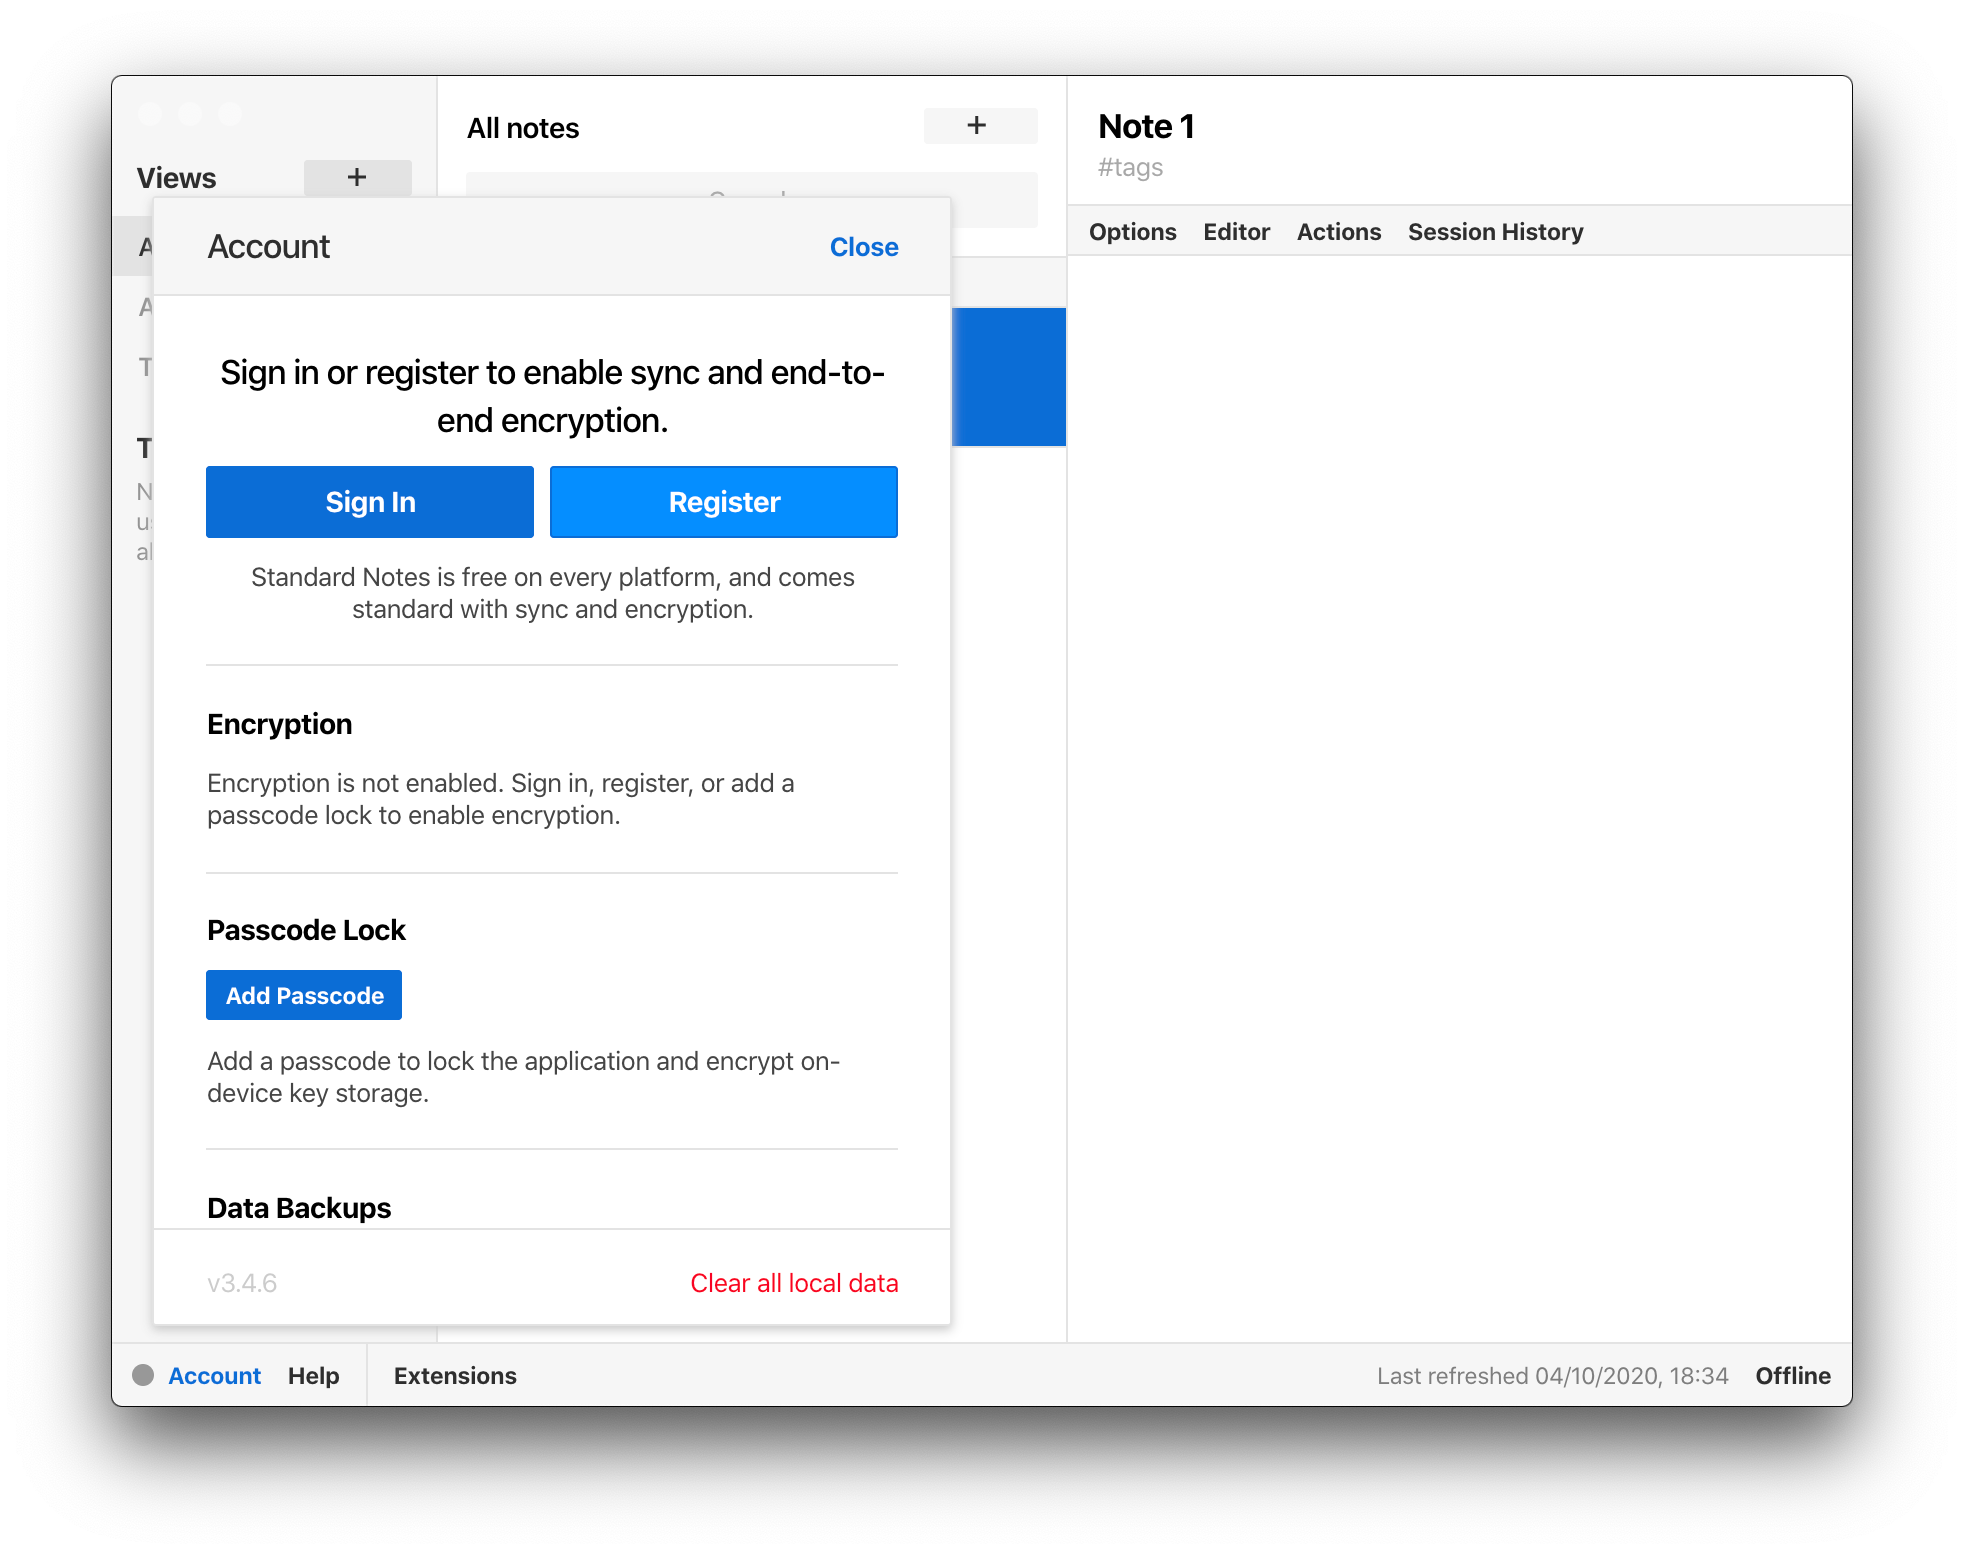
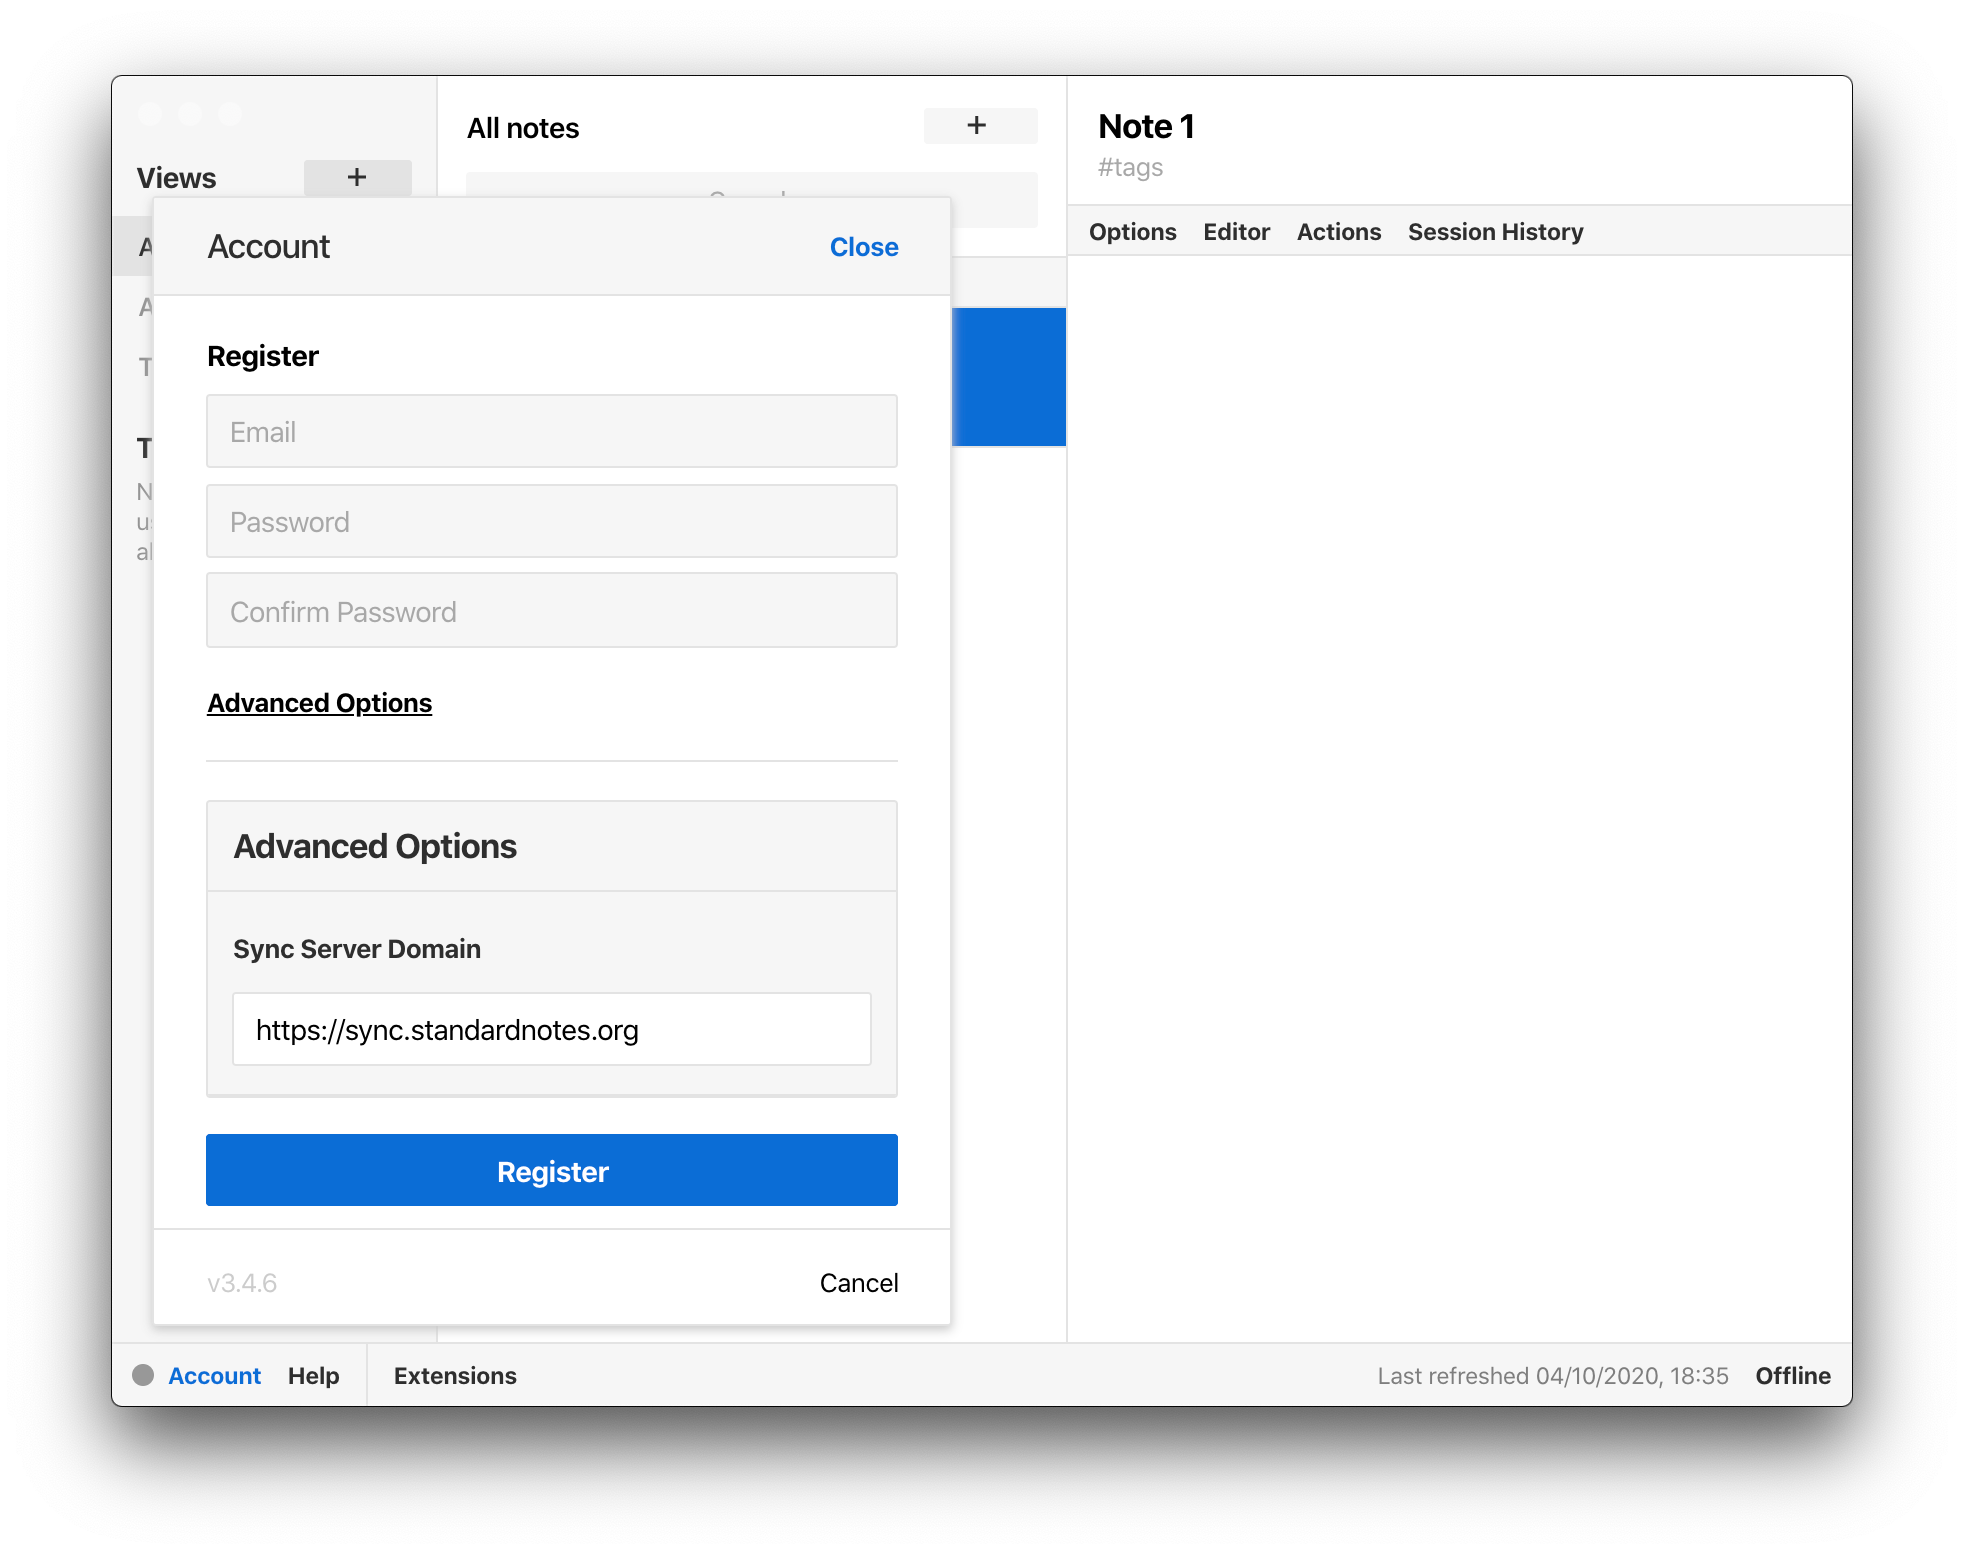
Click "Register" again and you are done! Now repeat that step for mobile apps as well as the web version on URL: https://app.standardnotes.org and you will have a perfect note sync solution on any device you can imagine.
Extensions - boost up your SN instance
Baremetal web hosting (using Synology WebStation)
Before you move into this territory keep in mind that these steps are optional and you will not have any problems using your SN setup without them. However, saying this, (as I said in the intro) SN in this form is free, very very minimalistic, and asking for more.
To get extensions to work you have two options:
- Buy a subscription with SN
- Host them yourself
These steps will focus on hosting the extensions on our end. To get this going we will use this GitHub repository https://github.com/iganeshk/standardnotes-extensions to build it.
After we have built it we will then host it as a virtual host on our NAS using WebStation and then again, reverse proxy it behind a nice custom name via HTTPS protocol. The result will be an HTTPS URL that we will then paste into SN and all extensions will load up.
STEP01 - install Web Station and register with GitHub
If you already don't have Web Station installed do it now by going to Package Center. Also, go to GitHub and register a free account (we will need this later on)
STEP02 - download the repository
Using the URL https://github.com/iganeshk/standardnotes-extensions download the content and place it inside your `/volume1/web/snextension` folder on your NAS. This will be the place where we will host our repository. The name of the folder can be whatever you want.
STEP03 - edit the .ENV file
Inside the folder locate env.example and rename it to .env and open it in a text editor.
It will look similar to this:
# Sample ENV setup Variables (YAML)
# Copy this file and update as needed.
#
#   $ cp env.sample .env
#
# Do not include this new file in source control
# Github Credentials
# Generate your token here: https://github.com/settings/tokens
# No additional permission required, this is just to avoid github api rate limits
#

domain: https://extensions.mydomain.com

github:
  username: GITHUB USERNAME
  token: TOKEN
Edit the final two lines (username and token) by entering your GitHub account name and a personalized token for this action. The token can be created following this procedure. Also, make sure to enter your public domain name for the extensions in form of an URL.
STEP04 - install python3 and its modules
Visit the Package Center again and check if you have Python3 installed, if not install it, and then in any case continue with the next step
Log into your NAS via SSH and install `pip` by first downloading it
curl -O https://bootstrap.pypa.io/get-pip.py
then install it (you might need to position yourself inside python3 folder):
python3 get-pip.py
/volume1/@appstore/py3k/usr/local/binAfter we have installed pip support it is time for python3 modules. For this, to work we will need to install two of them. pyyaml and requests. Run the following lines one after another. Pip will be located also in the bin folder on the above location
./pip3 install requests
./pip3 install pyyaml
Now that we have all the modules installed it is time to create our extension repository. Go to your `/volume1/web/yourextensionfolder` location and run the following command:
python3 build_repo.py
This will create a new `/public` subfolder inside your repository with all the extensions. We now have to configure a virtual host that will target that folder and then associate a URL that will be used to reach that destination.
STEP05 - configure virtual host using Web Station
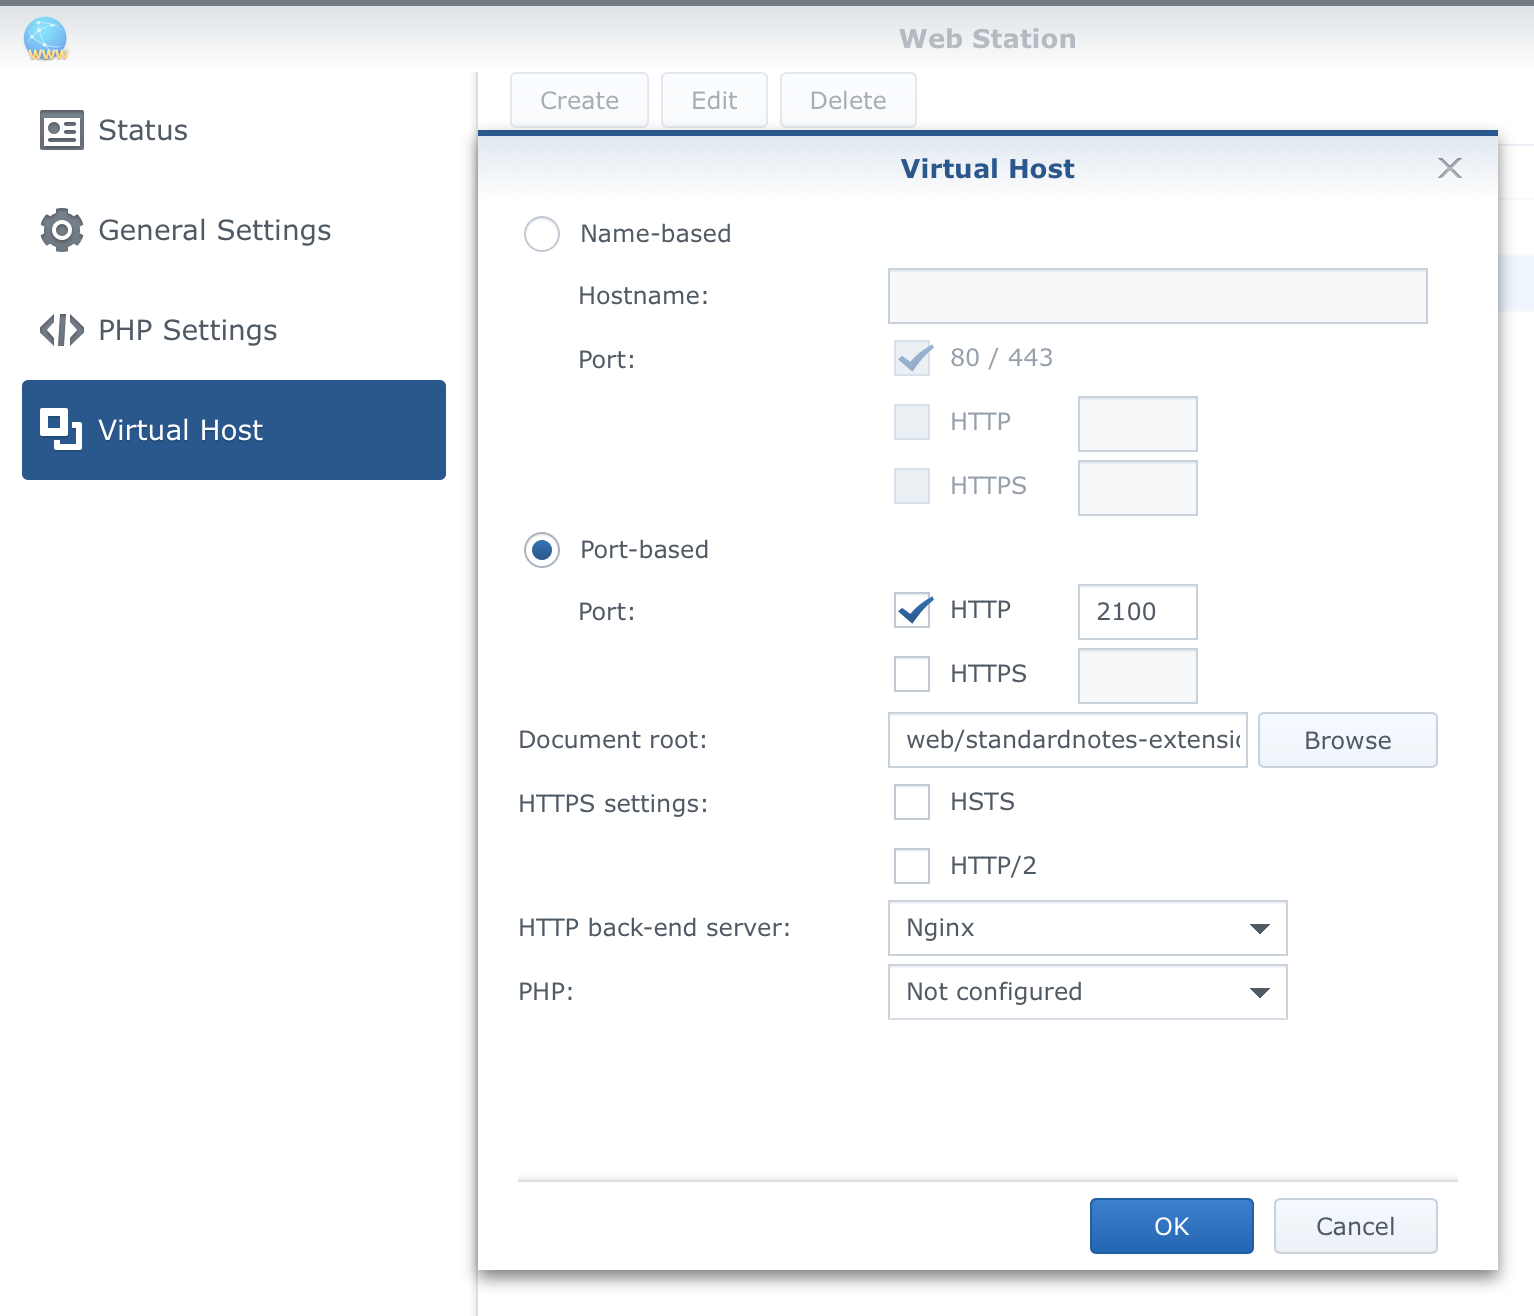
Open up the Web Station app and configure the following:
Click the Virtual Host tab and then the Create button.
Configure the host as presented (you can use any port that you want but remember it for later) and use the Browse button to locate the `/public` subfolder inside your extensions root folder
Next, we need to associate this virtual host and its custom port inside our reverse proxy settings. To do that, open Control Panel > Application portal > Reverse Proxy and add a new entry.
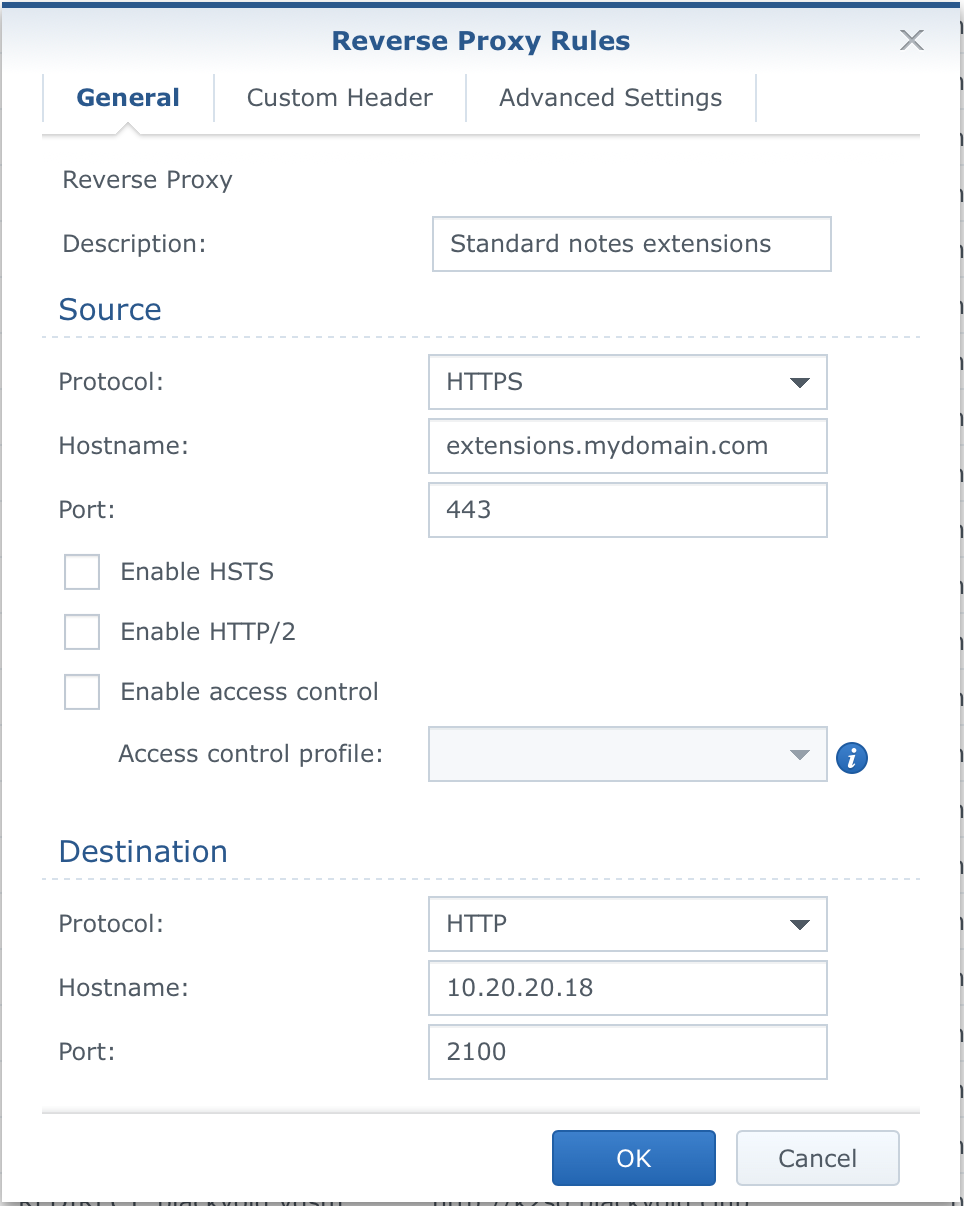
From the example above you will enter your hostname of choice (the one that you have to create in your domain registry and target your NAS IP and custom port that you have set up in the step before for your virtual host (2100 for this example).
STEP06 - test access to your repository and configure it with SN instance
This is the final step. Now that you have a valid reverse proxy set your extension URL will be like this:
https://extensions.mydomain.com/index.json
If you visit this URL in your browser you should get a nice clean list of all the extensions and their configuration parameters.
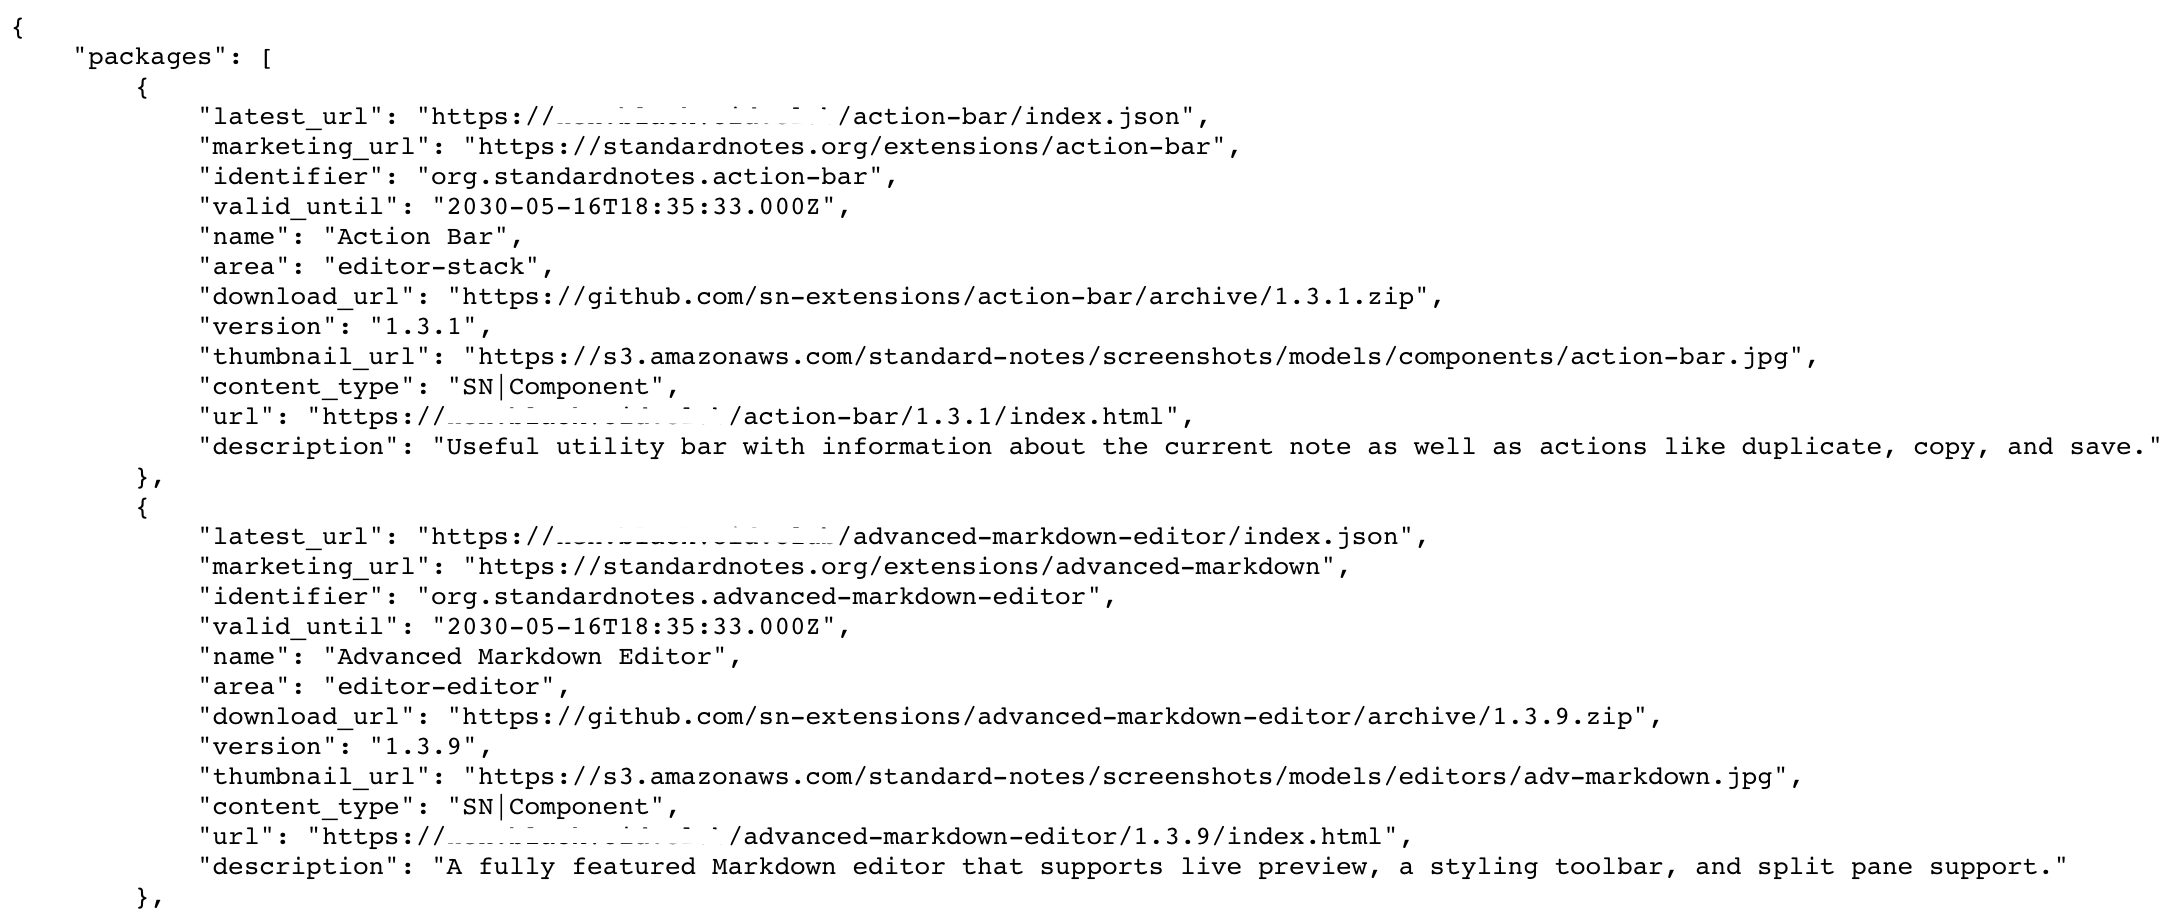
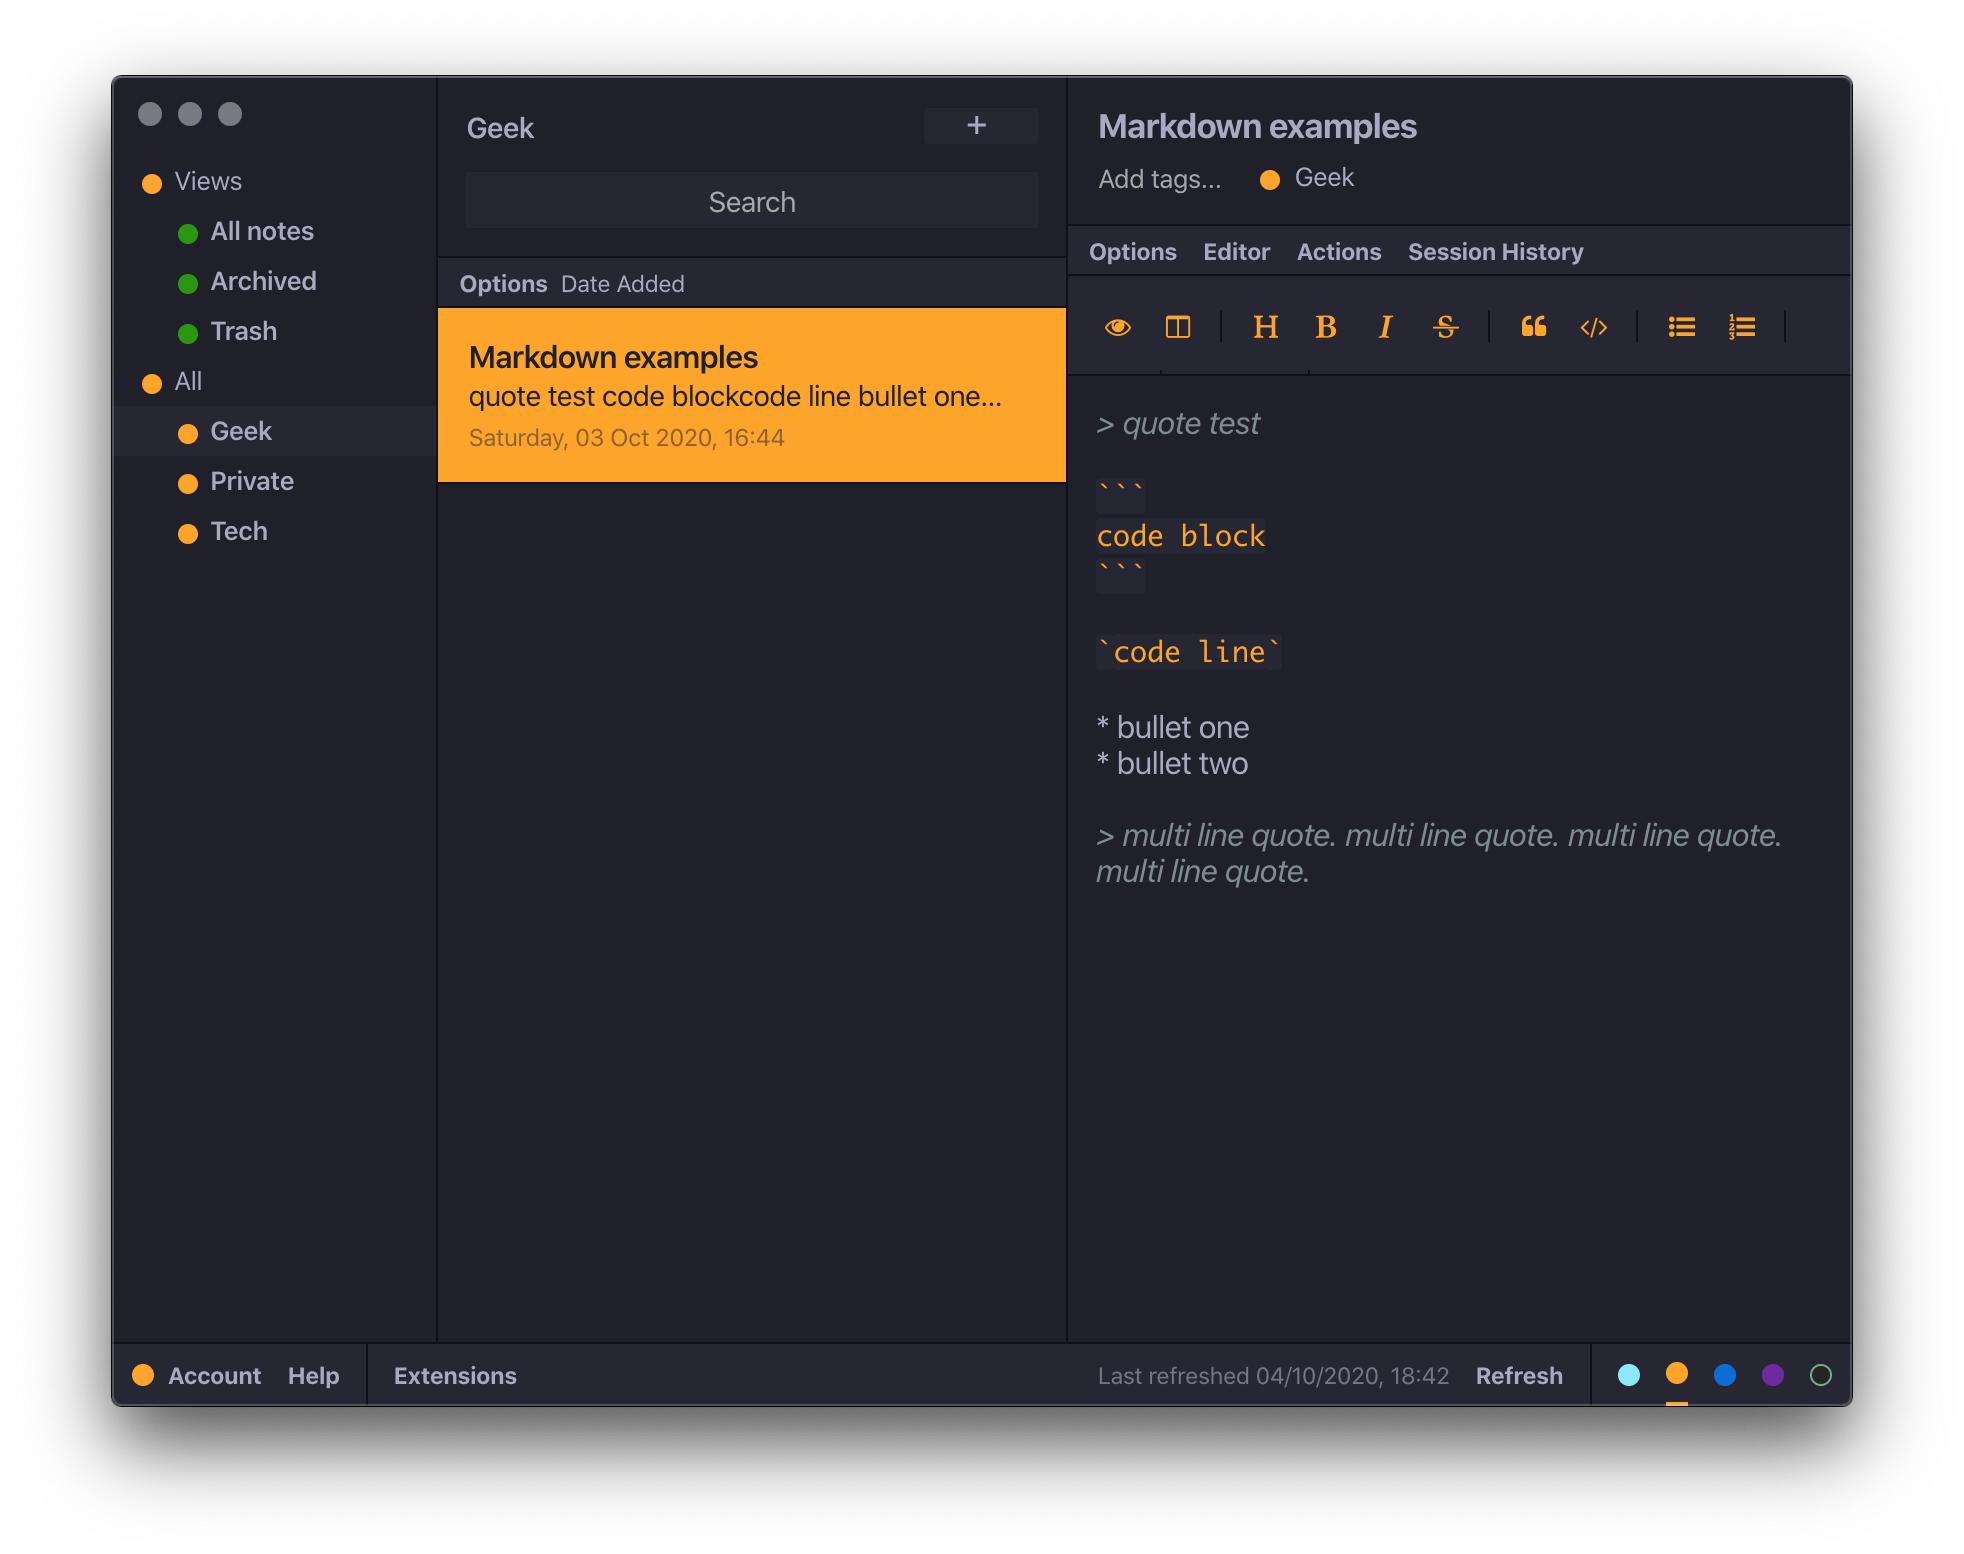
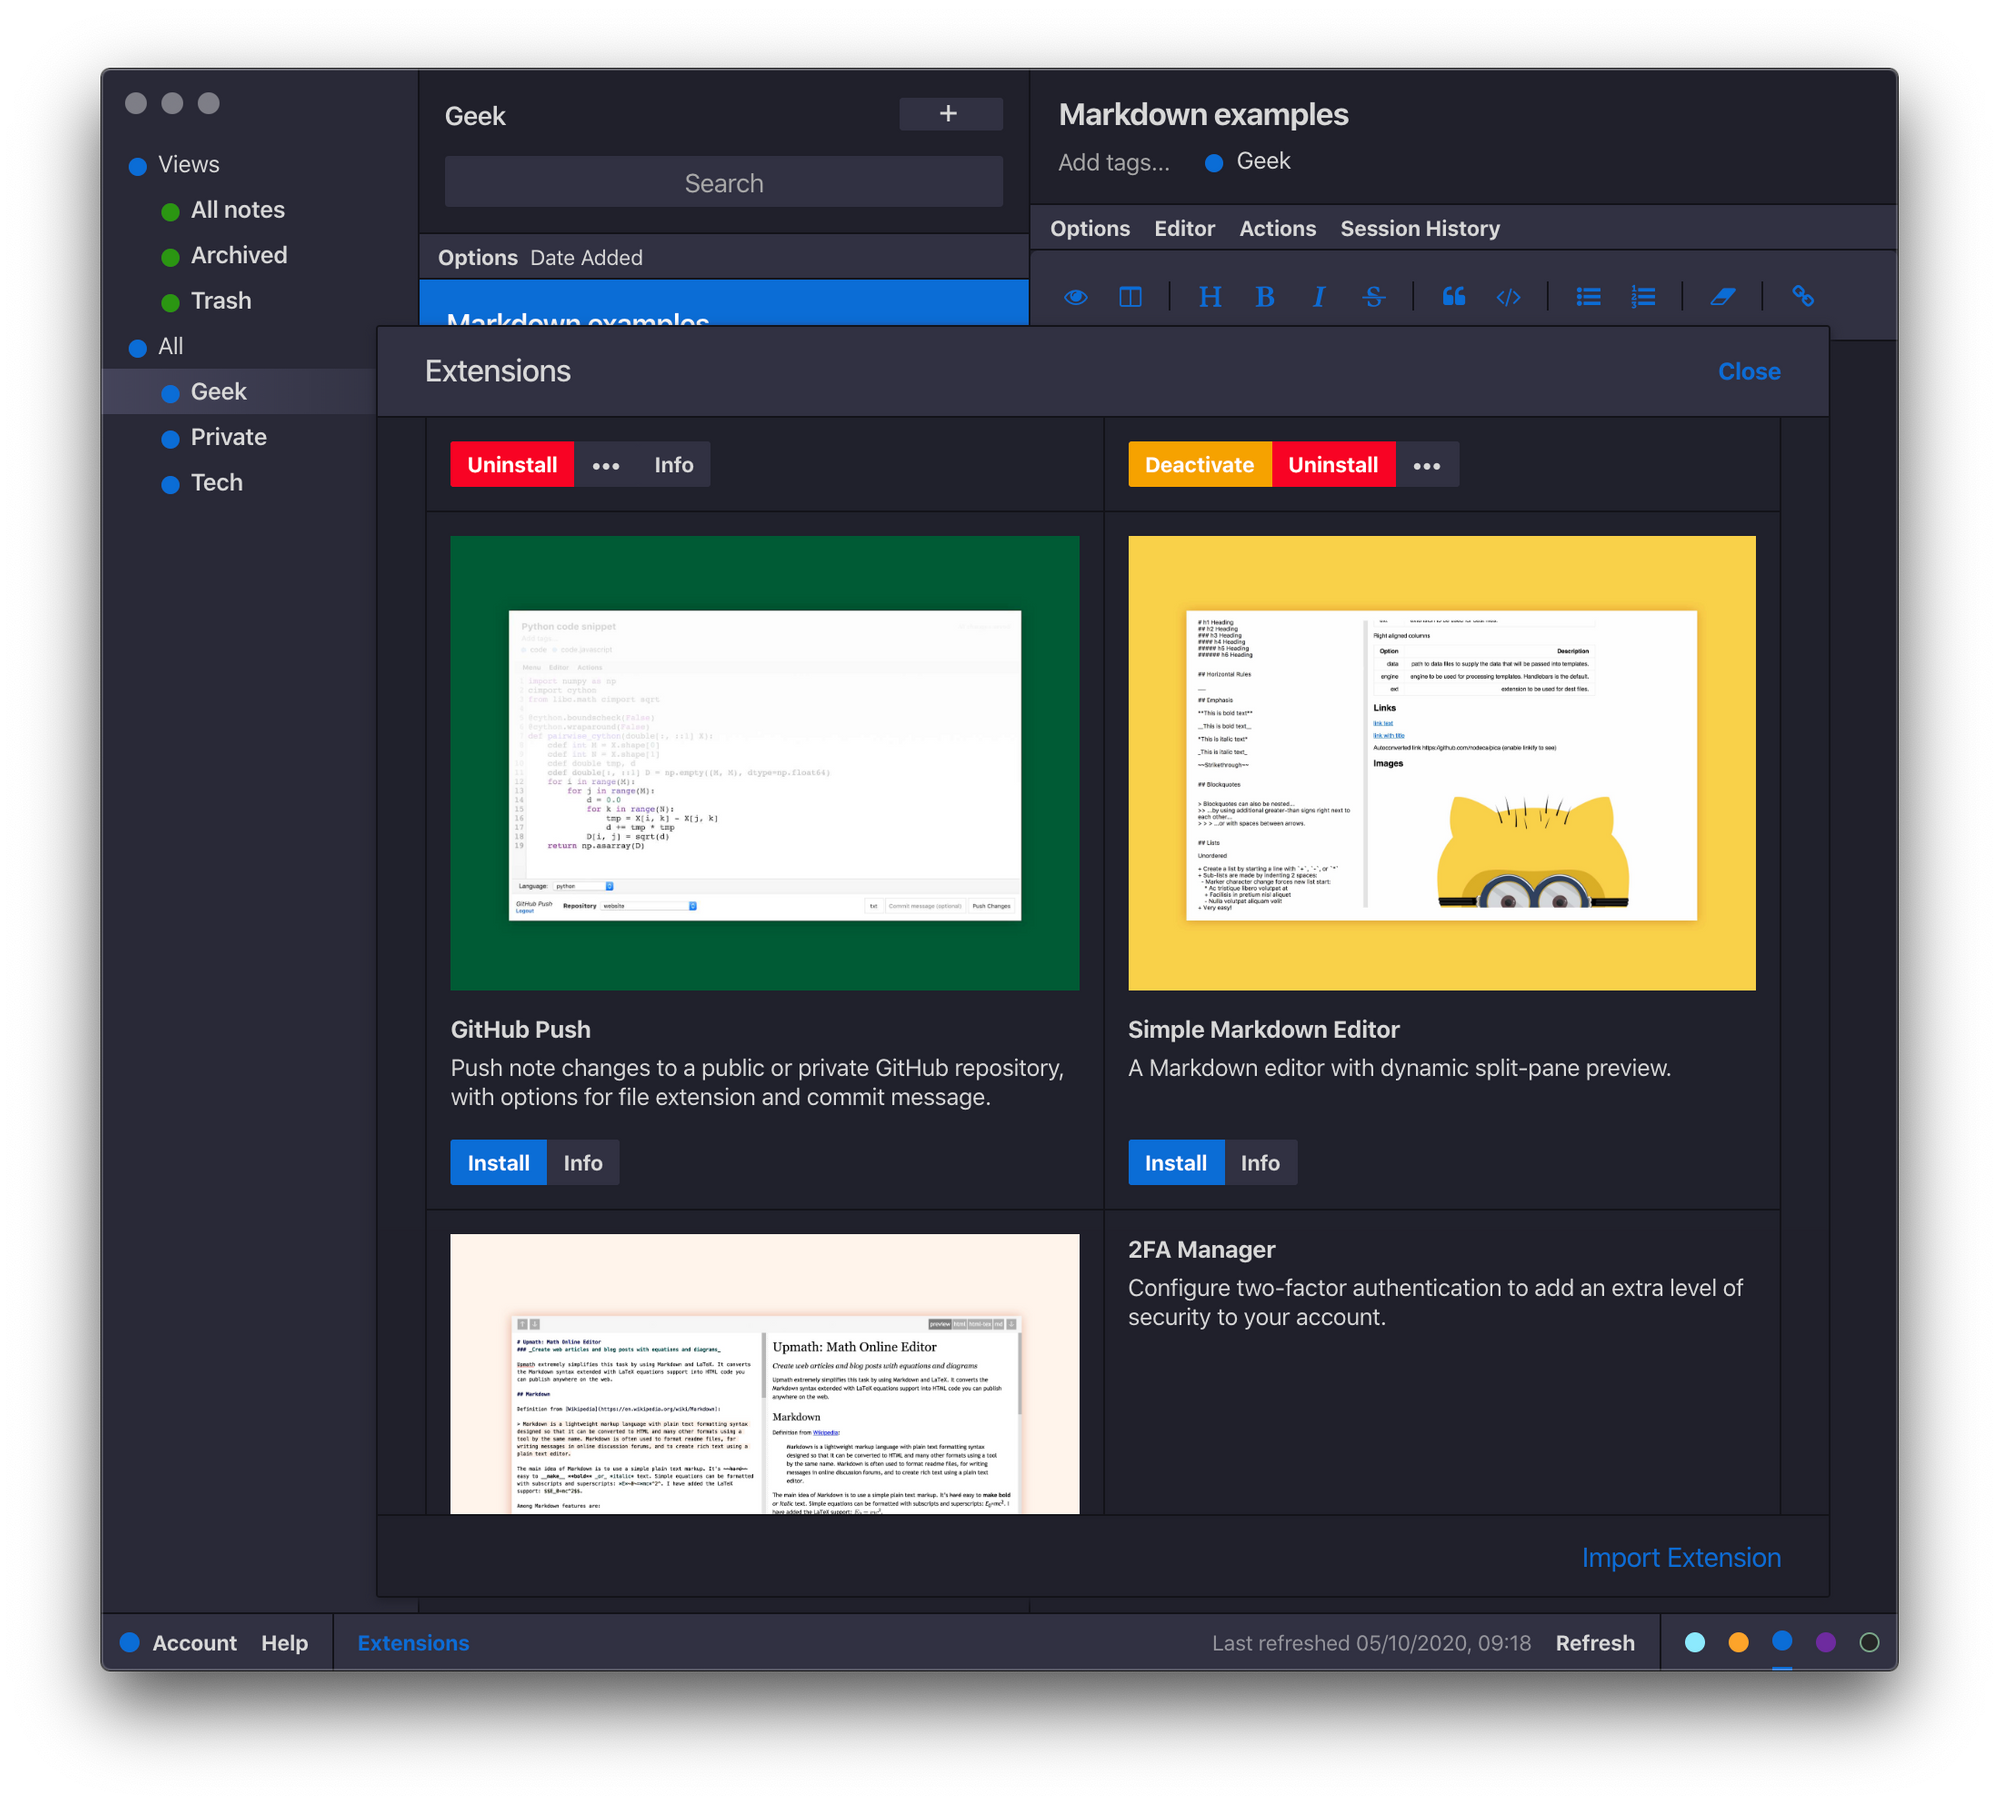
Finally, use that same URL inside your SN configuration to access the extensions. Open up SN app on your computer, click the Extensions link in the bottom left corner, copy the URL inside the text box labeled Enter Your Extended Activation Code and hit return.
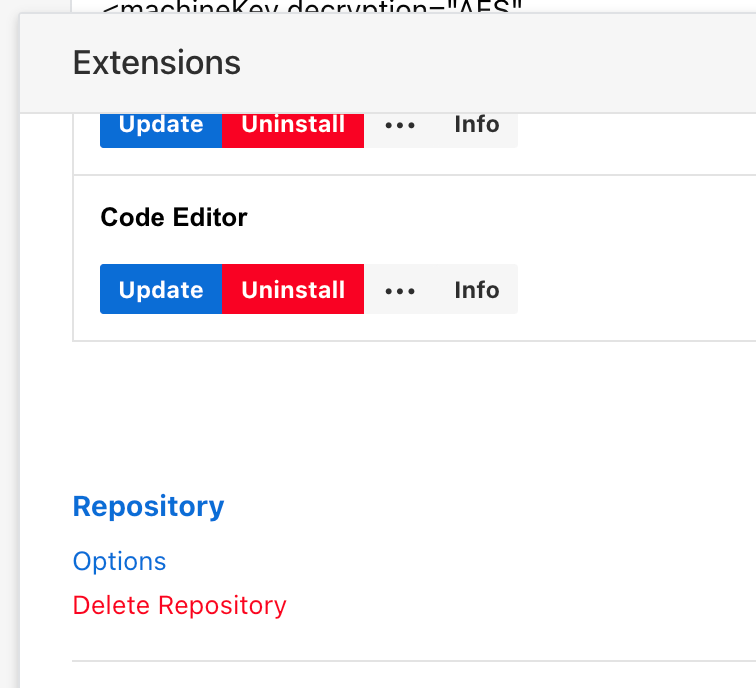
That it! If all is well, your extensions should list and you can install them and activate/deactivate them as you want.
Docker-compose method
If you prefer running extensions inside a Docker container you can use the following docker-compose to run a stack of Nginx (that will be used to host the final extensions via index.json) and another mtoohey/standardnotes-extensions image that will make the volume with actual extensions.
version: "3.5"
services:
  nginx:
    image: ghcr.io/linuxserver/nginx
    container_name: standardnotes_extensions
    environment:
      - PUID=1000
      - PGID=1000
      - TZ=Europe/London
    volumes:
      - /volume1/docker/sn_extensions:/config
      - standardnotes-extensions:/config/www
    ports:
      - 5555:80
      - 5556:443
    restart: unless-stopped

  standardnotes-extensions:
    image: mtoohey/standardnotes-extensions
    restart: "no"
    volumes:
      - /volume1/docker/sn_extensions/.env:/build/.env
      - /volume1/docker/sn_extensions/extensions:/build/extensions
      - standardnotes-extensions:/build/public
volumes:
  standardnotes-extensions:
    name: standardnotes-extensions
To run this I would suggest using Portainer and set this up as a stack that will, in the end, create two containers and you can push this via reverse proxy as the method above (using web station).
Just a bit of explanation of what this stack will do. As a result, there are two services, one called nginx, and the other is called standardnotes-extensions.
Nginx service will be using the linuxserver/nginx Docker image to bring up a web server container that will be used to serve the extensions on port 5555 (or 5556).
There are two volumes that this image will use. /config mapping is the regular mapping that will hold all the configuration elements of this container, while /config/www will be mapped to a docker volume that will be created using the second part of the stack, the standardnotes-extensions service.
The reason we are mapping it this way is that you can in end get to your index.json file in the same way as you would using the web station method. So, all the extensions will be in the root of the www folder inside the nginx container.
The second part of the stack relates to standardnotes-extenstions image/container. It uses three-volume mappings and a restart value set to "no". The reason for this restart parameter is so that once the creation of the final volume (that will contain all the extensions), the container itself will turn off and is not needed.
The first volume map line maps the .env file that you need to edit (details in STEP02). The second line maps to your local folder location where you will host all the YAML files for all your extensions. Finally, the last mapping is the actual docker volume that will be created as a result. Also, that same volume is the second volume mapping in the Nginx service section.
STEP01 - download the repository
Using the URL https://github.com/iganeshk/standardnotes-extensions download the content and place it inside your /volume1/docker/sn_extensions/extensions folder on your NAS. The name of the folder can be whatever you want just make sure that it matches your docker-compose path as well. So you need to copy the content of extensions folder (from the link) to your own extensions folder that you created.
STEP02 - edit the .ENV file
Inside the folder locate env.example and rename it to .env and open it in a text editor.
It will look similar to this:
# Sample ENV setup Variables (YAML)
# Copy this file and update as needed.
#
#   $ cp env.sample .env
#
# Do not include this new file in source control
# Github Credentials
# Generate your token here: https://github.com/settings/tokens
# No additional permission required, this is just to avoid github api rate limits
#

domain: https://extensions.mydomain.com

github:
  username: GITHUB USERNAME
  token: TOKEN
Edit the final two lines (username and token) by entering your GitHub account name and a personalized token for this action. The token can be created following this procedure. Also, make sure to enter your public domain name for the extensions in form of an URL.
STEP03 - create the container(s)
Now that you have configured your .env variable and prepared the files on your local folder it is time to run the creation of container(s) using the compose file.
As a result, you should see your stack looking similar to this:
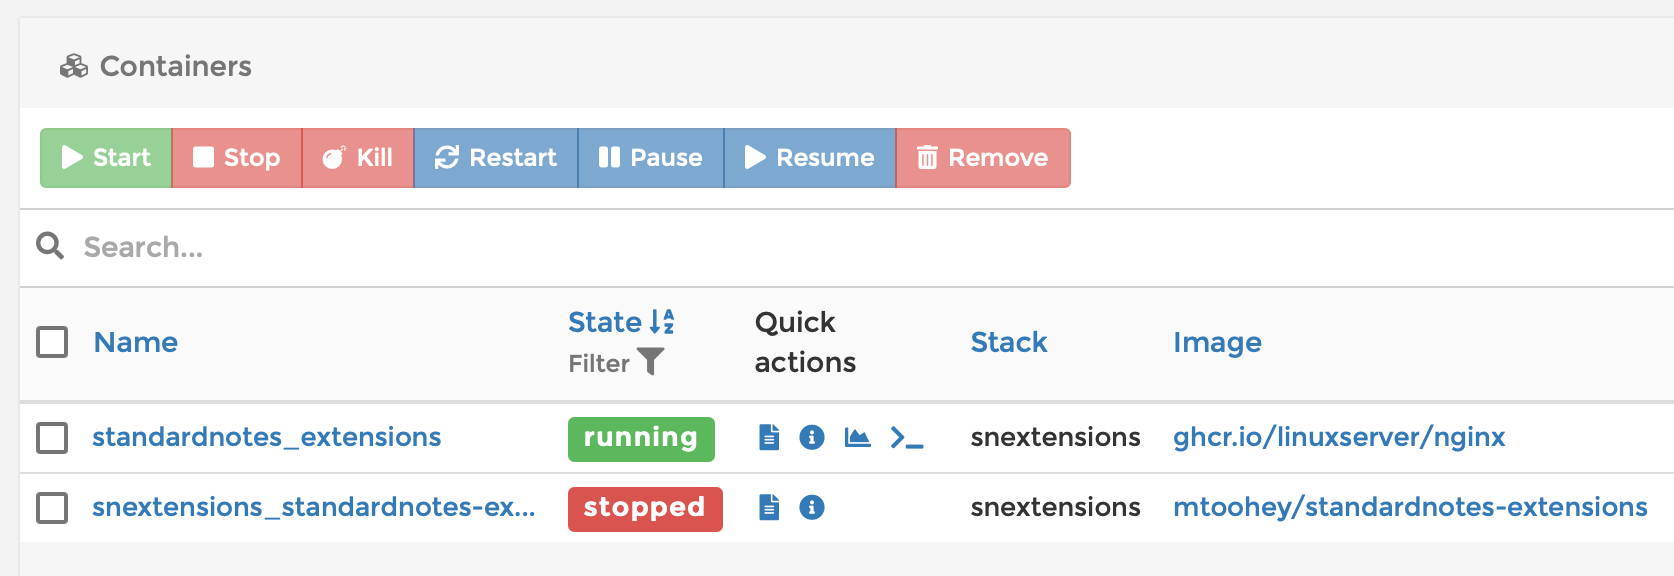
Now for the first 30 sec or so, both containers will be in the running state (green), but after the extensions container has created all of the extensions that it could find it will shut down and stop (this is normal). You can use the little "page" icon that will open the log and you can review it. This is how the log should look like after it has completed all that it needed to do.
Extension: Action Bar                     1.3.1 	(updated)
Extension: Advanced Markdown Editor       1.3.11	(updated)
Extension: Quick Tags                     1.3.2 	(updated)
Extension: Bold Editor                    1.1.3 	(updated)
Extension: Code Editor                    1.3.8 	(updated)
Extension: Folders Component              1.3.5 	(updated)
Extension: GitHub Push                    1.2.4 	(updated)
Extension: Simple Markdown Editor         1.3.9 	(updated)
Extension: Math Editor                    1.3.4 	(updated)
Extension: 2FA Manager                    1.2.3 	(updated)
Extension: Minimal Markdown Editor        1.3.5 	(updated)
Extension: Plus Editor                    1.4.8 	(updated)
Extension: Secure Spreadsheets            1.3.6 	(updated)
Extension: Simple Task Editor             1.3.6 	(updated)
Extension: TokenVault                     1.0.8 	(updated)
Extension: Vim Editor                     1.3.7 	(updated)
Theme: Autobiography                      1.0.0 	(updated)
Theme: Dracula                            1.2.1 	(updated)
Theme: Dynamic                            1.0.0 	(updated)
Theme: Focus                              1.2.3 	(updated)
Theme: Futura                             1.2.2 	(updated)
Theme: Midnight                           1.2.1 	(updated)
Theme: Muted Dark                         1.0.9 	(updated)
Theme: No Distraction (Dynamic)           1.0.0 	(updated)
Theme: No Distraction                     1.2.2 	(updated)
Theme: Overcast                           1.2.2 	(updated)
Theme: Pure Black                         1.0.9 	(updated)
Theme: Solarized Dark                     1.2.1 	(updated)
Theme: Titanium                           1.2.2 	(updated)
Theme: VS Code Theme                      1.0.17	(updated)

Processed:                     30 extensions. (Components: 16, Themes: 14)
Repository Endpoint URL:       https://extensions.mydomain.com/index.json
Now you can try and access your extensions using your local NAS IP address and port dedicated in the compose file. For example http://yourNASIP:5555/index.json .
If you get the list of extensions and their configurations, you are good and ready.

STEP04 - create a reverse proxy record
Now that you have it up and running the last thing that remains is to create a reverse proxy that will point to your final public extensions URL (that's the one that you have set up in your .env file).
For more details on how to configure any docker container via reverse proxy and bind it to a valid SSL certificate, read it here or if you want to set your own NGINX proxy and use that one, visit this link.
STEP05 - Connecting extensions to your SN server
This is the final step. Now that you have a valid reverse proxy set your extension URL will be like this:
https://extensions.mydomain.com/index.json
If you visit this URL in your browser you should get a nice clean list of all the extensions and their configuration parameters (the same one that you tested using your local NAS IP).
Finally, use that same URL inside your SN configuration to access the extensions. Open up SN app on your computer, click the Extensions link in the bottom left corner, and copy the URL inside the text box labeled Enter Your Extended Activation Code, and hit return.
Extensions gallery not loading inside a web browser
In some cases, you might find yourself trying to install an addon using the web app browser version of your SN instance only to find a problem with the gallery. The fact is that you will be able to use all of your installed extensions (you can activate/deactivate them), but you might not get the option to install new ones.
This will work using the desktop version of SN, but the web browsers might give you trouble because of CORS.
The error in the weblog might look something like this:
Cross-Origin Request Blocked: The Same Origin Policy disallows
reading the remote resource at
https://extensions.mydomain.com/index.json. (Reason: CORS request did not succeed).
Now, this is fine. There is nothing wrong with your extension's setup. This is just your browser protecting you from harmful action. To make this work you can try and get this sorted using a few methods.
01. Add headers to your reverse proxy entry for your extensions.
Open up your reverse proxy setting for the extension entry and create two separate entries with their values:
'Access-Control-Allow-Origin' '*';
'Access-Control-Allow-Headers' 'content-type';
Reload your main SN site and open the extensions menu. If the gallery loads, great, if not try a different method.
02. Install CORS plugins in your browser
You could (if there are options) install CORS addon in your browser and turn it on. Then reload your site and try and access your extension gallery. Still nothing? Read on.
03. Disable Cross-Origin Restrictions inside a browser
In the end, if your browser supports it (like Safari for example) you could just disable the CORS feature by using the Developer menu inside Safari. There you will find the Disable Cross-Origin Restrictions menu item. Activate it and then reload your site and access the extensions.
If none of the methods work, you could always install and extensions, and that way you will have them listed in your extensions window inside a browser. So the only main issue here is that you might not be able to install any extension via a browser, but you can use them (activate/deactivate) even without this CORS expectation.
WebApp - host your own WebApp SN instance
As stated before you have the option to run your own version of SN web app so you don't have to rely on their own accessibility at https://app.standardnotes.org/.
Follow these steps.
First, let's download the repo so we can have it prepared:
docker pull standardnotes/web:stable
Next, let's go to GitHub and download the .env example file for our Standard Notes - https://github.com/standardnotes/web/blob/develop/.env.sample
Download this file, edit it (following the instructions below), and finally save it to your NAS (for example in `/volume1/docker/standardnotes_web/`).
.env. So no name just the extension env. This might make your file invisible so bear that in mind.Edit the following:
AILS_ENV=development
PORT=3001
WEB_CONCURRENCY=0
RAILS_LOG_TO_STDOUT=true
RAILS_SERVE_STATIC_FILES=true
SECRET_KEY_BASE=test
APP_HOST=https://webapp.mydomain.com

EXTENSIONS_MANAGER_LOCATION=extensions/extensions-manager/dist/index.html
BATCH_MANAGER_LOCATION=extensions/batch-manager/dist/index.min.html
SF_DEFAULT_SERVER=https://notes.mydomain.com

# Datadog
DATADOG_ENABLED=false

# Development options
DEV_DEFAULT_SYNC_SERVER=https://notes.mydomain.com
DEV_EXTENSIONS_MANAGER_LOCATION=public/extensions/extensions-manager/dist/index.html
DEV_BATCH_MANAGER_LOCATION=public/extensions/batch-manager/dist/index.min.html
So the main things that need to change are:
lines 6,7, and 11
APP_HOST variable will be the public name of your web app, so make sure to make a new DNS record for it.
SF_DEFAULT_SERVER variable is your main notes syncing server address so enter the one that you have configured and will use with your desktop and mobile apps.
Now that we have set up the ENV file we will use it with a `docker run` command line:
docker run -d --name=stdnotes_web -p 3001:3001 --env-file=/volume1/docker/standardnotes_web/.env standardnotes/web:stable
Be sure to change (if you want), the left port value to some other value that you will use with this setup.
Also, keep in mind that the --env parameter needs to match the destination of the ENV file. If all goes well, you should get your app up and running.
To test if all is well, try and access your instance using http://yourNASip:3001 (or a custom port that you have set) to get to the page.
Apply the same reverse proxy policy for your new web app in order to get a nice HTTPS web app URL.
FileSafe - encrypt your attachments
Just like I said before you can self-host any part of this solution and this one is about FileSafe.
FS will allow you to integrate your SN instance with Dropbox, GoogleDrive, most WebDAV servers, and Amazon S3.
In this example, I will show you how to configure FS docker image and how to connect it to a WebDAV server.
Follow these steps.
First, let's download the repo so we can have it prepared:
docker pull standardnotes/filesafe-relay:latest
Considering that I will show you just how to run with a WebDAV server nothing special is needed apart from running this one-line command
docker run -d --name=standardnotes_filesafe -p 3000:3000 -e HOST=filesafe.mydomain.com standardnotes/filesafe-relay:latest
After you have created the Docker container open SN app and make sure you have the Bold Editor extension up and running. If not, install it then continue forward.
After you have loaded up the Bold Editor, click on the File Safe icon on the toolbar. It will load up the extension looking like this:
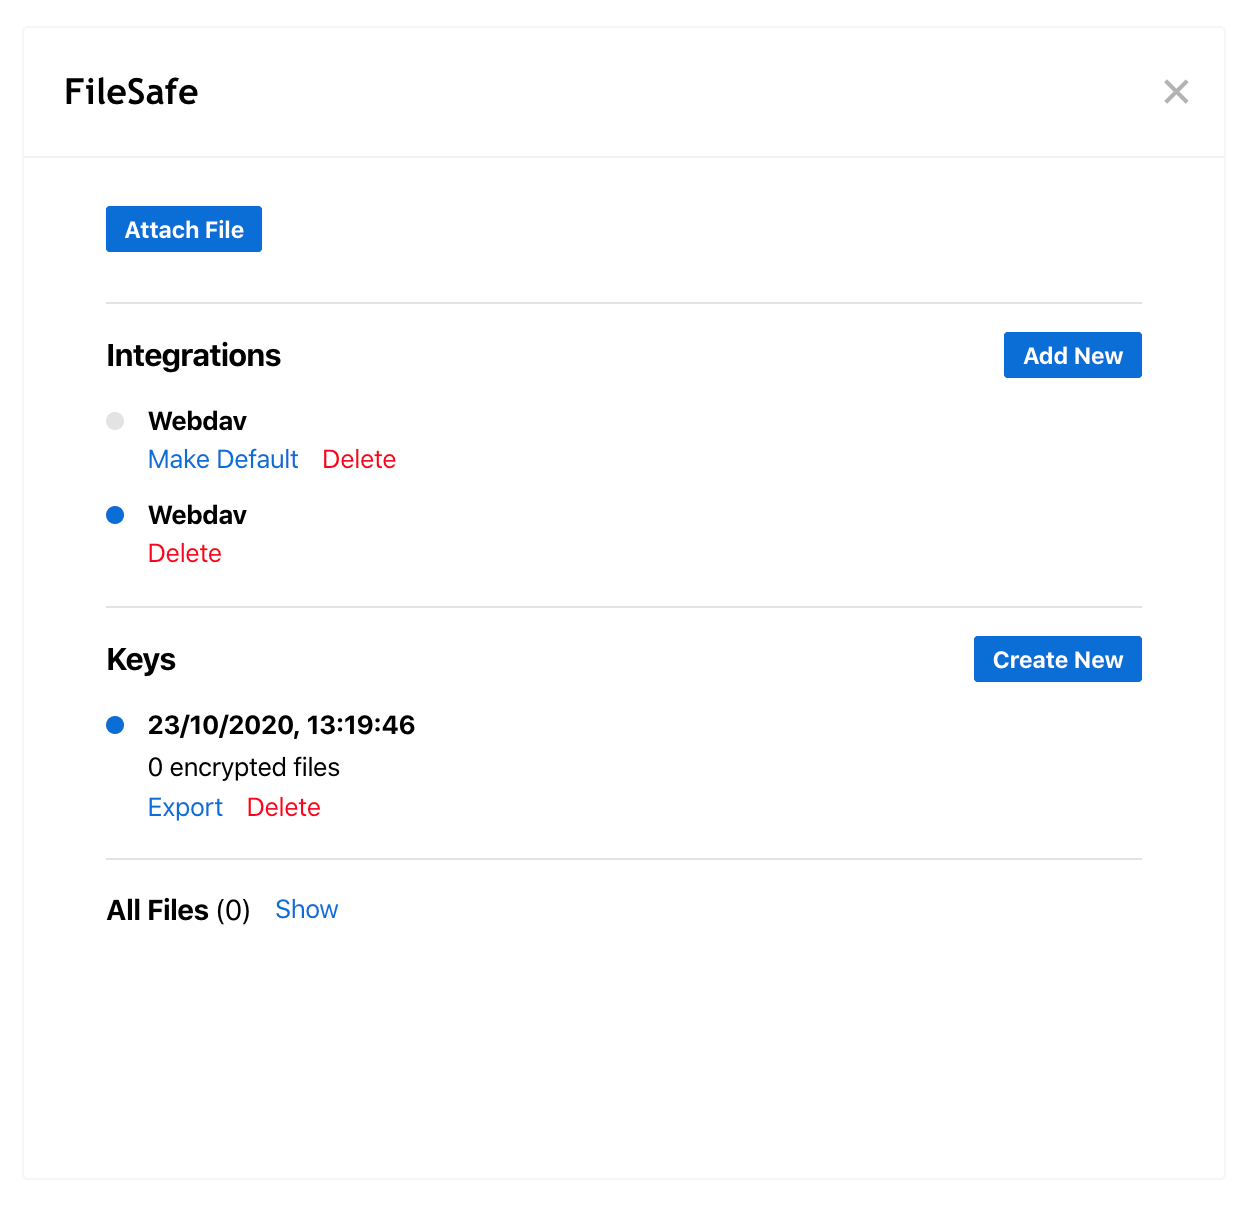
After you have added an encryption key click the Add New button to add a new integration.
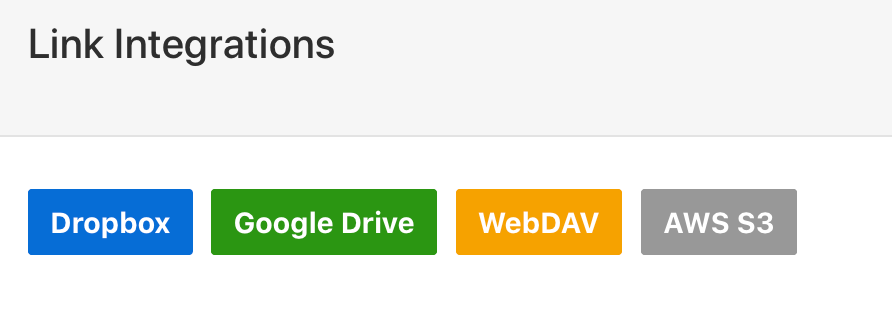
By default, it will open up https://filesafe.standardnotes.org window and load up the options like the ones on the next image.
You should get the exact same thing.
Now click on the WebDAV icon and configure your connection.
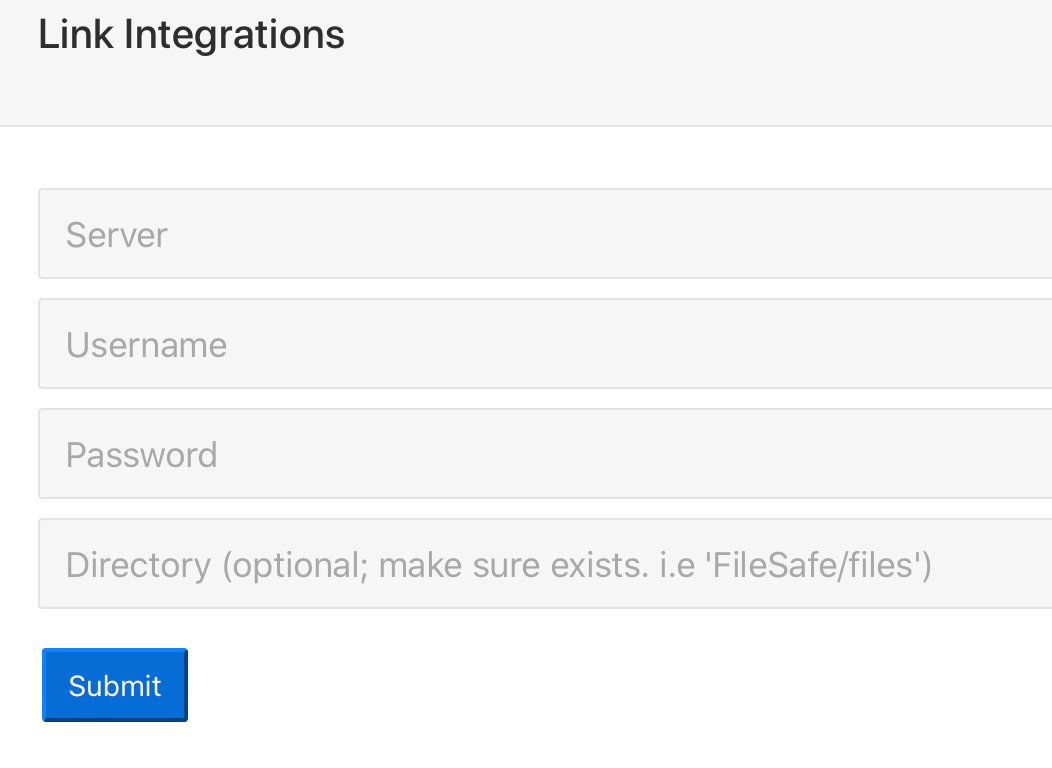
Depending on your WebDAV of choice you might need to enter specific URL and/or combinations in the username field.
I have tested this with pCloud.com and it works just fine. However, atm I am still unable to get it running with Synology WebDAV configuration (will post and updated if this changes).
https://webdav.pcloud.com for international, and https://ewebdav.pcloud.com for EU
Conclusion
Now you have a fully private SN configuration running. Well done!
Hope this will be of some use to some of you out there. If you have any comments let me know in the section below, and also if you need any help feel free to write about it or use the *Support Chat link at the top of the page for some instant chat.