VMware & Synology (part 1) - manage NFS & iSCSI storage on ESXi host

While Synology is not always associated with a hypervisor platform, even though it provides one, it can still be used with several world-known solutions. This short two-part series will show how we can use a compatible Synology NAS with VMWare ESXi host, as well as how to back up and restore virtual machines running on that same host. On top of that, we will see how Active Backup for Business and Synology's SAN manager packages work in this type of scenario.
: Intro
Most self-host users, as well as people that like to tinker with their local hardware, will want to keep as much data as possible on their own hardware, and under their supervision. If we move past the regular images, videos, and media content, a NAS can be used in many other ways.
So what might those be exactly? Well, to start off, if we focus on virtualization and containerization alone, depending on the type of NAS we own (in terms of specifications and configuration), we can utilize it as a powerful hypervisor, or just as a storage for said hypervisor running on a different machine in the network.
In this article, we will focus on the latter. How can a Synology NAS be used in combination with a VMWare ESXi host running on a different device? In this particular case, the NAS will not be a hypervisor in terms that it will host a platform that runs and maintains virtual machines. No, this time around, it will be configured solely as a storage destination point that will be used with said virtual machines but only to store them and help them back up and restore them if needed.
: ESXi - what is it?
Now before we move forward, it needs to be said what VMWare ESXi is, or rather what a hypervisor is. By definition, there are two types of hypervisors, type 1 and type 2. A hypervisor Type 1, also known as a "bare-metal" hypervisor, is virtualization software installed directly on physical hardware. It runs directly on the host machine's hardware and manages the guest operating systems on top of it. Considered more efficient and secure than Type 2 hypervisors, Type 1 hypervisors are commonly used in enterprise virtualization environments. ESXi in this case is a Type 1 hypervisor.
For this particular case, we will be looking into ESXi version 8.
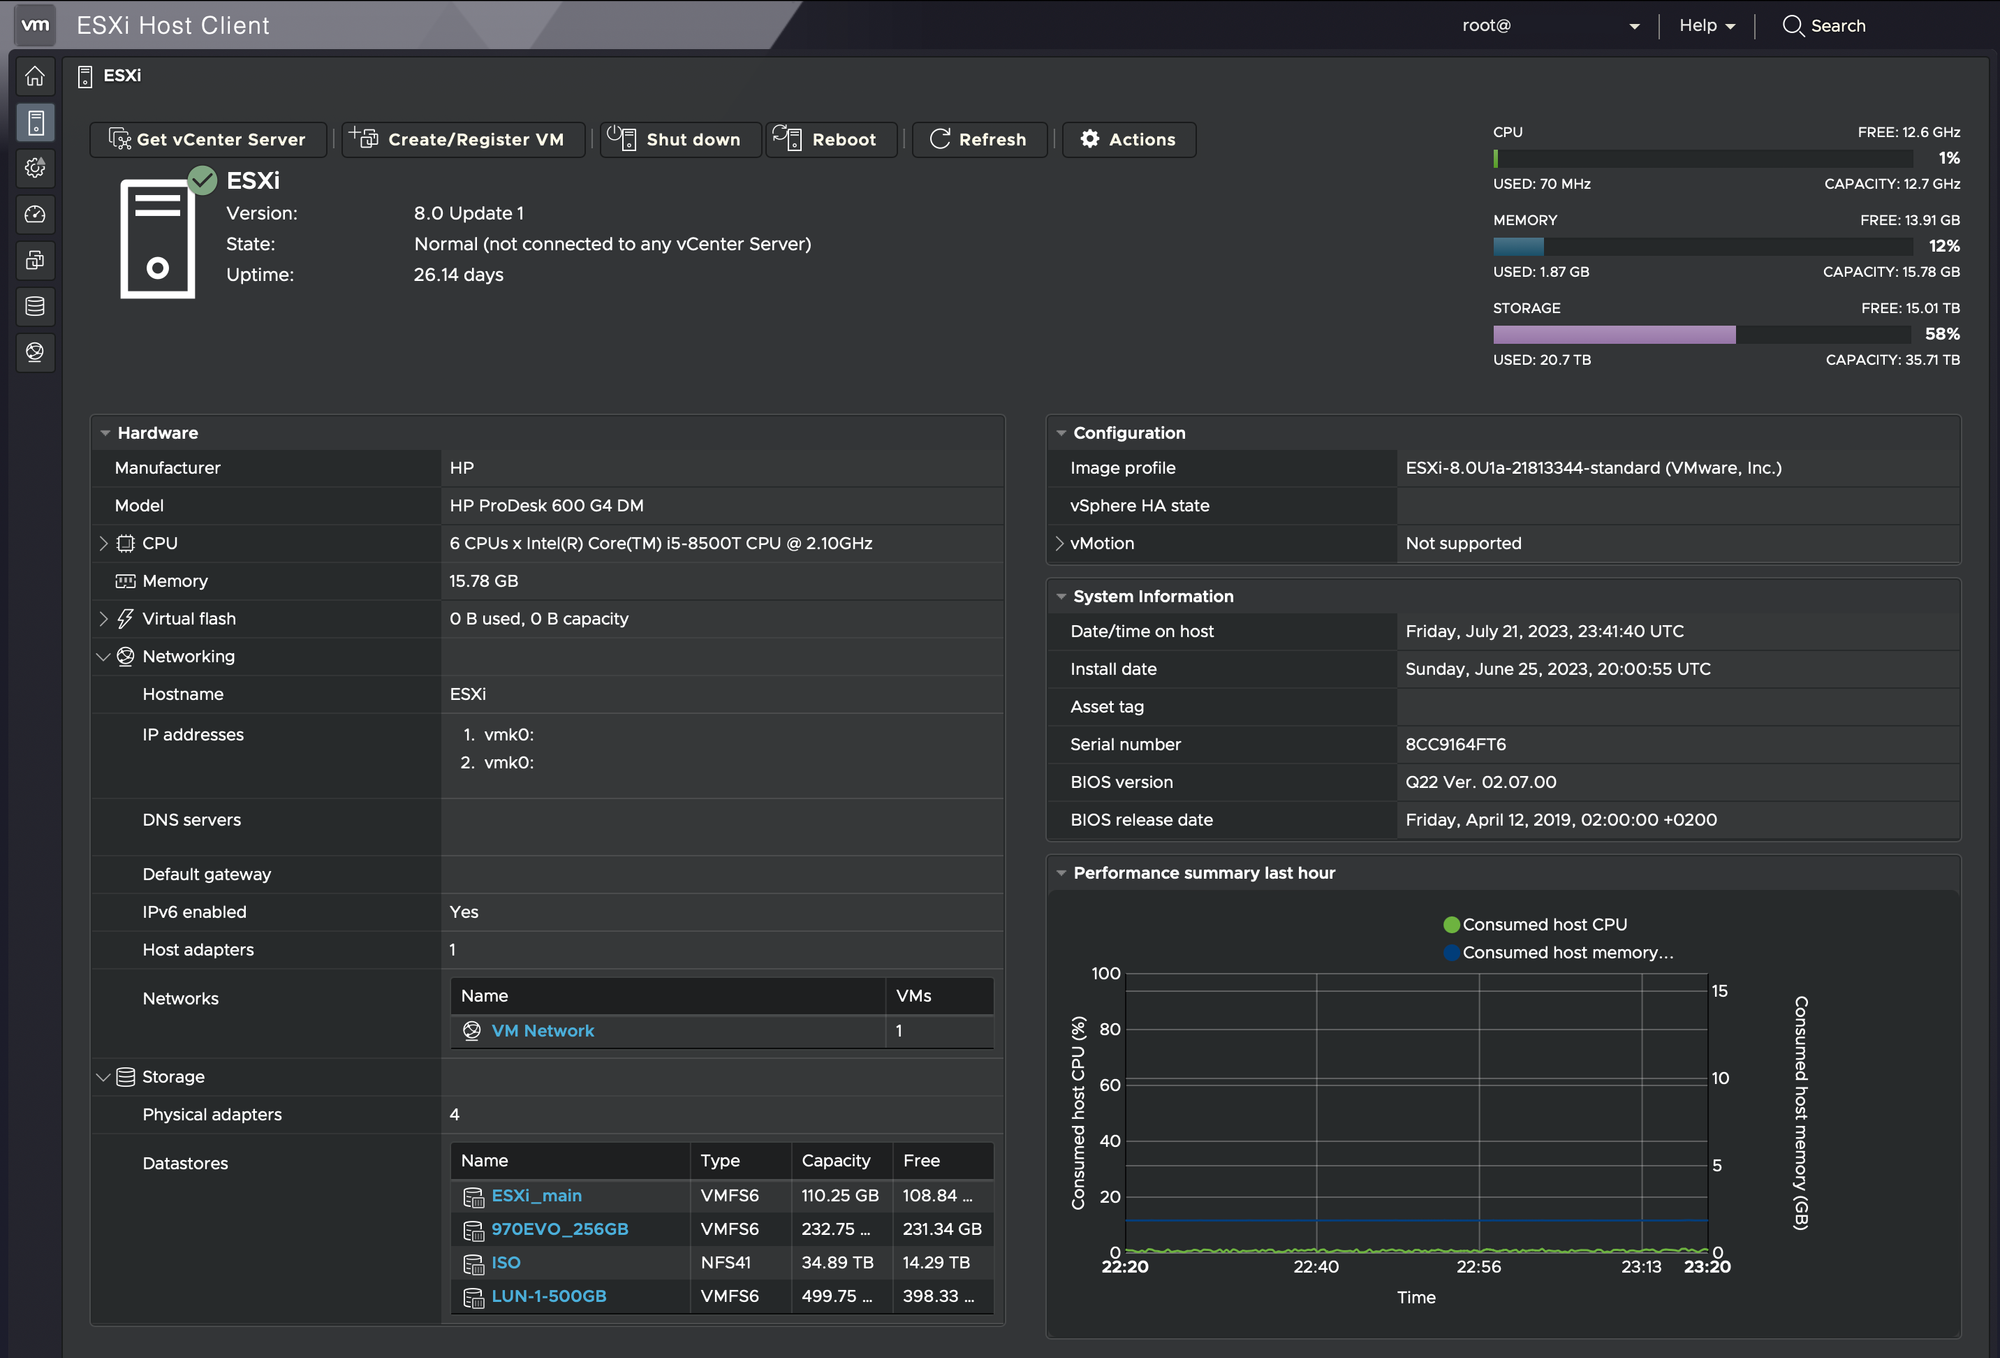
Getting the hypervisor up and running is nothing major. After downloading the ISO installation from the VMWare site we can boot into the installer and follow the wizard. Upon completion, ESXi will be accessible via a web browser on an IP address that was configured during the installation.
One of the main configurations that we need to do after the hypervisor is up and running is to connect storage to it. On top of its local storage, there are ways to get both NFS and iSCSI LUNs connected to it, so that those may be used as a place to keep the content of the virtual machines.
Considering that this article will focus on the NFS and iSCSI access of content located on the Synology NAS, let's see how easily we can present network shares and iSCSI LUNs inside ESXi.
: NFS configuration - Synology DSM settings
In order to get started with NFS support inside DSM, we will need to do two (2) major steps. The following will be an example of accessing content from a NAS running DSM 6.2 just to show that compatibility is there.
We start by opening the Control Panel > File Services. On the first tab, SMB/AFP/NFS we need to locate the NFS section and enable it. For better compatibility, we can use NFS 4.1.
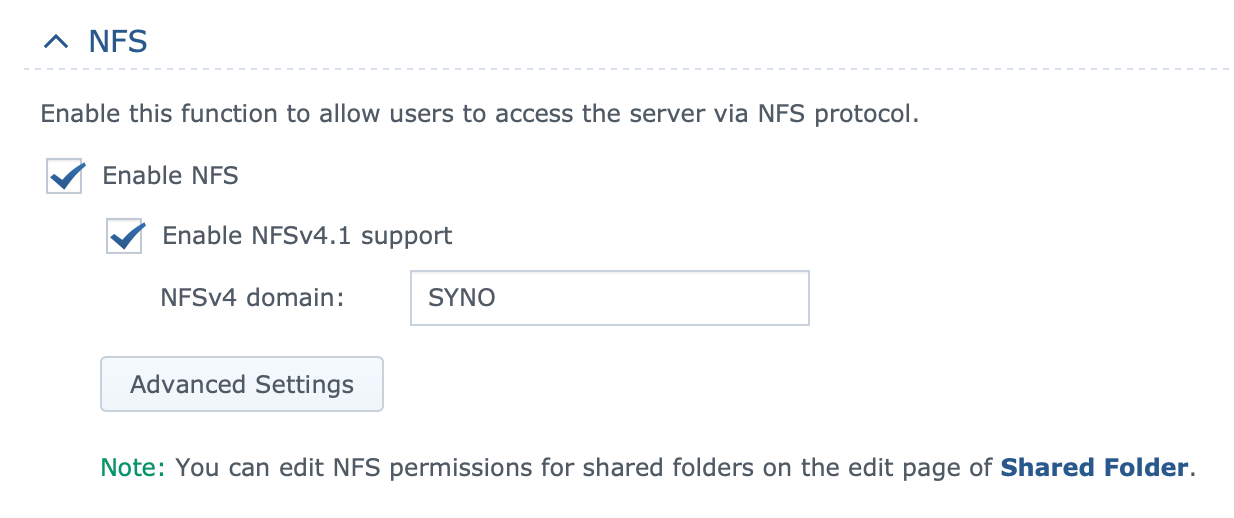
As indicated by the note at the bottom of the image, Shared Folder is where we will need to go for the second step.
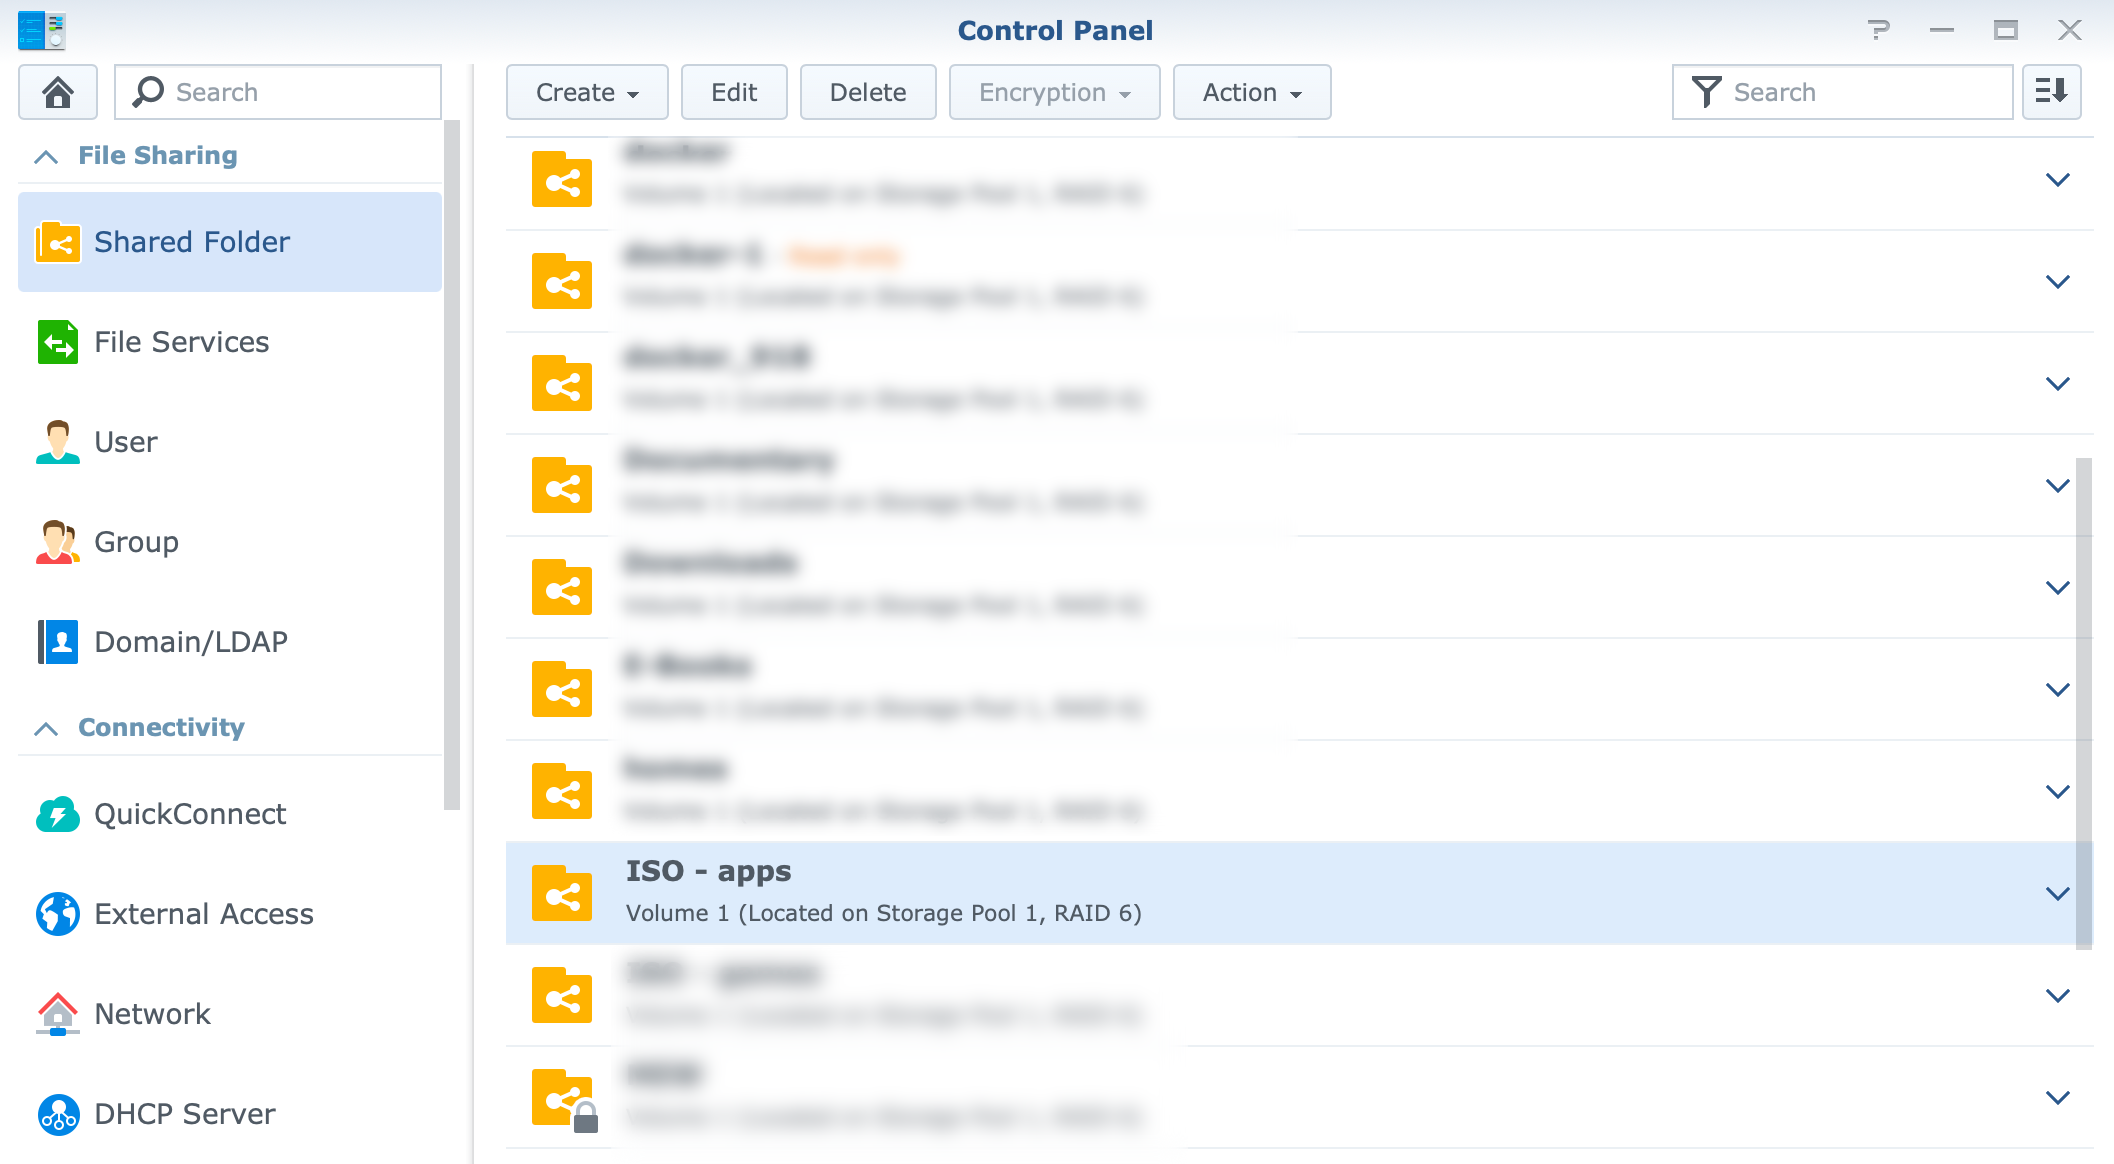
Control Panel > Shared Folder will list all the root folders that exist on the NAS. Selecting the ones that we want to be visible when accessing this NAS via NFS protocol will be done by editing each root folder manually, so no bulk operation.
Selecting the folder, we then need to Edit the permissions in such a way that we will add NFS access to it. This needs to be done for each folder. A faster way to do it (and if you know what you are doing) would be doing it all via SSH and editing the /etc/exports file, but do not go there unless you are certain you know what you are doing.
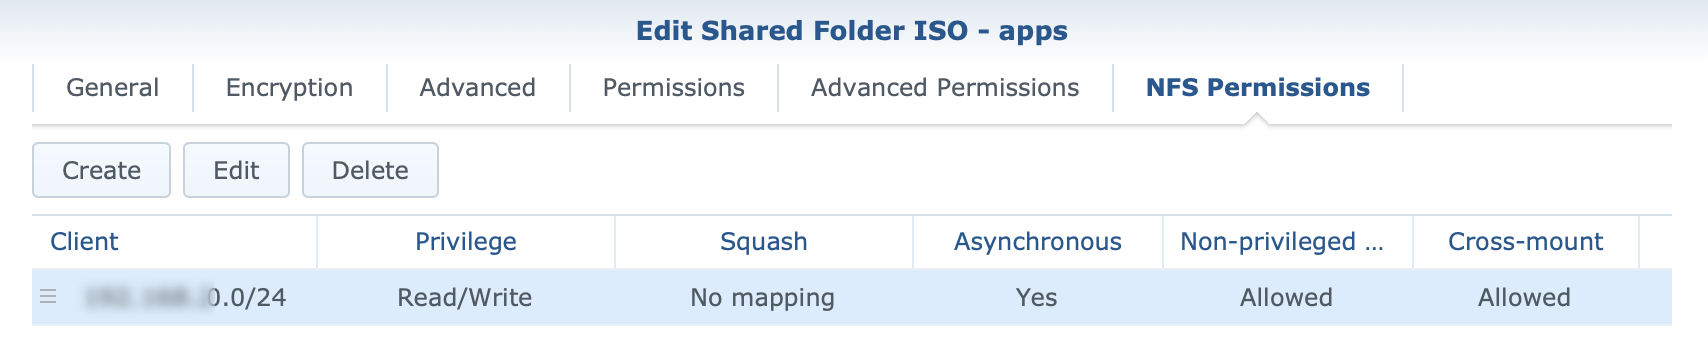
Using the Create button we can add the client IP address (or subnet) that has permissions for this particular folder when using NFS.
Now that we have activated NFS and given permissions, we can finish up the process inside ESXi, and try and connect to this destination folder.
: NFS configuration - ESXi datastores
Configuration on the ESXi side is fast and simple, involving a single form and a few parameters. If all else is in order (network visibility, firewall, etc), the connection will be established with no effort.
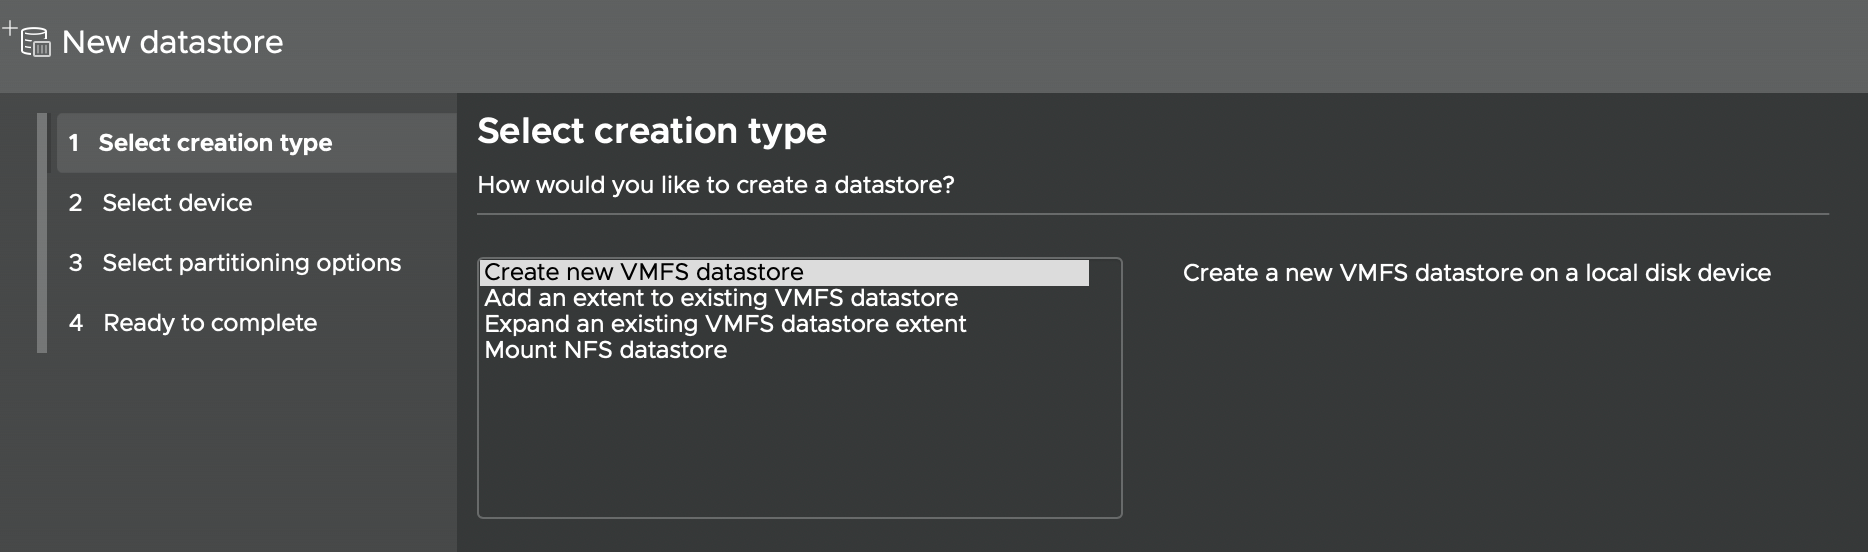
Using the Storage section of the ESXi interface, we can add a new datastore by clicking the New datastore button.
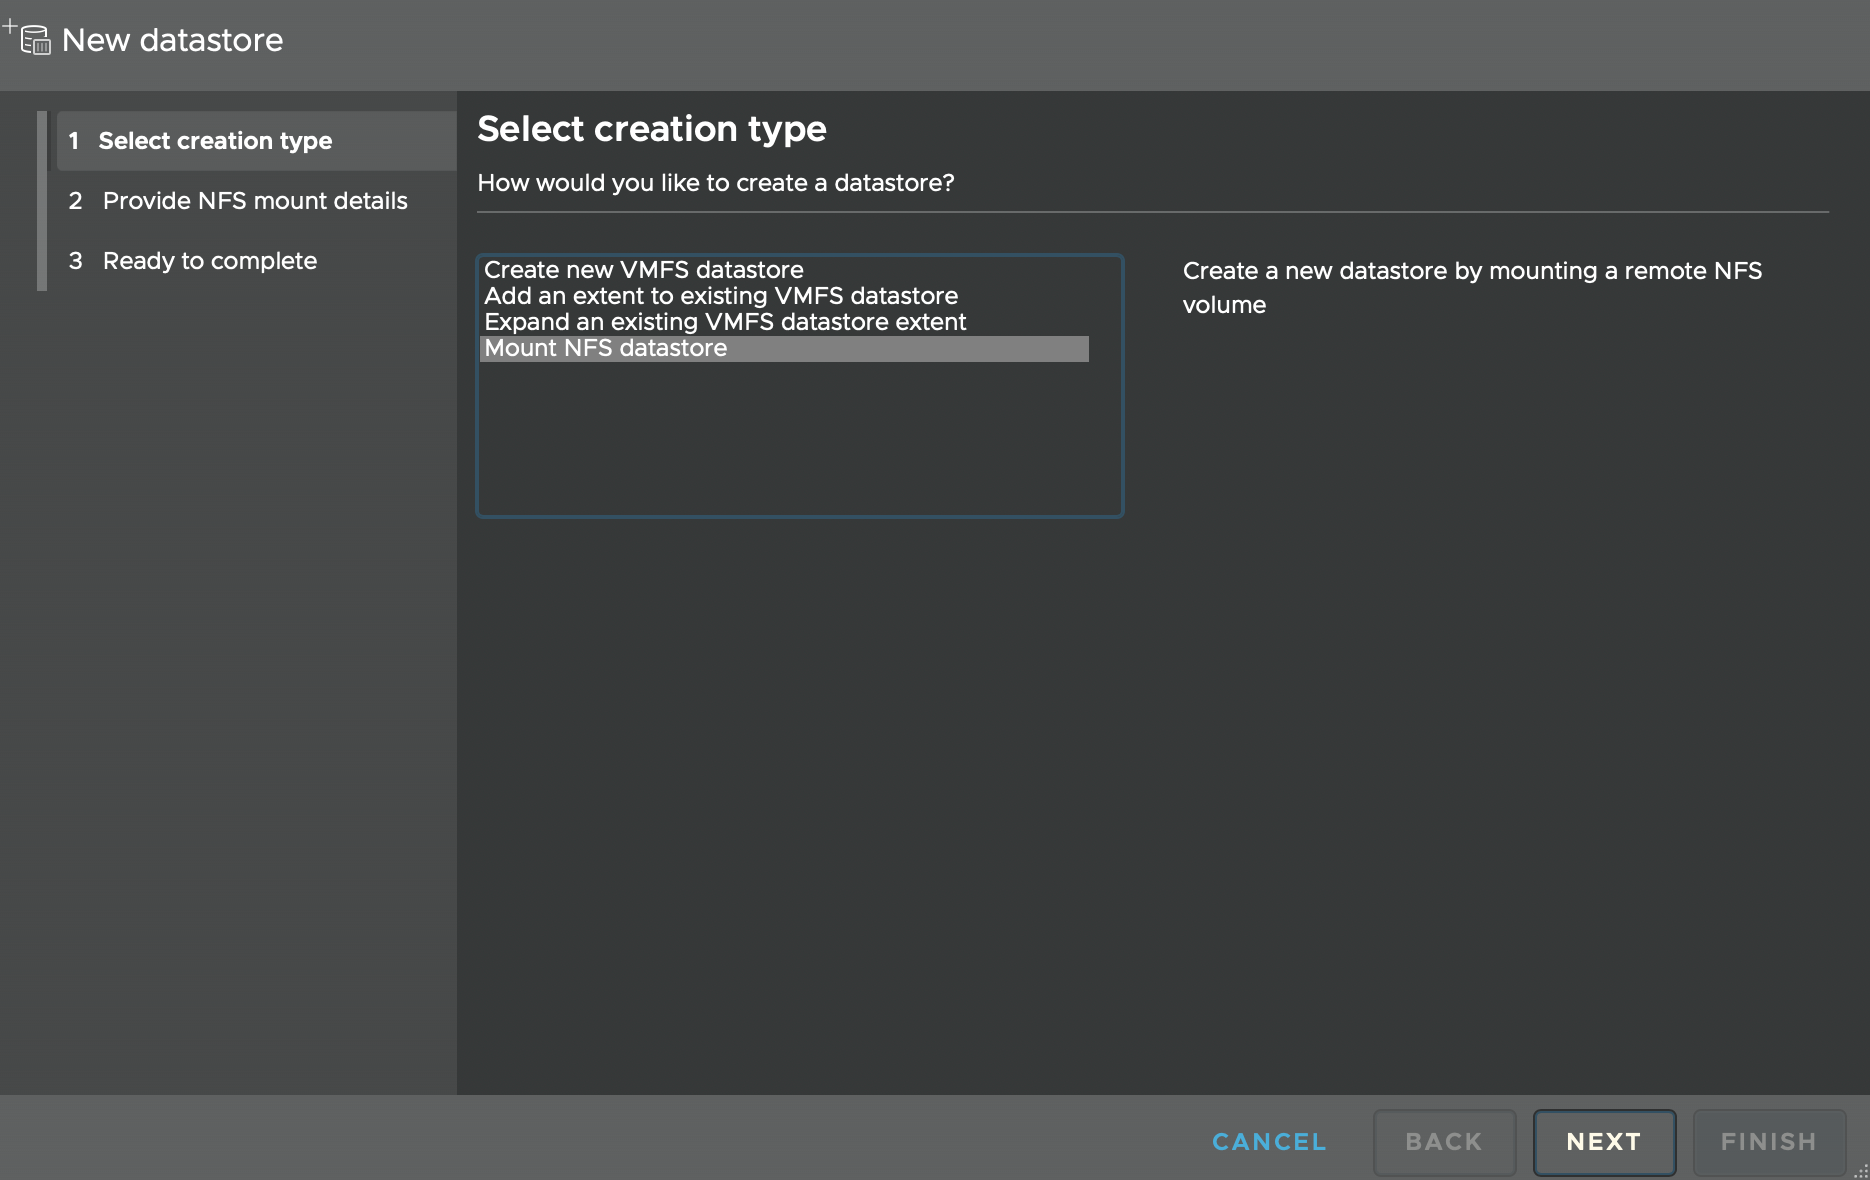
The wizard will present all the options including the Mount NFS datastore on the bottom. Clicking next, will open up a form that we need to fill out in order to connect to the Synology configured NFS mount points.
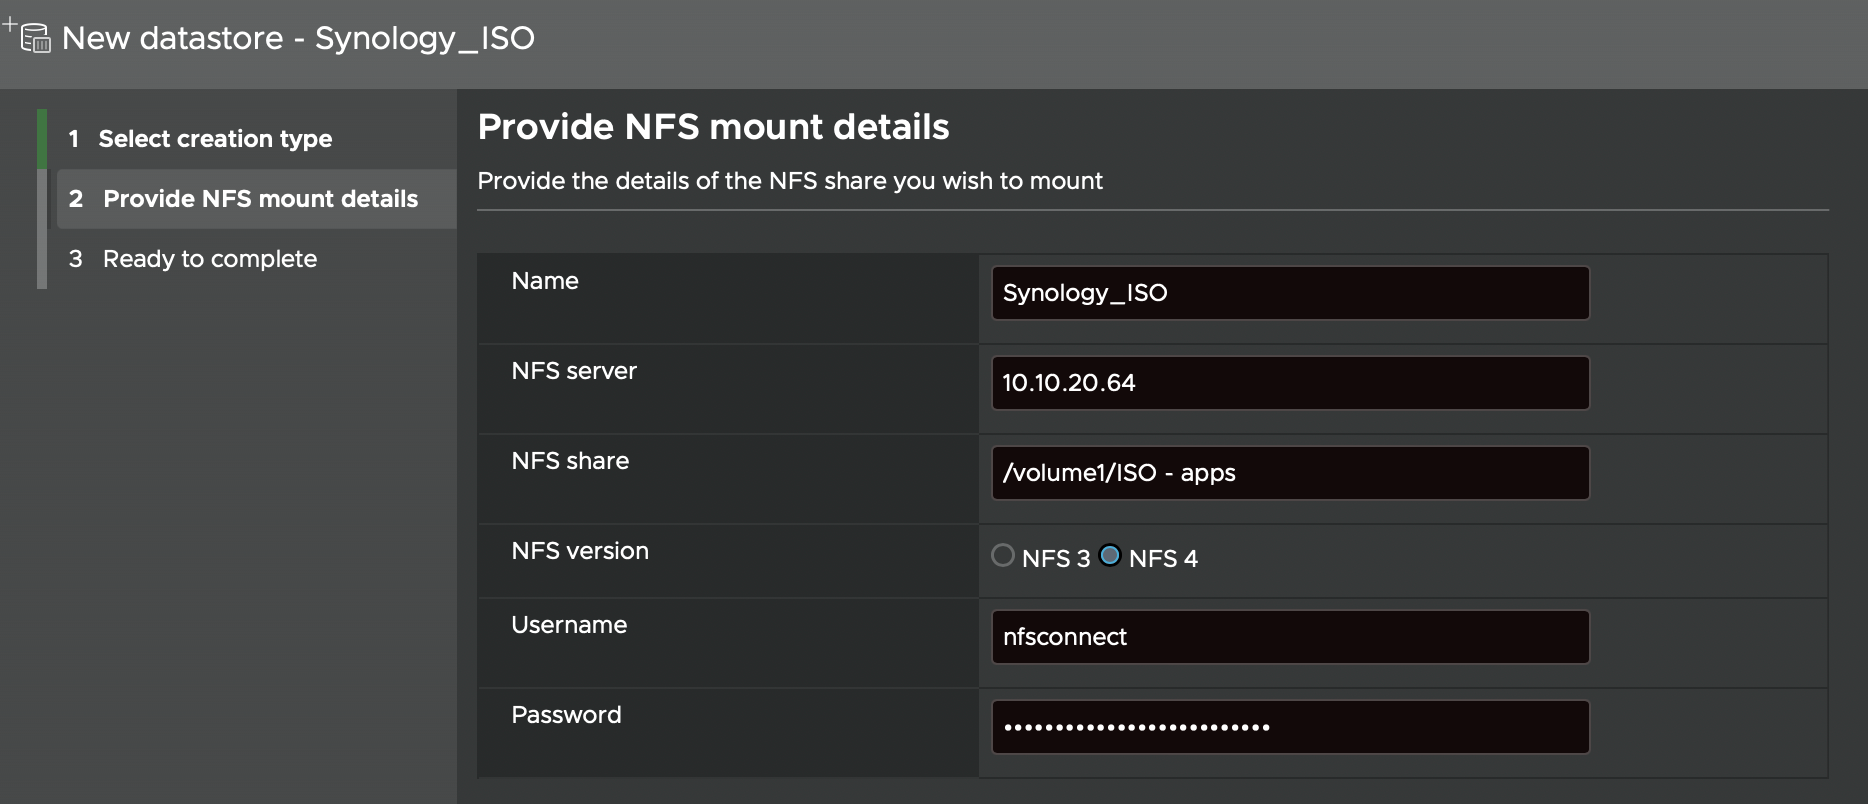
Entering the IP address of the NAS as well as the username and password of the account that has permissions, there is one more thing that needs to be entered exactly. The NFS share path.
Entering only the root name of the folder will not be enough and an error indicating permission issues will pop up. This has nothing to do with permissions in terms of username or password but the fact that the path is incomplete.
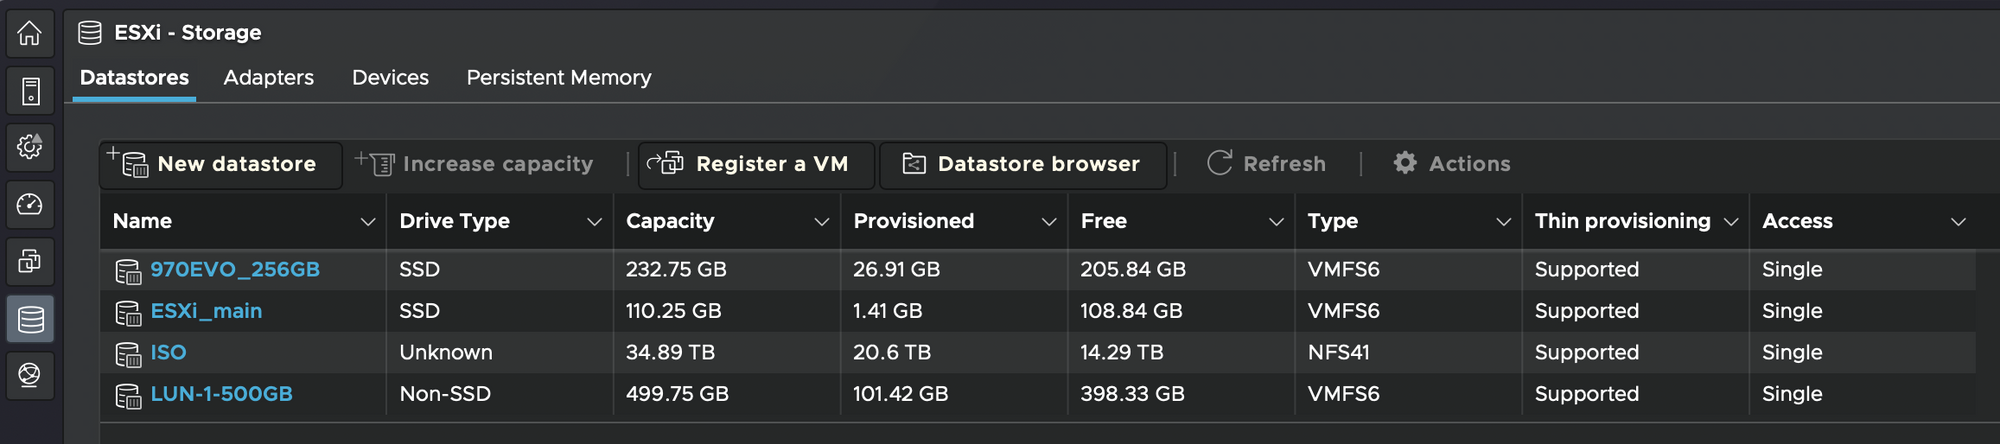
Once the datastore is visible and in the list, we can use the Datastore browser button to access and view the content of that path via the NFS protocol.
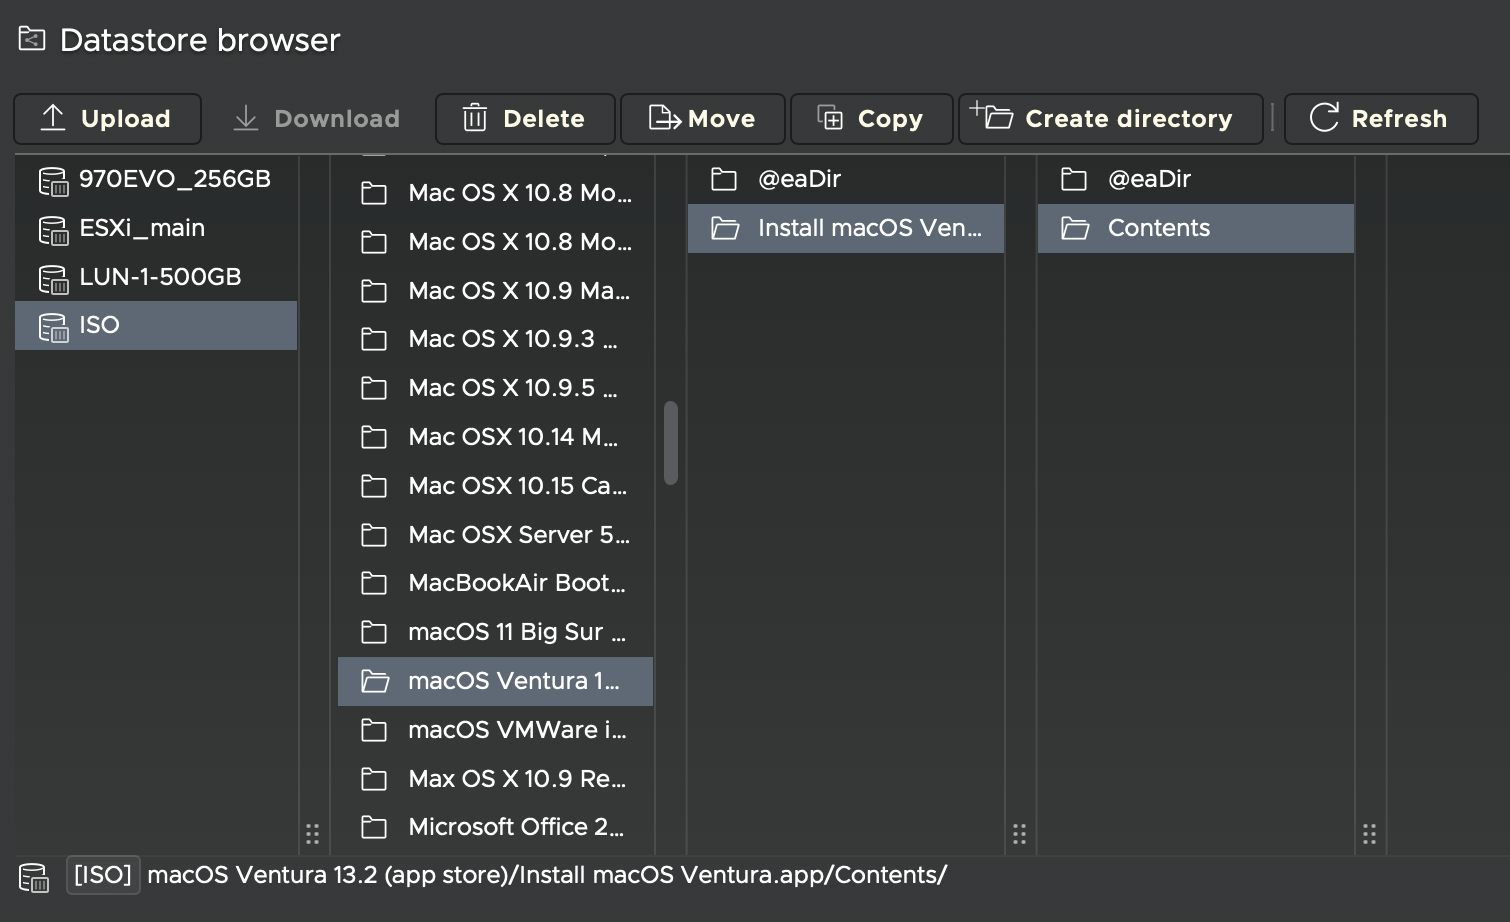
Now that the store is visible it will be possible to use it as a source for any virtual machine deployment in the future.
: iSCSI datastore configuration - Synology DSM SAN manager
iSCSI option has been part of the DSM for a long time. It has evolved over time as most packages have, and in the current version of DSM, version 7, it has been pulled out of the Storage Manager into its own separate one, the SAN Manager.
For more details on the SAN manager and how it works with a Windows OS as its target as well as some recovery options, do read up on the article linked above.
Moving forward with the topic at hand, we will see how to configure a target and LUN and present them inside ESXi, as a datastore, similar to NFS.
Inside the iSCSI section of the SAN Manager, we can begin with a wizard that will allow us to create a target or also a LUN connected to that particular target in one go.
Naming the LUN and defining its size will also be possible using the LUN section of the Manager in case there is a need to alter its specifications.
So, apart from installing the SAN Manager, with DSM 7 it comes preinstalled, we only need to configure the target and LUN(s), and we are ready to go. The next bit is configuring and presenting the LUN inside ESXi, as an additional datastore.
: iSCSI datastore configuration - ESXi datastore
Starting as we did with NFS the Storage section inside ESXi will offer alongside the Datastores tab, a few others as well. One of them is Adapters. There we first need to configure the iSCSI default adapter by turning it on and pointing it to the target configured in the previous step.
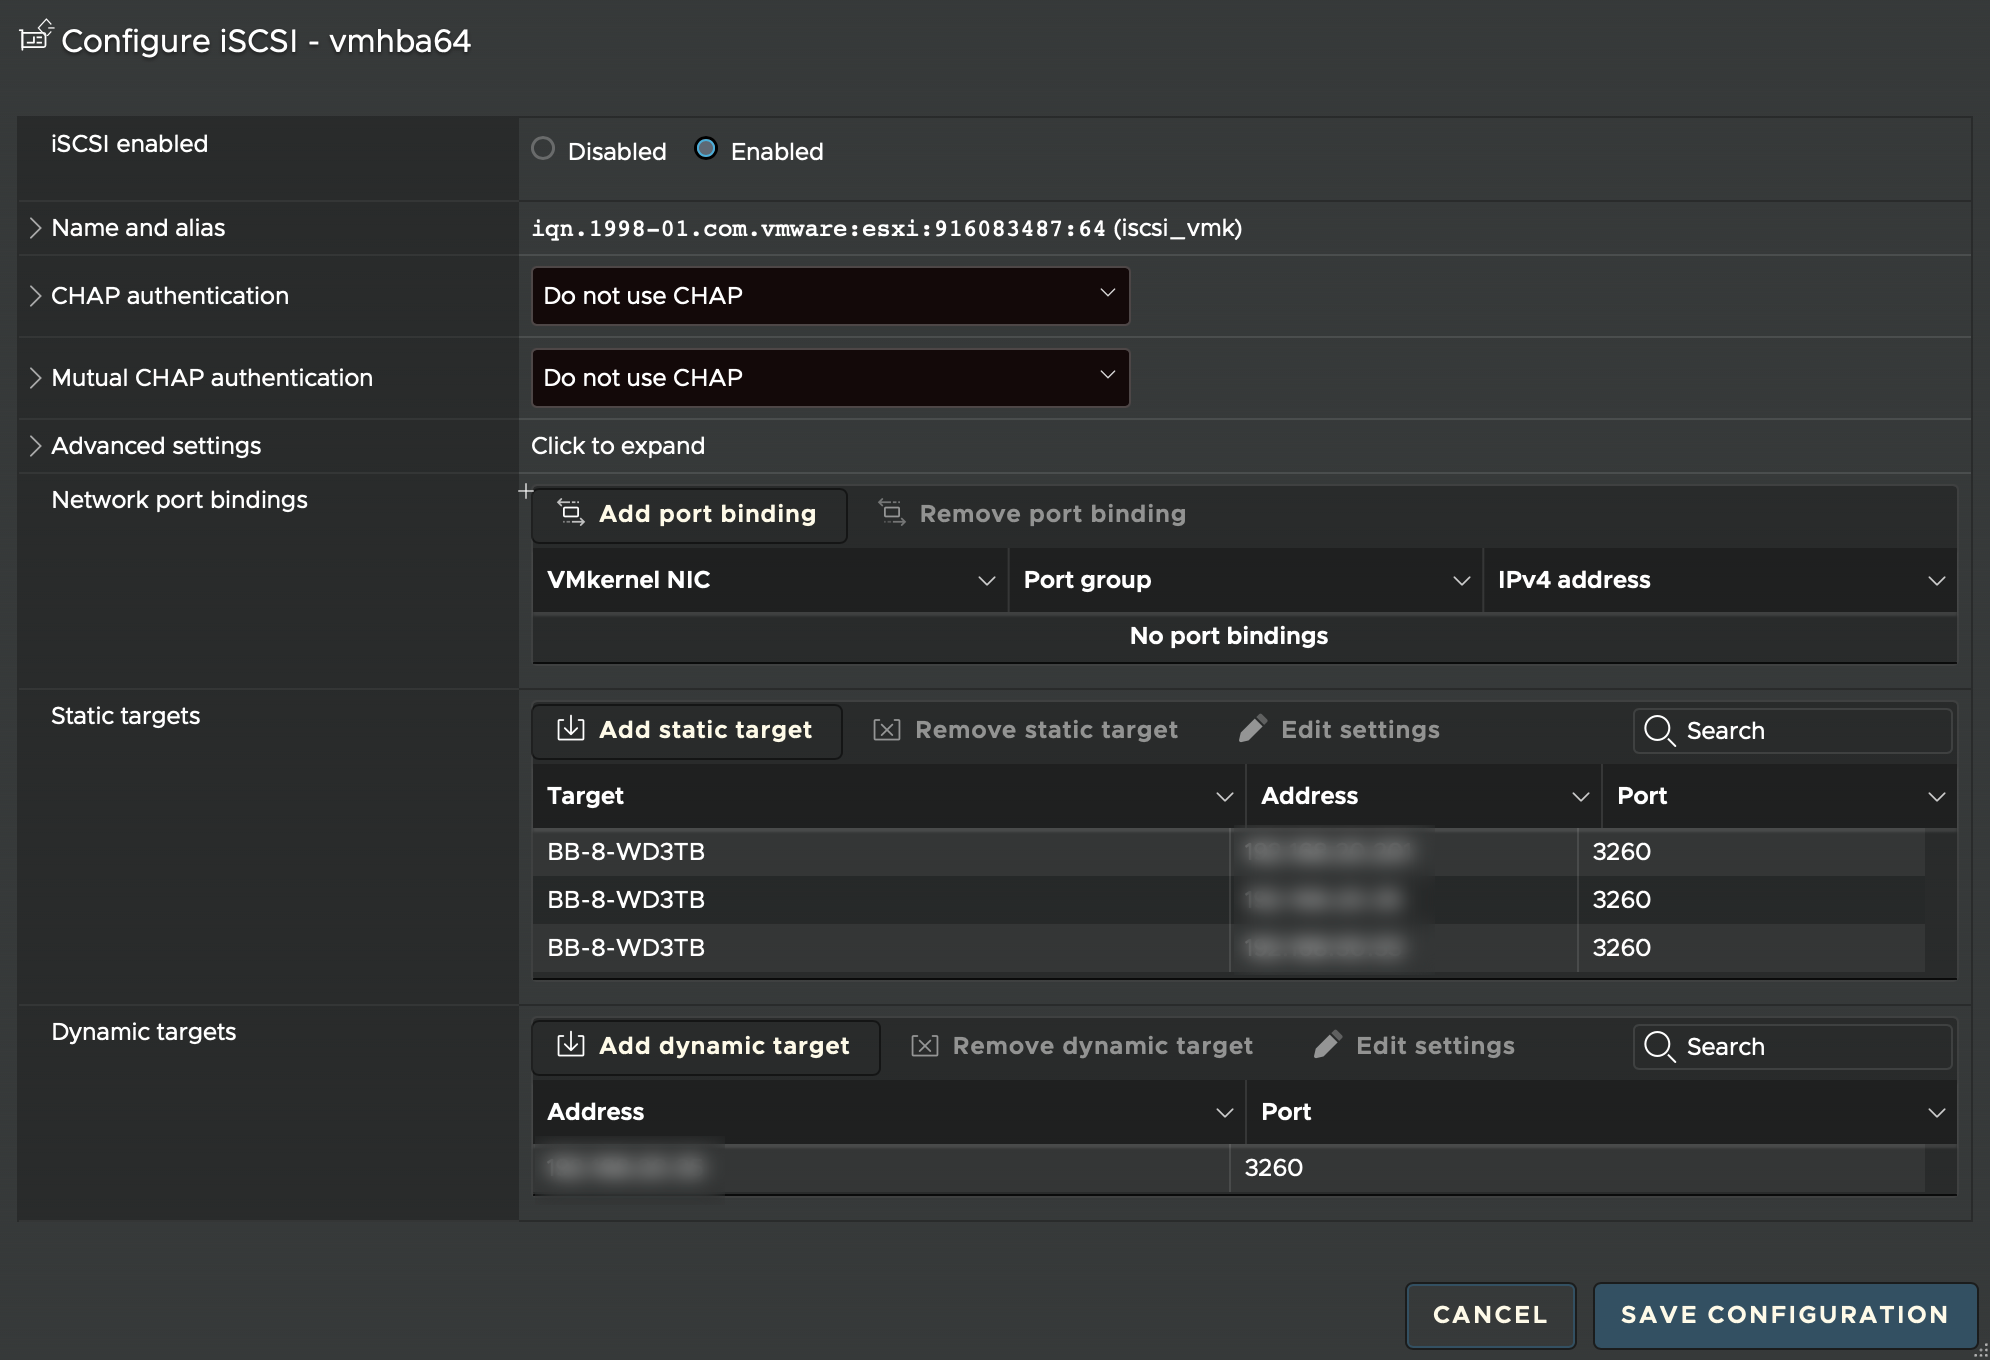
By enabling the iSCSI adapter we will have the option to add both static and dynamic targets by simply entering the IP address of the iSCSI target, in this case, the IP address of the NAS.
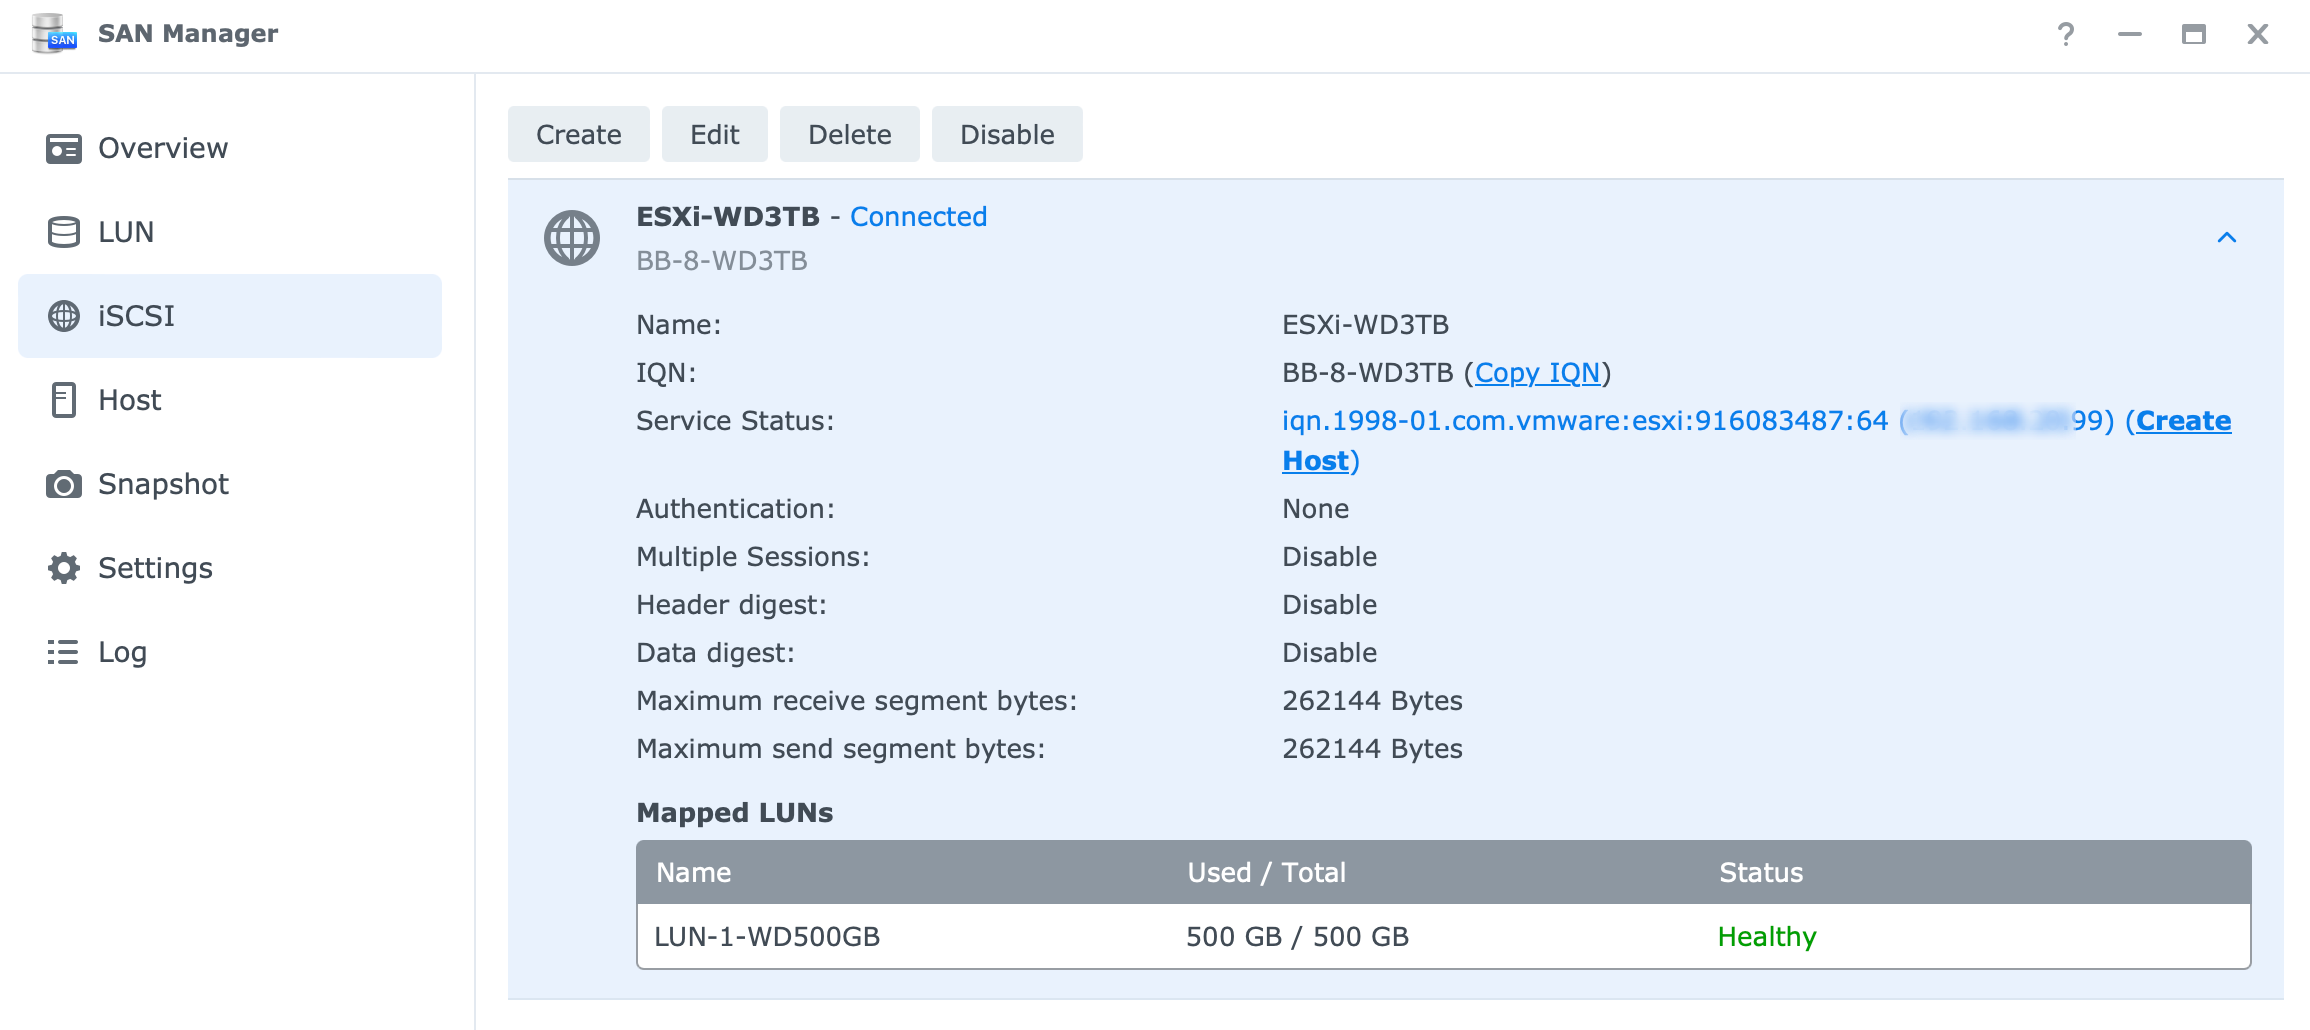
Once the save configuration has completed its process, moving back to the datastore tab we can use the same storage wizard to add any "visible" LUNs that are presented on the configured target.
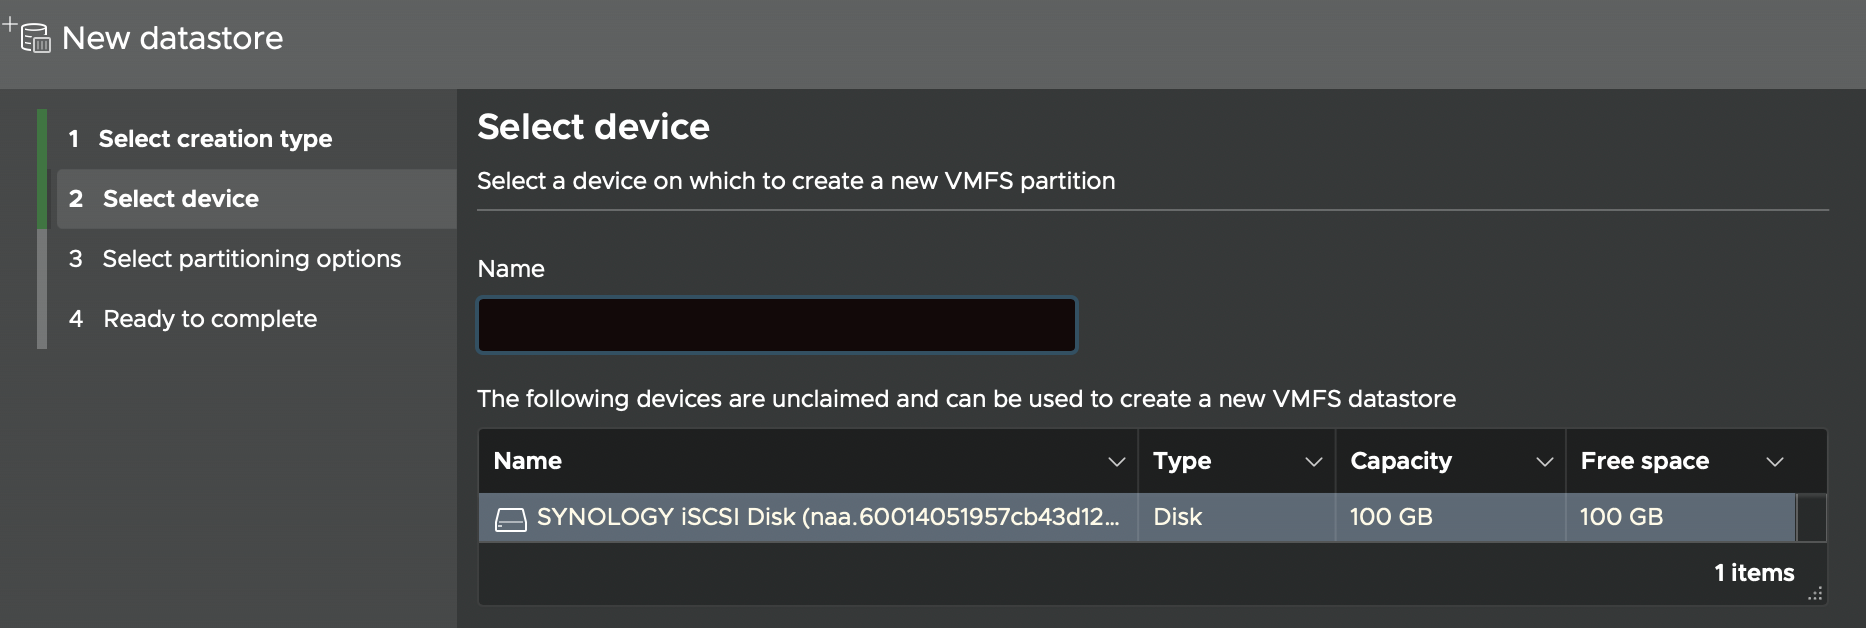
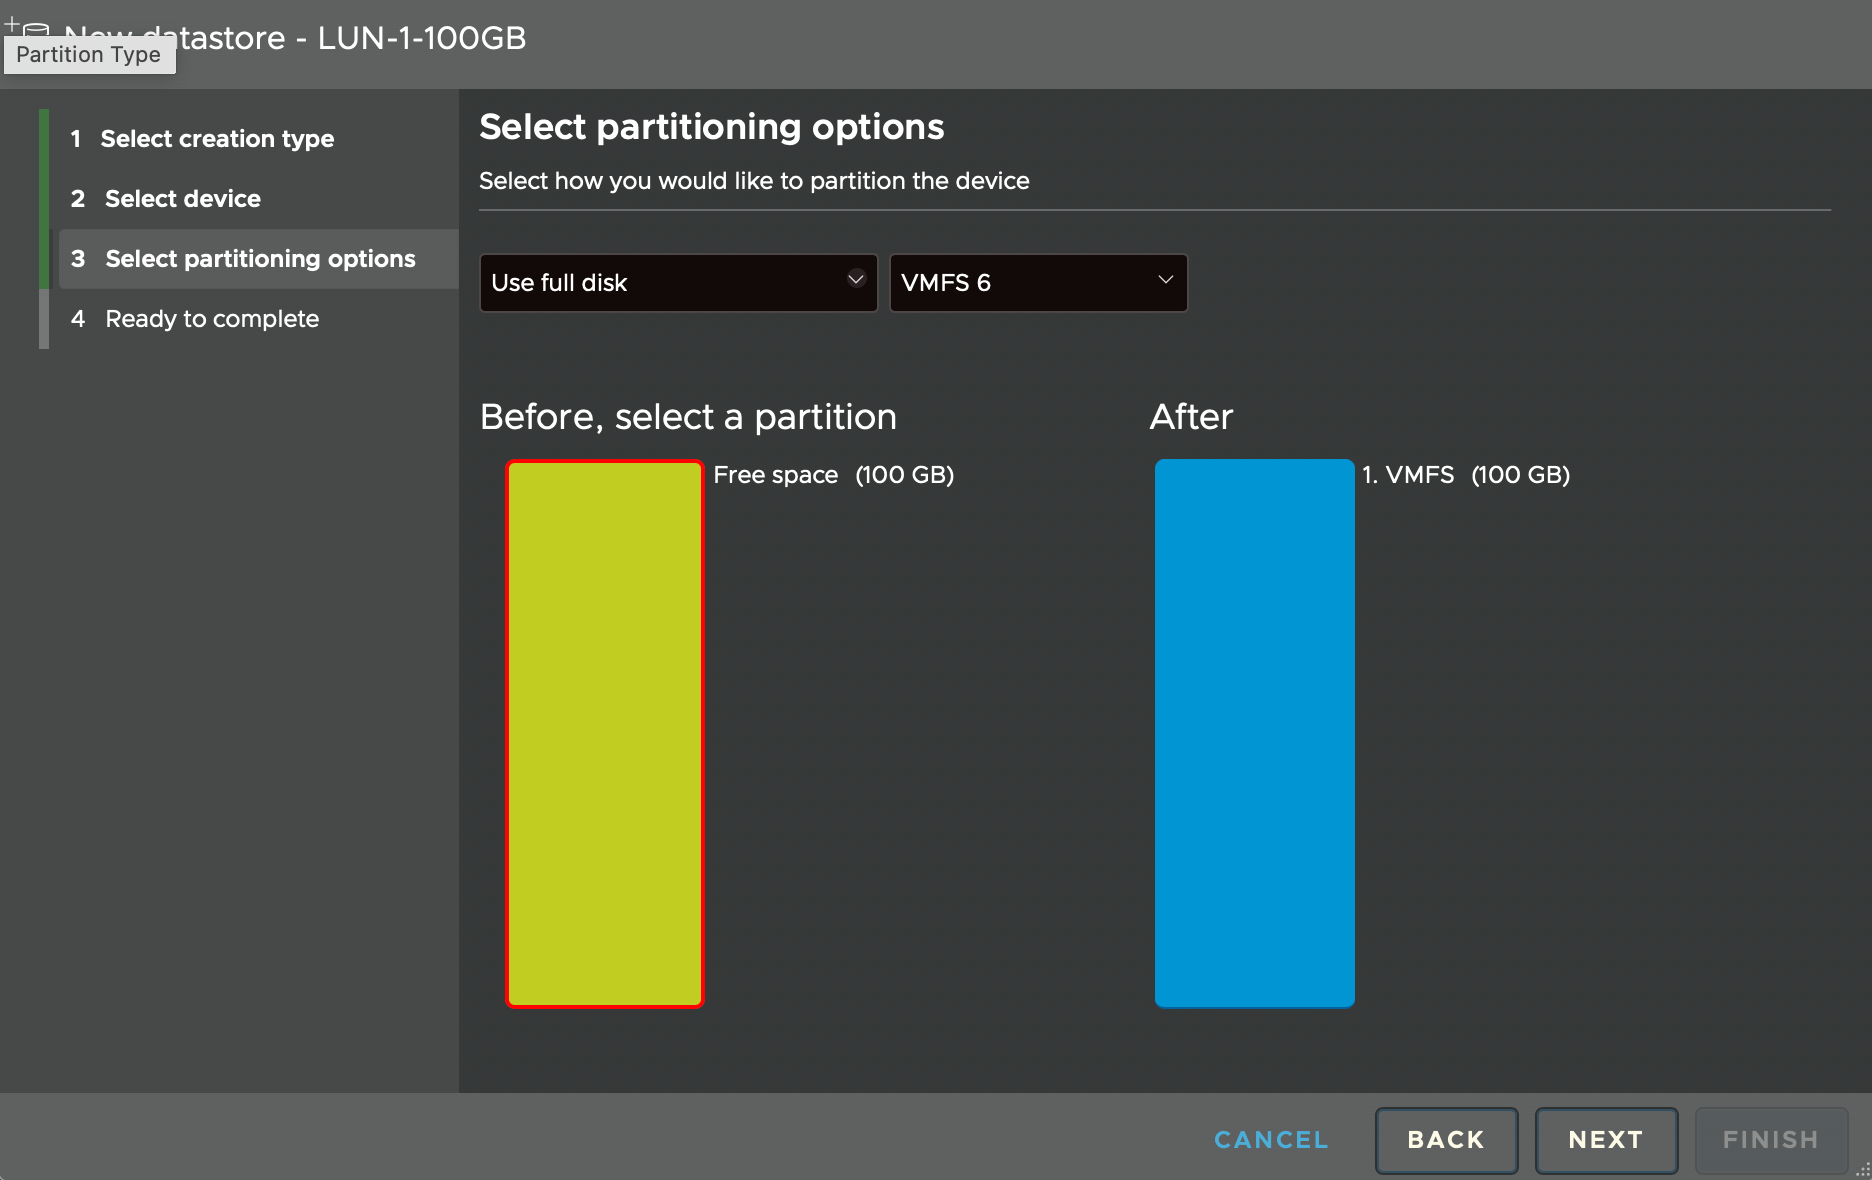
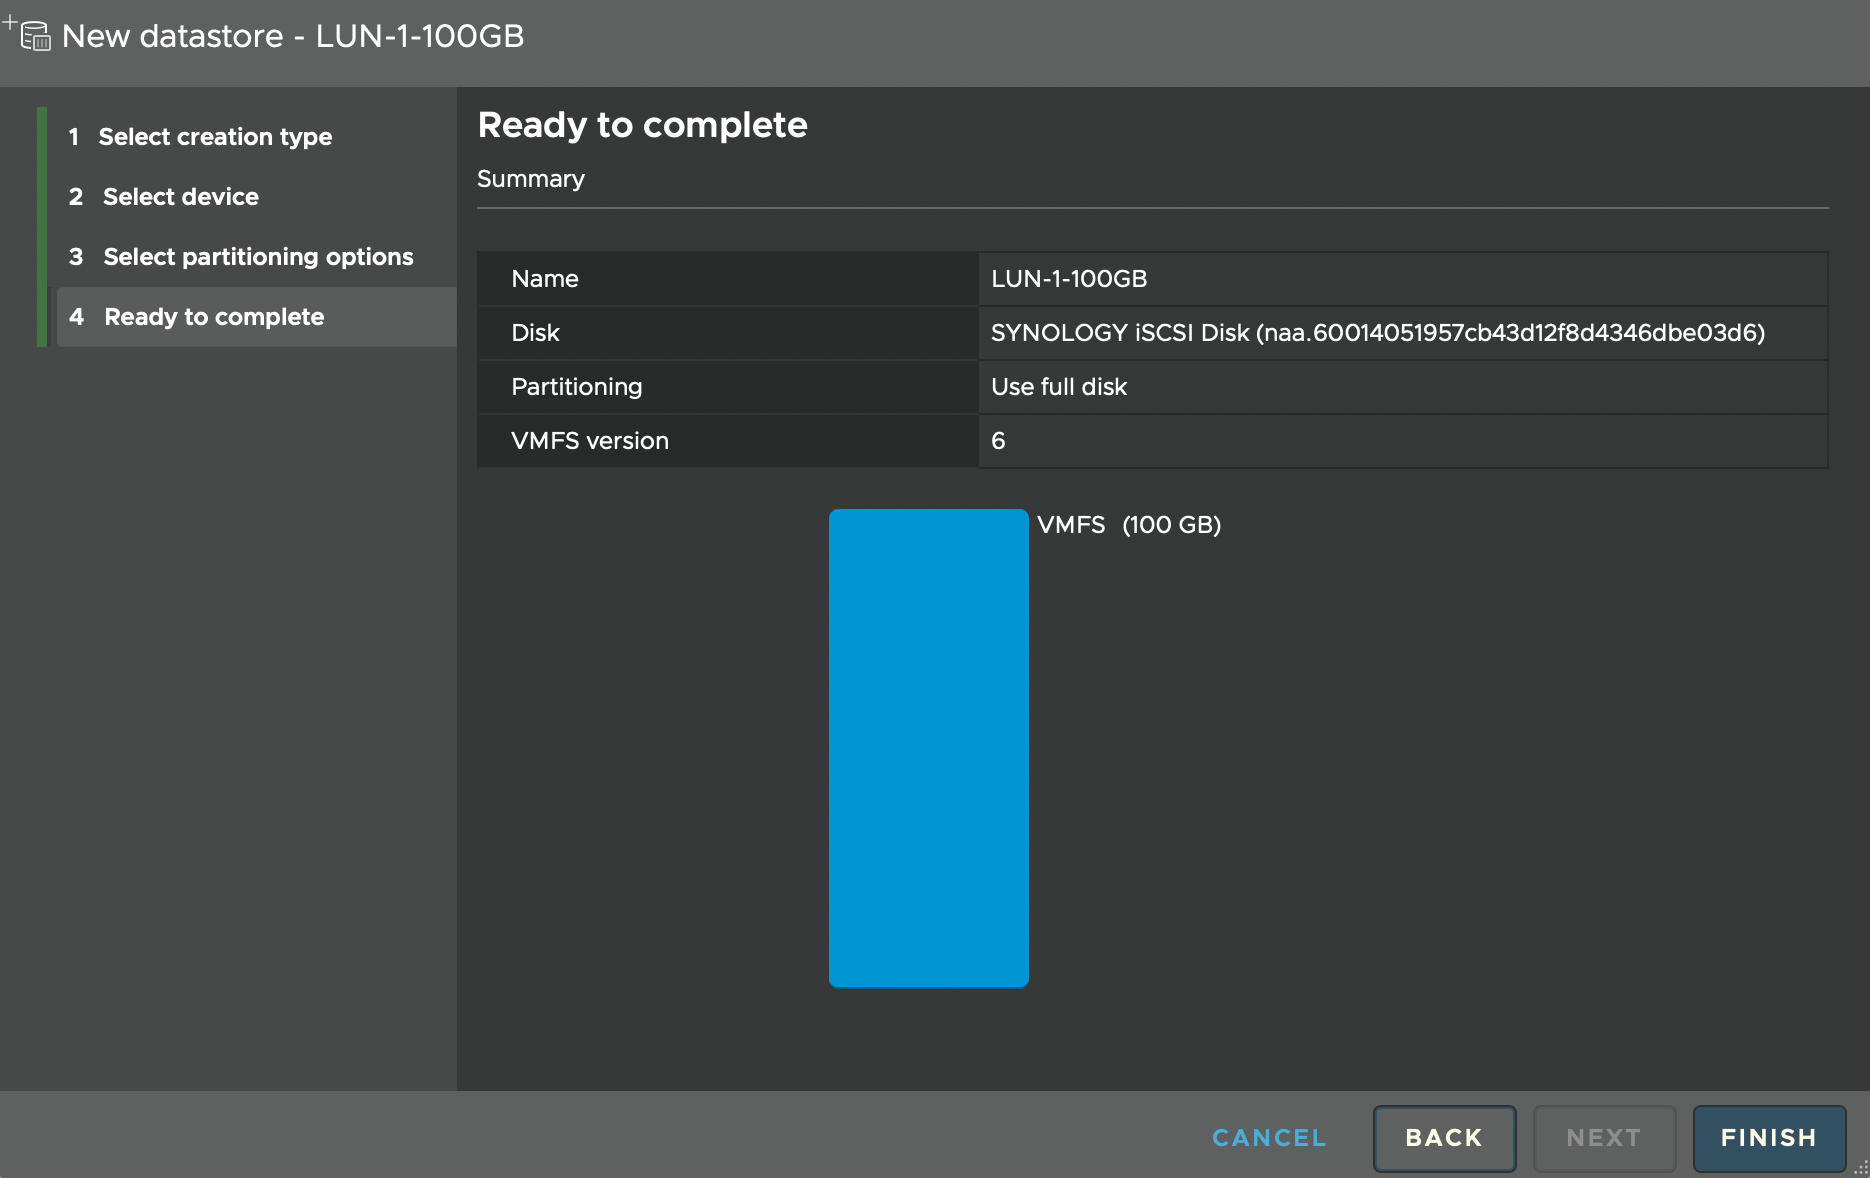
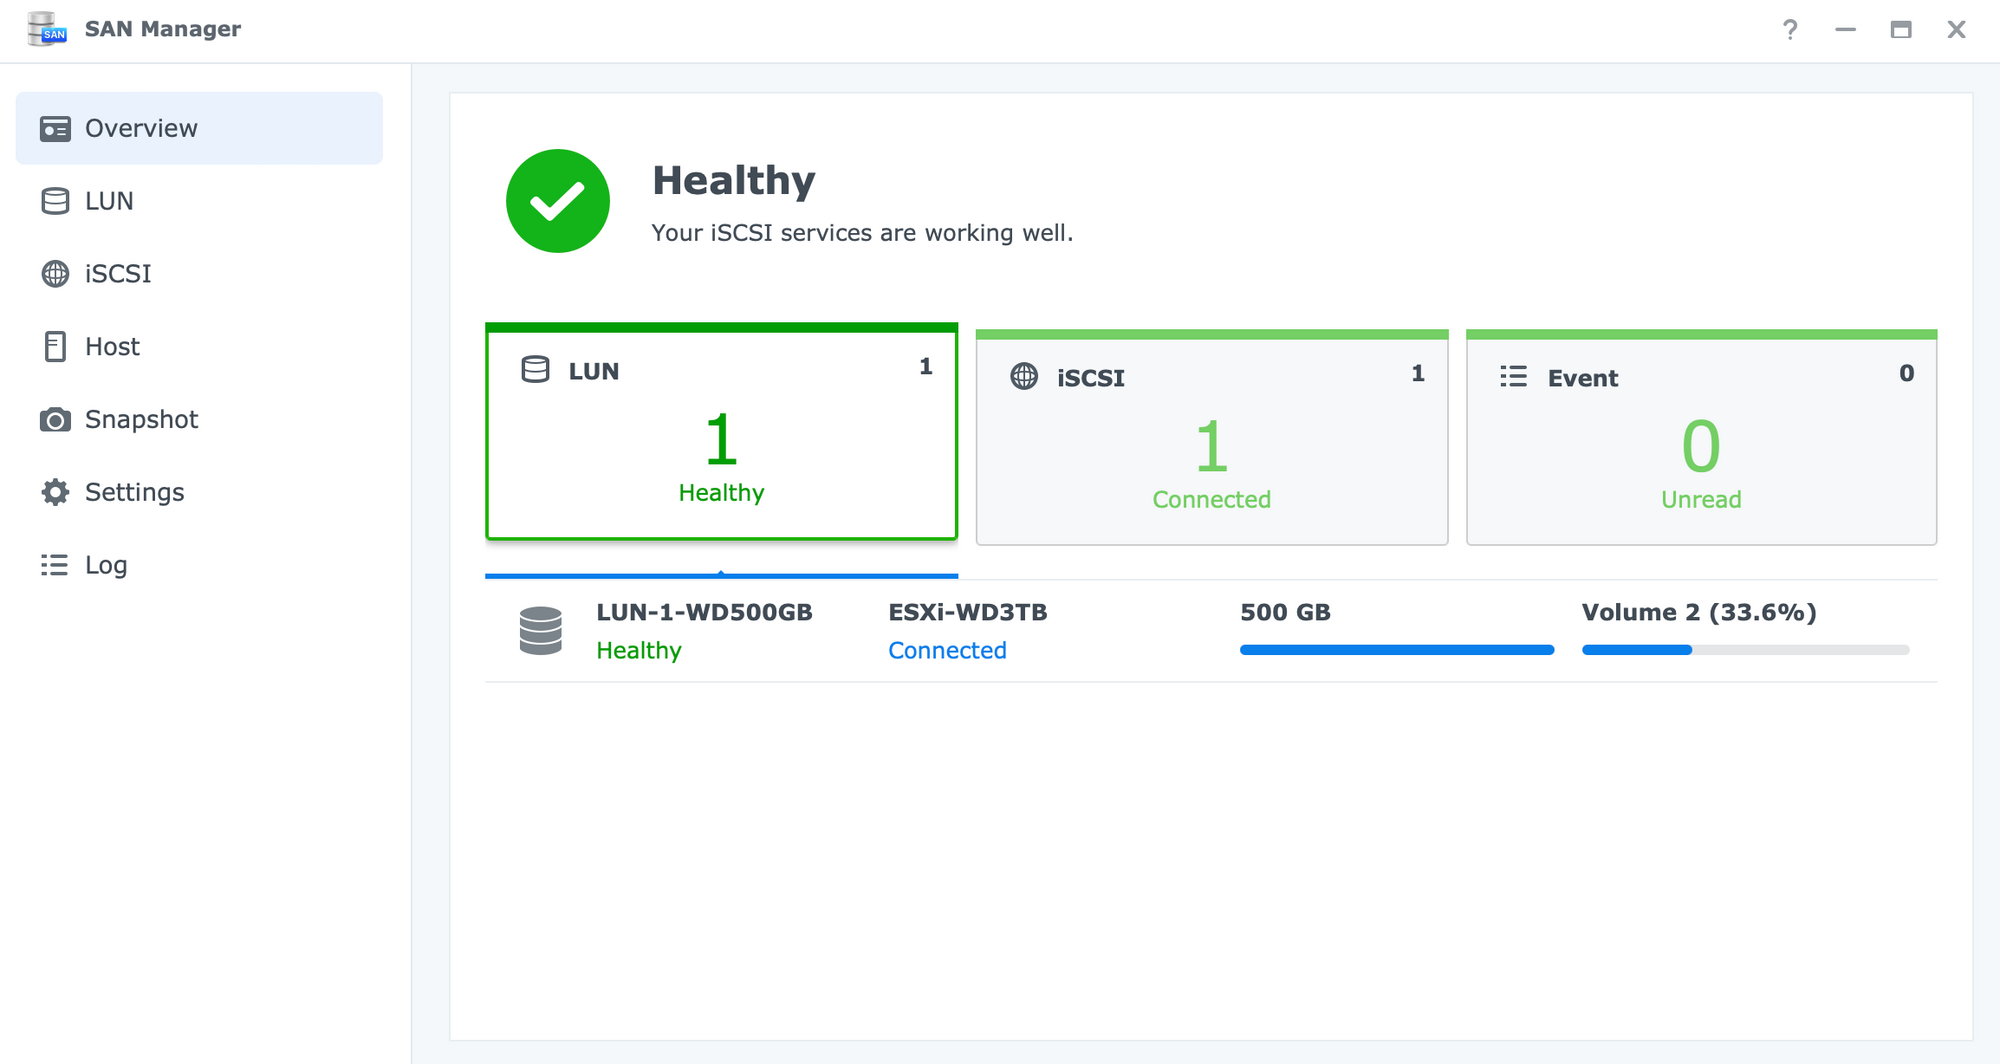
Once the partition has been added to the host it will be listed as a usable datastore. Also, the SAN Manager will register the LUN as healthy and in use regarding its capacity.


So there we have it. A simple and painless way to use DSM 6 or 7 with ESXi v8 in order to offer NFS or iSCSI as storage. The creation of a VM, as well as its backup/recovery using Synology's Active Backup for Business, will be presented in the following part 2 article.