Wireguard SPK for your Synology NAS


Download sections
: DSM 6.2 SPKs
: DSM 7.1 SPKs
: DSM 7.2 SPKs
: DSM 7.3 SPKs
Building your own Docker image
Install and run the package
: Install and start the Wireguard SPK
build.sh file to accommodate the netfilter.org/pub/libmnl/ URL path change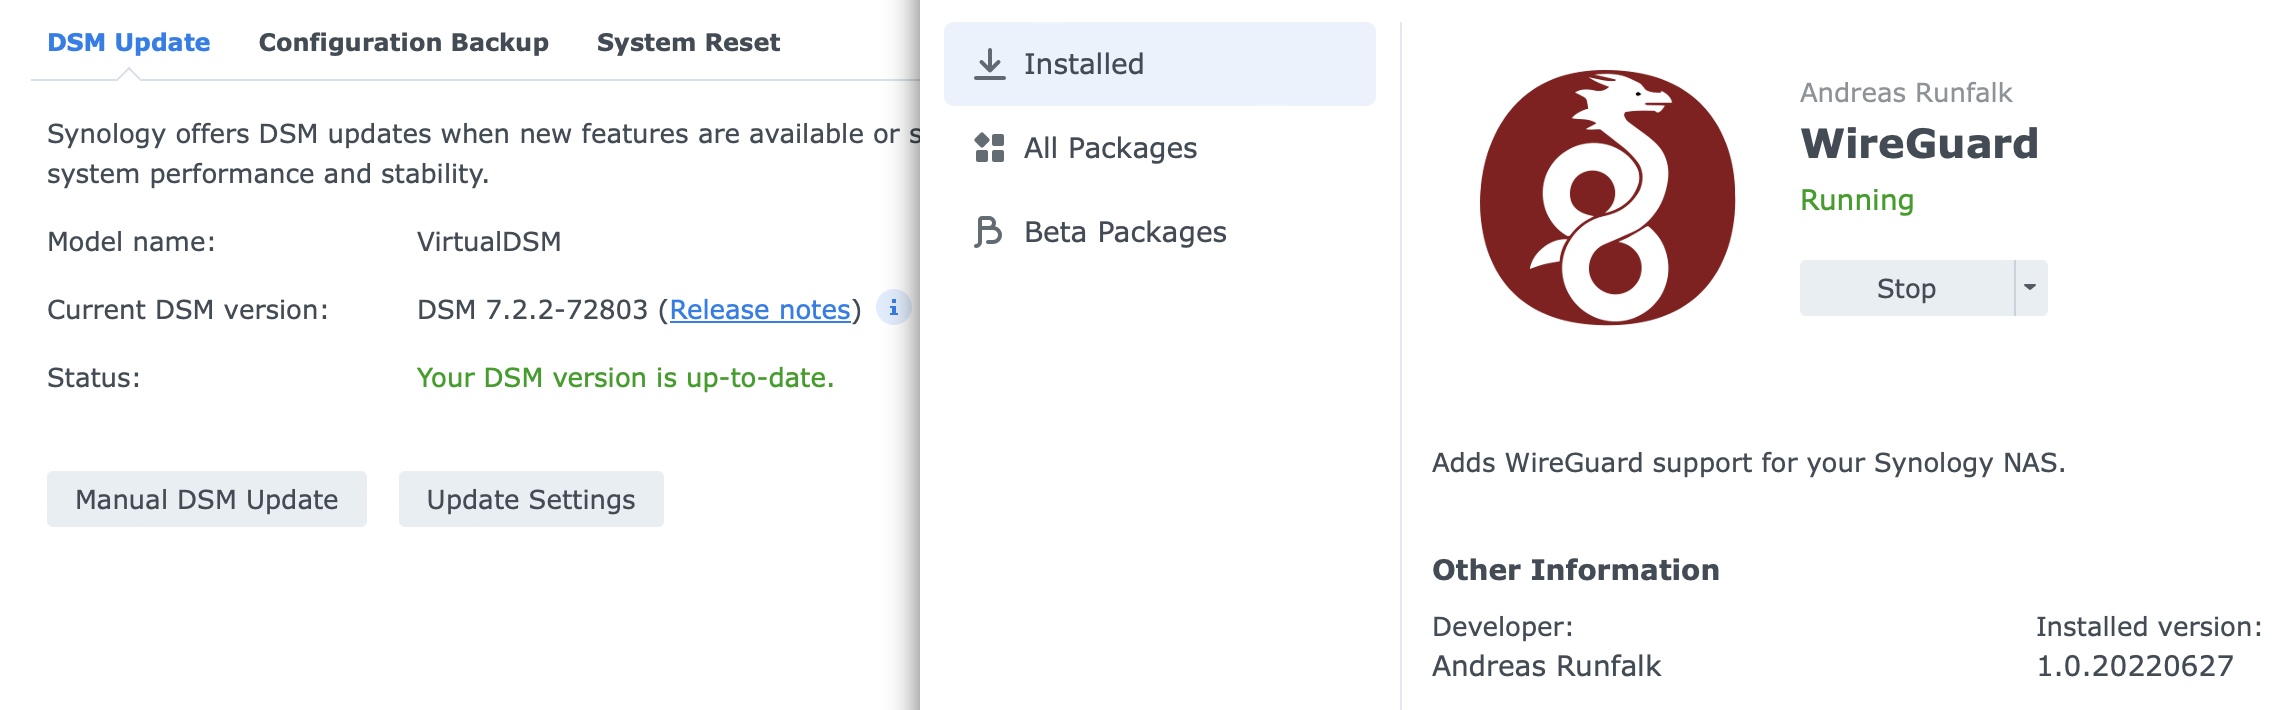
SPKs for DSM 6.2
Denverton models:
DVA3221, RS820+/RS820RP+, DS2419+II, DS2419+, DS1819+, DVA3219, RS2818RP+, RS2418+/RS2418RP+, DS1618+
SPKs for DSM 7.1
Use this page to identify your Synology CPU architecture.
Apollolake models:
DS620slim, DS1019+, DS918+, DS718+, DS418play*, DS218+
Avoton models:
RS1219+, RS818+/RS818RP+, DS1817+, DS1517+, RS2416+/RS2416RP+, RS815+/RS815RP+, DS2415+, DS1815+, DS1515+, DS415+
Braswell models:
DS916+, DS716+II, DS716+, DS416play, DS216+II, DS216+
Broadwellnk models:
FS3600, FS1018, SA3600, SA3400, DS3622xs+, RS4021xs+, RS3621xs+, RS3621RPxs, DS1621xs+, RS1619xs+, DS3018xs
Cedarview models:
DS713+, DS1513+, DS1813+ DS2413+, RS814+, RS2414+,
Denverton models:
DVA3221, RS820+/RS820RP+, DS2419+II, DS2419+, DS1819+, DVA3219, RS2818RP+, RS2418+/RS2418RP+, DS1618+
Geminilake models:
DVA1622, DS1520+, DS920+, DS720+, DS420+, DS220+, DS423+, DS224+
R1000 models:
RS422+, DS1522+, DS923+, DS723+
v1000 models:
FS2500, RS822+/RS822RP+, DS2422+, RS2821RP+, RS2423+/RS2423RP+, RS2421+/RS2421RP+, RS1221+/RS1221RP+, DS1821+, DS1621+
vDSM:
SPKs for DSM 7.2
Apollolake models:
DS620slim, DS1019+, DS918+, DS718+, DS418play*, DS218+
Avoton models:
RS1219+, RS818+/RS818RP+, DS1817+, DS1517+, RS2416+/RS2416RP+, RS815+/RS815RP+, DS2415+, DS1815+, DS1515+, DS415+
Armada37xx models:
DS119j, DS120j
Armada38x models:
DS419slim, DS218j, RS217, RS816, DS416j, DS416slim, DS216, DS216j, DS116
Braswell models:
DS916+, DS716+II, DS716+, DS416play, DS216+II, DS216+
Broadwell models:
FS3400, FS2017, RS3618xs, RS18017xs+, RS4017xs+, RS3617xs+, RS3617RPxs, DS3617xsII, DS3617xs
Broadwellnk models:
FS3600, FS1018, SA3600, SA3400, DS3622xs+, RS4021xs+, RS3621xs+, RS3621RPxs, DS1621xs+, RS1619xs+, DS3018xs
Denverton models:
DVA3221, RS820+/RS820RP+, DS2419+II, DS2419+, DS1819+, DVA3219, RS2818RP+, RS2418+/RS2418RP+, DS1618+
Epyc 7002 models:
SA6400
Geminilake models:
DVA1622, DS1520+, DS920+, DS720+, DS420+, DS220+, DS423+, DS224+
Geminilakenk models:
DS225+, DS425+
R1000 models:
RS422+, DS1522+, DS923+, DS723+
R1000nk models:
DS725+
RTD1296 models:
DS420j, DS220j, RS819, DS418, DS418j, DS218, DS218play, DS118
RTD1619B models:
DS124, DS423, DS223j, DS223
v1000 models:
FS2500, RS822+/RS822RP+, DS2422+, RS2821RP+, RS2423+/RS2423RP+, RS2421+/RS2421RP+, RS1221+/RS1221RP+, DS1821+, DS1621+
v1000nk models:
DS925+, DS1525+, DS1825+, RS2825RP+
vDSM:
SPKs for DSM 7.3
root)Apollolake models:
DS620slim, DS1019+, DS918+, DS718+, DS418play*, DS218+
Denverton models:
DVA3221, RS820+/RS820RP+, DS2419+II, DS2419+, DS1819+, DVA3219, RS2818RP+, RS2418+/RS2418RP+, DS1618+
Geminilake models:
DVA1622, DS1520+, DS920+, DS720+, DS420+, DS220+, DS423+, DS224+
Geminilakenk models:
DS225+, DS425+
R1000 models:
RS422+, DS1522+, DS923+, DS723+
R1000nk models:
DS725+
RTD1619B models:
DS124, DS423, DS223j, DS223
v1000 models:
FS2500, RS822+/RS822RP+, DS2422+, RS2821RP+, RS2423+/RS2423RP+, RS2421+/RS2421RP+, RS1221+/RS1221RP+, DS1821+, DS1621+
v1000nk models:
DS925+, DS1525+, DS1825+, RS2825RP+
vDSM:
If you have ever tried to connect outside your LAN back into it in order to get to certain content or devices, you were probably quickly suggested to make a VPN connection as a prerequisite.
While VPN is still the most secure way to do it, there are various methods, protocols, and solutions to do it. In the linked article above, you can find what methods Synology uses in its VPN package, but they are yet to support a new player in this field, Wireguard.
In short, Wireguard is a new standard and protocol that has made huge leaps in performance over a very popular OpenVPN or IPSec. While still not implemented out of the box as other protocols, it will be soon enough.
So what is this all about then? Well if you want to use your NAS as a Wireguard server or client you will need to have certain modules in place in order to be able to use it. As it was said, Synology still doesn't officially support it, but you can install 3rd party packages that will solve this problem.
This article will help you describe what you need to do (and how to do it) in order to get a valid Wireguard SPK (DSM Package Centar compatible installer) for your NAS CPU architecture, and if all else fails, build your own with Docker.
First off, the credits go to Andreas Runfalk for making the effort to make this happen. His Github repository has all the info that I will cover in this article, but I will show the execution of it as well on a real-world device.
The already precompiled list of Wireguard SPK packages (for DSM 6.2) can be found here. If your device is not on the list, or you are looking for how to make this happen for DSM 7.1, keep reading.
Using the process described on the Github repository, you can make your own Docker images, and of course containers, that will be used to build the valid SPKs that you need.
I have already done that for both DSM 6.2 and 7.1. So if you want to get into the action, just use them by following the process below.
Wireguard SPK Docker images (6.2, 7.1, 7.2 & 7.3)
All images are uploaded to hub.docker.com, so you are welcome to pull them and build your own SPK.
Each image is used identically, depending on the DSM in question, so make sure that you are using the correct one.
blackvoidclub/synowgbuild - Wireguard SPK builder for DSM 6.2
blackvoidclub/synobuild71 - Wireguard SPK builder for DSM 7.1
blackvoidclub/synobuild72 - Wireguard SPK builder for DSM 7.2
blackvoidclub/synobuild73 - Wireguard SPK builder for DSM 7.3
How do build an SPK?
As with any Docker operation, you will need to use it with root account on your NAS via SSH.
Make sure that you have access to your NAS via SSH by enabling it via Control Panel > Terminal and SNMP, and activating the SSH checkbox.
Next, use any SSH-compatible application (like Terminal on macOS, or Putty on Windows), and log in with your default DSM user.
Once that is done, elevate to root by entering sudo -i command and repeat your default password. This will land you at the root command prompt, and you will be ready to move along.
Now that you have root access make sure to run the following command as a single line but before that change two (2) parameters needed.
sudo docker run --rm --privileged --env PACKAGE_ARCH=<yourNASarch> --env DSM_VER=7.1 -v /volume1/docker/synowirespk71:/result_spk blackvoidclub/synobuild71
The Docker run command takes PACKAGE_ARCH and DSM_VER parameters that you need to change depending on your NAS and its DSM version.
To get your NAS CPU architecture, consult the following Synology KB article.
Examples of values that you can put in here are:
    apollolake
    armada38x
    avoton
    braswell
    broadwell
    broadwellnk
    bromolow
    cedarview
    denverton
    geminilake
    kvmx64
    monaco
    rtd1296
    x64
The DSM_VER parameter needs to be set to either to 6.2, 7.1, 7.2 or 7.3 depending on your need and of course what image you are using.
Finally, add the location that will be a volume bound to the container's result_spk folder by doing it like this:/your_local_folder_path:/result_spk.
Optionally we can use this single-line command line that includes the local folder of the already downloaded toolkits, to improve the speed of the process:
docker run --rm --privileged --env PACKAGE_ARCH=<yourNASarch> --env DSM_VER=7.1 -v /volume1/docker/toolkit_tarballs:/toolkit_tarballs -v /volume1/docker/synowirespk71:/result_spk blackvoidclub/synobuild71
Again, make sure that the local toolkit location already exists at the mentioned location of your choice.

You will have to be patient with the progress as it can take a long time (about 10 minutes or so) to pull the corresponding toolkit, so just let it do its thing.
Cloning into 'pkgscripts-ng'...
[2022-07-21 13:10:49,508] INFO: Download... https://dataupdate7.synology.com/toolchain/v1/get_download_list?identify=toolkit&version=7.1&platform=base
[2022-07-21 13:11:18,372] INFO: Download... https://dataupdate7.synology.com/toolchain/v1/get_download_list?identify=toolkit&version=7.1&platform=apollolake
[2022-07-21 13:15:09,513] INFO: tar -xhf /toolkit_tarballs/base_env-7.1.txz -C /build_env/ds.apollolake-7.1
[2022-07-21 13:18:23,801] INFO: tar -xhf /toolkit_tarballs/ds.apollolake-7.1.env.txz -C /build_env/ds.apollolake-7.1
[2022-07-21 13:19:36,459] INFO: tar -xhf /toolkit_tarballs/ds.apollolake-7.1.dev.txz -C /build_env/ds.apollolake-7.1
[2022-07-21 13:21:12,766] INFO: All task finished.
--2022-07-21 13:21:12--  https://crt.sh/?d=8395
Resolving crt.sh (crt.sh)... 91.199.212.73, 2a0e:ac00:c7:d449::5bc7:d449
Connecting to crt.sh (crt.sh)|91.199.212.73|:443... connected.
HTTP request sent, awaiting response... 200 OK
Length: 1200 (1.2K) [application/pkix-cert]
Saving to: 'DSTRootCAX3_Extended.crt'

     0K .                                                     100%  608M=0s

2022-07-21 13:21:13 (608 MB/s) - 'DSTRootCAX3_Extended.crt' saved [1200/1200]
Once that is all done, the rest will go real quick, generating a long (and I do mean long) log. The task of creating the SPK will be another minute or so and you are done!
----------------- Time cost statistics -----------------
Time cost: 00:01:11 [Build-->WireGuard]

1 projects, 0 failed, 0 blocked.
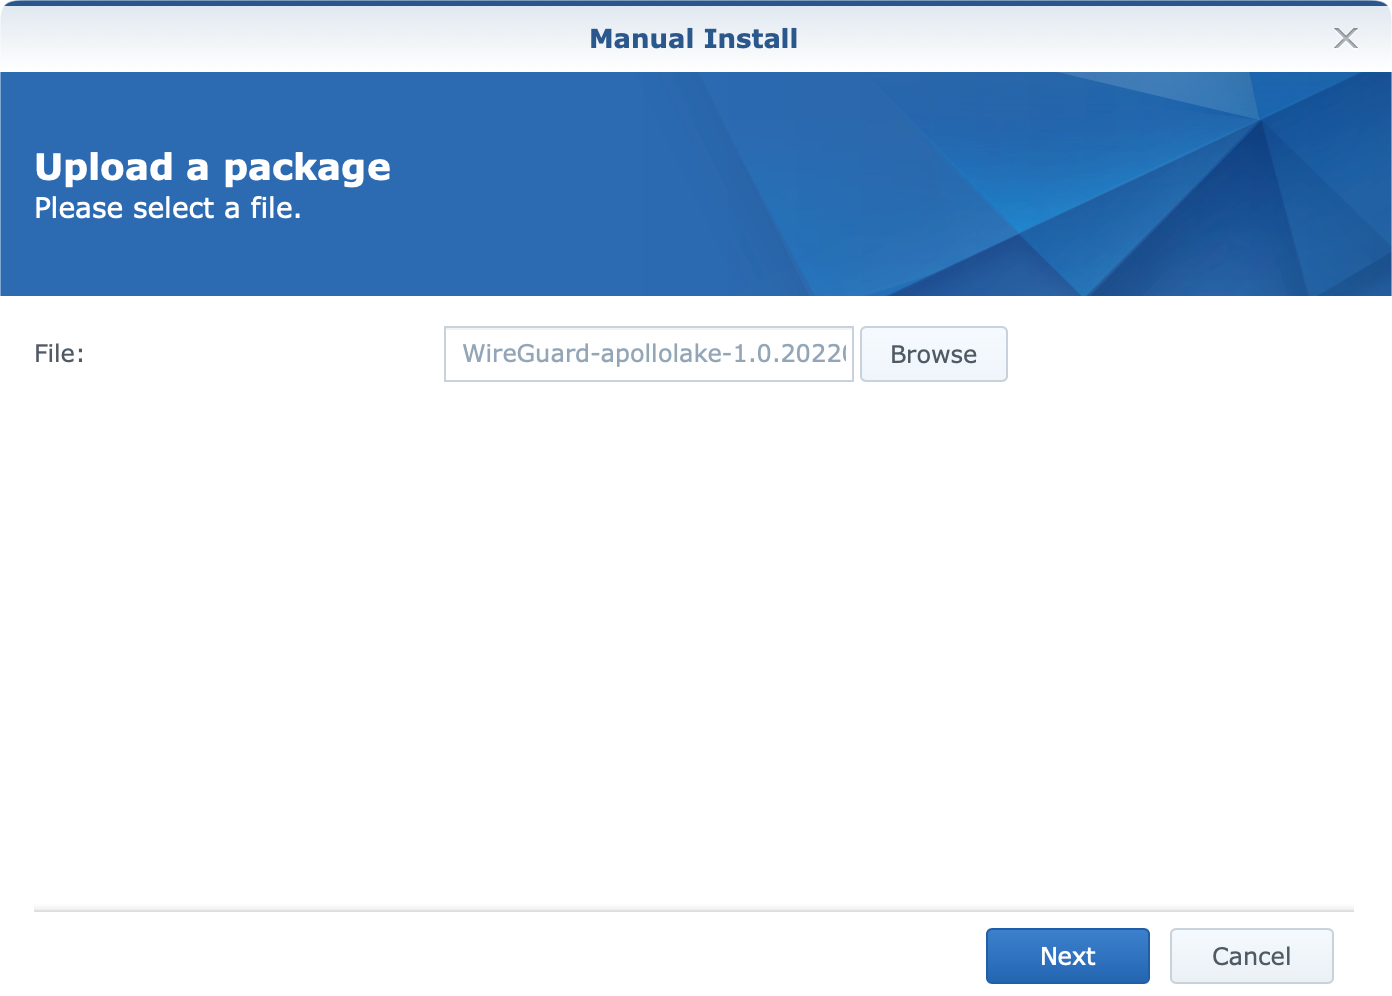
The final project will be an SPK file that will have a similar name, depending on your CPU architecture, WireGuard-apollolake-1.0.20220627.spk.
Install and start the Wireguard SPK
Now that you know how to build any SPK needed, it is time to install it and run it so that your NAS will be ready for future Wireguard operations.
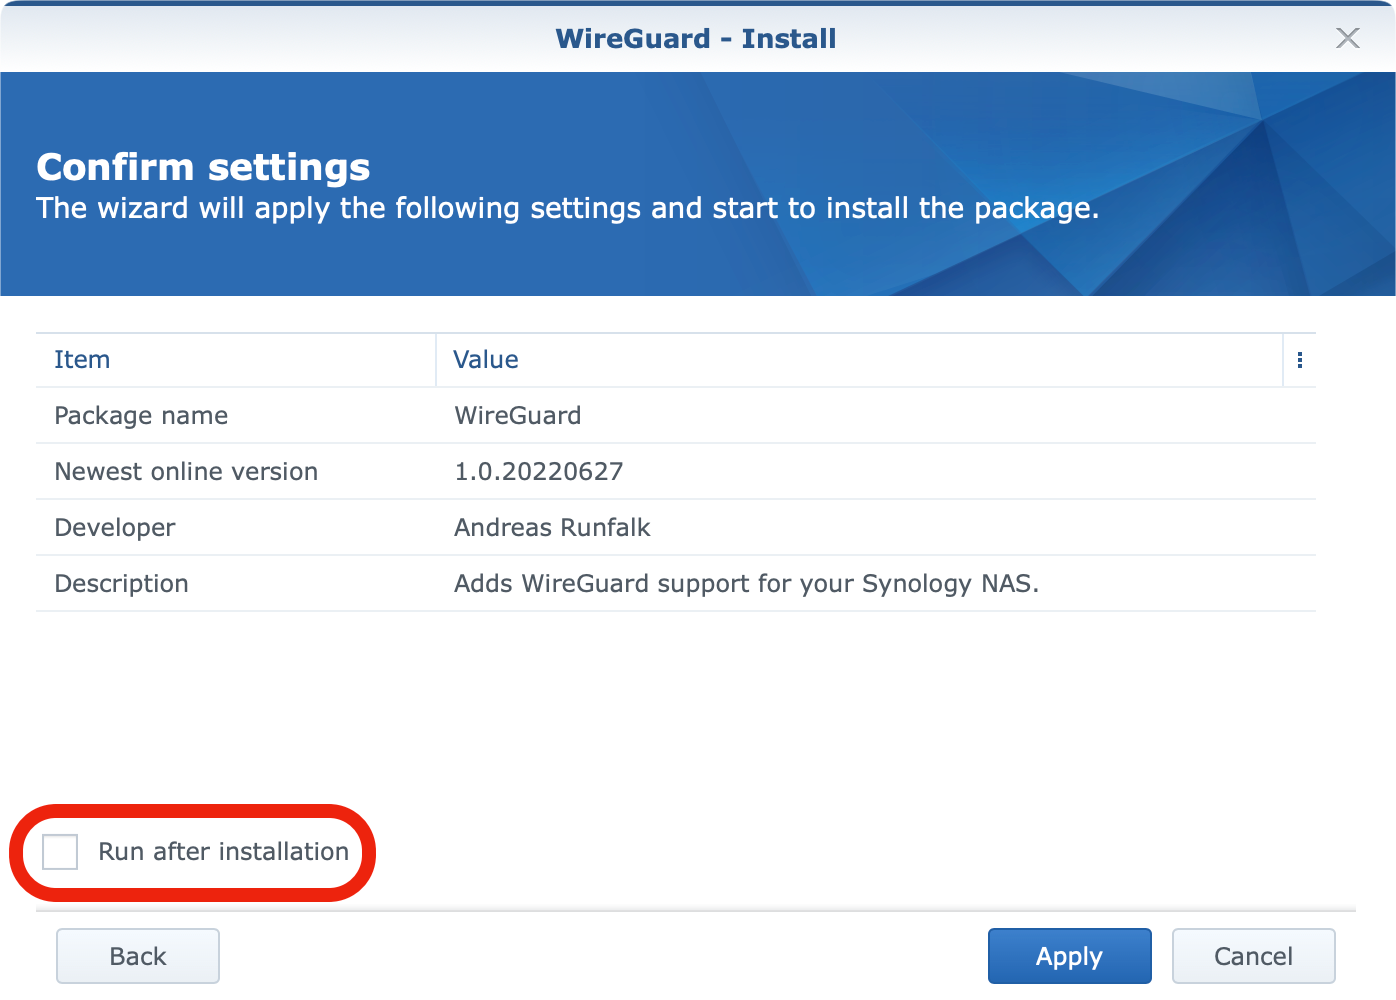
Log into your NAS, and open Package Center. Use the Manual install button and locate the SPK in order to upload and install it.

Next, jump back to the SSH prompt as root and run the following command to start the package: /var/packages/WireGuard/scripts/start.

Once that is done, a quick check inside the Package Center will also confirm that Wireguard support is running.
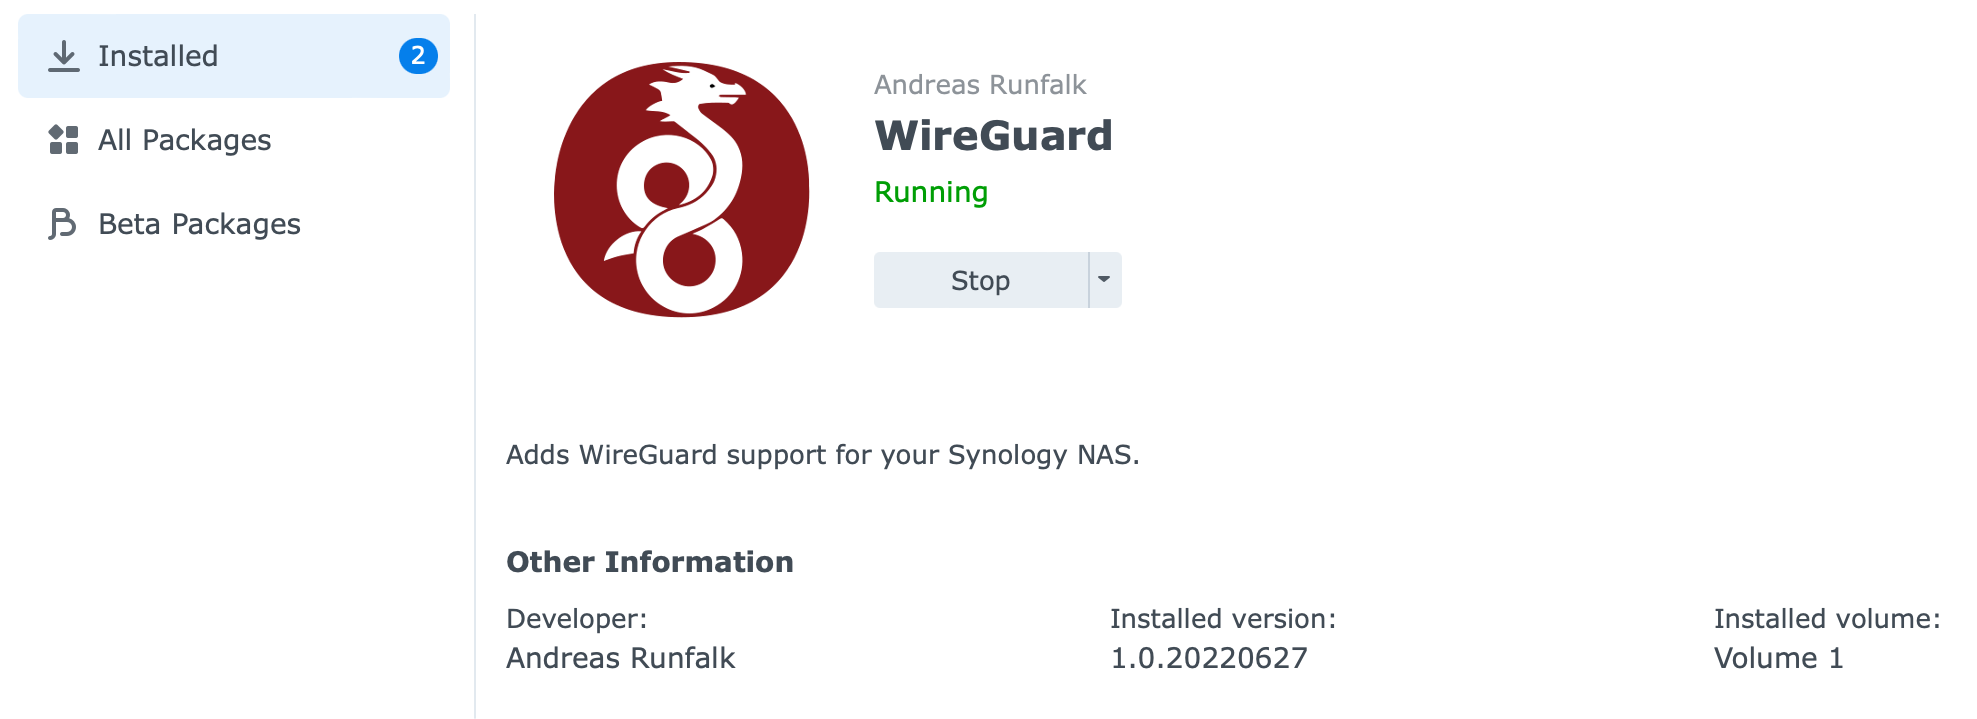
That's it. Your NAS now has Wireguard support and is ready to be configured as a Wireguard server or client.
ERROR: line 93: /dev/null: Permission denied
In case you have tried to follow this article and failed to run this on your own, one of the reasons might be the line 93: /dev/null: Permission denied error. There is an open ticket on GitHub for this particular matter, so try and follow it in case there will be development on that front.
Some users have found out that running this image on a different machine runs just fine, and in some other cases, it does not. At the moment I have no idea why this is happening, as I am unable to reproduce the issue (on any of my 4 NAS boxes).
If you do get in a similar situation, let me know in the comment section below, or contact me over the support chat (upper right corner of the site, visible on desktop only), and I will gladly build you an SPK for your model.
In the follow-up article, we will see how you can configure an incoming Wireguard VPN server that will serve as your "access point" from outside your network as an alternative to popular VPN methods linked at the start of this article.
Comment on the topic in the section below if you have any questions, or suggestions on the matter.


