Synology 101 - Part 5: Security & access

Here we are at the end of this 101 series. To wrap this up, this article will focus on security and secure access in general. You will see what would be best to do in specific cases to maintain your security but still not trouble yourself too much when you need access to your NAS. Mainly when accessing the NAS from the outside world.
Having access to your data at any time is almost essential nowadays. Using a NAS but not having some access to it while outside your home, limits you in many ways. Still, saying this does not mean that it is a bad thing, but also thinking that you are 100% safe is an illusion. Just to be clear, if you have no connection to the outside world means you can't be attacked as well. Best to do all you can to avert as much threat as possible, than to regret it later on.
Here are the main elements that this article will cover:
GENERAL HARDENING OPTIONS
- DSM and app updates
- Port configuration
- QuickConnect, DDNS, custom domain
- SSL certificates
- Firewall
USER HARDENING AND SECURE ACCESS
- Hardening your user account
- 2FA
- Trusted/untrusted client settings (former AutoBlock)
- Password manager
- App and data permissions
- Secure SignIN (DSM 7 only)
SECURE METHODS OF ACCESS VIA THE INTERNET
- VPN
- Reverse Proxy
General hardening options
There are a lot of elements that you need to include when it comes to making your NAS as a platform secure. It doesn't matter if you are a light user or a family with many heavy users, the point is that you should take all the steps that you can to minimize the attack surface towards your NAS, your data, and apps and services.
DSM and app updates
I guess the essential thing with any system is to keep it up to date. Just to be clear, this does NOT mean that the latest and greatest version is something you should be blindly going for. Read up on the changes and update/patch if needed.
The main elements that you should be focusing on are security and exploits, then the fixes (if you are having a problem with some core elements), and then new features.
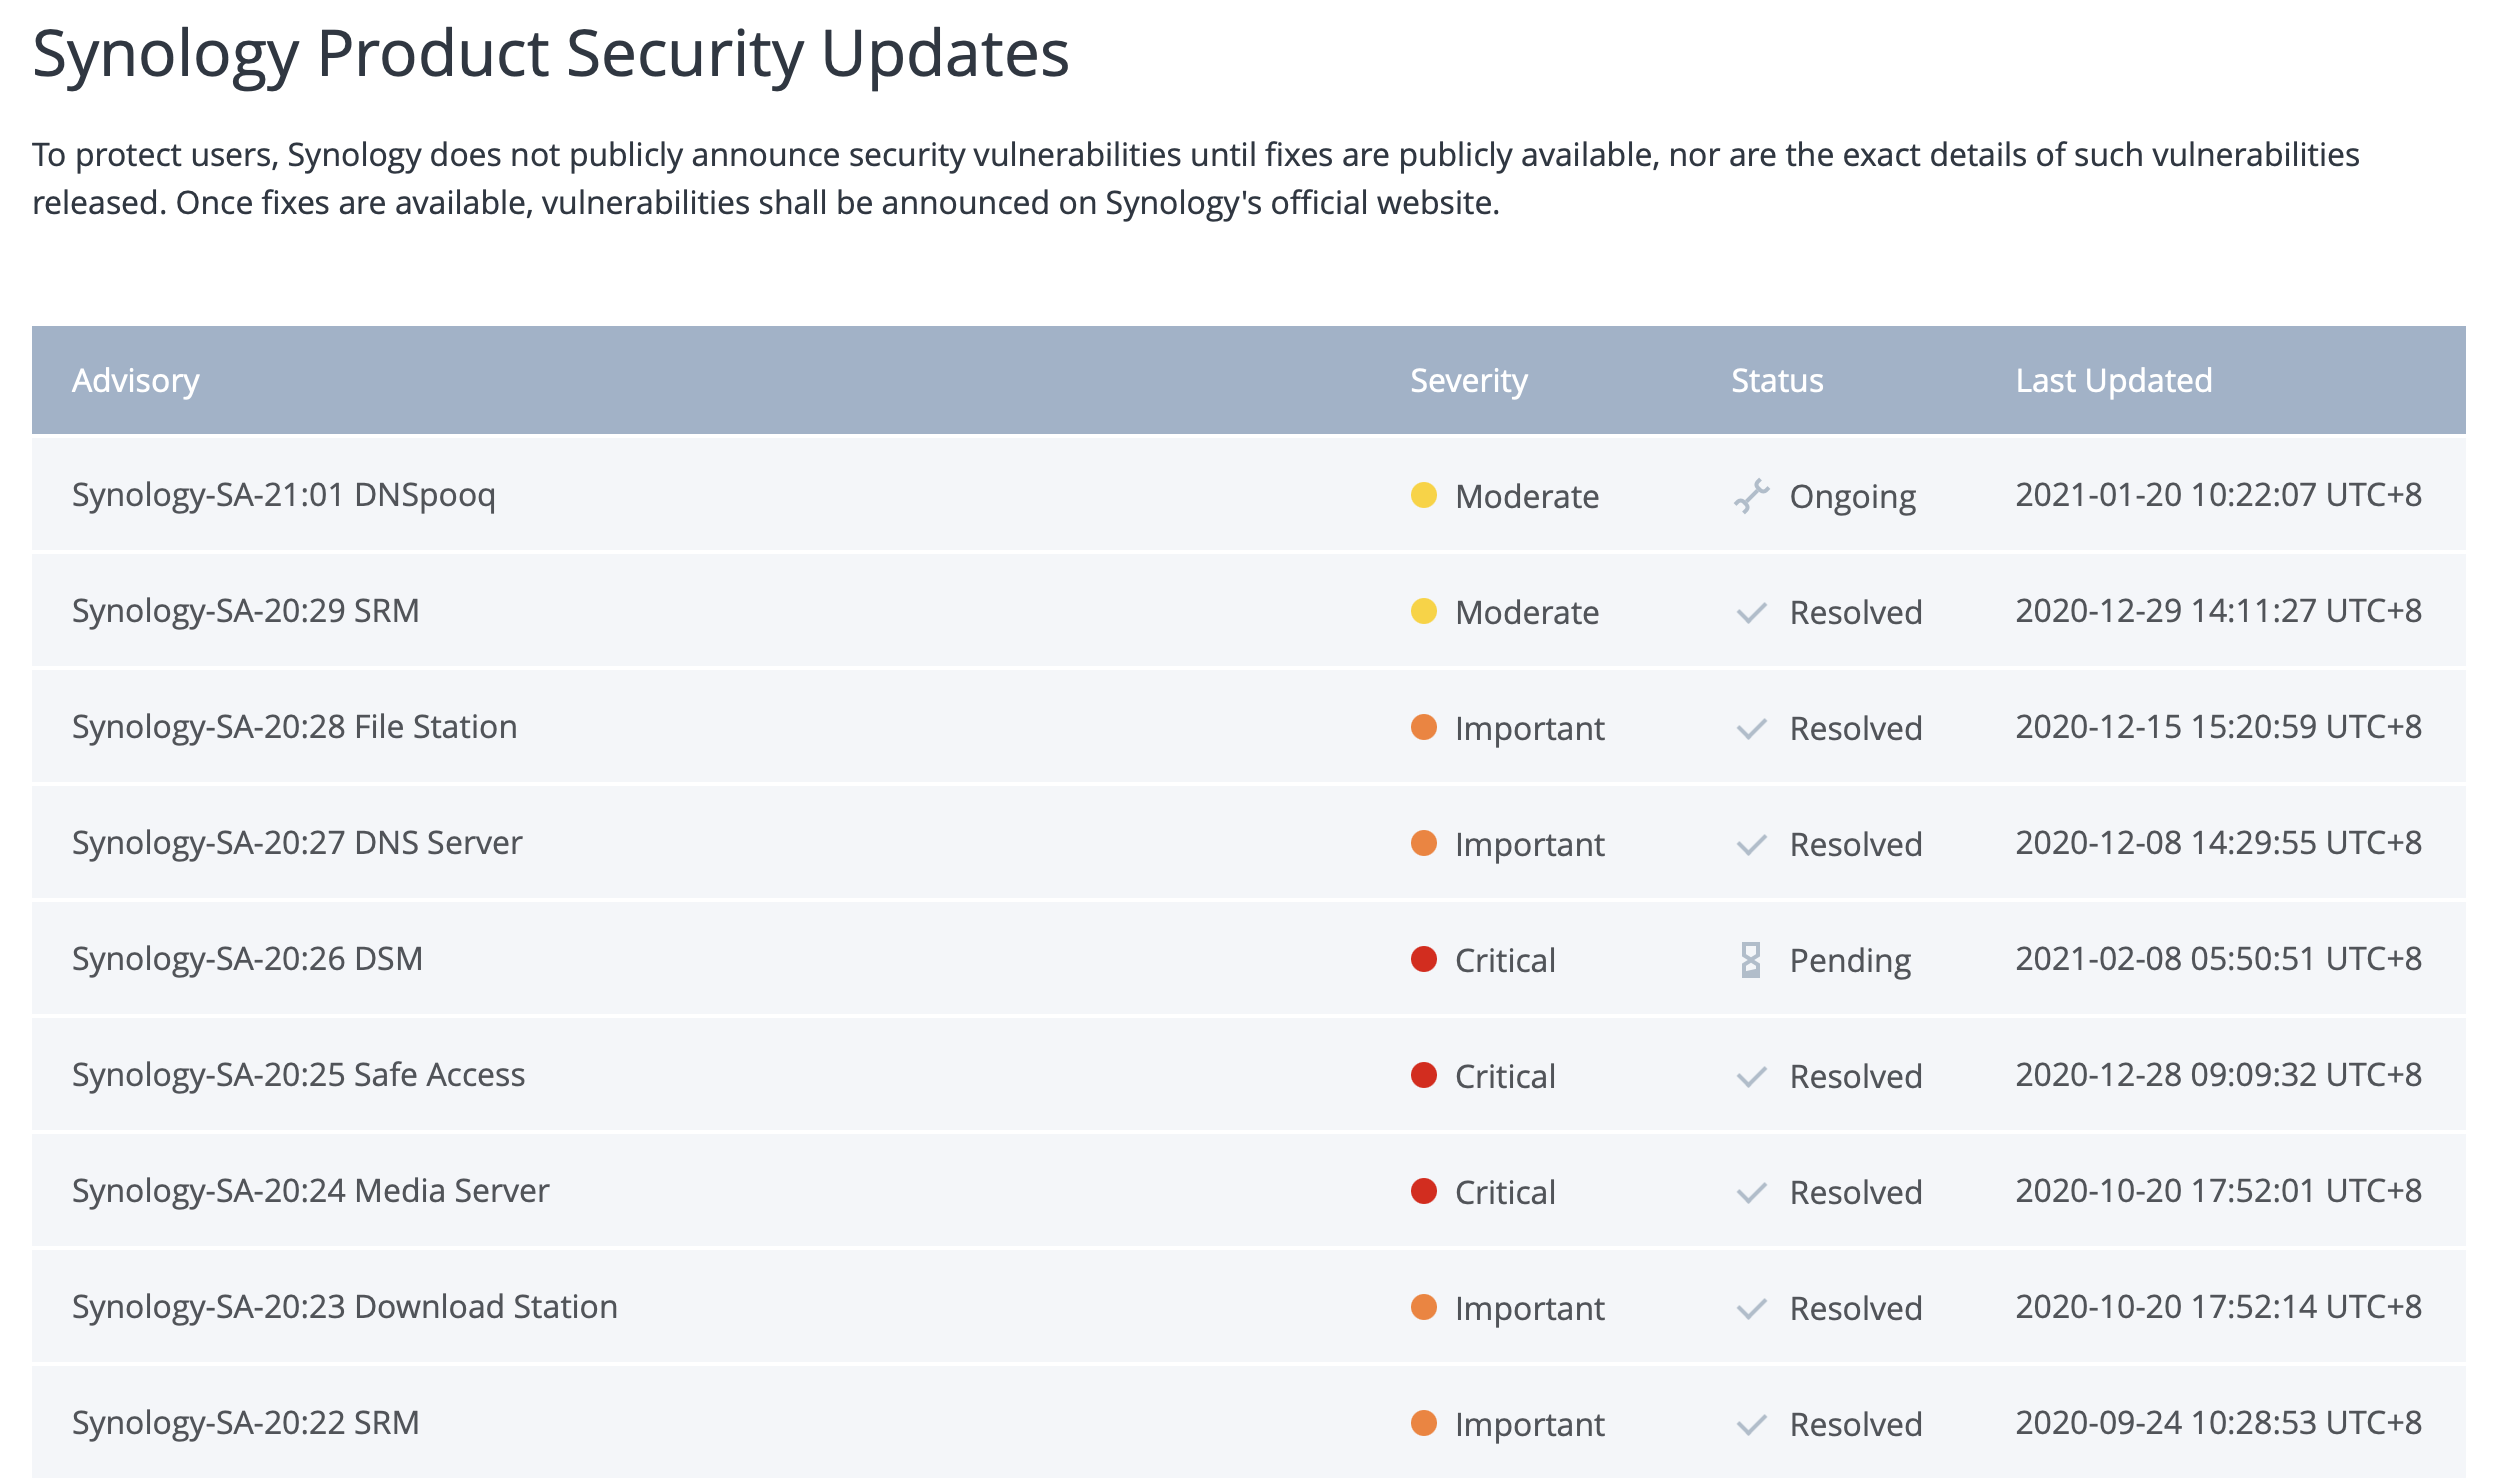
An example of a valid update would be this:

As you can see from the image above, security problems are addressed usually down in the list, way down, unless there is a critical problem. So be sure to read the whole release log before hitting the update button.
While we are on the subject of security problems with DSM and its apps, it would be a good practice to keep an eye on the Security Advisor web page on the main Synology site.
Once you are sure that the update is beneficial for you proceed with the actual update process. There are two (2) ways you can do it:
Online - NAS that has a connection to the Internet
Offline - NAS that is "sandboxed" in LAN access only
The online process includes the following:
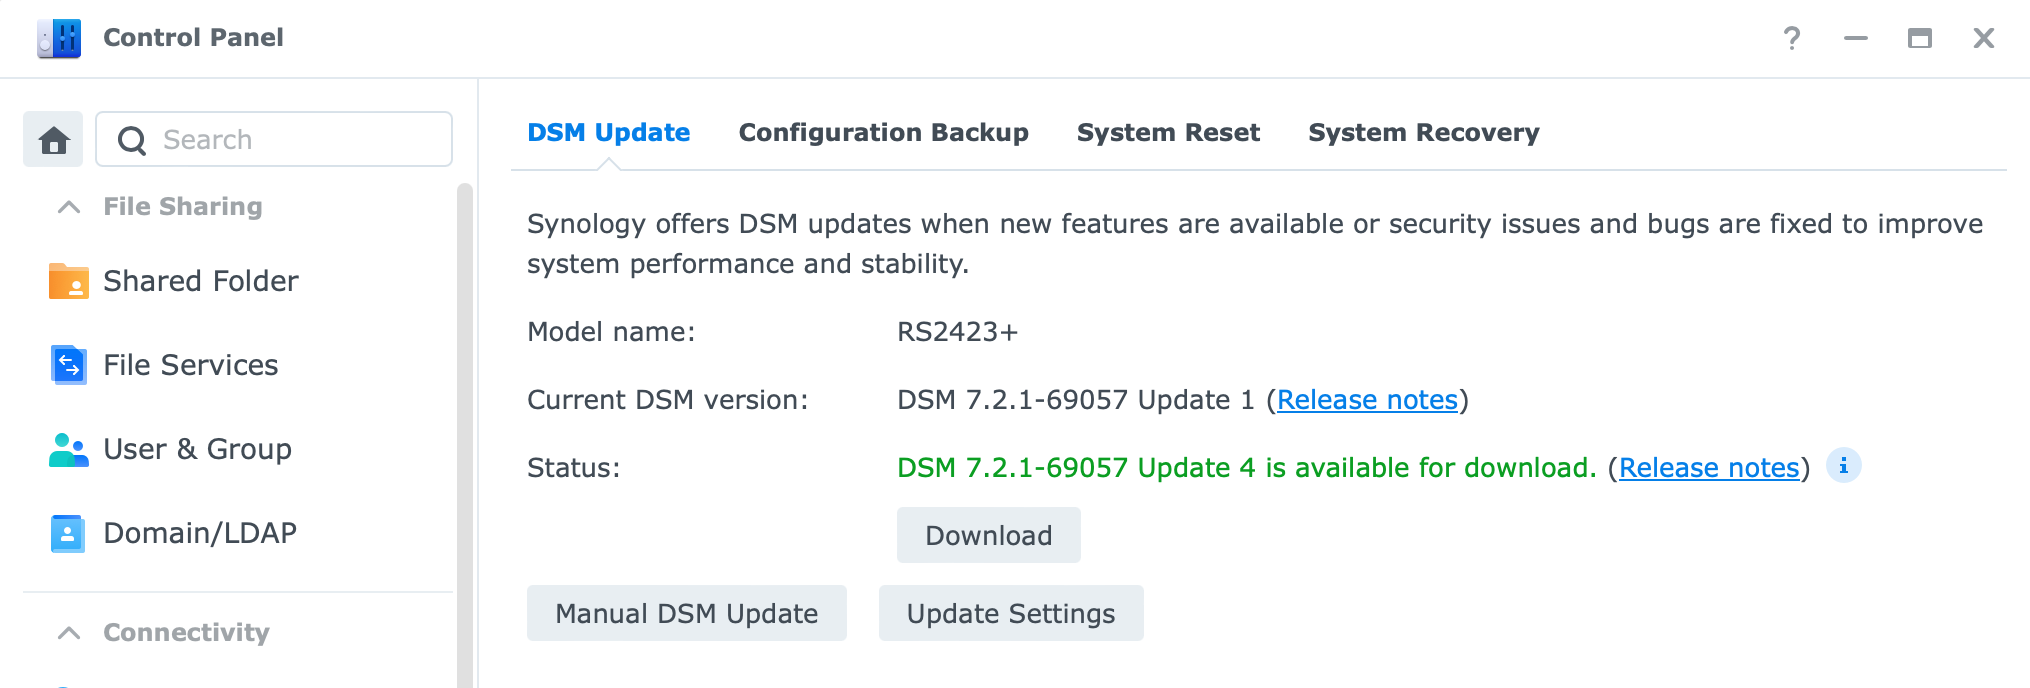
- Log into the DSM web portal
- Open up Control Panel > Update & Restore
- Let DSM do a check
- Click "Download" after a new update has been detected
- Reboot (this will happen automatically in 99% of the time)
- Log in and check if everything is ok
The offline process includes the following:
- Go to Download Center on Synology.com (https://www.synology.com/en-global/support/download)
- Locate your NAS and download the DSM version using the big blue "Download" button

- Log into the DSM web portal
- Open up Control Panel > Update & Restore
- Click the "Manual DSM update" button
- Browse your DSM installation file
- Update & Reboot (this will also happen automatically)
- Log in and check if everything is ok
Now that you are all patched up, you can move on with the other steps. Keep your NAS as much as up to date as possible to avoid nasty day 0 situations and exploits.
An example of one scenario when you are not patched up (this was not a day 0 situation but still) is a Synology incident from August 2014 called "Synolocker". You can read more on that here. The point was that the exploit was done using a security problem that was patched a while back, but because many users were not up to date (and had other vulnerable points that will be covered by this article) they had their data encrypted. Another point is to have a valid backup am I right?
Port configuration
In this section, we will move to one of the main elements of minimizing your web presence, modifying default DSM ports.
If we reflect briefly at the end of the previous point and mention Synolocker, one crucial part of how an owner became a victim of that ransomware, was the fact that they were using standard default DSM ports, 5000 and 5001.
Even if you are not considering opening your NAS to the Internet, it is a good thing to change its default ports. To do that follow these steps:
- Log into DSM
- Open up Control Panel > Network > DSM settings (last tab)
- Change both 5000 and 5001
- Wait for the browser and DSM to reload
- Check if you are on a custom port in the web browser URL
Now that was not too hard, was it? With this single change, you will be already off a large number of radars out there gunning for familiar ports such as these. If you want access to your NAS from the Internet then you will have to port forward those custom ports on your router to get access. More on this in the following section.
QuickConnect, DDNS, custom domain
When it comes to remote access to your NAS and its apps and services, you will have multiple choices here. Some of the most common ones are QuickConnect, DDNS (Dynamic DNS), and using your custom domain via reverse proxy.
All have pros and cons so let's reflect on those a bit.
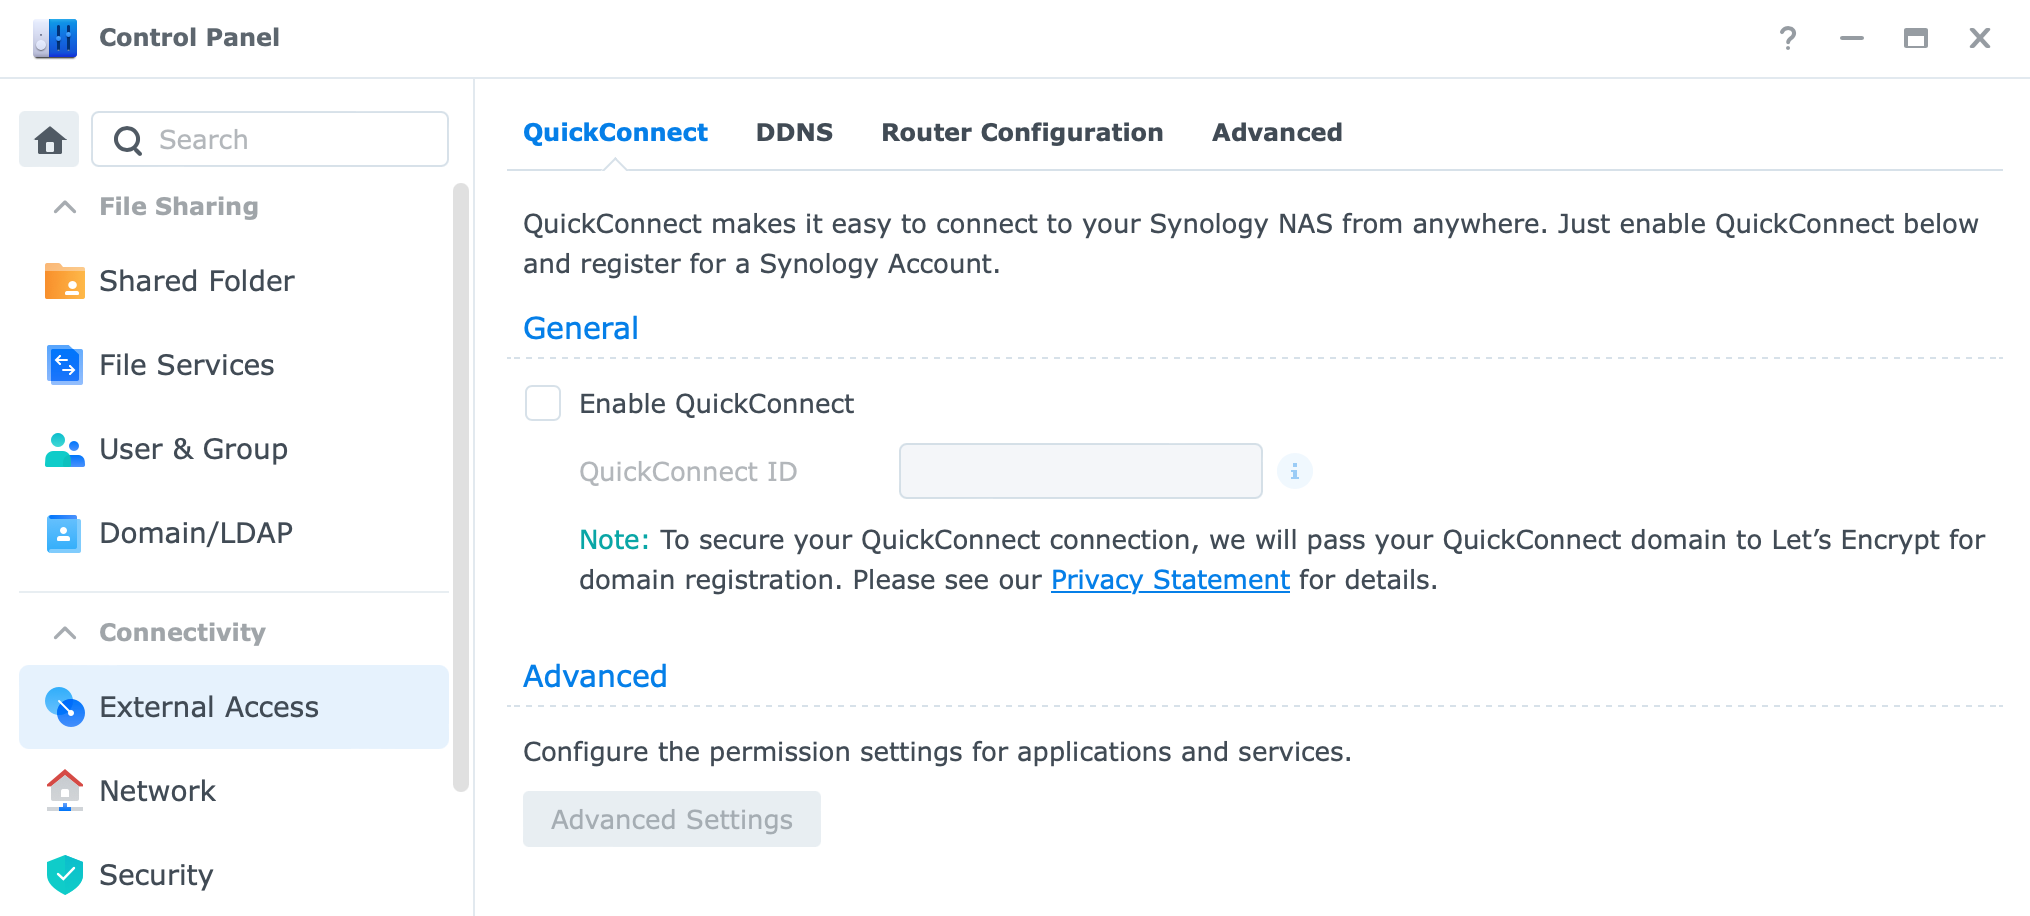
QuickConnect is the easiest way to get back to your NAS. It will not require any configuration on your part when it comes to port forward and router configuration but you need to be aware of how it works.
To activate QC go to Control Panel > QuickConnect and enable it. Give it a custom name and it will generate a unique QC name.
There are two ways that QC will try and establish a connection to your NAS:
QuickConnect relay service: Your QuickConnect connection will be relayed via the Synology Relay Server when direct QuickConnect access to the Synology NAS is not possible under the current network environment.
Quickconnect direct: When your Synology NAS is under a UPnP-enabled router, the router will be informed to create port forwarding rules for QuickConnect.
So what this means is that in case one you will go via Synology replay server (Taiwan) and eventually get connected to your NAS. Case two, if you have a UPnP router it will automatically configure ports needed for a direct connection to your NAS.
Now, I don't use QC for both reasons. One, I don't want to be relayed as it increases access time and two, I like to control my ports because I have UPnP disabled. Would advise having it closed as well. Well, you might ask what then? Then you go via the DDNS route.
DDNS is short for Dynamic DNS meaning that you will be able to have a custom domain name with one of the DDNS registers and that will allow you to connect back to your NAS using that name and not a public IP address. More so, if your IP address changes from time to time, DDNS will keep track of it and map your active/fresh public IP address to your DDNS name. That way you will not be locked out from your NAS if your ISP changes your public IP address.
The only "downside" with this approach is that you will need to maintain your port configuration when it comes to port forwarding and opening ports for each service on your NAS you want access to.
I said downside, but it is an upside because you will have full control of what traffic comes in your LAN and on what port. When it comes to security, this is the best way if you need to "open up" in the first place.
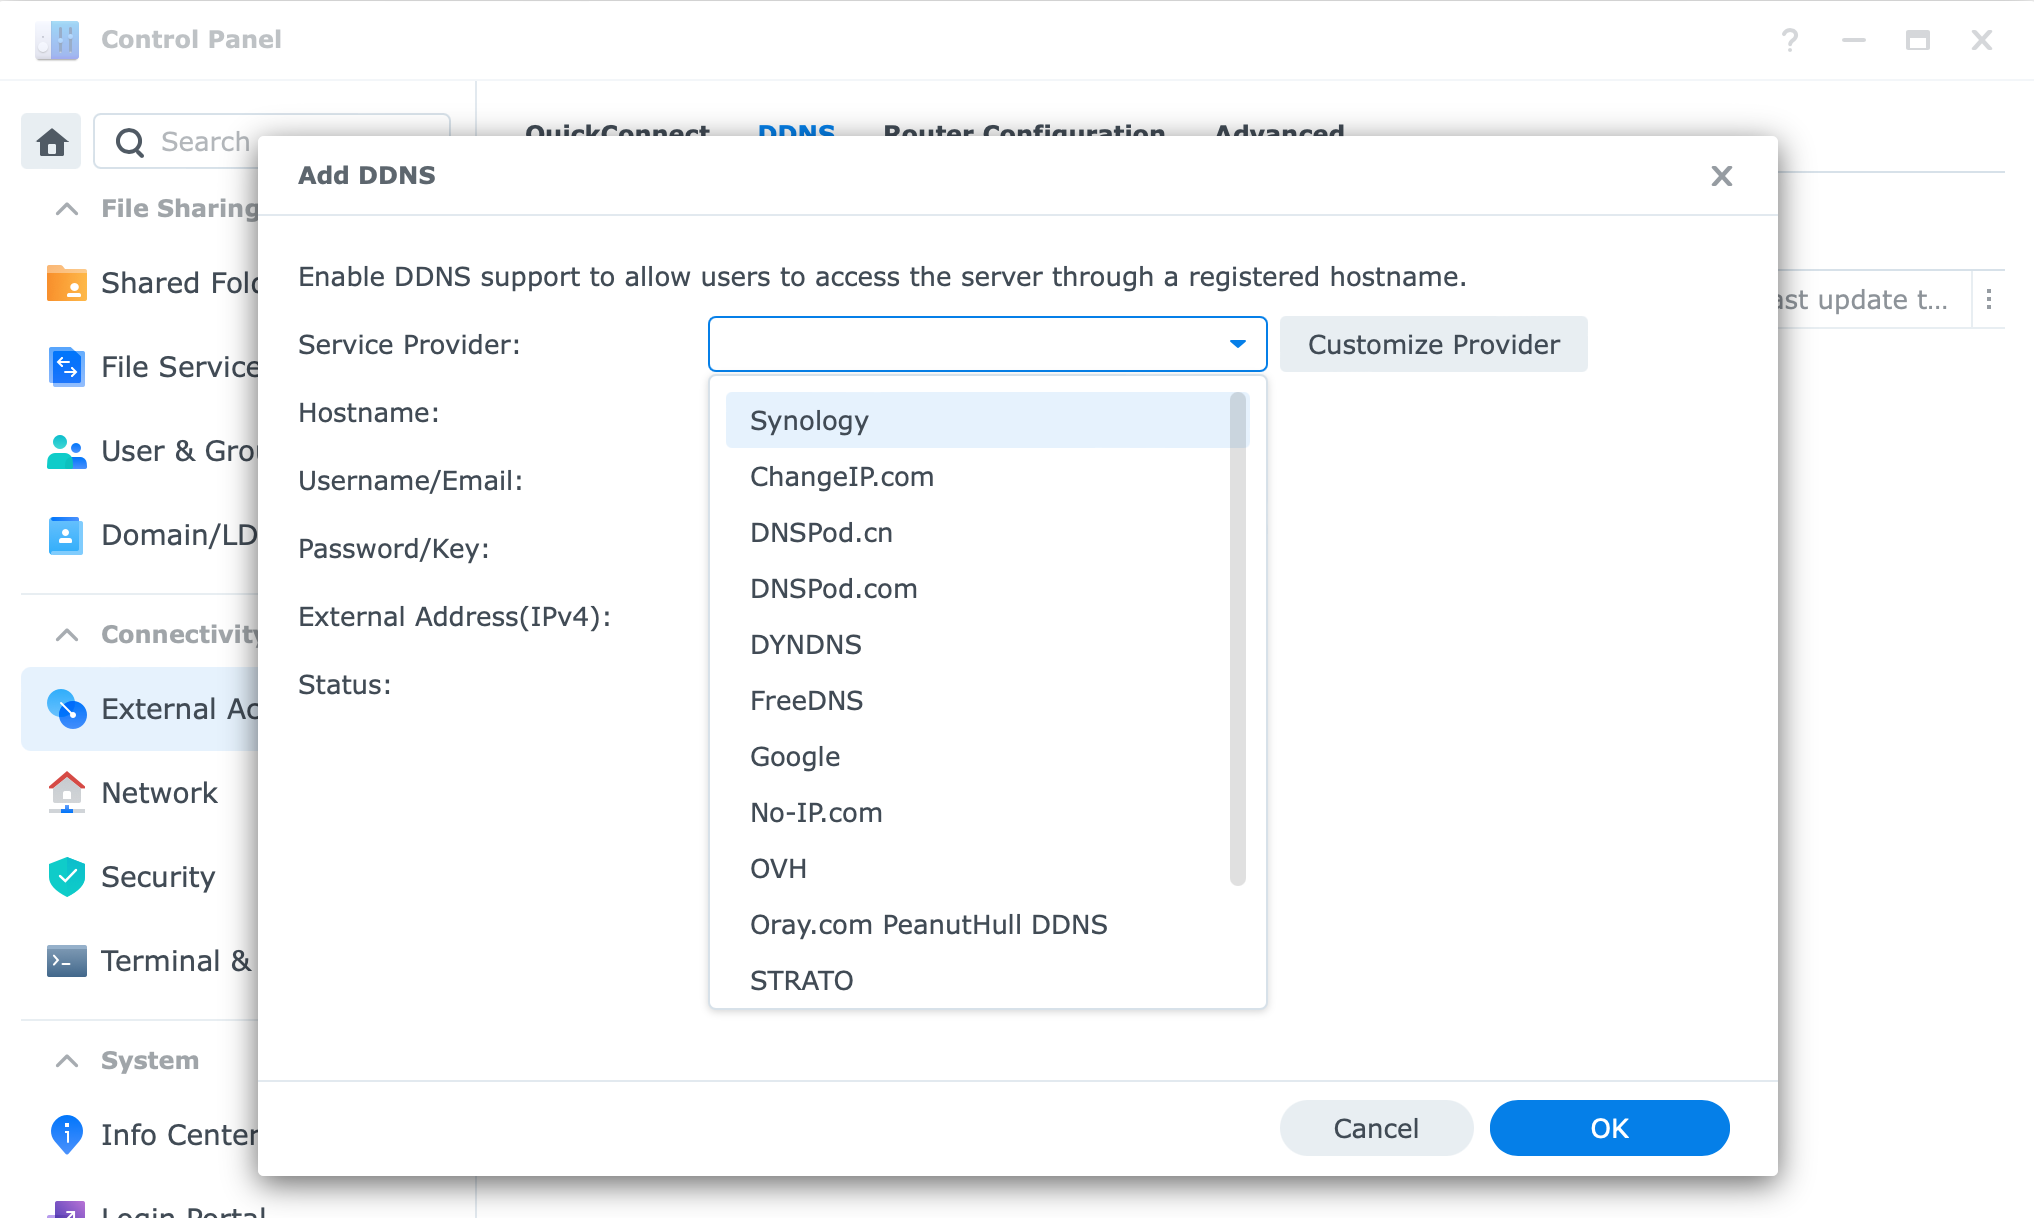
To configure DDNS access on your NAS, you will again go to Control Panel > External Access and on the DDNS tab start the wizard.
You will have a large number of providers at your disposal and note that Synology is on the top of the list. Yes, they also offer DDNS services with a large number of root domains. So your domain can for example be mydomain.synology.me.
The upside of using Synology DDNS is that you will automatically be issued a Let's Encrypt SSL certificate to protect your outside access by getting a shiny green SSL secure lock pad next to your public name: https://mydomain.synology.me.
Other 3rd party DDNS registers will not have support for this and you will have to manually import a certificate that you will have to generate on your own.
Custom domains are an option to host and terminate your custom public domain name on your NAS, for example, to use with a website being hosted on your NAS, or any 3rd party service that you want.
The way this works is that you will register a domain name with Dreamhost, GoDaddy, and the like and then configure any custom subdomain name to point to your NAS where the service lives.
When a traffic request hits your router you can transfer it using a built-in reverse proxy mechanism and redirect it to an app or service that lives on your NAS. For example, https://app1.mydomain.com needs to activate services on your NAS at http://172.50.25.30:8080. This way your app is not exposed on a default port 8080 using a non-encrypted protocol, but rather it's using HTTPS protocol on a default 443 port (that you don't have to enter because it is the default HTTPS port). The result is a secure connection that looks very descriptive and clean.
This method will again mean that you have to have control of your ports (in this case 443) on your router but the upside is that you will have to open up only a single port that will guide all your requests towards a reverse proxy on any custom port. As a result, your attack surface when it comes to your NAS is just a single 443 port and not a custom port for each of your apps.
SSL certificates
While we are on the subject of SSL certificates, you can use any custom SSL certificate that you have issued with any 3rd party provider or you can create a free Let'sEncrypt one right inside DSM UI.
Having SSL-protected content out there is vital today as more and more browsers will start to drop connections while accessing an unencrypted site, and on top of that, you and your visitors will have a safer experience accessing the content.
To get started just go to Control Panel > Security > Certificate (tab) and start the process.
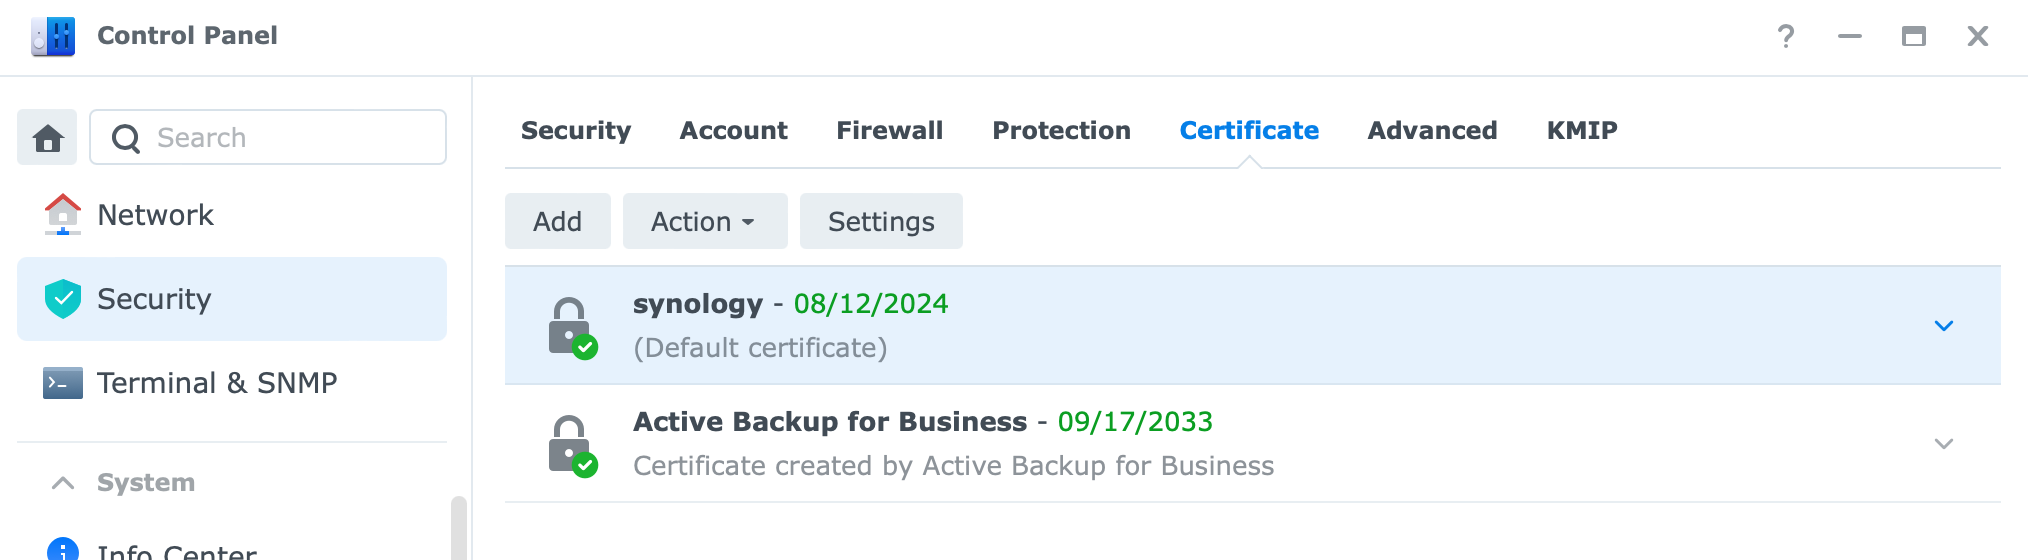
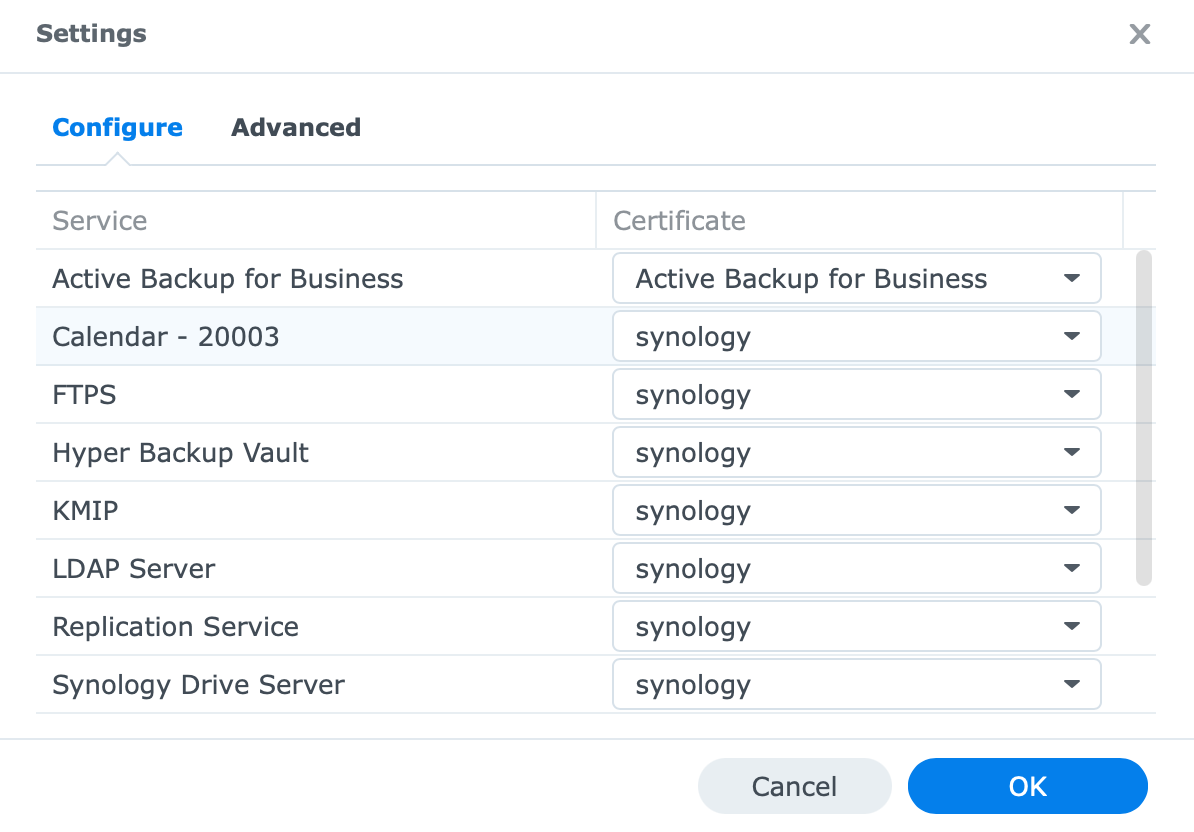
Using the wizard you can add a certificate to your NAS and assign it later on using the Configure button to any number of apps and services that you have running on your NAS.
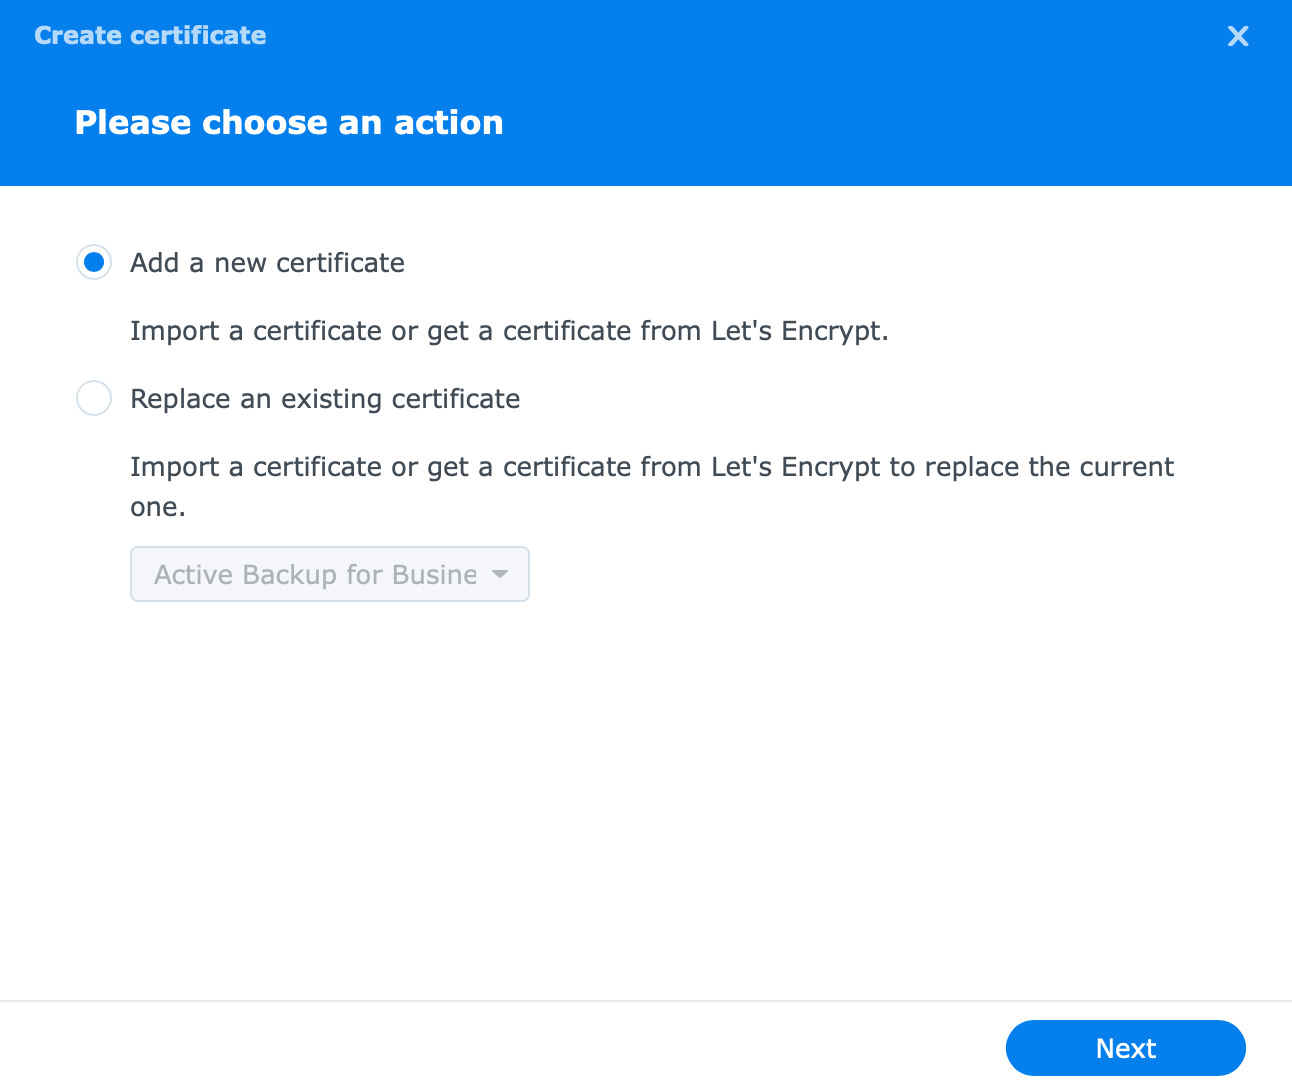
Using Add > Add a new certificate and selecting the 3rd option (image above) you will start the process.
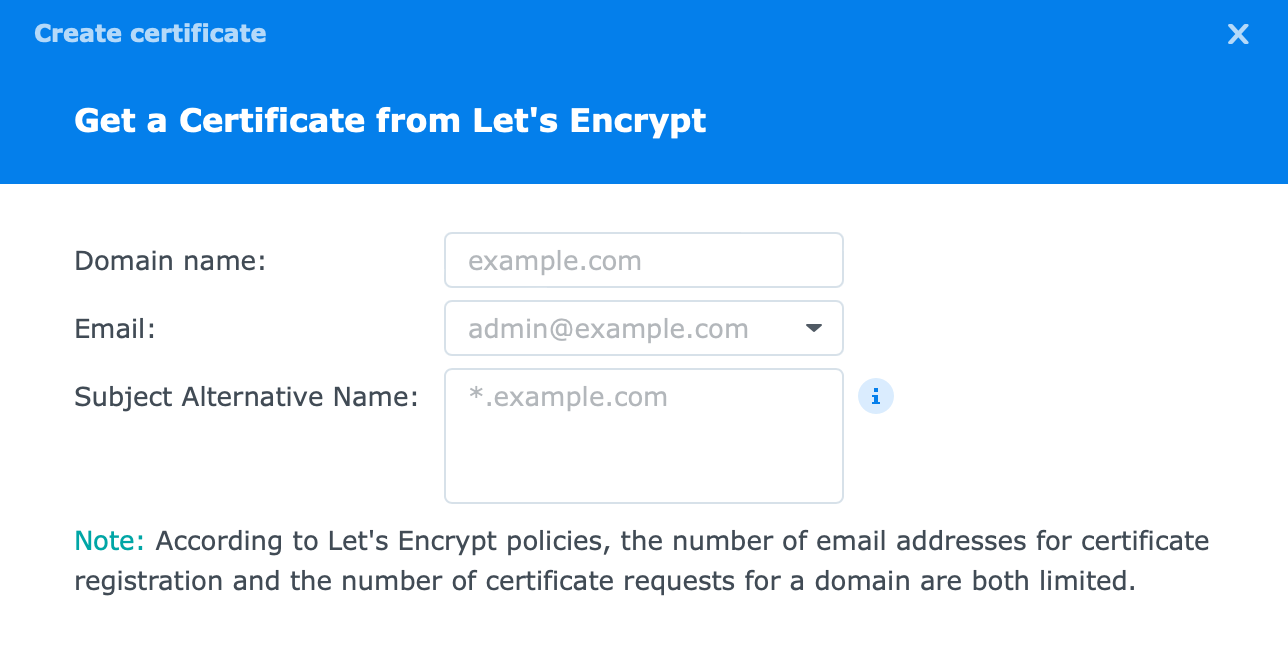
After that, you will reach a point where you need to enter your domain name, email, and optional SAN values.
Here you will enter your desired domain name, valid email that will be used in the registration as well as notification channel for any changes regarding the certificate in question, and if you want, any additional names that will also be part of this certificate.
So for example. Domain name is mydomain.synology.me, and SAN values can be, audio.mydomain.synology.me, video.mydomain.synology.me, calendar.mydomain.synology.me, etc. So basically any service that you want access to, has to be protected with an SSL certificate.
There are limitations here as to how many characters you can place in the SAN field, so if you have a lot of it, best to use the wild card certificate instead.
If you want a wild card certificate (that means that you can use any subdomain name before your root domain like *.mydomain.synology.me) then as your domain name parameter just put your root domain name and nothing in the SAN field. Like so: mydomain.synology.me.
The bottom line is that after you get your certificate you can alter what apps and services will use it. To make that happen use the configure button to change the values:
Firewall
Firewall term is so common today that almost anyone who works with computers has heard it. Well NAS also has its firewall and as such, it can be there to protect you if you choose to do so.
Located under Control Panel > Security > Firewall after you enable it you will be able to configure various rules on how to set it up.
Considering there are a lot of options you can set up I will not go into those at the moment. The main thing here is to remember that if you have your NAS open to the Internet using a firewall is mandatory.
You can set up what type of traffic will be allowed or not, what countries can have access, and in the end, deny specific IPs or a range of IPs access to your NAS altogether.
Make sure not to avoid having your FW up and running!
With this, we can conclude the first part of securing your NAS. Next up we will see what needs to be done when it comes to user protection and having your account secure to make it less vulnerable to hacks and exploits.
User hardening and secure access
As I mentioned a few times, using your services is the main reason you got a NAS. But how well you protect that access is imperative to keep your data safe from hacks, exploits, and ransomware.
Hardening your user account
The main element here is your user account. If you keep your system safe and secure, patched and hardened then your account is next on the list to be exploited. Week password or no password accounts are an easy target and you should start there. Using complex passwords (and long ones) is the best way to keep your account safe.
Also, consider changing your password here and there, and do not reuse your password with multiple service accounts (your NAS password is the same as your PC login or something like that).
In the second module of this series, we saw how to make an account, and using a complex password is the best thing you can do at the moment. There I also mentioned that you should be using 2FA (second-factor authentification) to further protect your account, so I will not go over that process again.
One thing to mind here is that you should give your account minimum access rights even if it's your account. This means that it would be best to keep your account at a "user" class level and only use an "administrator" class account when you need to do administrative operations on your NAS.
Limiting access to folders, services, and options in your DSM will be another way to protect your content in case your account does get exploited.
Finally, one more way you can strengthen your account is by making changes to password policies. Located in Control Panel > User > Advanced, you will find there several options to boot your user's passwords.
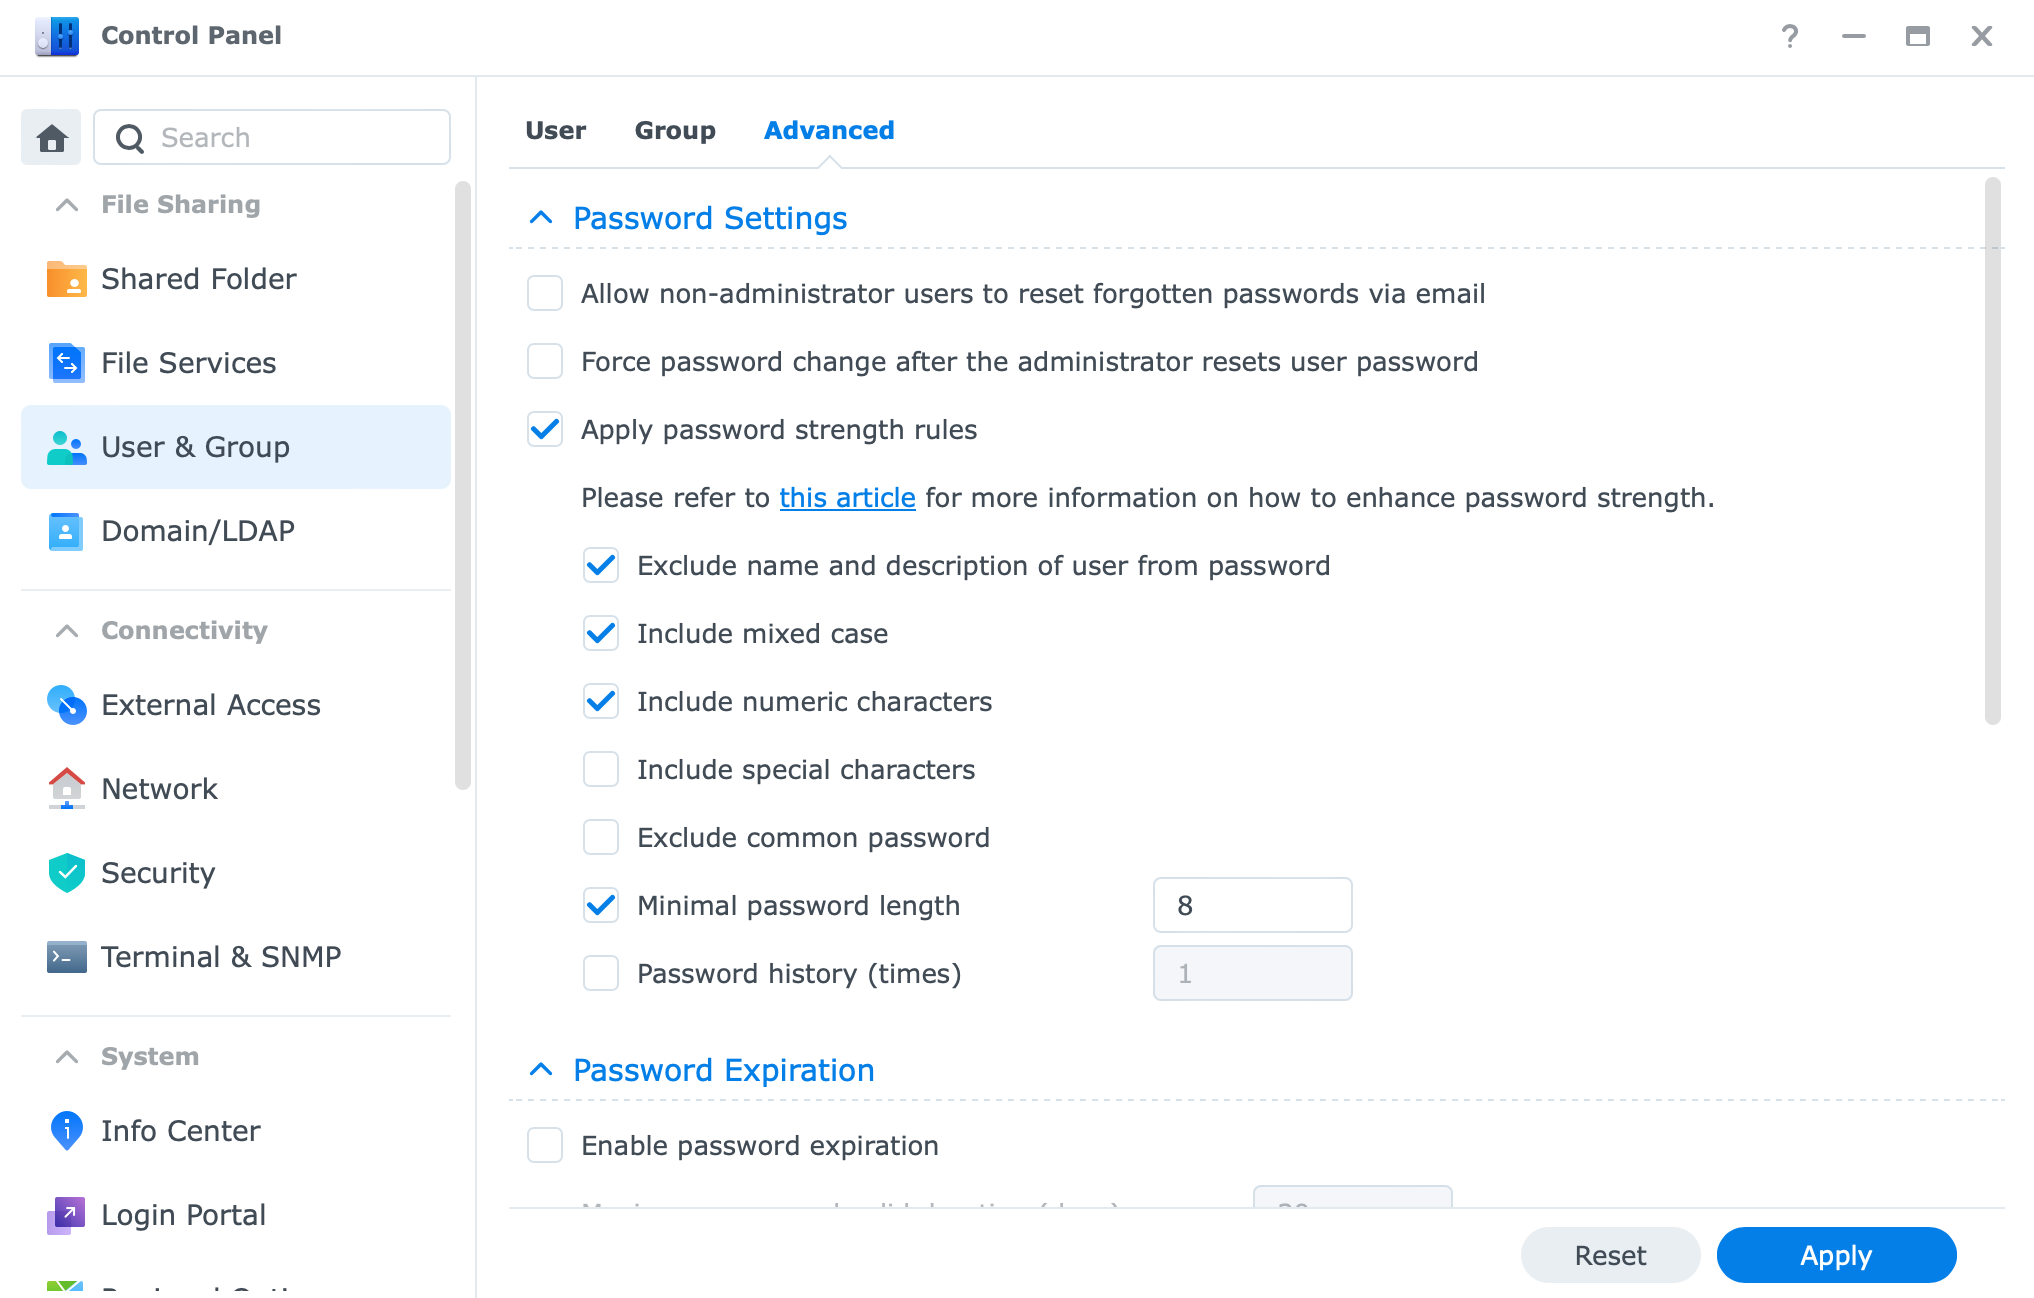
Be sure to go over those and force any additional settings that you think you will need.
2FA
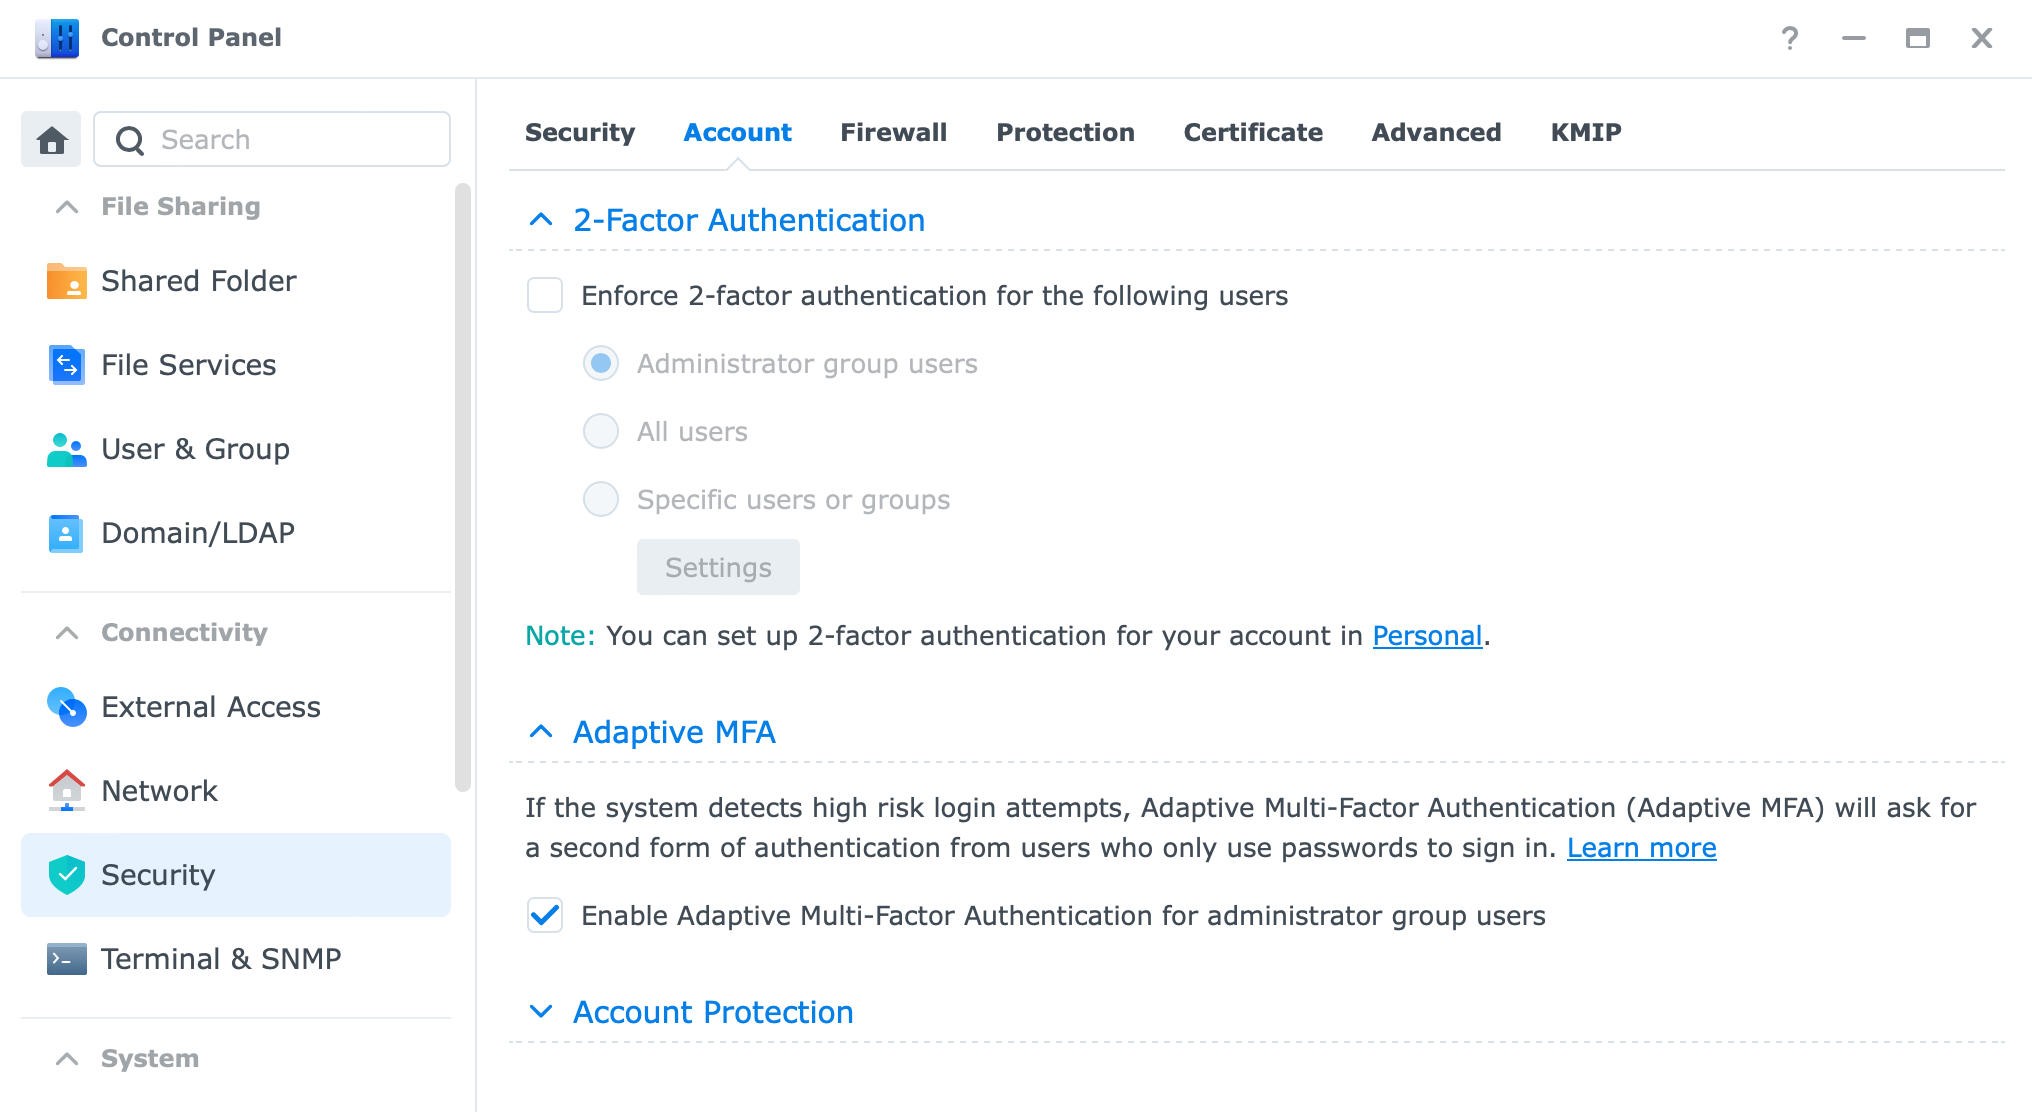
As I mentioned already, setting up 2FA (if you have that option) is a great way to protect your account. DSM offers 2FA settings per user or NAS, so to speak.
What that means is that you can actually "force" 2FA to be mandatory for each account you have on your NAS, and the user will have no option but to configure it and use it.
This option is located also in the Security> Account section where password settings are configured.
In case you have problems logging in to your NAS using 2FA you can issue a one-time password that will be sent to your email that you have configured with your account.
Trusted/untrusted client settings (former AutoBlock)
The last set of options when it comes to account hardening and protection is using what Synology calls Account protection. Located in Control Panel > Security > Account these settings will allow you to control any brute-force attacks against your account in an attempt to guess your password and log in.
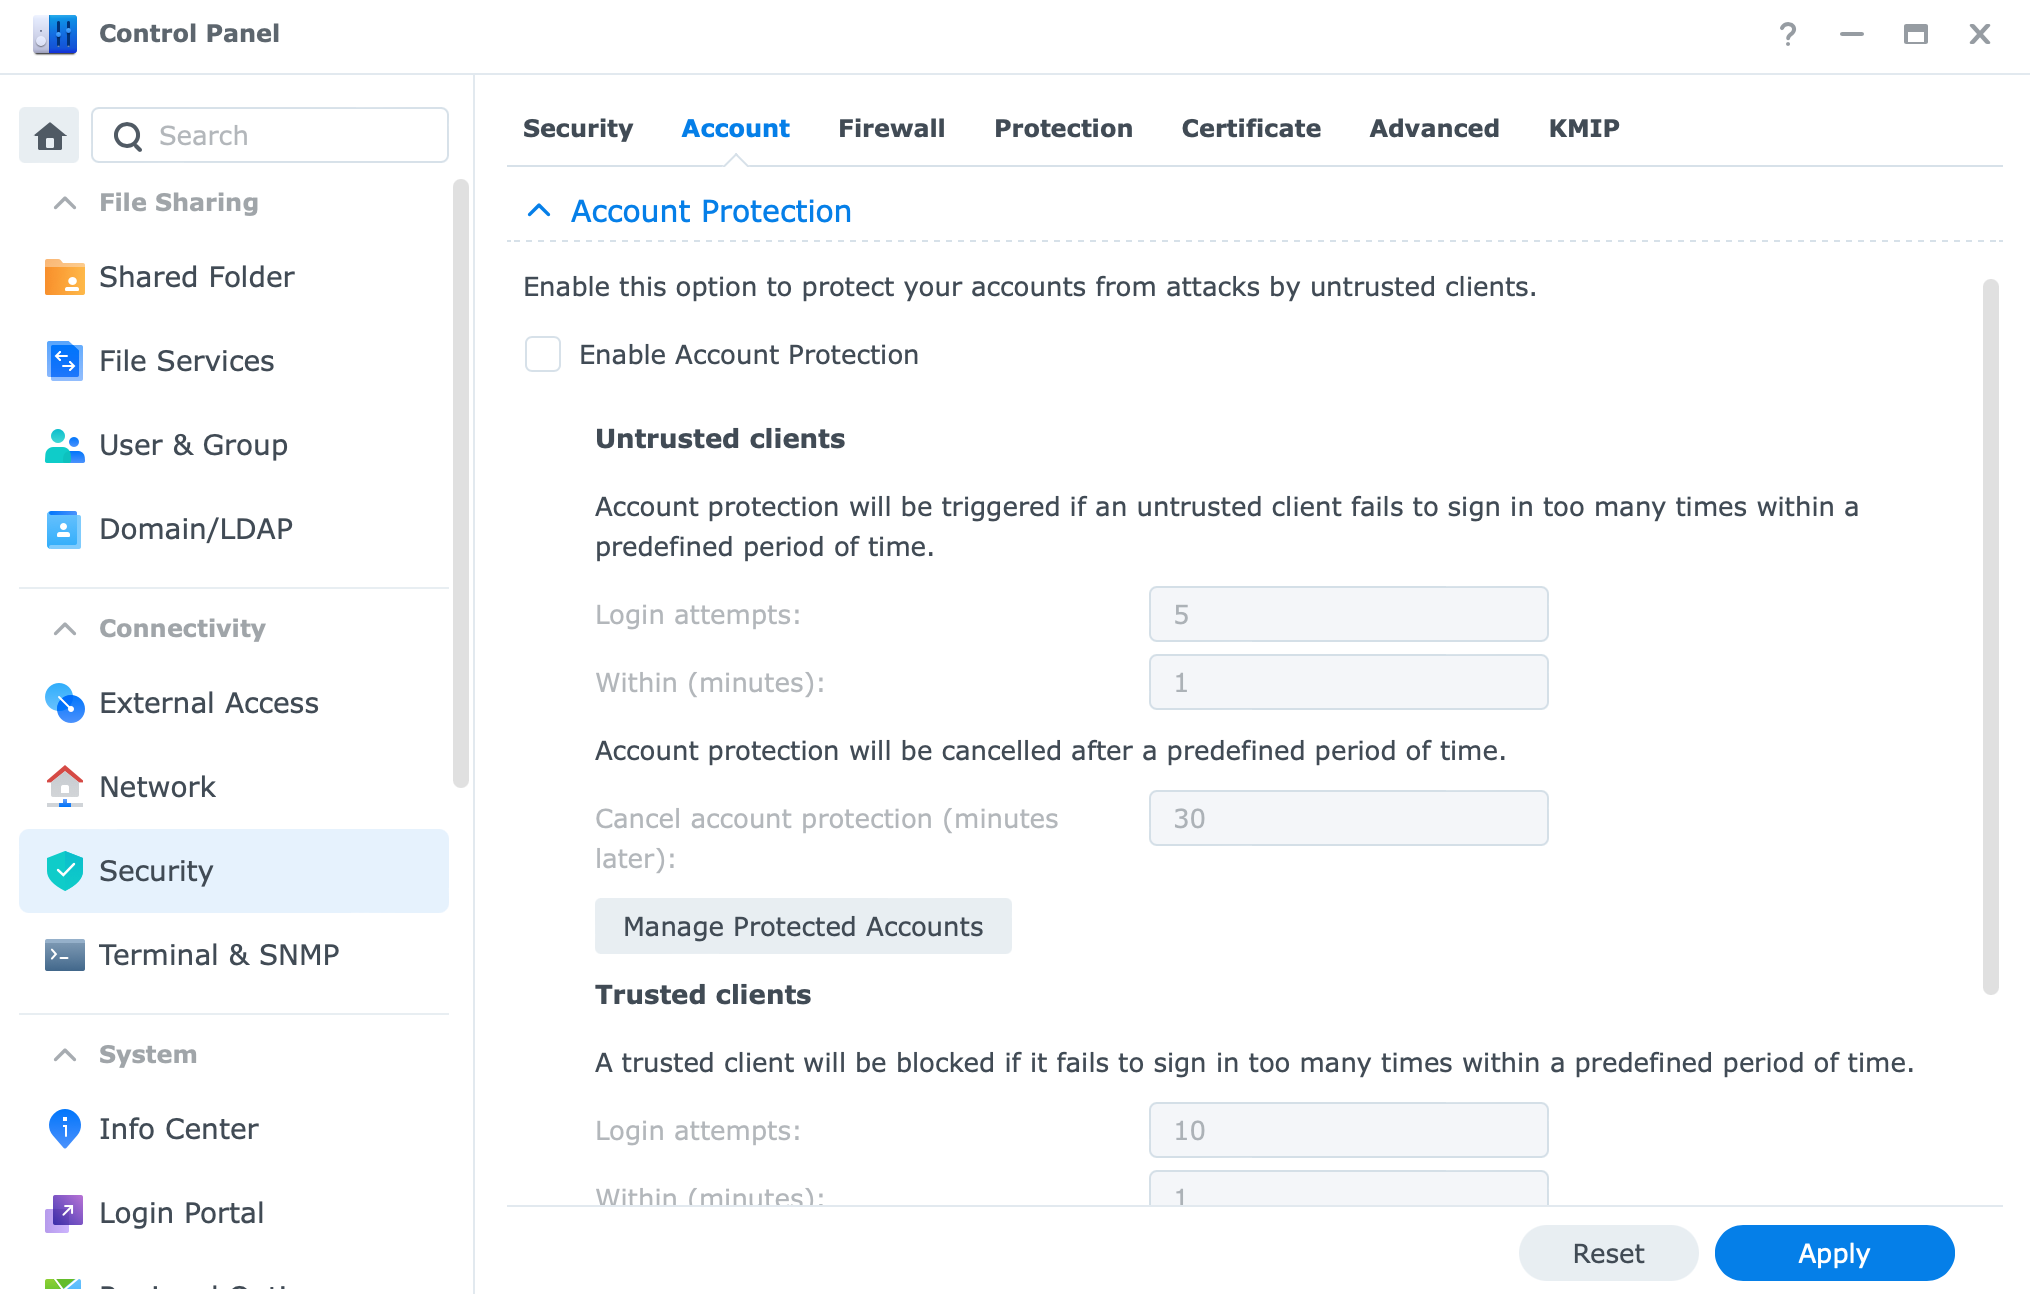
This will be an excellent addition to your set of tools needed to protect data access.
Password manager
Another way to harden your access to your NAS and data is by using a password manager. As a personal preference, I would recommend using Bitwarden in a self-hosted setup (if you can) to maximize your security when it comes to passwords and OTP settings.
A password manager will be a great benefit for accessing your NAS as it offers 2FA options as well, so you can log into your NAS using one and also generate a 2FA code from the same app.
Of course, BW is not the only password manager out there so any will do as it will allow you to use complex passwords, without the need to type them in (keyloggers) or use the same one with multiple services (bad choice).
A recent addition to the world of Password managers is Synology's own C2 Password platform. Free to use (with the PRO plan coming), you can not use it even if you do not own any other Synology product.
For more details on this platform visit the C2 Password page and also read up my article on it by visiting this link.
App and data permissions
When it comes to your data and apps or services running on your NAS you can configure your DSM user accounts what they can or can't use.
The simple way, from a DSM level, is to configure these settings using the Users module in the Control Panel.
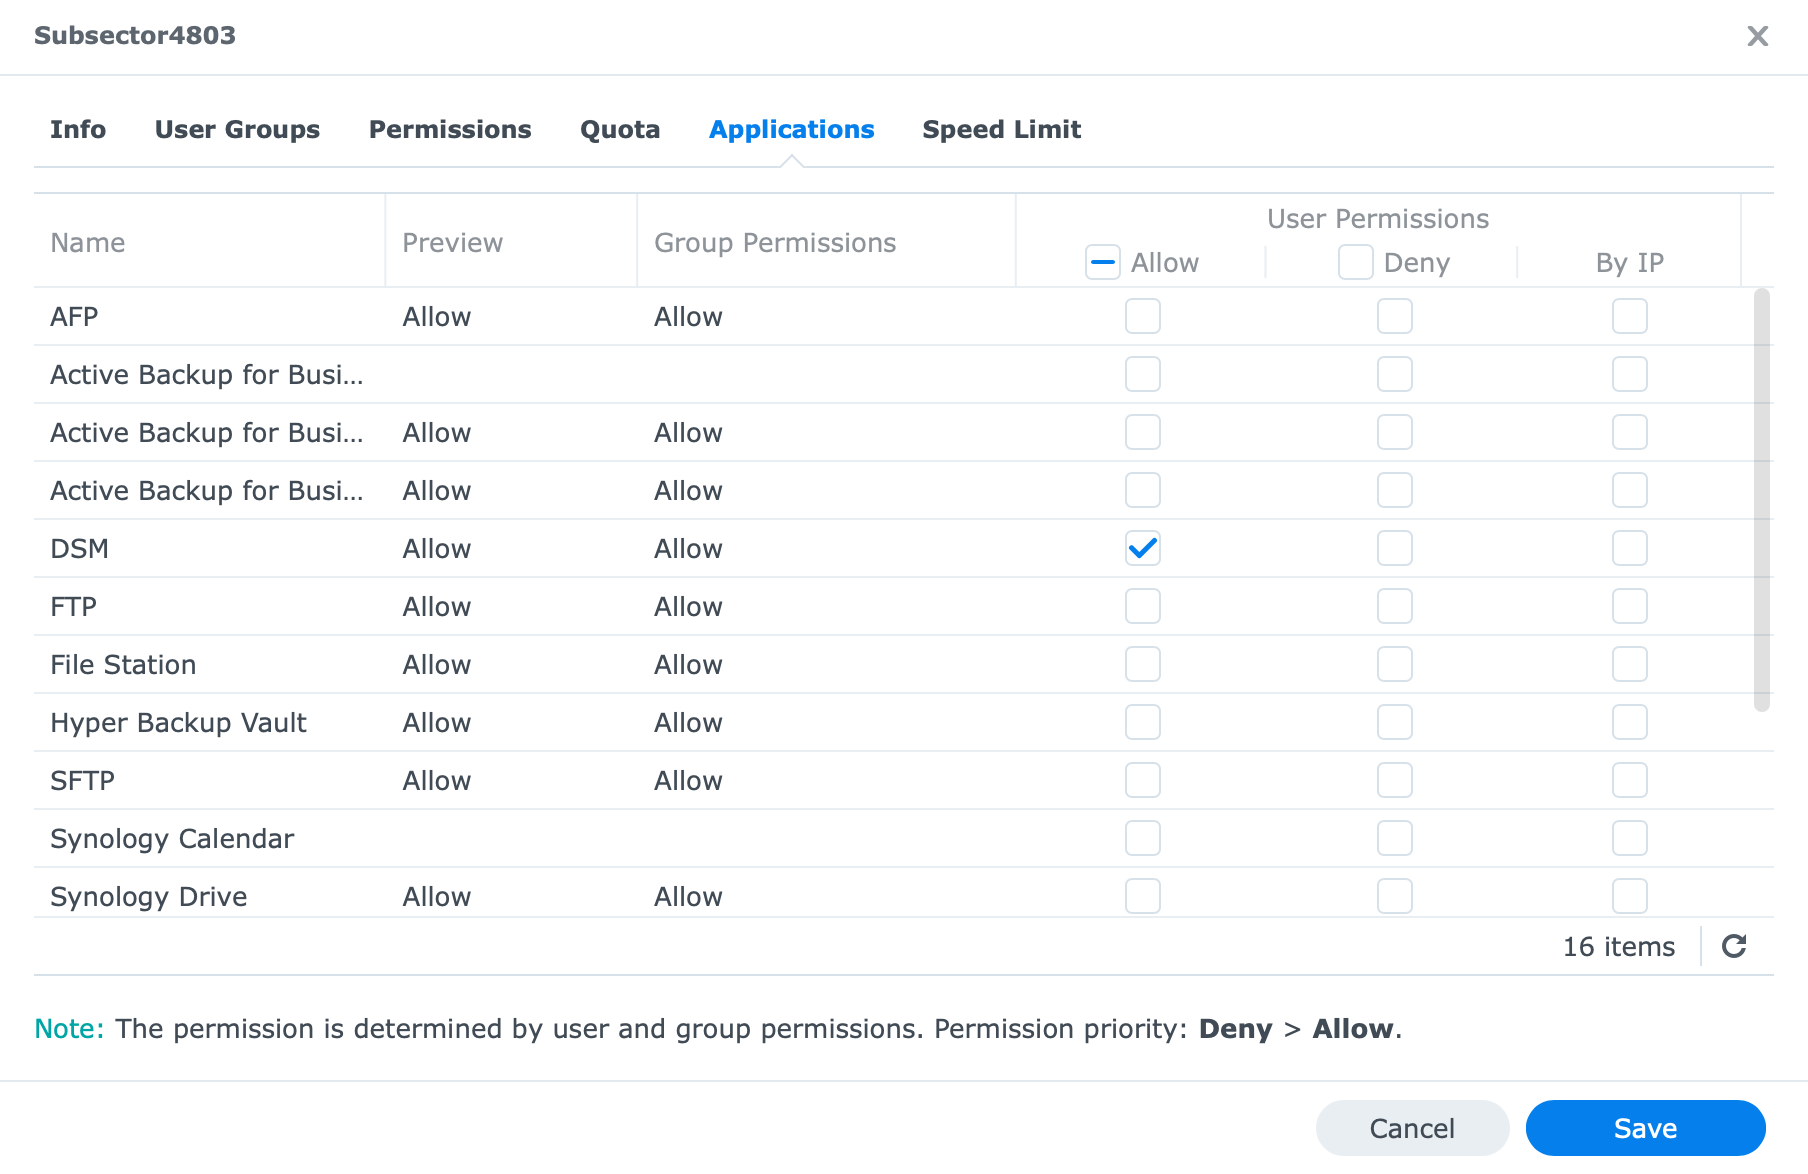
By editing your existing user you will have access to Permissions, and Applications tabs that will allow you to configure what type of permissions each user can have when it comes to data access and app usage.
Be sure to allow them access to only apps and folders that are required, and give them minimum permissions, for example, read-only settings on a folder. No need to allow them to read/write permissions if write permissions are not needed.
Secure SignIN (DSM 7 only)
All that was said so far will culminate in this upcoming DSM 7-only feature called Secure SignIN. I will not go into details on it because there is already an article here on the site that you can read.
The bottom line is that Synology is also aware of the increased security needed when it comes to user access. Reasons were already mentioned in this article and soon you will have a combination of a strong password, 2fa, and biometrics combined into one.
SSIN feature will allow you to use a Synology new mobile app to authenticate in your NAS with just your username and your mobile device. No password is needed. You will unlock the app with touch or face identification and the password will not be needed. If you are interested, go and read the article for more details.
Not the shortest of articles and the longest in the series but security is important so, now that we have passed 3500 words so far, let's finish with the last part of this article.
Secure methods of access via the Internet
So far we have seen several elements that can increase your data security and protect your data from unauthorized access, but, as I said before, there is no 100% security. The best thing to do would be to keep your NAS disconnected from the web. That will leave only on-premise problems, and it would be easier to handle in any case.
If however, you are keen on accessing your apps and services from the outside but do not want to expose your NAS directly on a larger number of ports, there are two methods you can use.
VPN
Virtual private networks have been around for a long time. By securing an encrypted tunnel of communication back to your "home" (where your NAS lives) you will have the ability to use your apps and services just as you access them while you are at home, even if you are connecting via the Internet.
The whole idea of a VPN is to make sure that you get a LAN experience from a remote location.
More detail on this is in the following article.
Do keep in mind that this will require you to maintain the VPN server settings, certificates, and port on your router, to successfully connect. On top of this, you will need a VPN client app on your device of choice when you connect to your VPN server running on your NAS.
Synology also offers VPN Server Plus pacakge, but this is a platform that only works on their router lineup with SRM (Synology Router Manager) OS.
Reverse proxy
Finally, we have something called a reverse proxy. Just to be clear this is not directly a secure way of getting to your apps and services but it can be if you configure it and use it that way.
There is a whole article (and another one using reverse proxy as a Docker solution) on this subject, but now I would just like to give an example of how you could use a reverse proxy to get more secure (public) access to your apps and services while still having ease of use.
So the idea behind this is that you have some apps and services on your NAS that you want access to. To get to them using HTTPS security protocol on a default 443 port, and a nice custom name, you can use a reverse proxy to step in and help you with it.
Instead of using http://172.25.50.88:1234, you can use something like https://app.mydomain.com. Nice right? You are using HTTPS (secure) protocol with a valid SSL certificate (more on this above), a nice memorable name on a single 443 (default HTTPS port).
To make this happen you will need a custom domain name, a valid SSL certificate, and a single port open on your router (443). Why is this good? Well if you, for example, have multiple apps, app1, app2, app3.mydomain.com you can still use them all on a single 443 port open on your router, and reverse proxy will redirect traffic to a local app where the app is hosted. If you would not have them run via reverse proxy you would have to open every single port for that app on your router, which will, as a result, be a large attack vector surface for hackers and exploits to gain access.
Conclusion
I hope this article has given you an idea of what should be going into planning when it comes to accessing your data from a remote location (especially over the Internet), and what can you do to minimize any potential "hits" on your data and infrastructure.
Think about your NAS, your account, about the ports and protocols that you want or will be using, and take it from there. Synology KB articles are full of detailed instructions on each specific setting described here, so read them as well, but as always you are welcome to ask questions in the comment section below or using the *support chat link in the main navigation.