Synology DS1522+ review

Table of Contents
: Intro
: Packaging
: SSDs
: E10G22-T1-mini card
: DSM setup and apps installation
: Speed tests
: Virtualization and containerization
: Plex
: Conclusion
:Intro
Even though it was already known that this model was coming as a worthy successor to the awesome DS1520+, the new DS1522+ is here with a few surprises of its own.
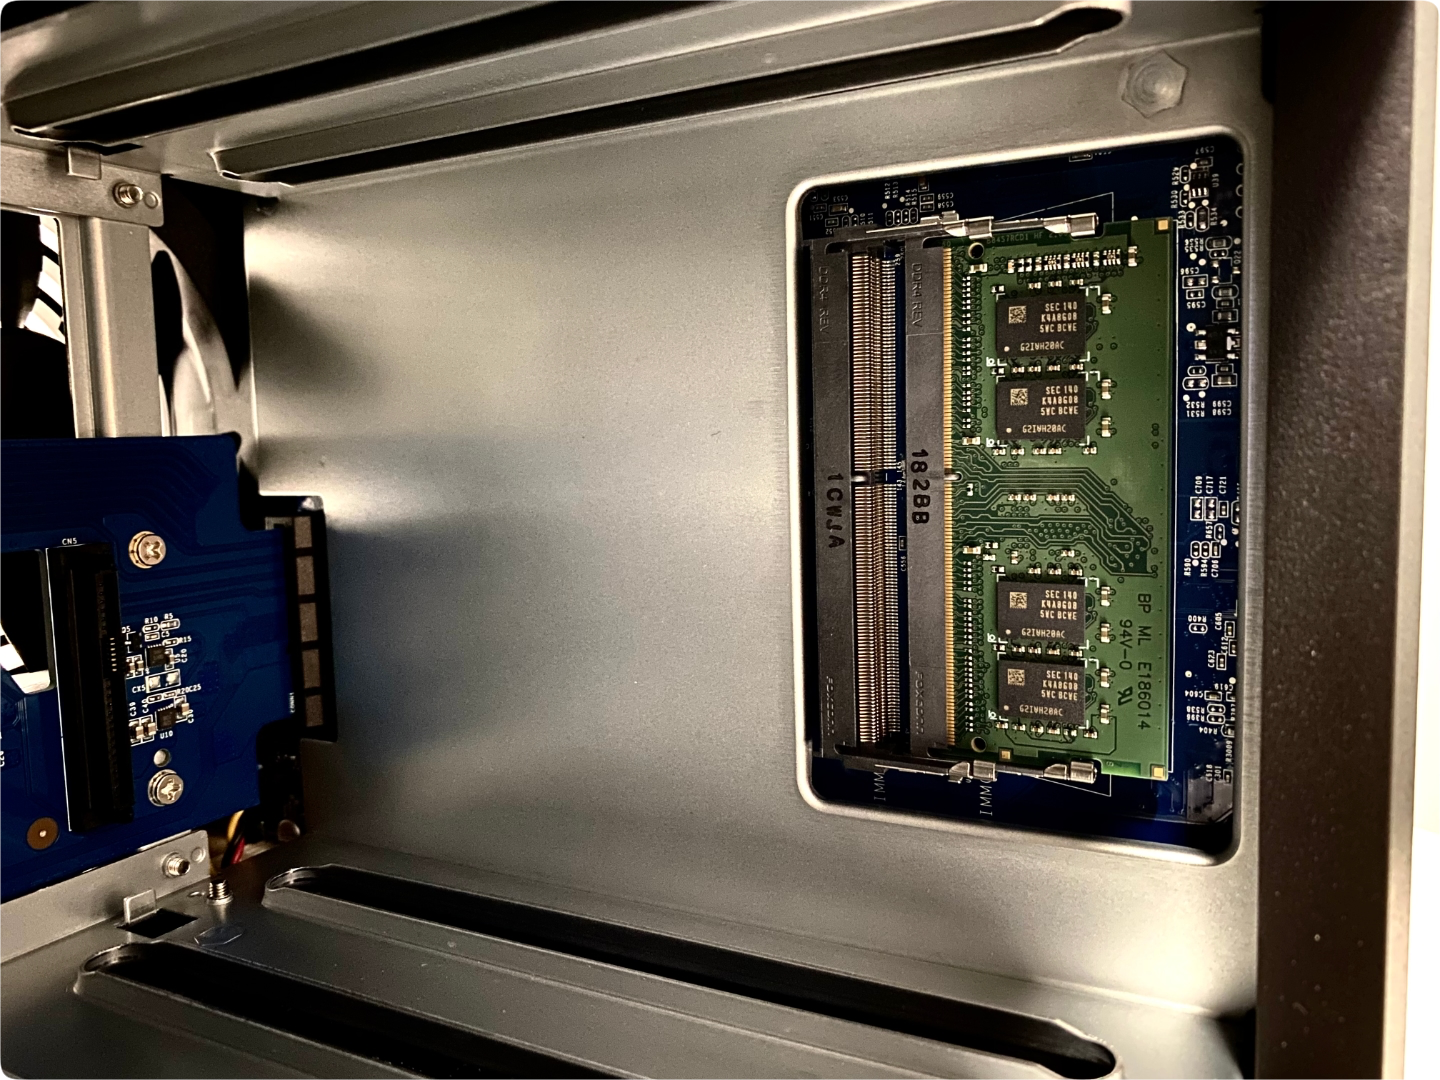
Packing a new heart inside, it was clear that just like all the rest of the x22 models, this one will also come with an AMD Ryzen R1600 CPU. As much as that was not a huge surprise, what is a welcome sight is the fact that this new 5-bay NAS comes with 8GB of DDR4 ECC memory and a total of 2 memory slots for a maximum of 32GB (2x 16GB).
It is a shame that the CPU is from the "embedded" lineup without the Vega GPU, so we can forget about some media server roles for this particular model, but more on that later.
On top of that, the bottom and back sides uncover more details. This model supports up to two DX517 expansion units for a total of 15 drives via its dual eSATA ports. In case you need more snappy performance, you can populate two M.2 drive slots (2280 models) with NVMe drives configurable as your volume cache array.
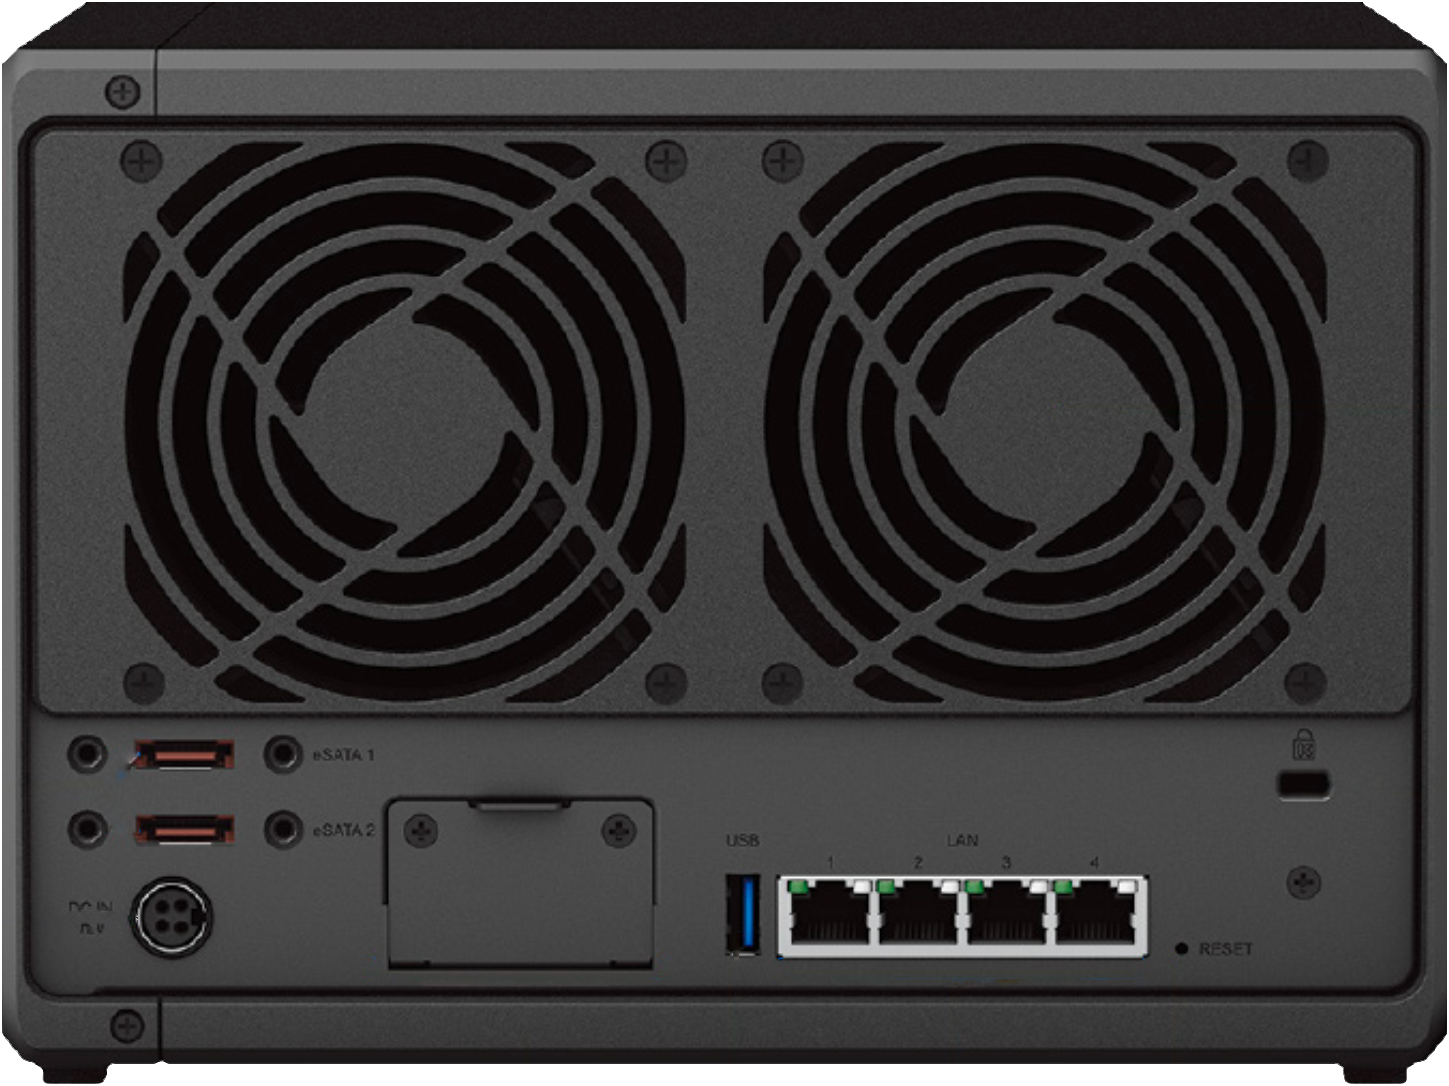
Following along the back we can see that Synology is still holding on to the 1G LAN ports, and in this particular case, four of them. Most were hoping for some 2.5G ports, but that is not the case. One major reason for this is the fact that DSM7 in one of its updates will support SMB multi-channel support that will allow for a LAG configured setup to utilize multi-gig transfers between two clients instead of just maxing out at a single 1G lane.
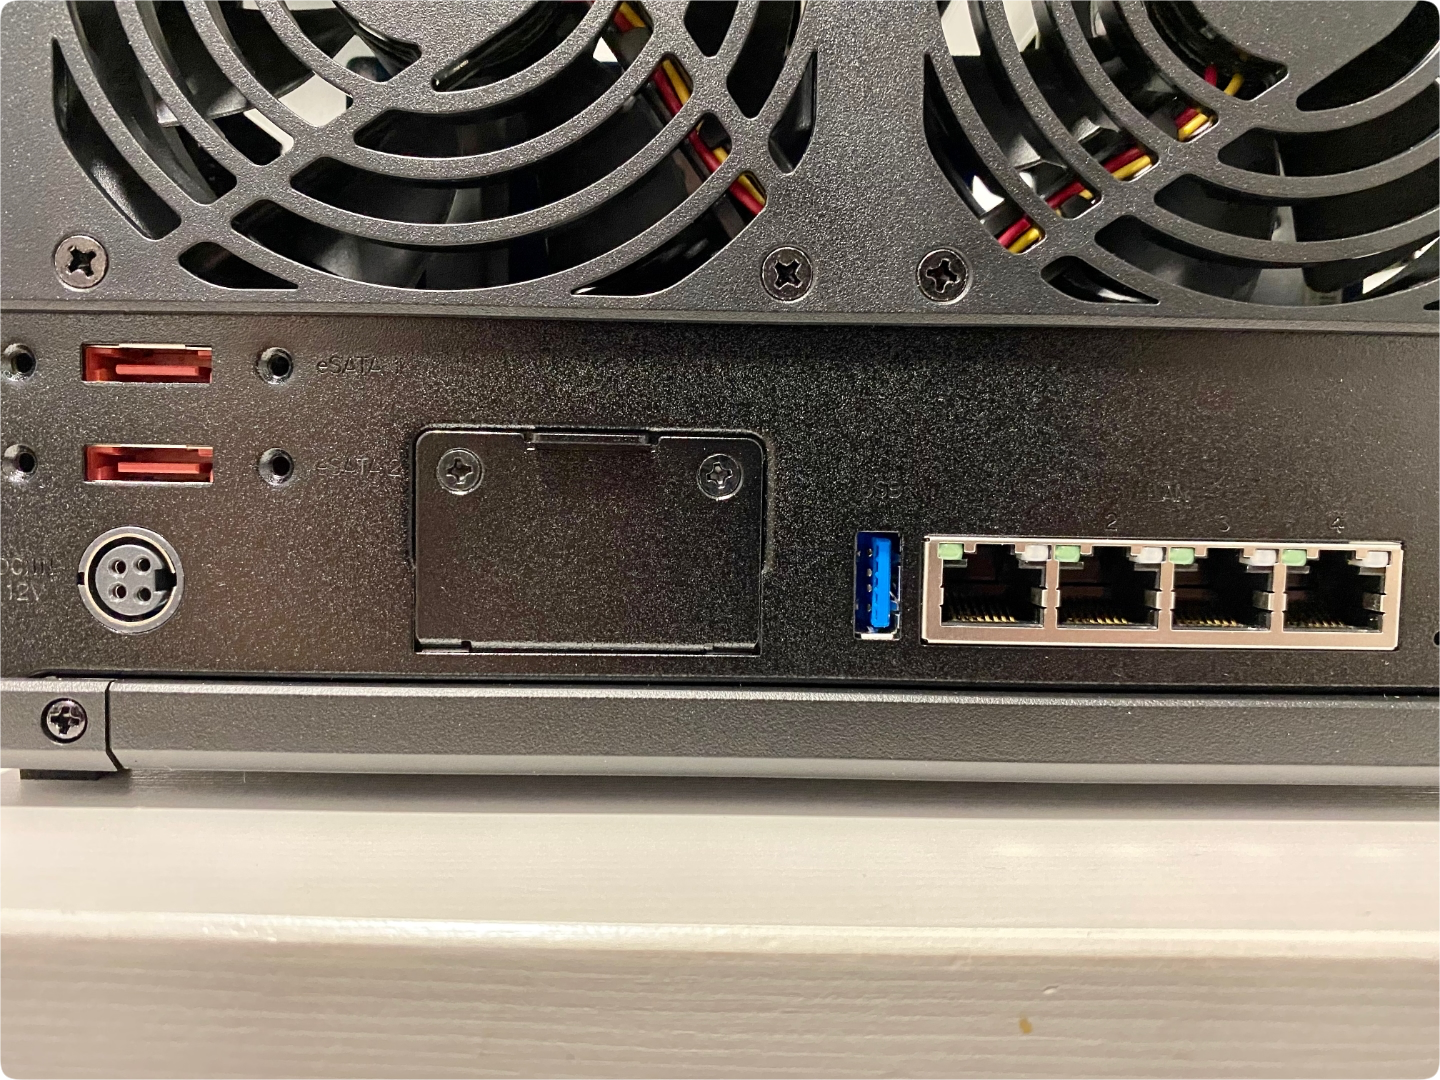
Of course, before you get upset there is one surprise with this model. 10G is optional! Using a proprietary PCIe expansion card (Gen3x2) Synology is bringing 10G speeds now this particular model as well. So, along with over 400MB/s transfers using all 1G LAN adapters, you will have the option to push 1GB/s of data as well.
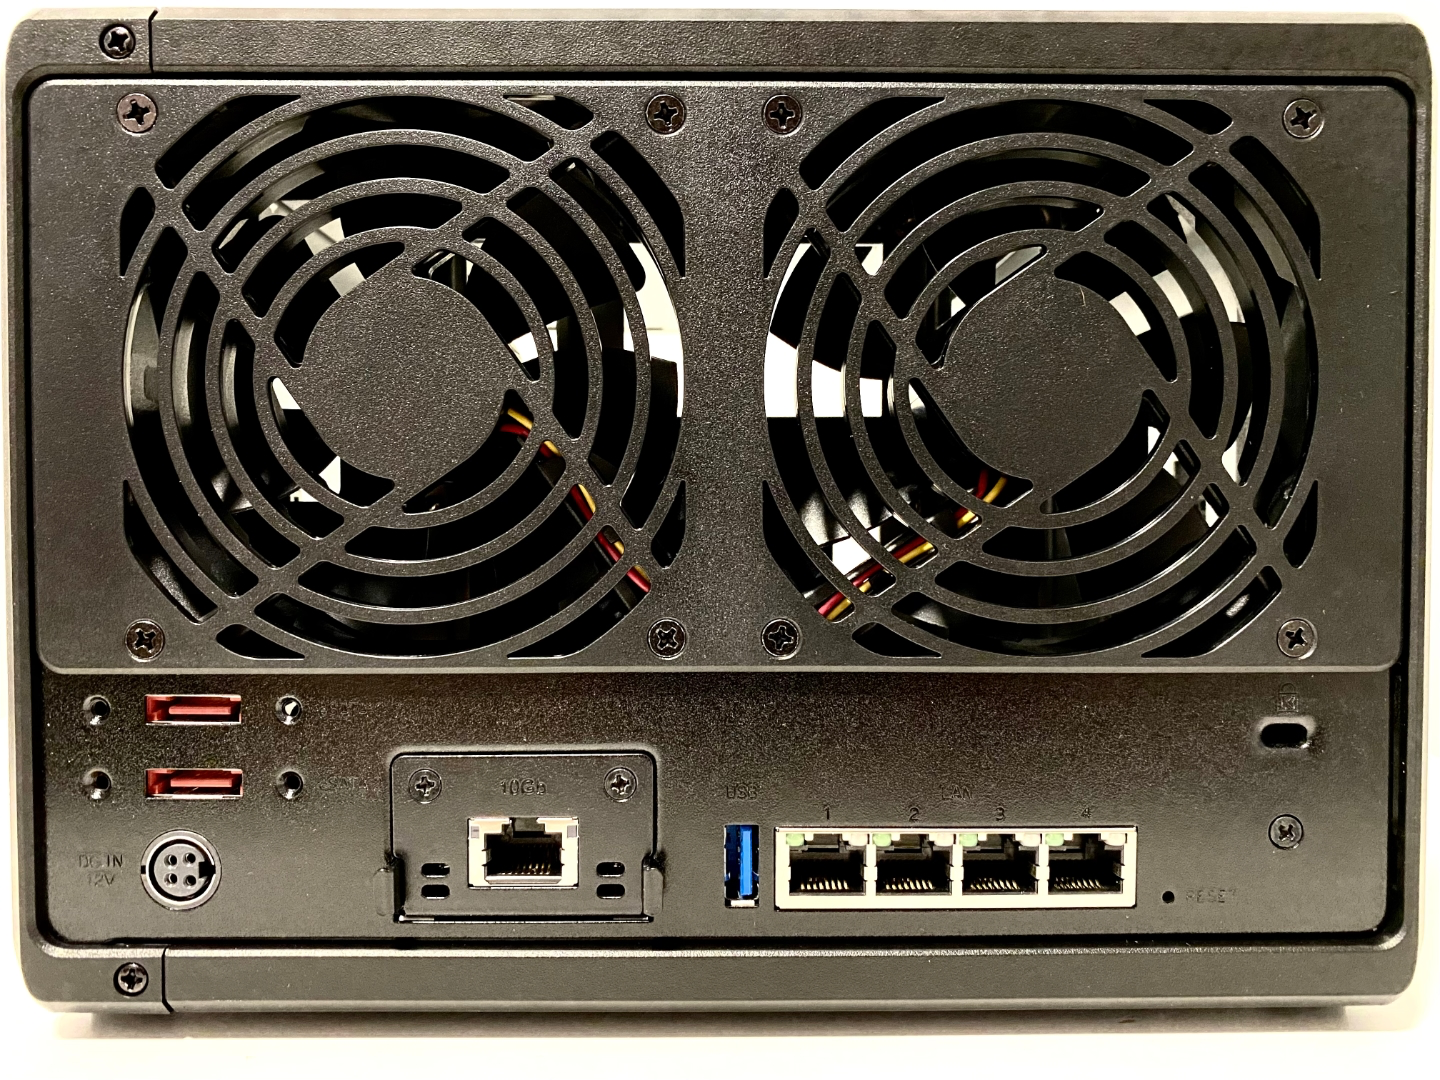
Finally, on the back, we can see the USB 3.2 Gen1 port that you can use for connecting almost any storage device that you want. As always, most of the backside is utilized by two 92x92mm fans that will keep you NAS cool, while also not producing a lot of noise.
Keep in mind that you can replace them with some aftermarket models for even more silence in case you need it. From personal experience (not just on this NAS) the drives tend to be louder than the actual cooling.
While we are on the topic of cooling, this AMD will run a bit hotter than a previous model of Intel Celeron for example with its 12-25W TDP. Still, with more RAM and 10G support, it will be worth it in case you will need to utilize it that way.
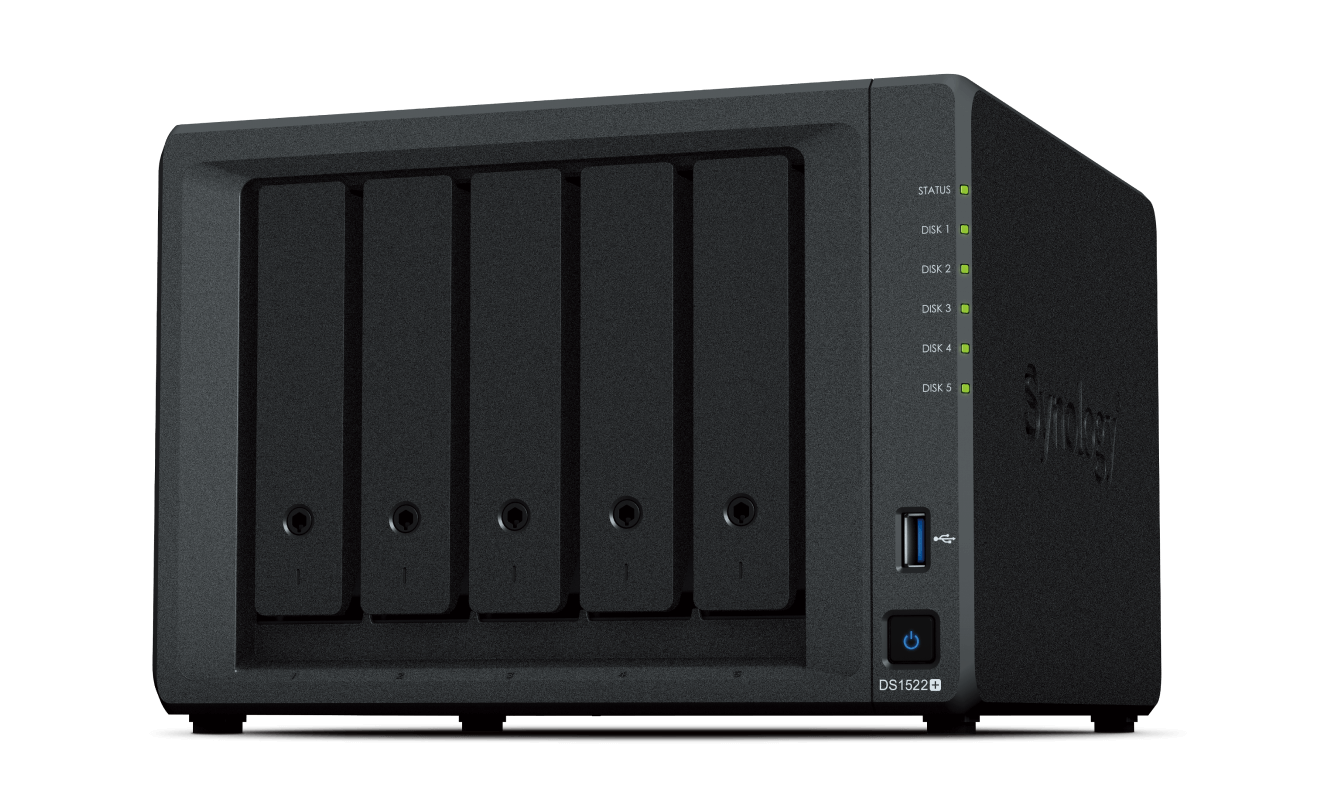
This 5-bay NAS on the front follows a very familiar look and feel with 5 bays capable of housing 3.5" HDDs or 2.5" SSD. (SATA).
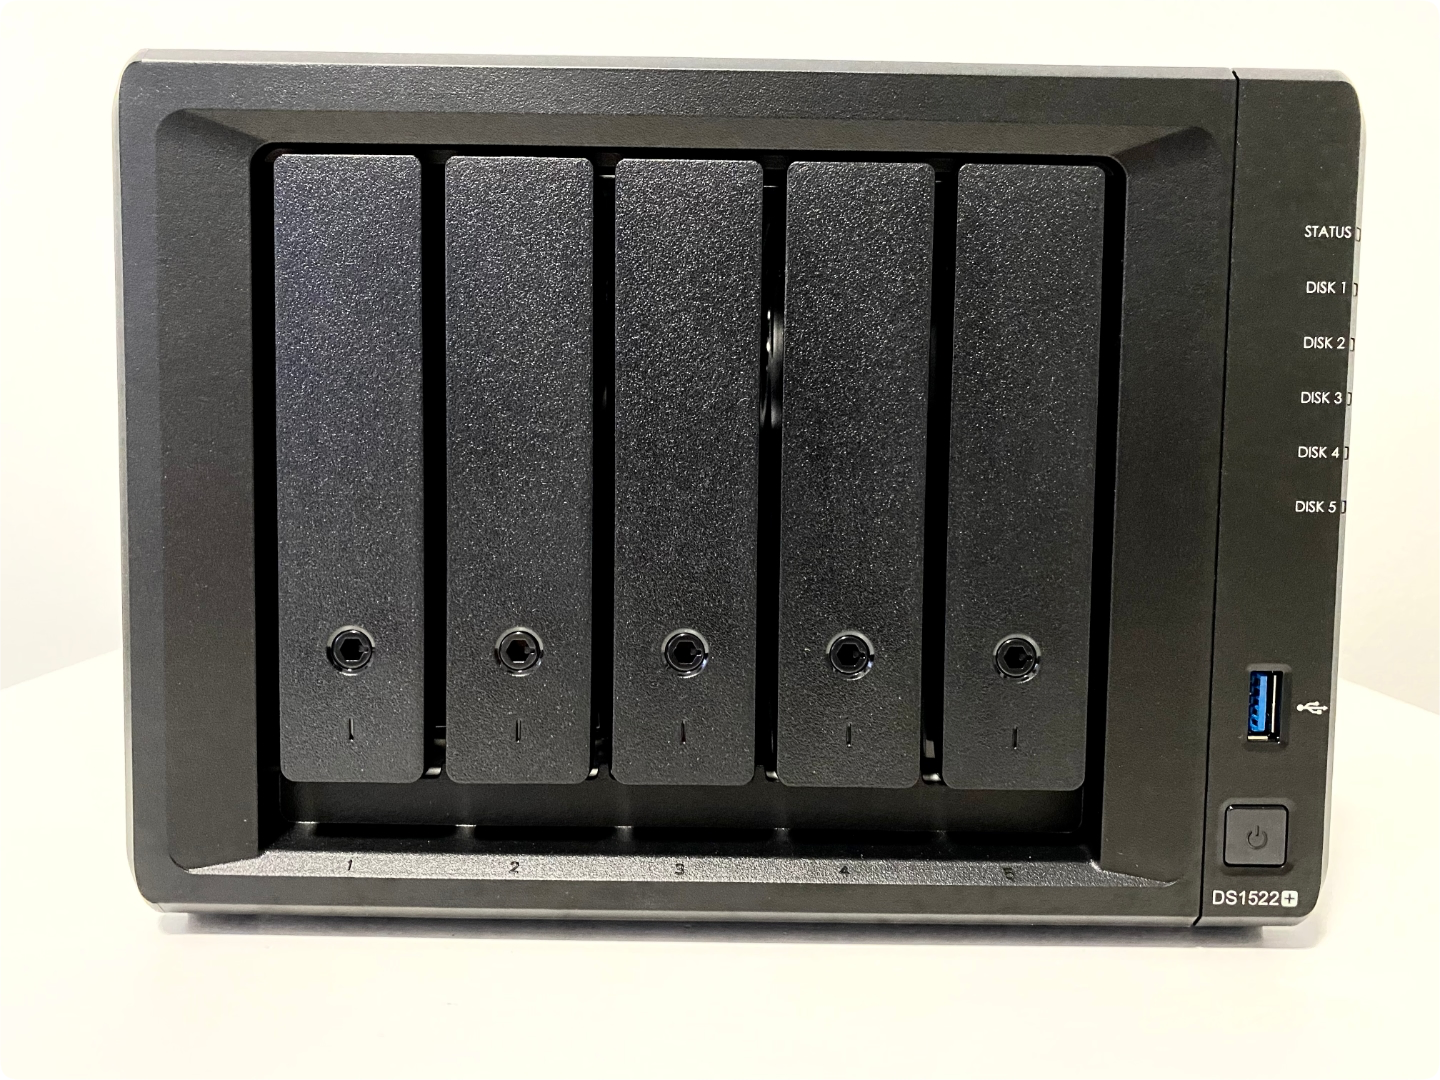
For this particular setup, I will be running with four SAT5210 SSDs (Synology brand) in various combinations to see how it performs.
DS1522+, depending on your overall configuration and drives will use from 16 to about 53W of power, and is covered by a 3-year hardware warranty that can be extended using the new Extended Warranty Plus program for a total of 5 years.
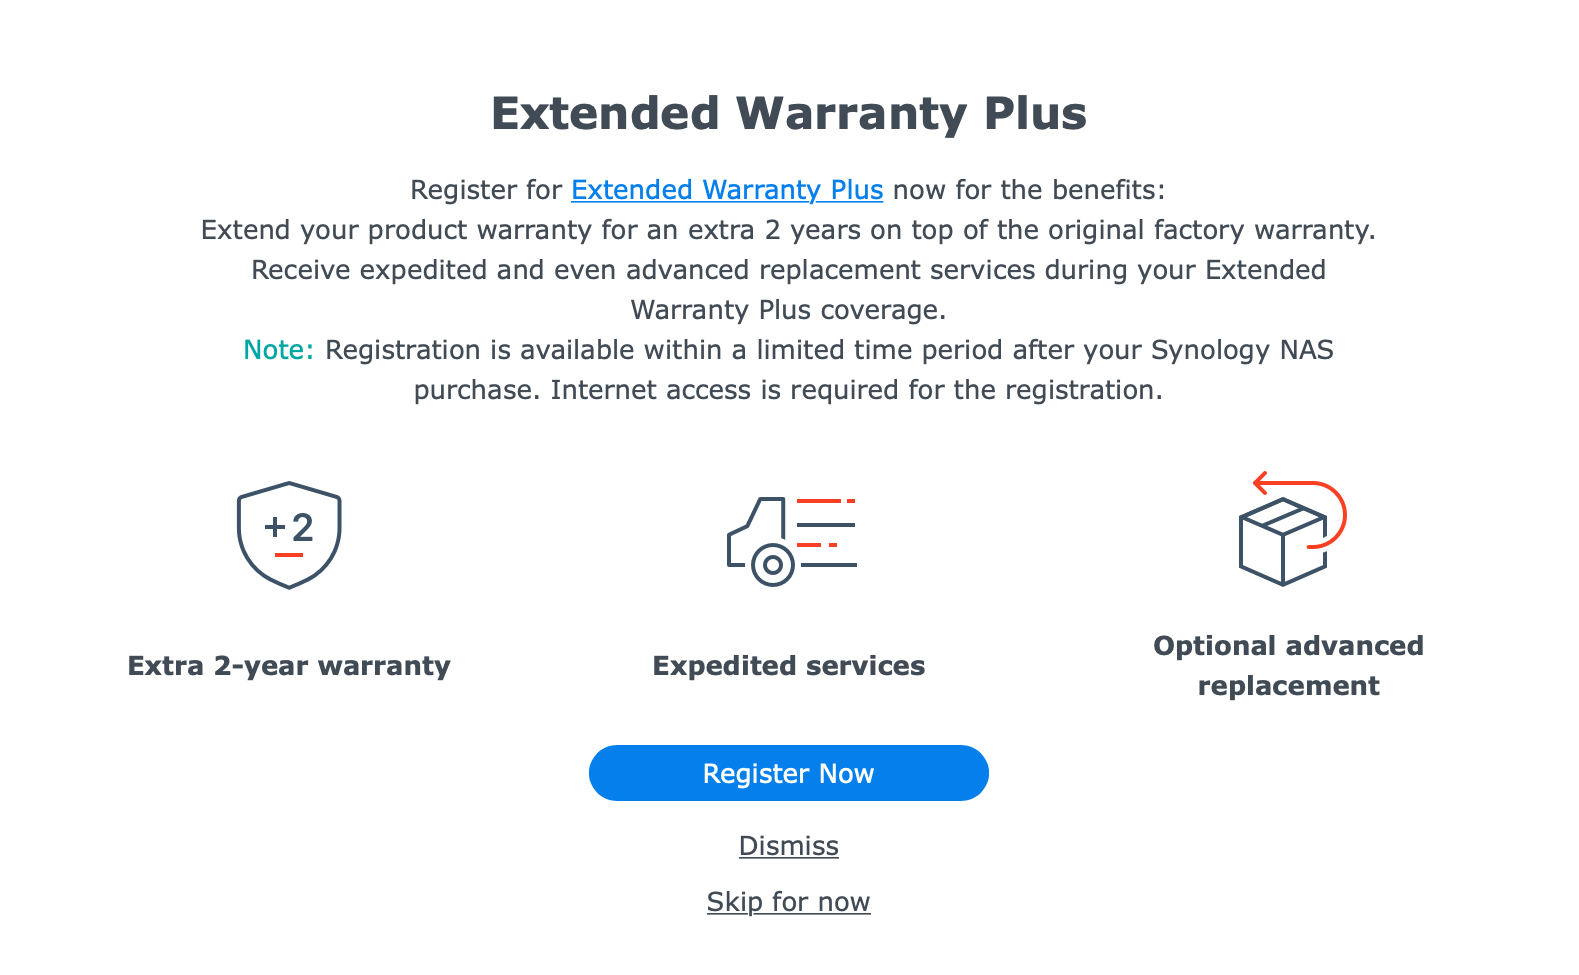
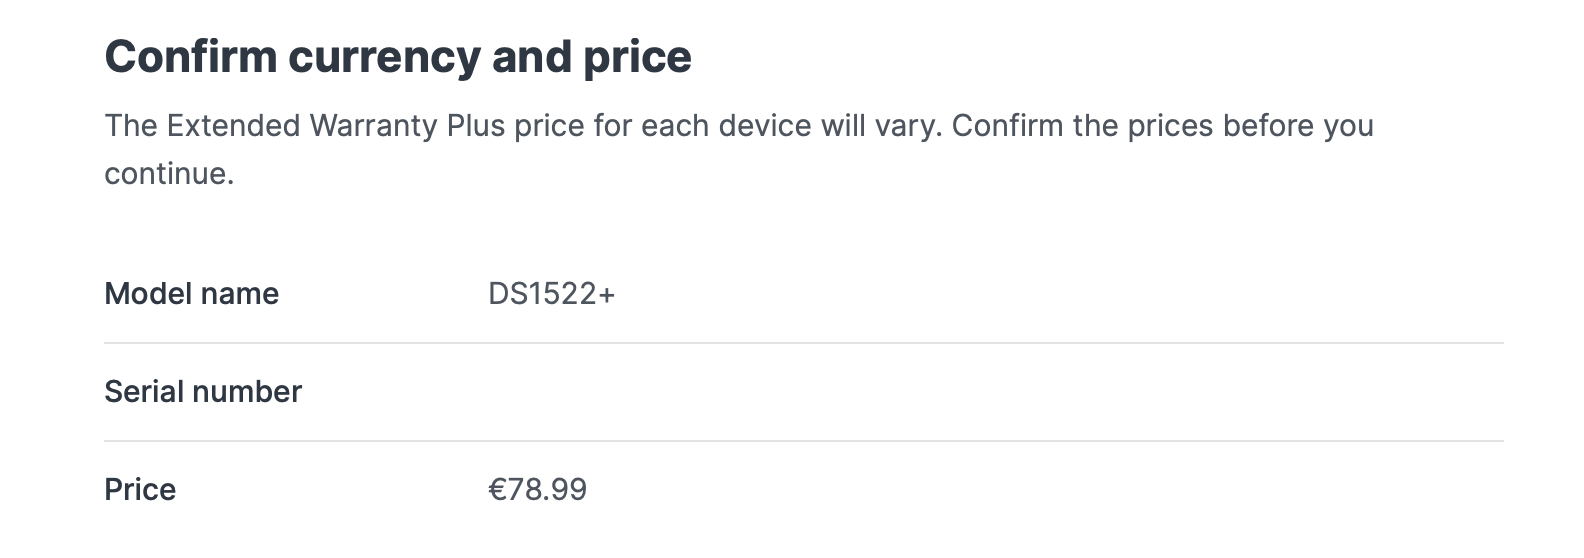
Extended Warranty Plus for DS1522+ in Croatia costs about €79 (for additional 2 years of support). Personally, I think it's a great added value as well considering that it is about 10% value of the whole NAS.
:Packaging
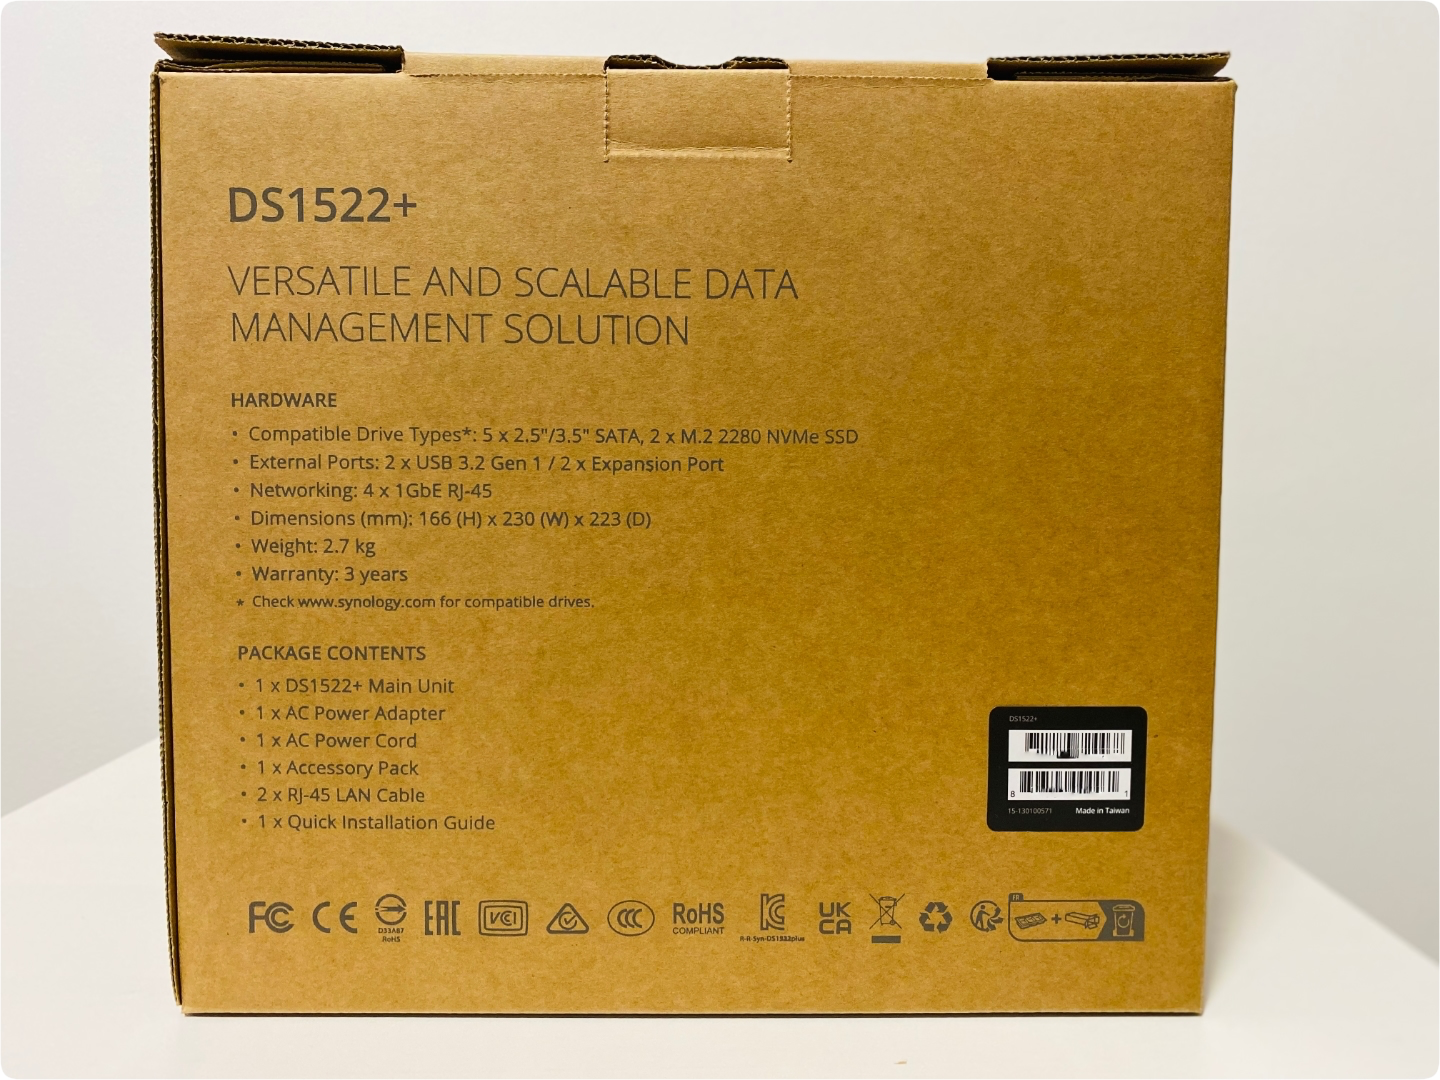
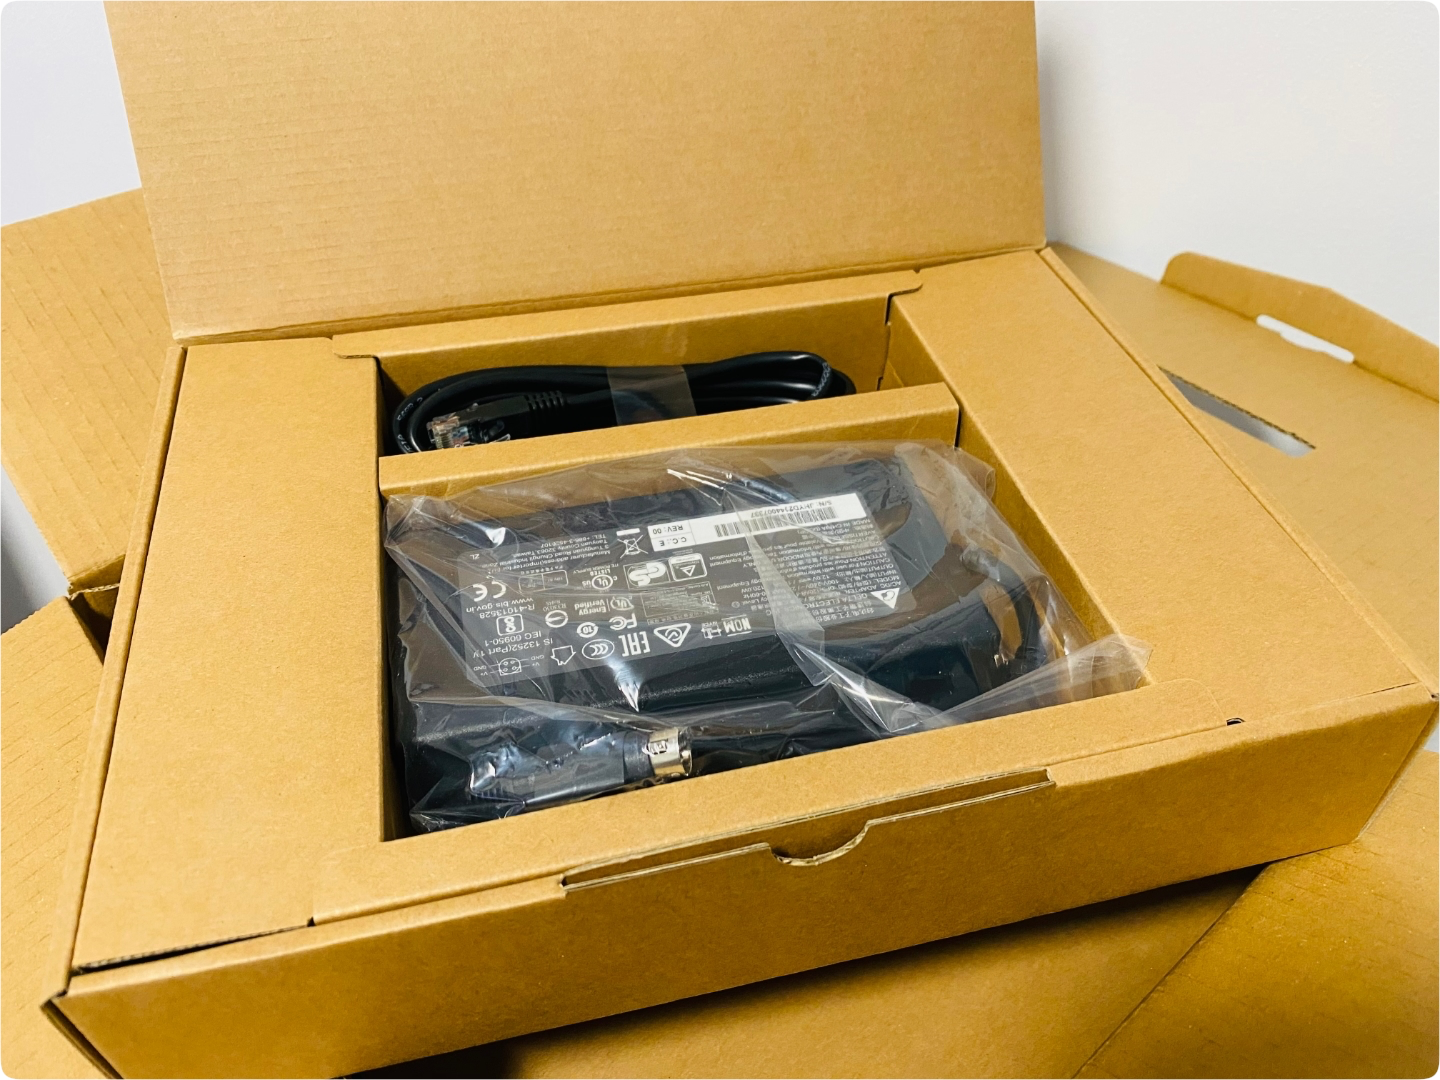
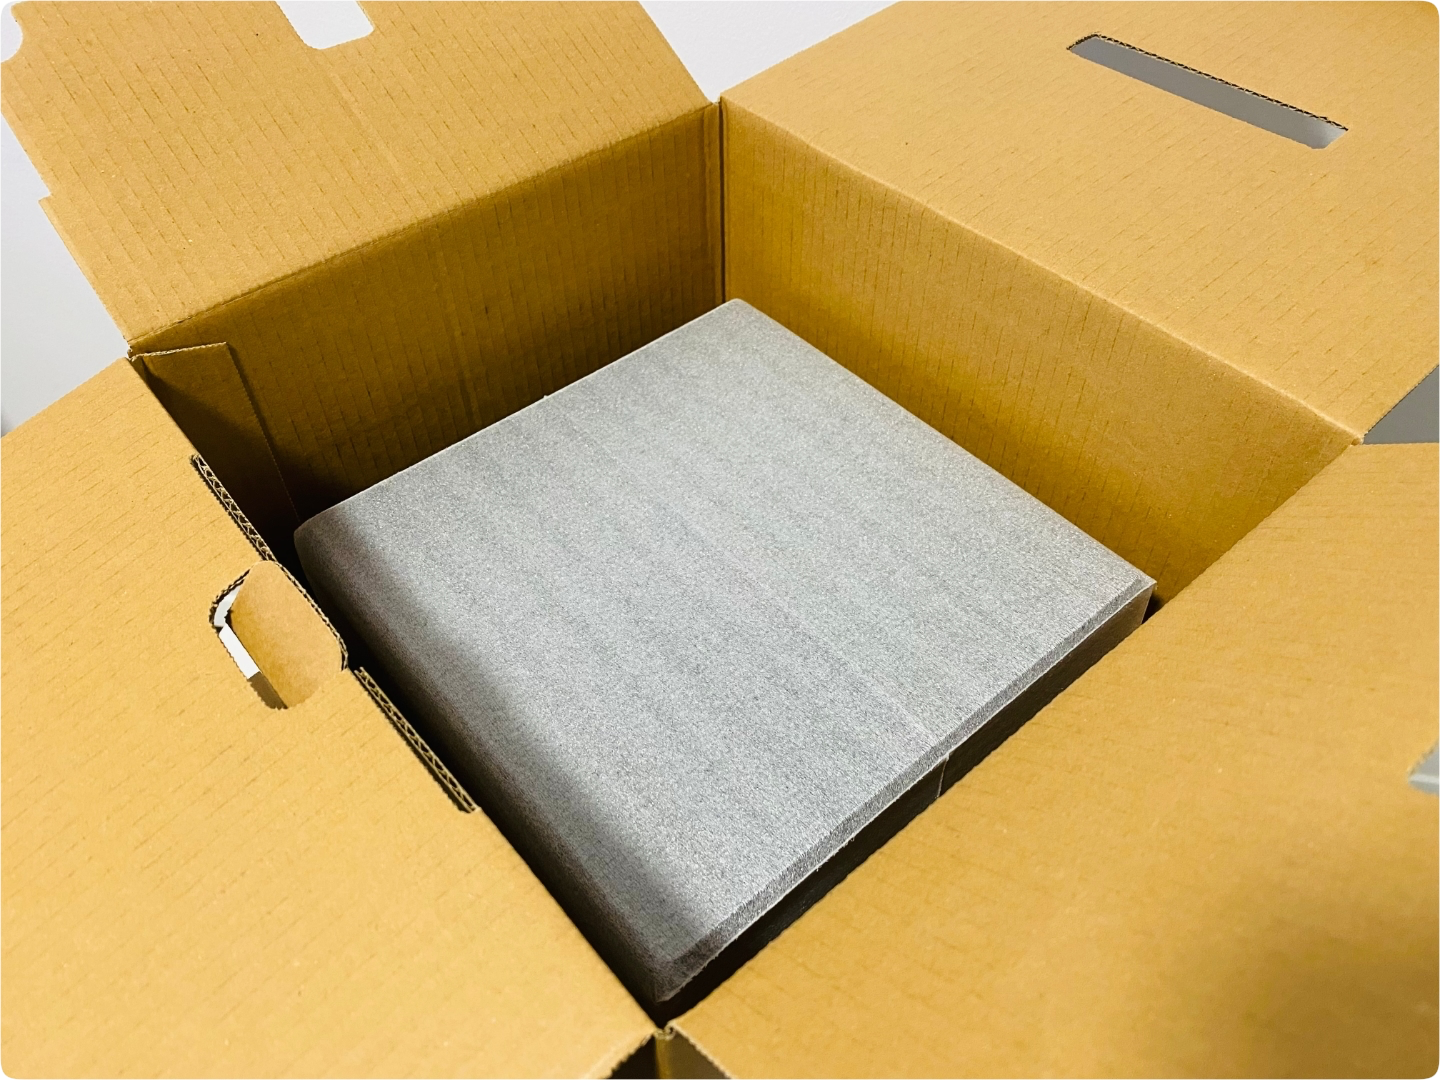
All Synology devices have been using a very minimalistic packaging for years now, and DS1522 is again, no exception. With a sturdy and clean "eco" design there is something about unboxing these devices.
Not saying it's Apple grade, but very close.

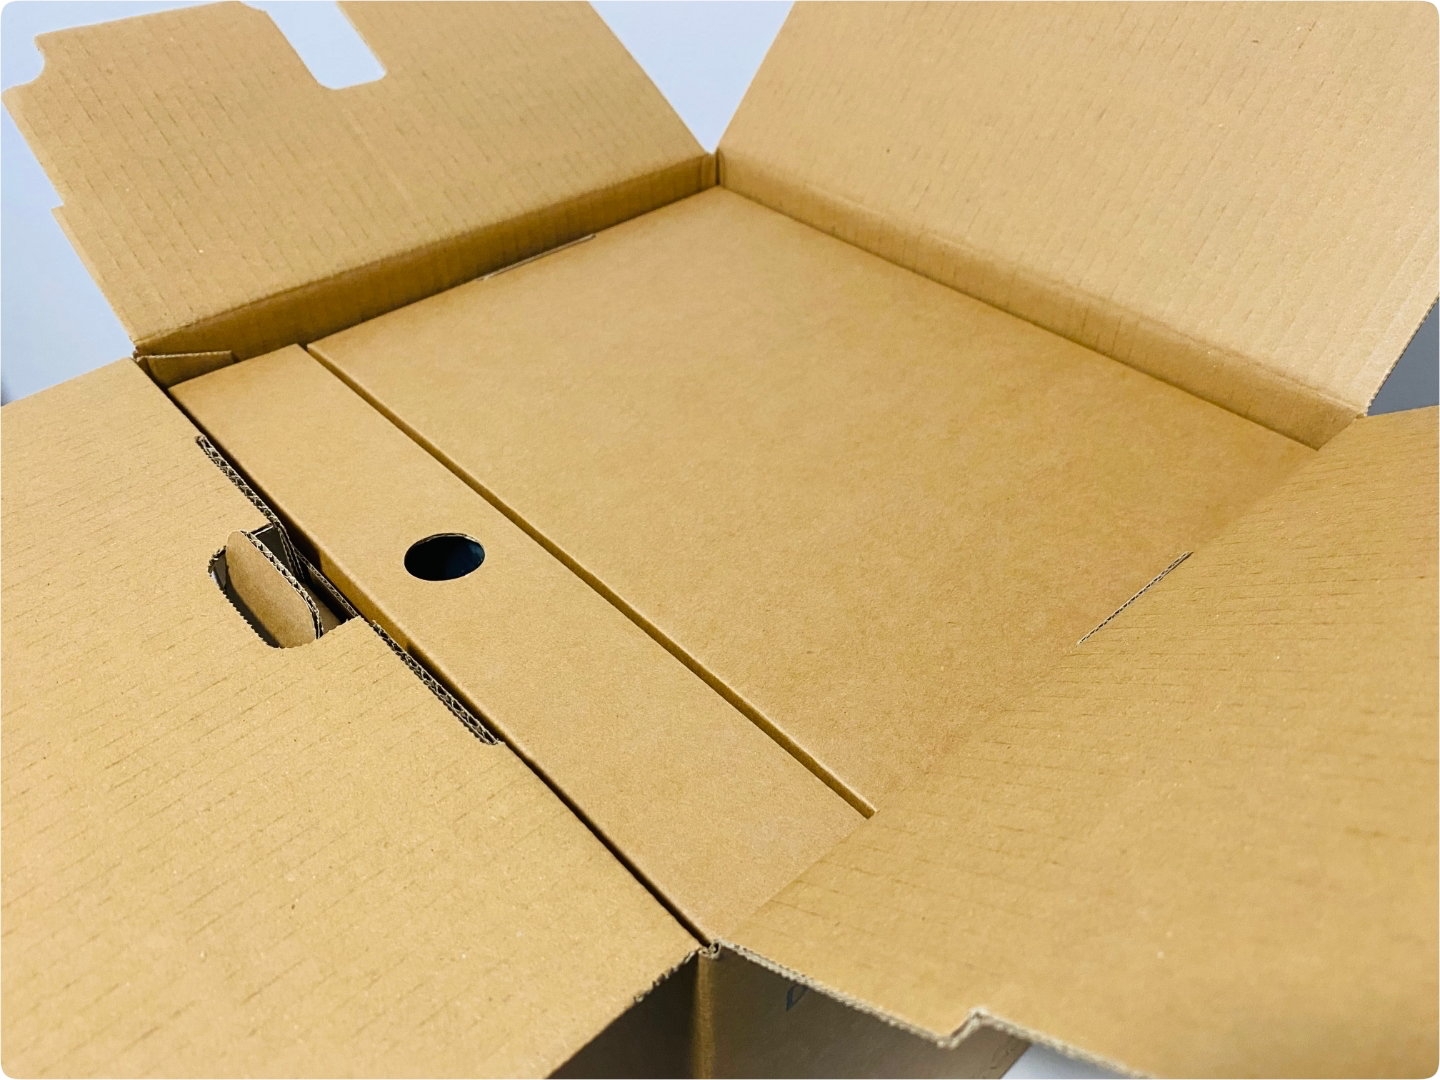
Inside the box apart from the obvious are two additional boxes for cables, a power adapter, and 2x LAN cables. Divided into 2 levels, there is little room for anything else.
Also, the NAS itself is floating in the middle of the box, so any accidental hits will probably not affect it at all, let alone damage it.

:SSDs
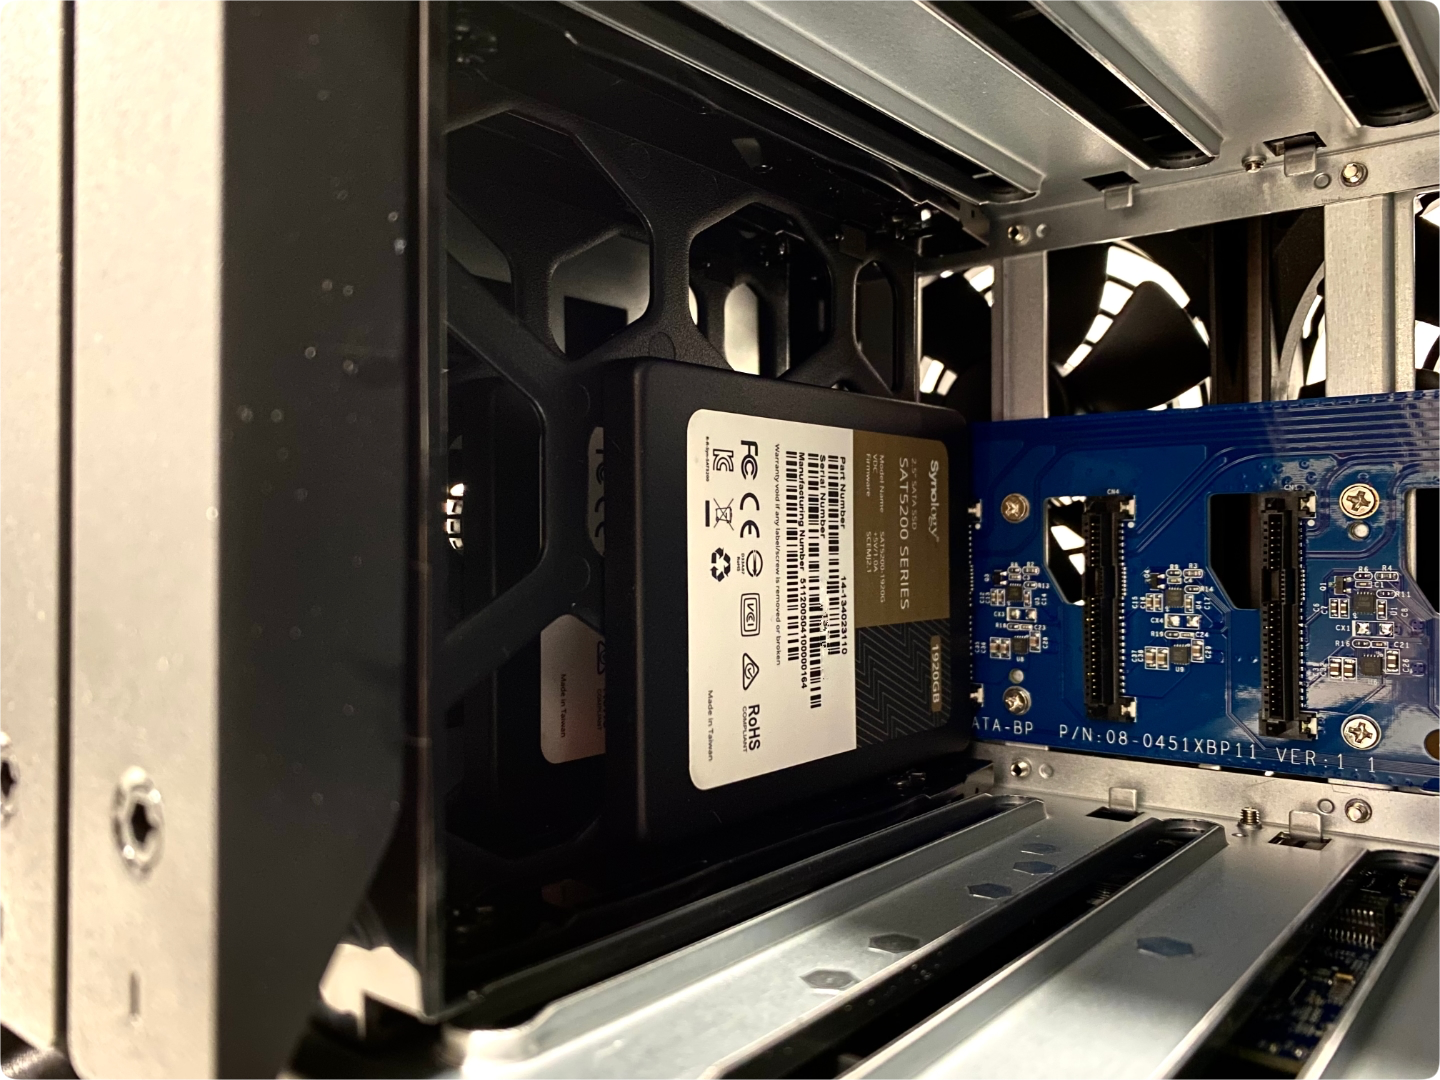
For testing with this NAS, I got four Synology branded SSDs from their SAT5200 lineup. A few 2TB as well as 4TB drives.
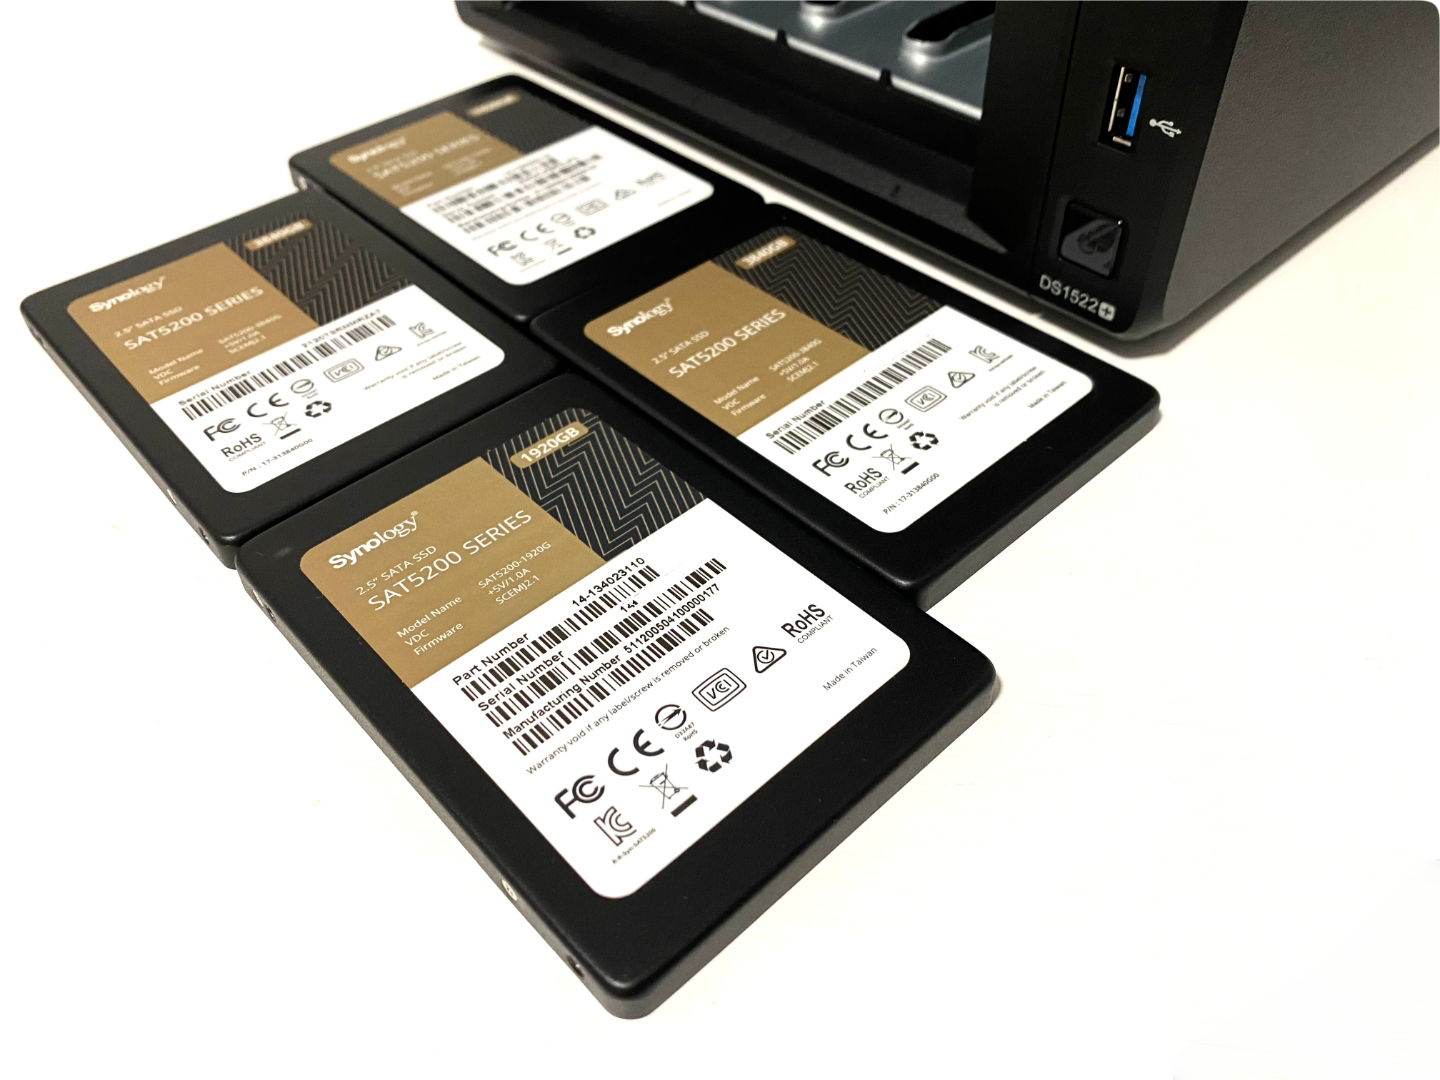
Considering that the NAS has 10G capabilities, it would be best to test it with SSD drives to see just how well it can perform.
The drive installation is straightforward, and you can use the included screws that came with the NAS to secure the drives inside the caddies.
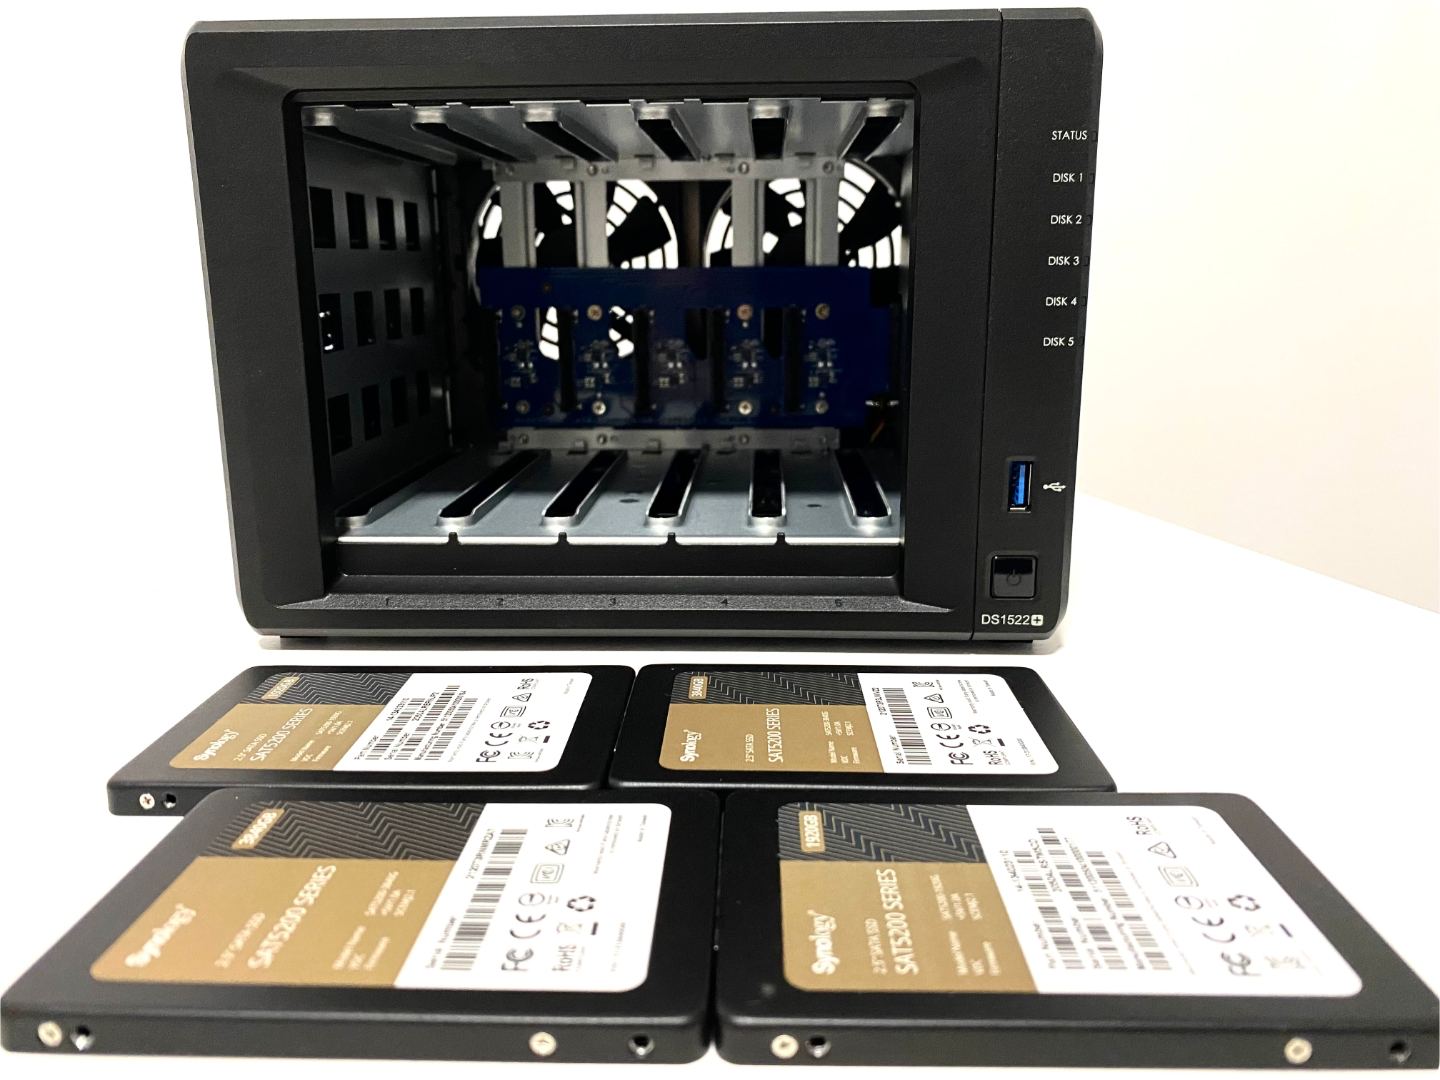
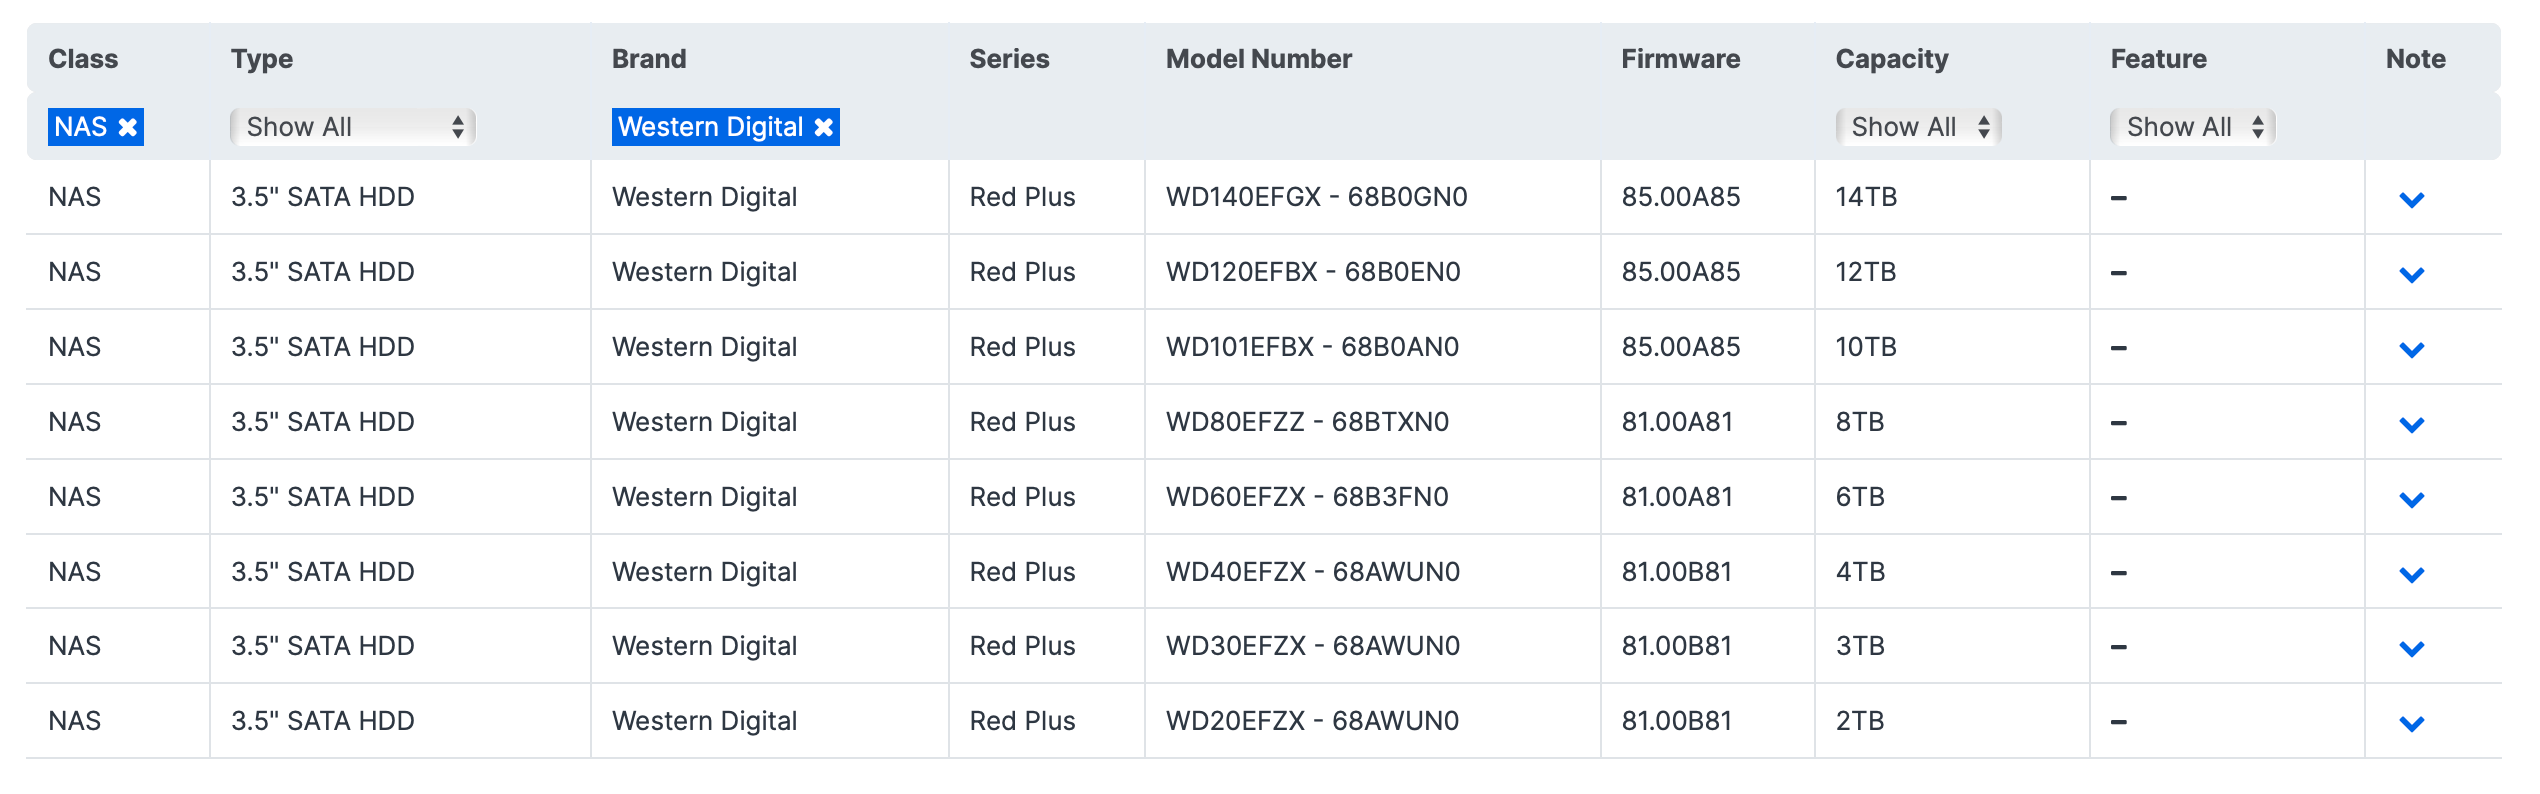
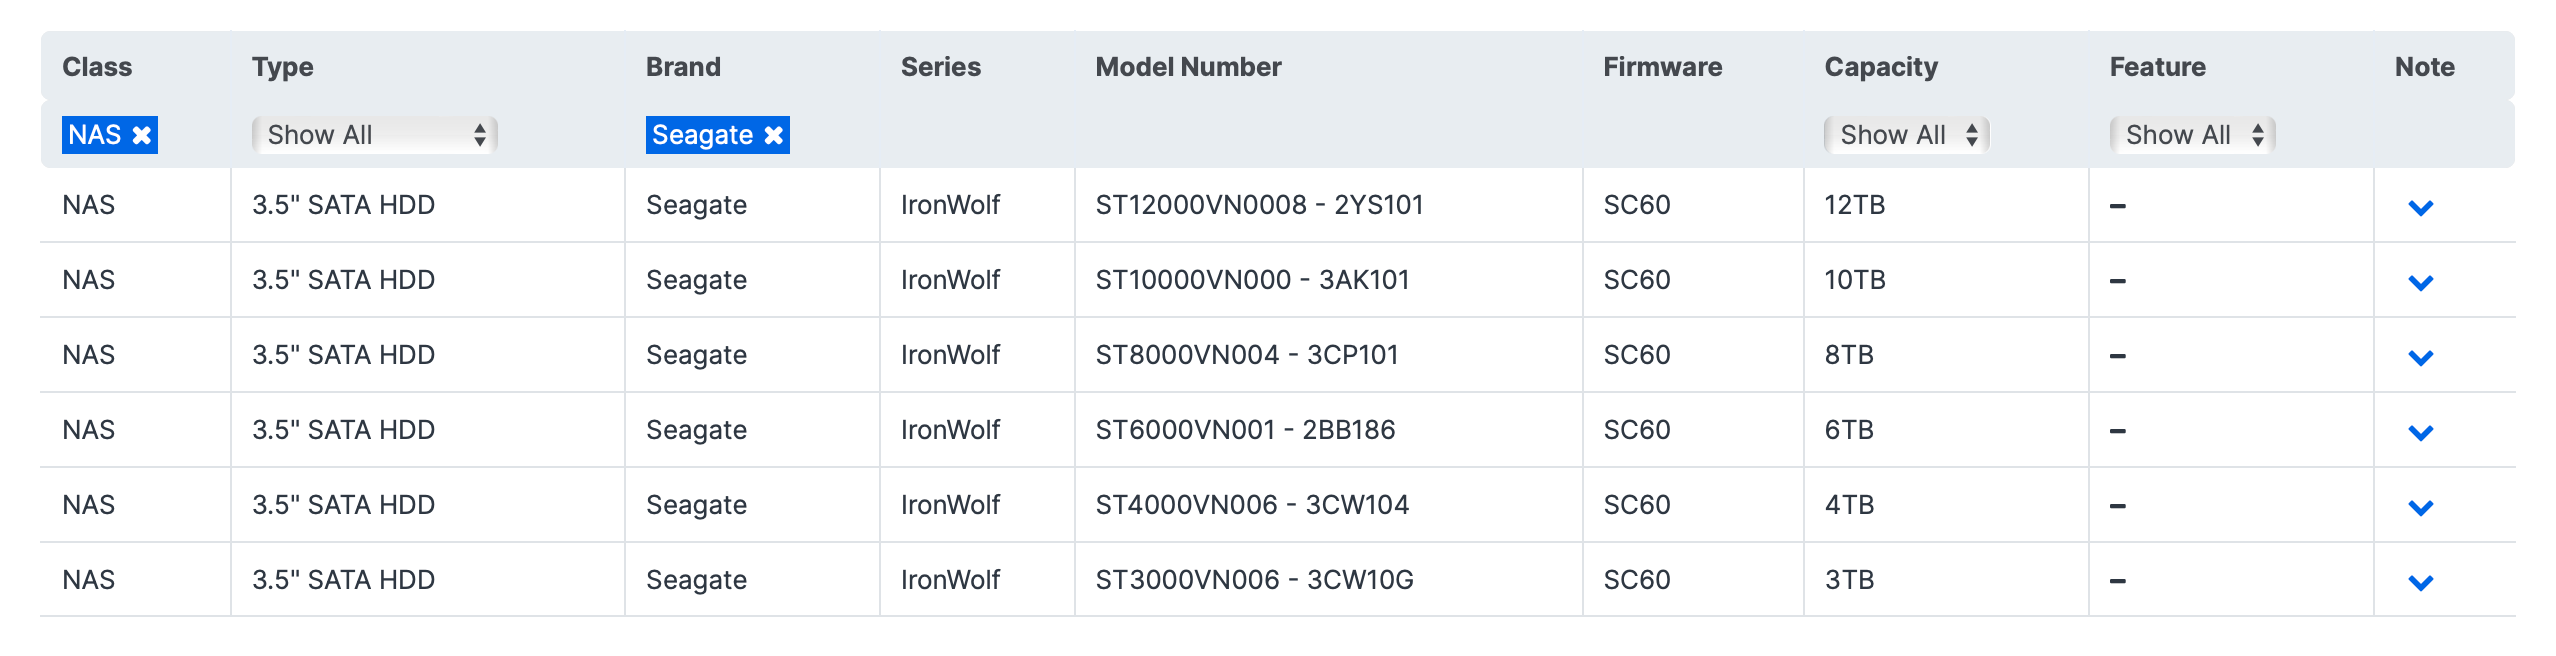
Of course, DS1522+ supports 3.5" drives as well, just be mindful of what models you will place inside the unit (both 3.5" and 2.5") considering the new HDD Synology policy. Best to consult with the compatibility page for the NAS itself before going out and buying them.
For DS1522+ the supported drive list (at the moment) covers a large array of drives, not just Synology ones, but Toshiba, WD, and Seagate alike.
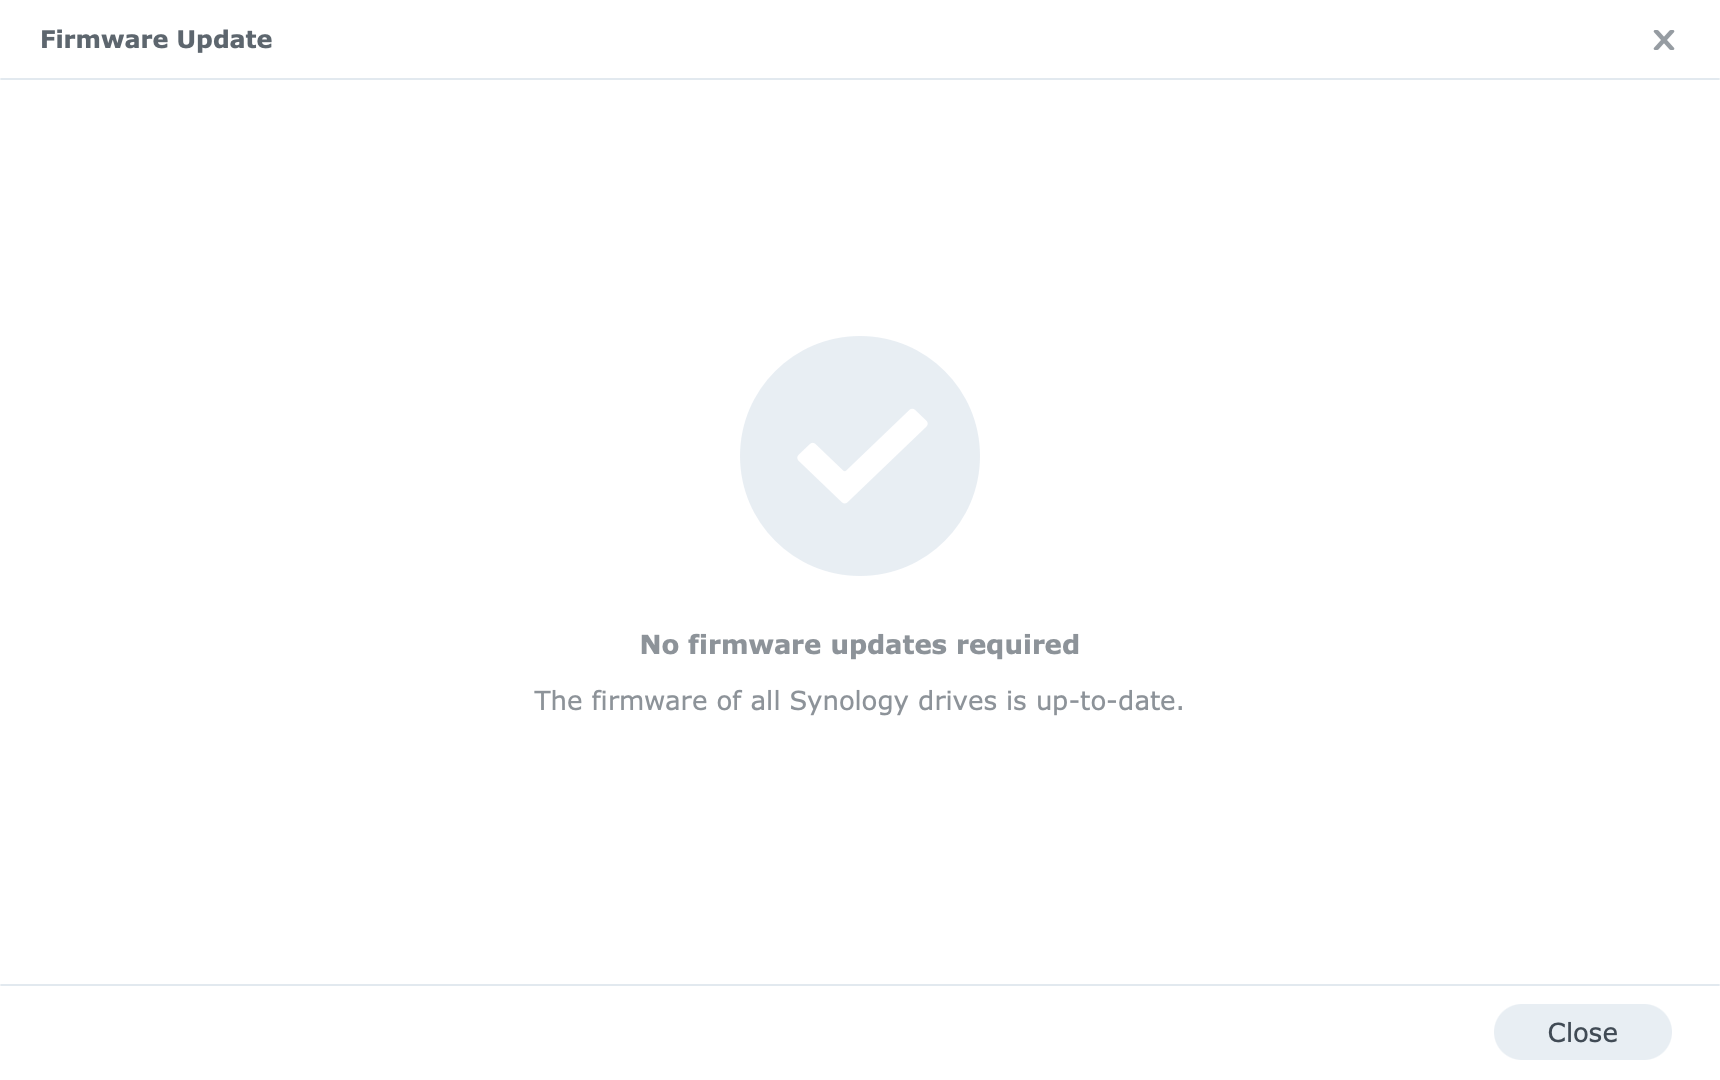
All four drives used in this particular configuration are running with the latest firmware version. You can use the Storage Manager to check the version of each drive and update it as necessary.

In the following sections, I will talk about speeds and drive configurations, as well as their comparison to some of the non-Synology branded drives as well.
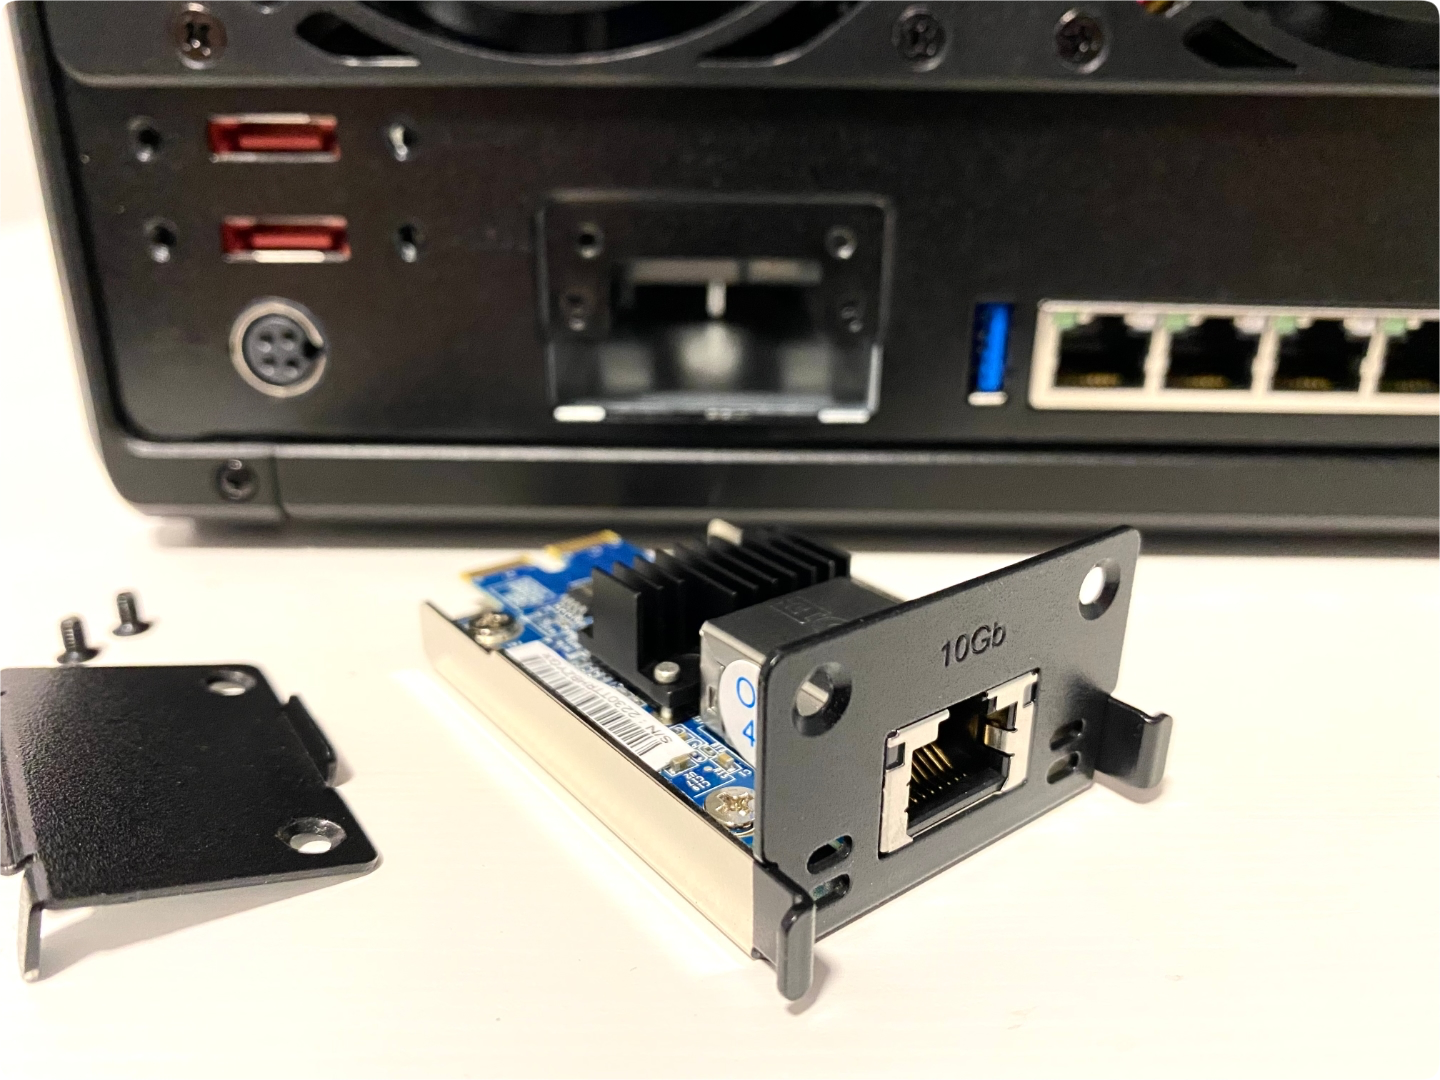
:E10G22-T1-mini card
Alongside this NAS, Synology released also a new type of custom 10G (copper) network adapter called the E10G22-T1-mini. It is a bit of a mouthful, but never mind the name as long that allows us to get 10G in a small form factor case, right?
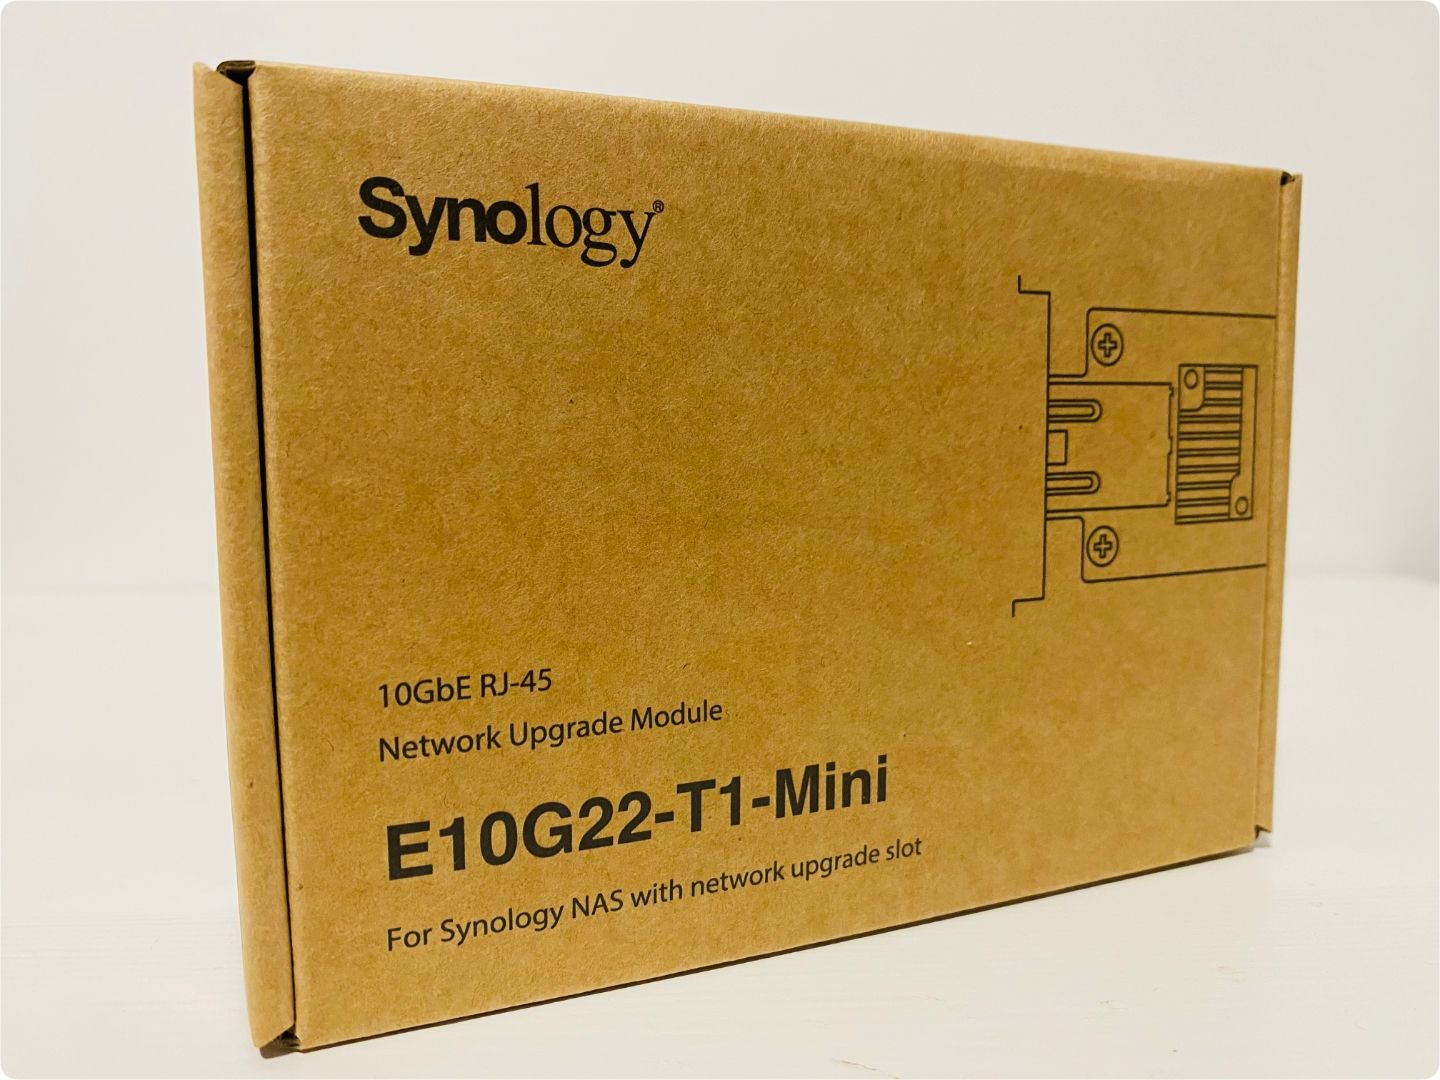
While on the subject of small form factor, this new card is not a standard low profile PCIe card, so you will have to buy this exact card if you want 10G capability inside this NAS. The same goes for the new RS422+ rack model. That NAS is essentially DS1522+ in rack format with one bay left and no NVMe slots.
With a price tag of €125 (plus tax), this add-on card will not break the bank and would be a valuable asset to future-proof your NAS.
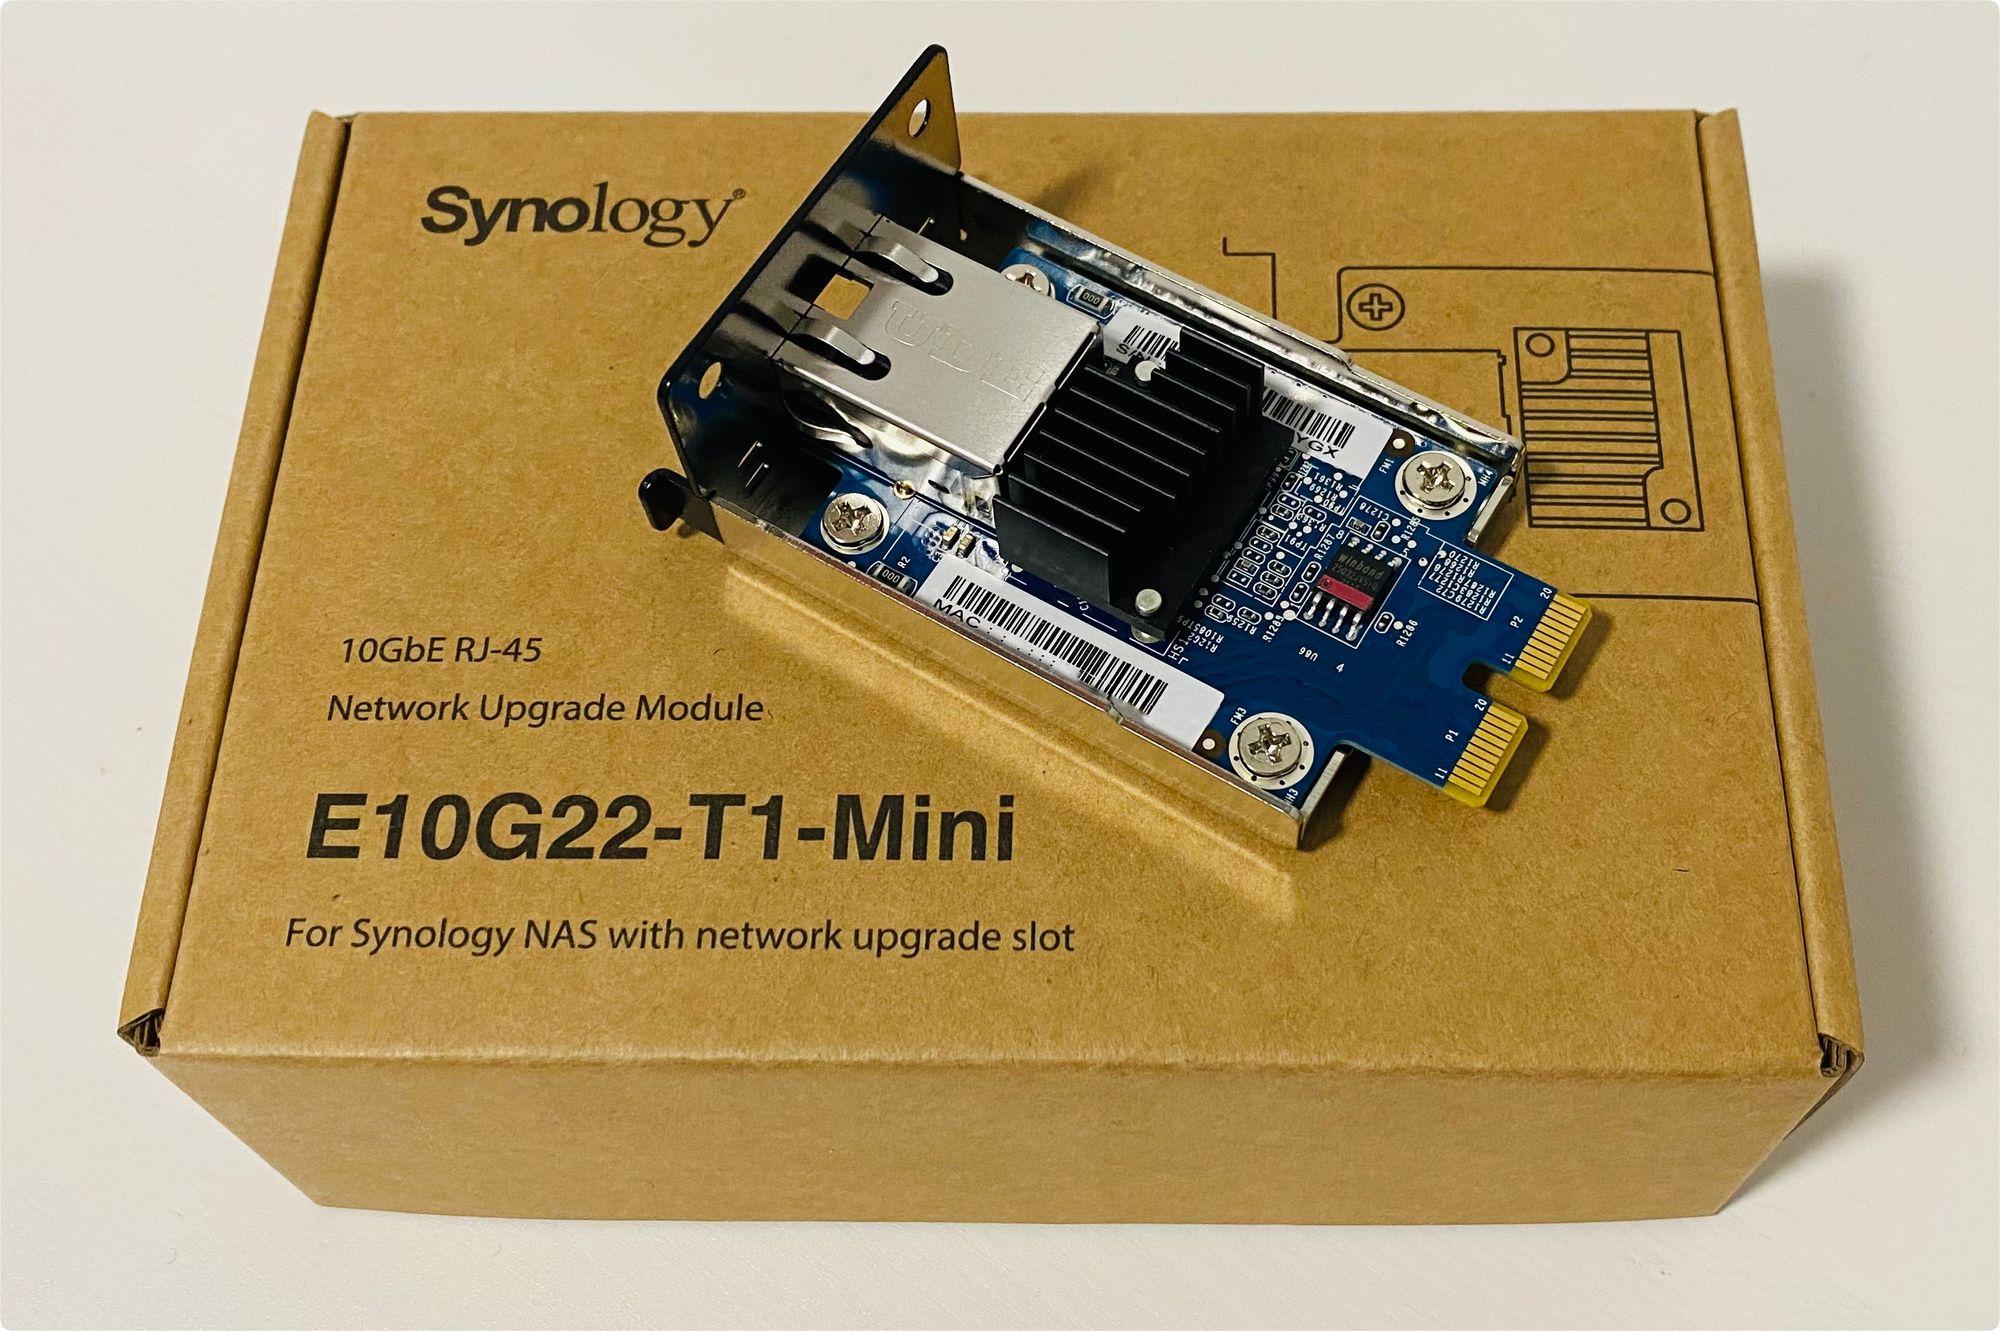
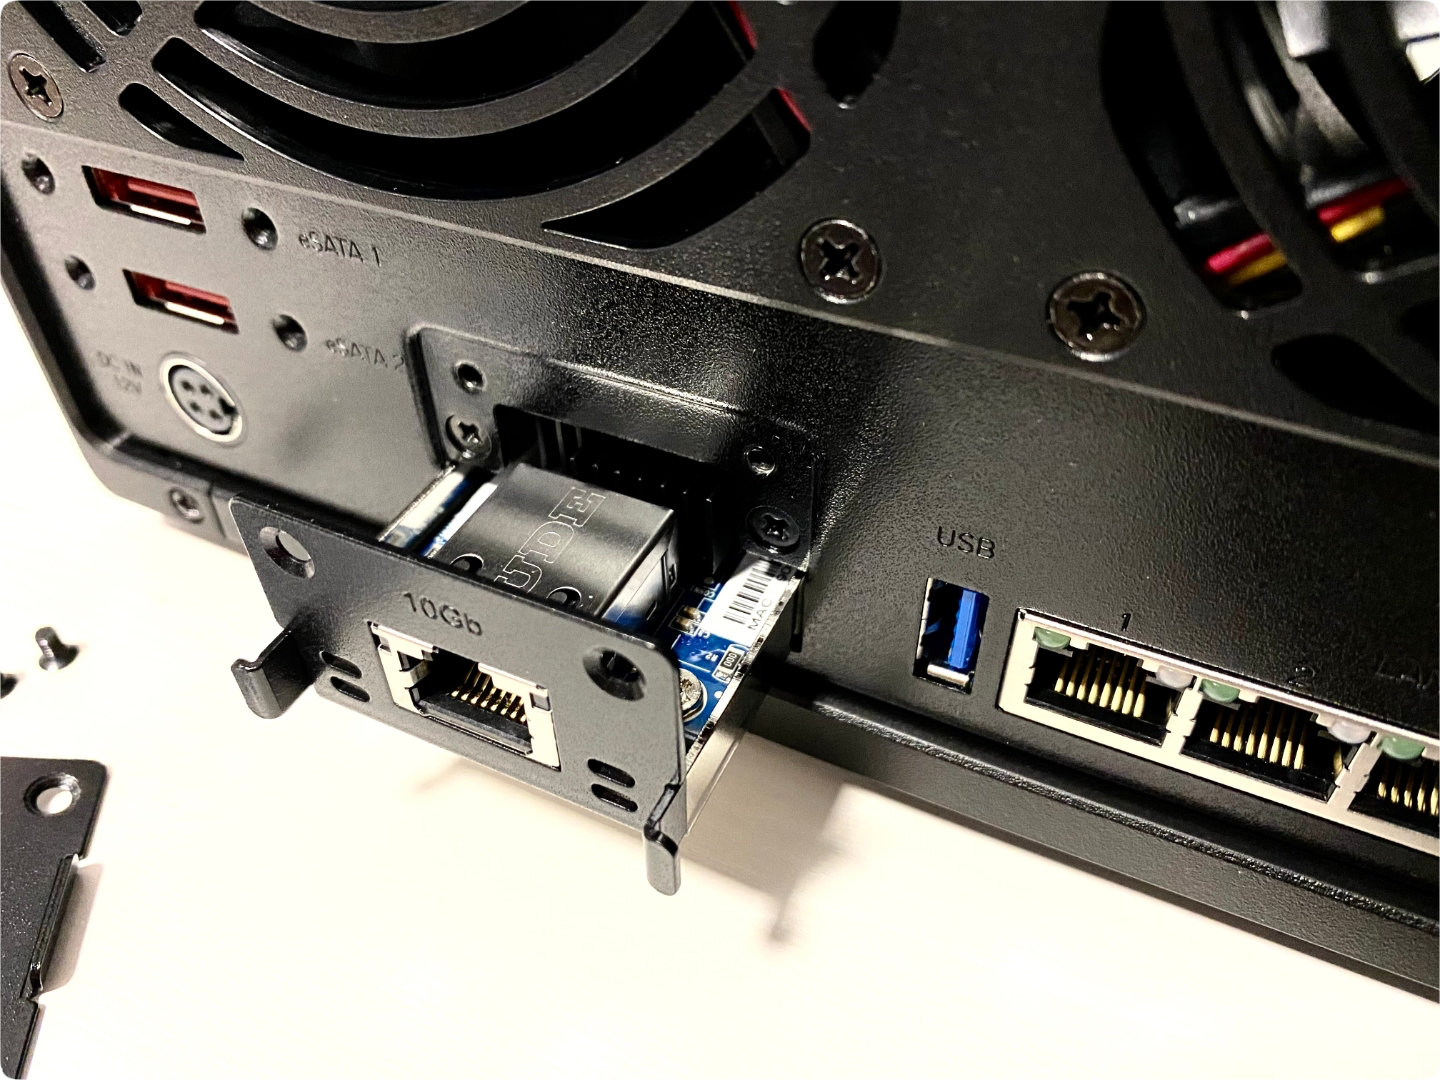
The installation inside DS1522+ was particularly easy and the fact that you only have to take out 2 screws without disassembling the NAS itself, is also a nice bonus.
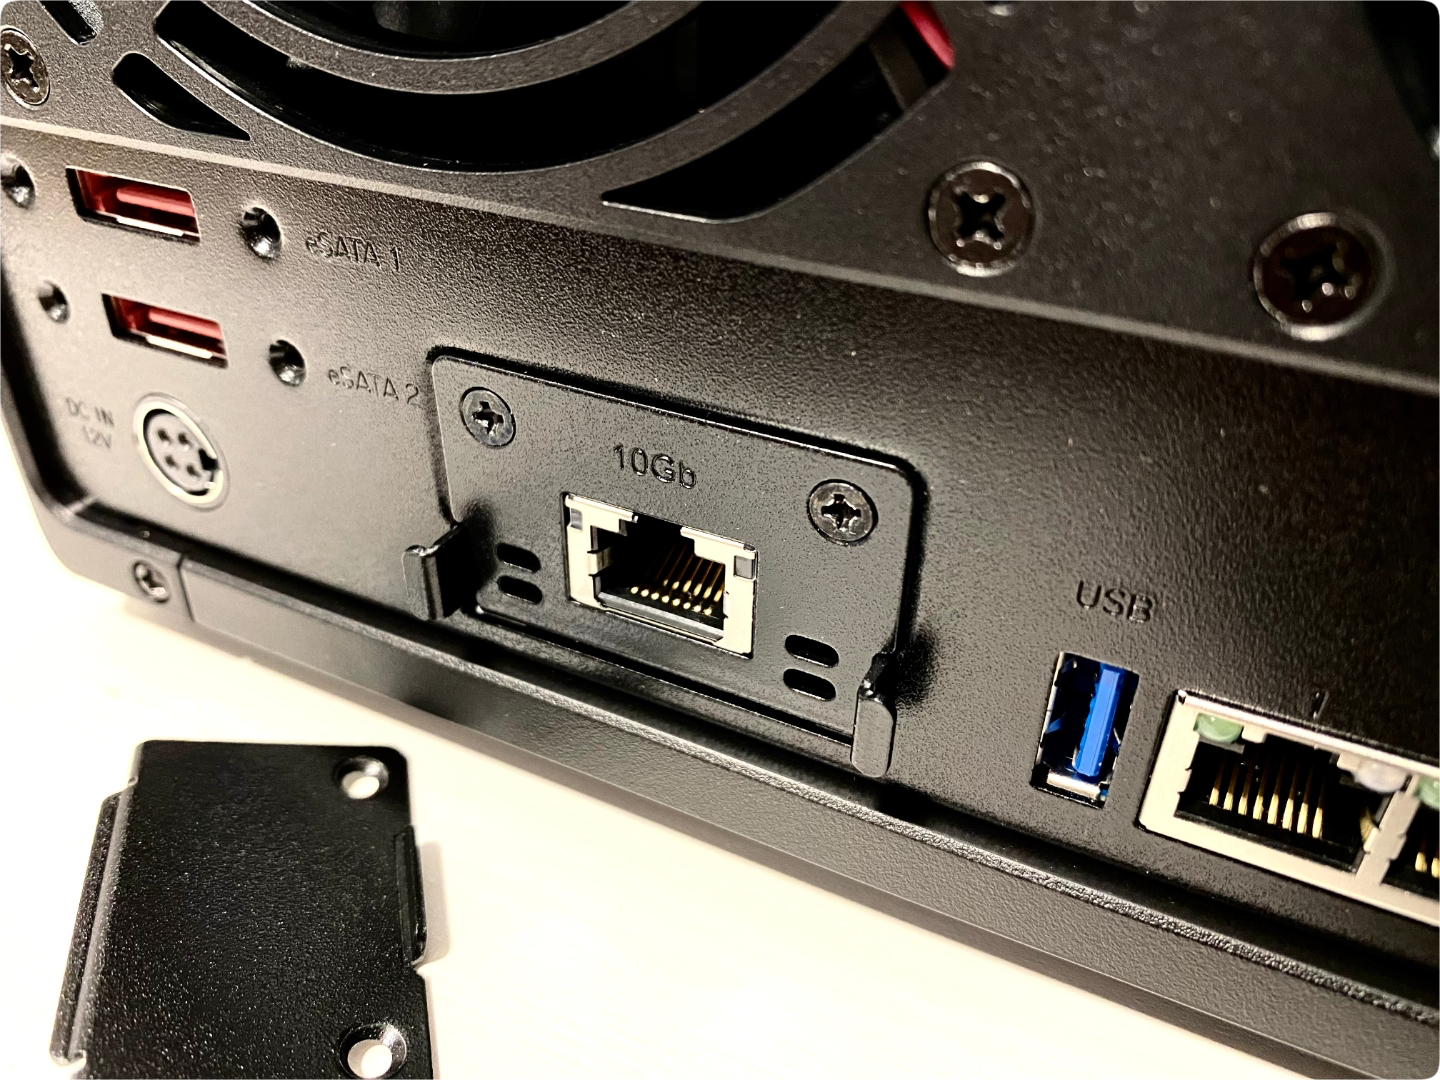
The back side of DS1522+, as said before, holds the upgrade port.


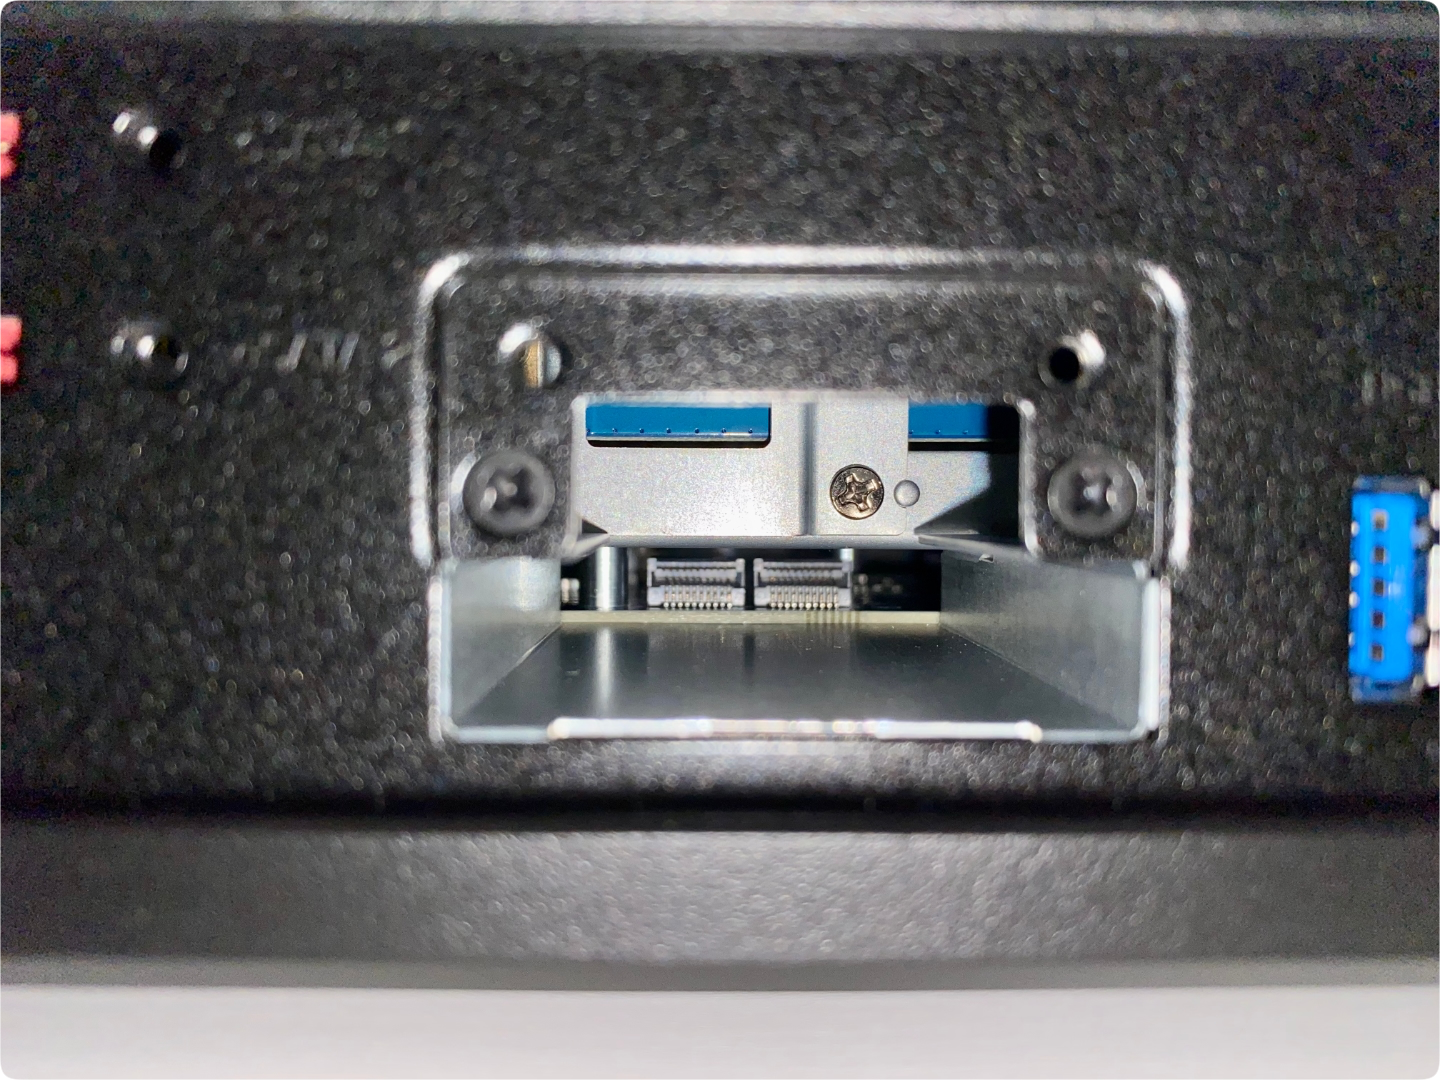
Once the backplate is removed, you can clearly see the dual connector ports. The only thing left to do is slide the card in, lock it in place, and screw it in, that's it.
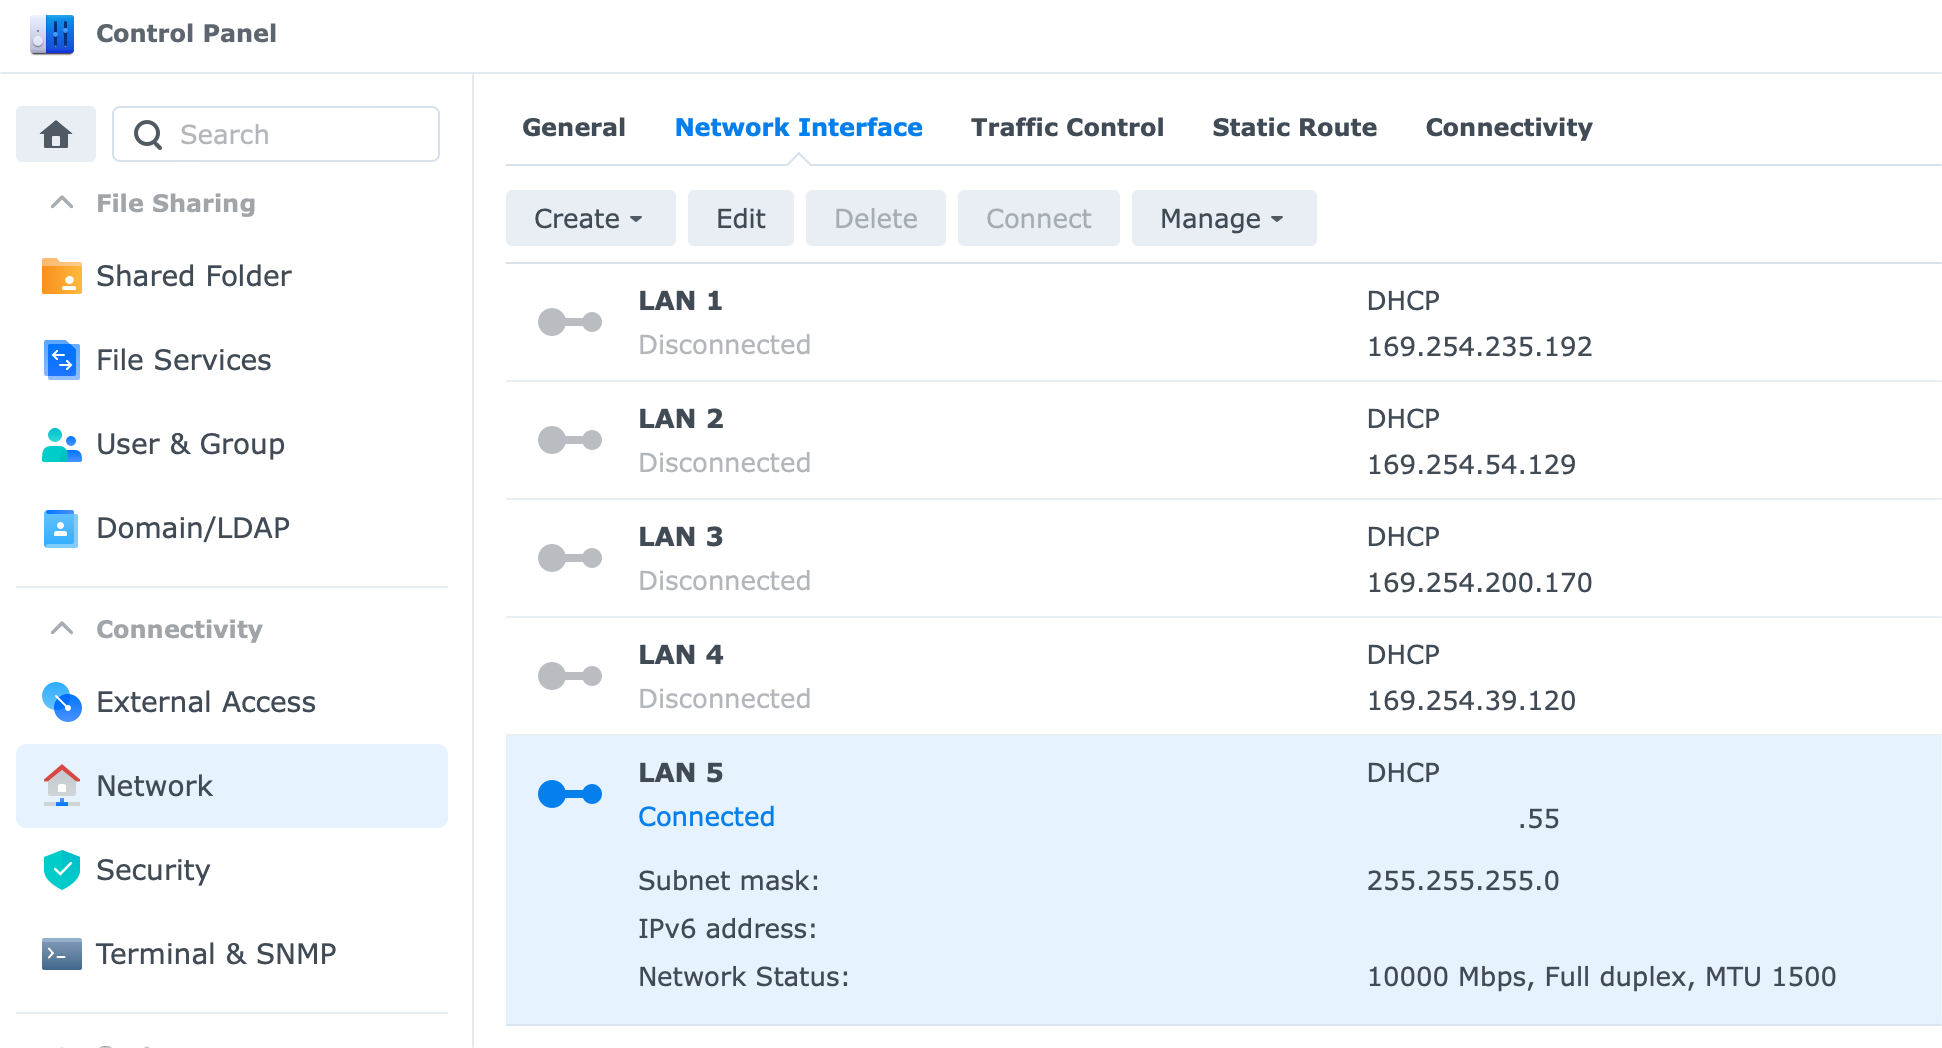
DSM will detect the card by default as LAN 5, and you can use it as a single interface, or in parallel with the remaining 1G ports.
:DSM setup and apps installation
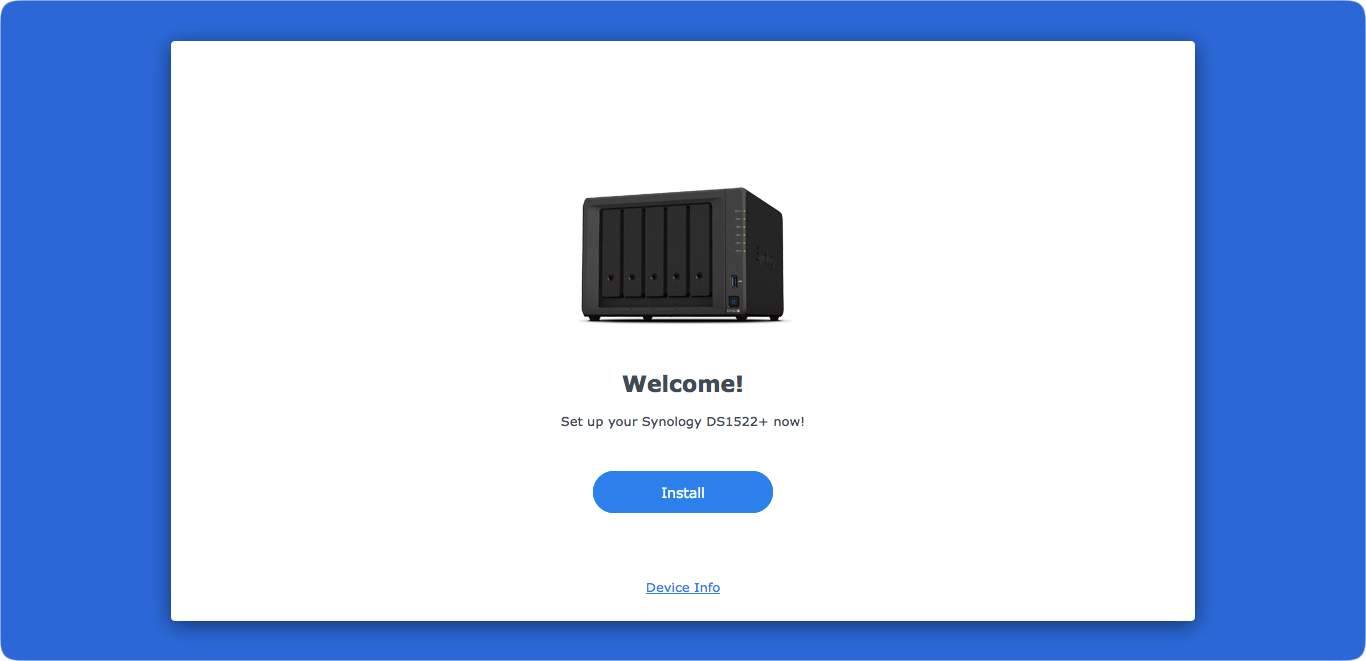
As with any other Synology NAS, the installation process is identical. First, we need to detect the device on the network either by using the Synology Assistant desktop app (you can download it from the Download center on the Synology website) or by using find.synology.com web location via your desktop browser.
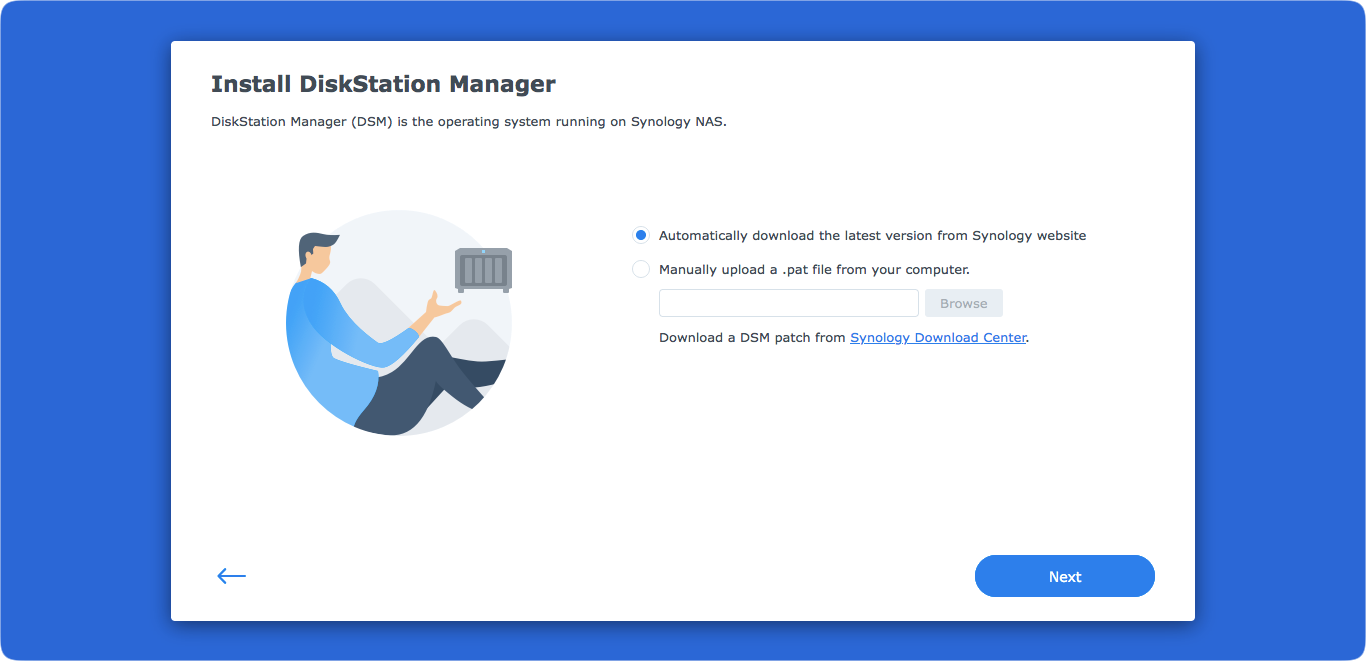
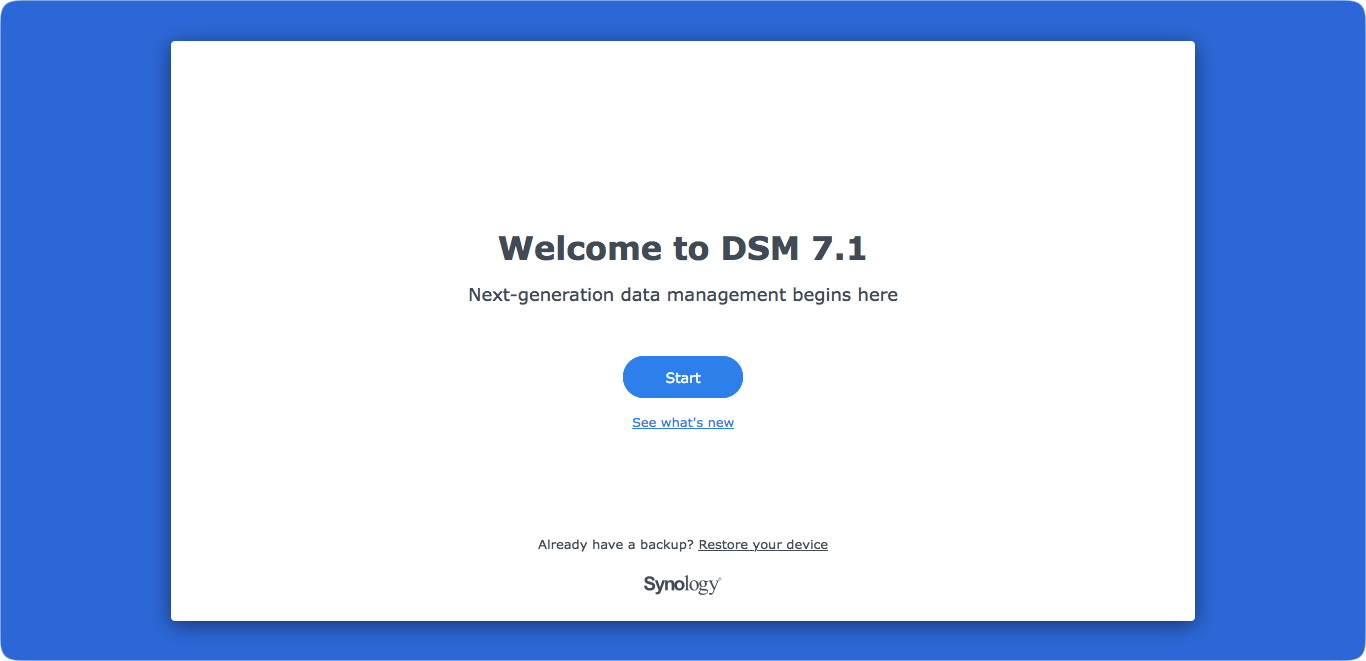
In any case, once the device has been detected, you can access the DSM (Disk station manager web UI) to start the installation process. If you have Internet access for that device the setup process will be straightforward.
For this particular model, I have to say that the boot-up process was super fast and the device was visible on the network within the first minute. What followed was a familiar setup process that included download of the latest DSM version, installation, reboot, and another boot-up.

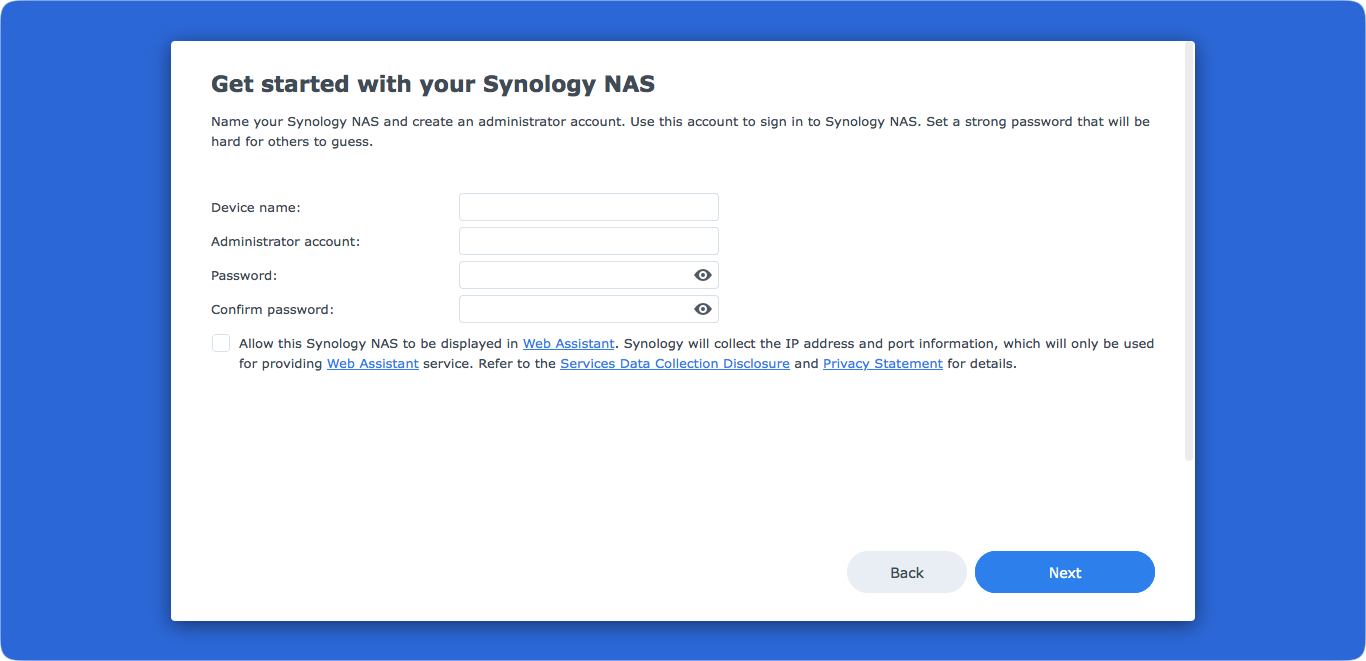
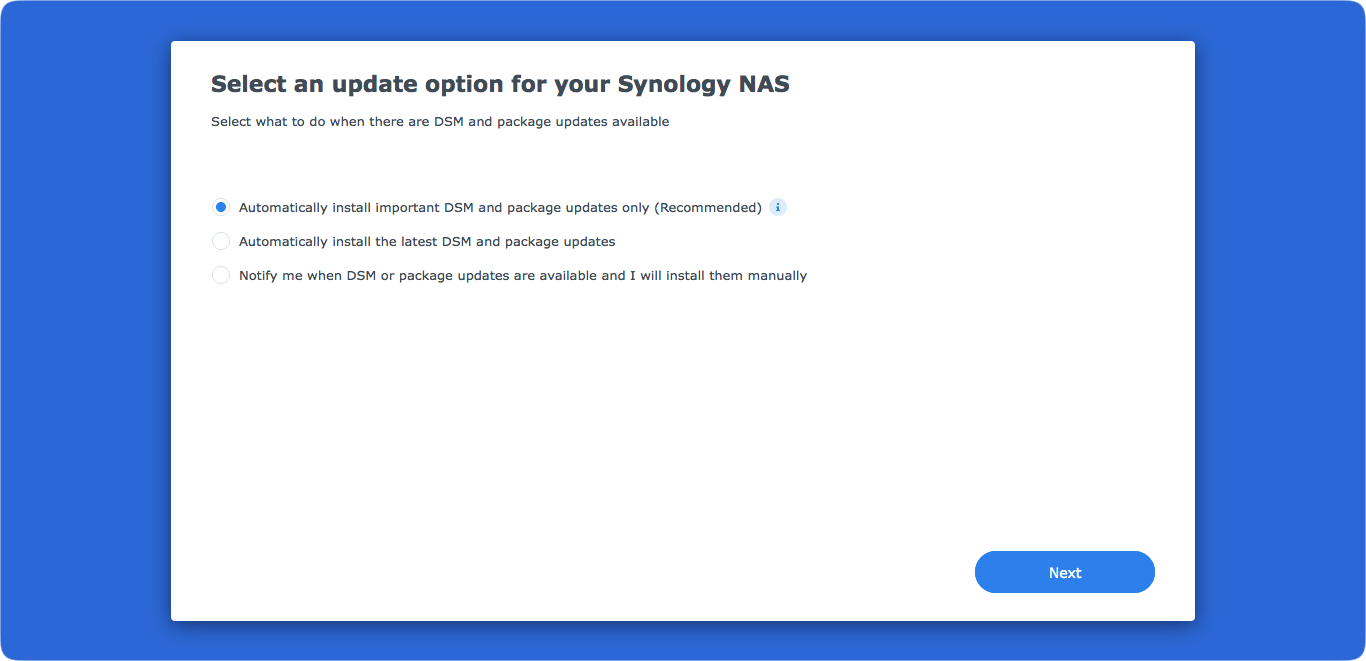
All that took about three (3) minutes, so I can say that the DS1522+ was ready for further configuration within five minutes since it was turned on.
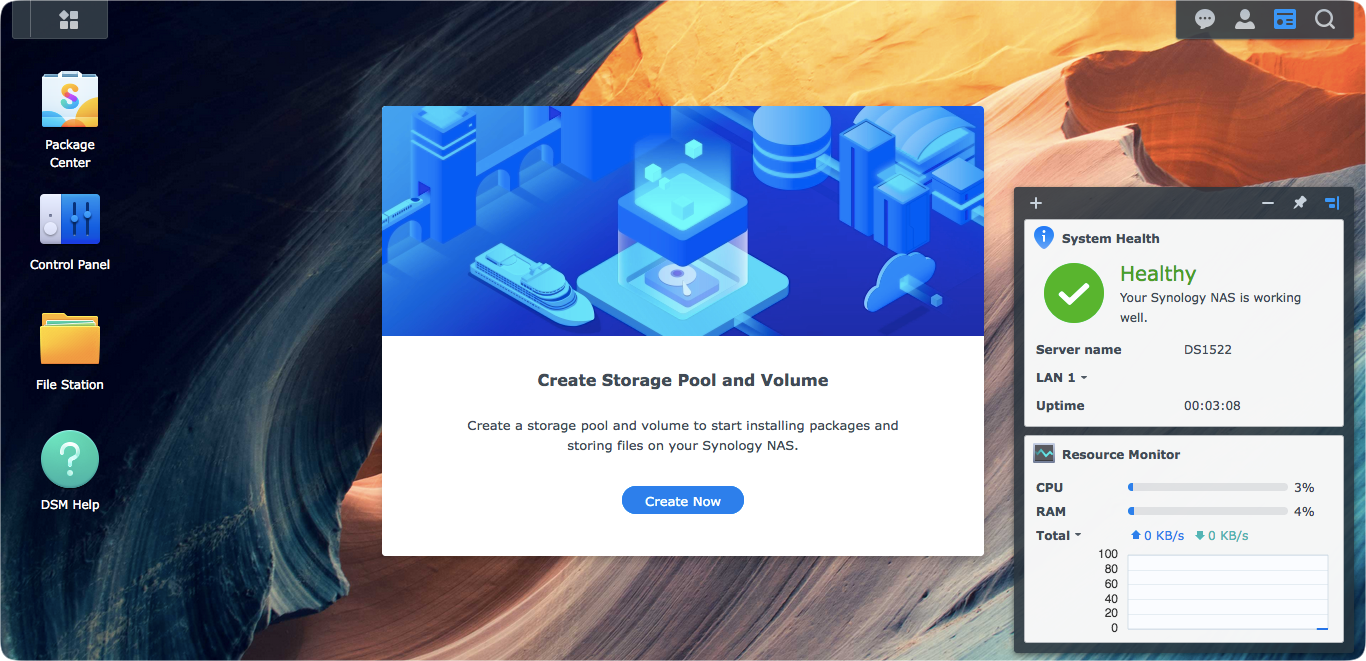
What followed was the rest of the initial configuration. Mainly, volume creations and app installations from the Package Center.
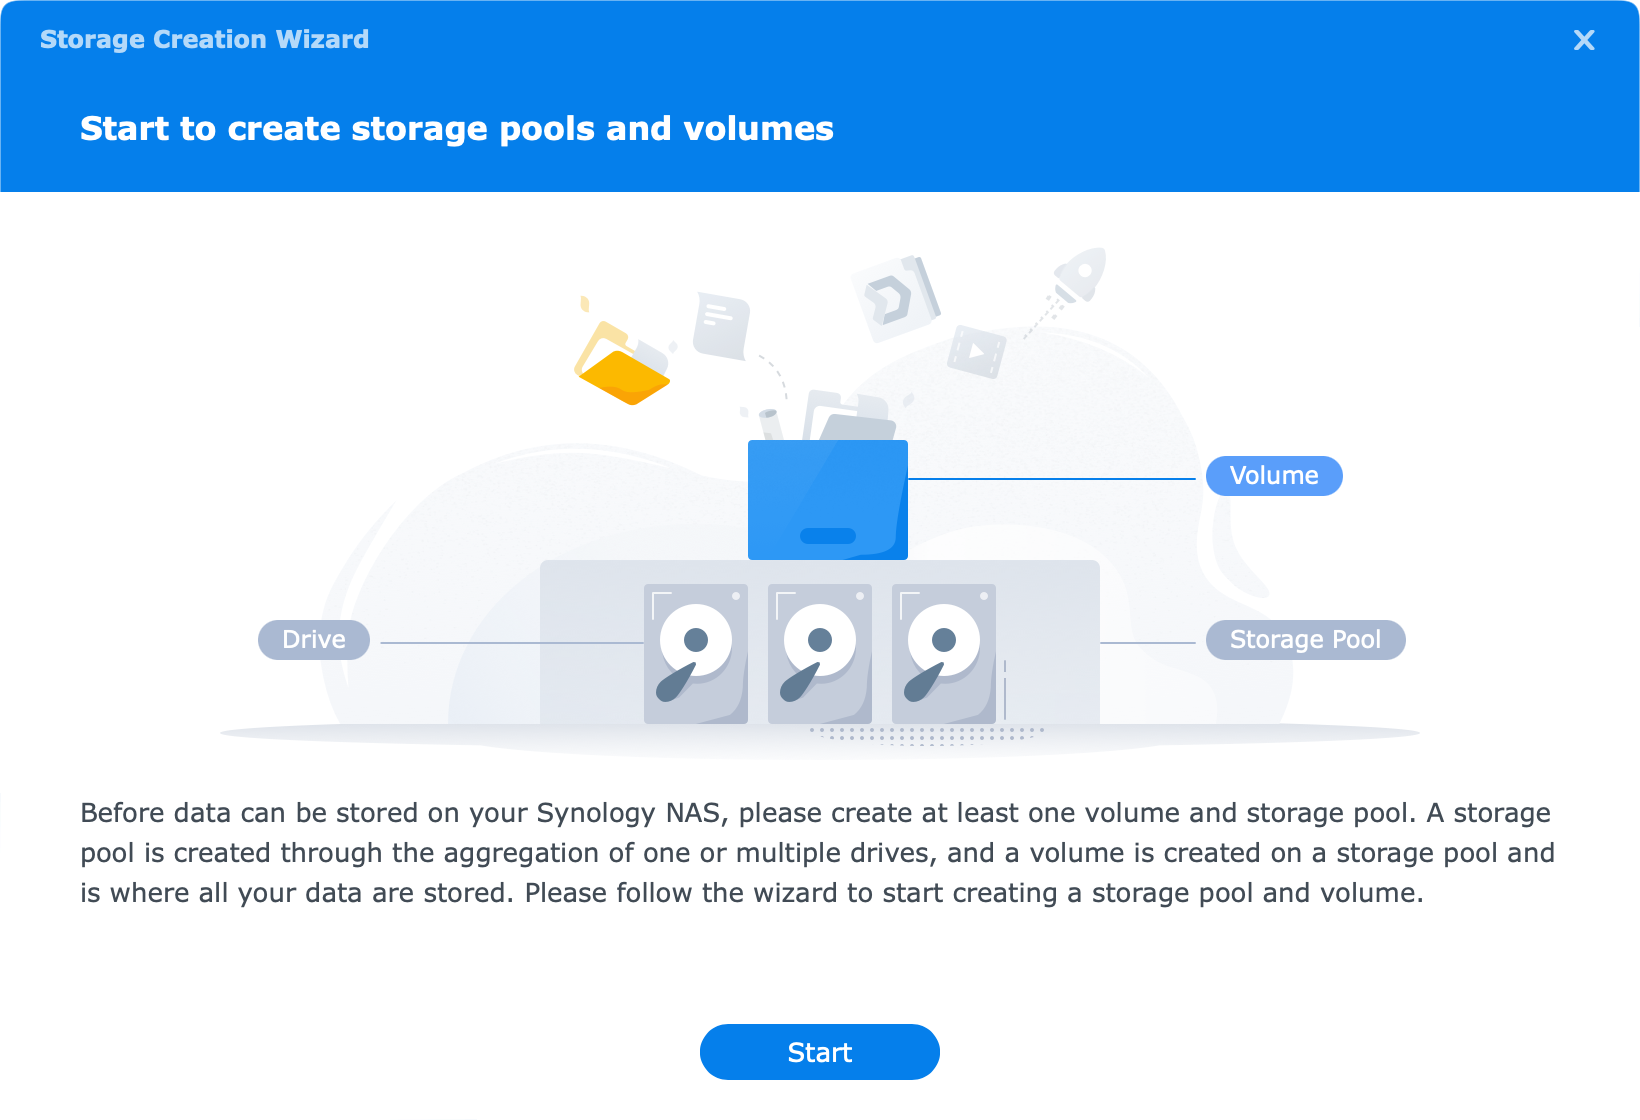
Using the Storage Manager app you can create any number of volumes that will satisfy your needs depending on the number of drives that you have at your disposal.
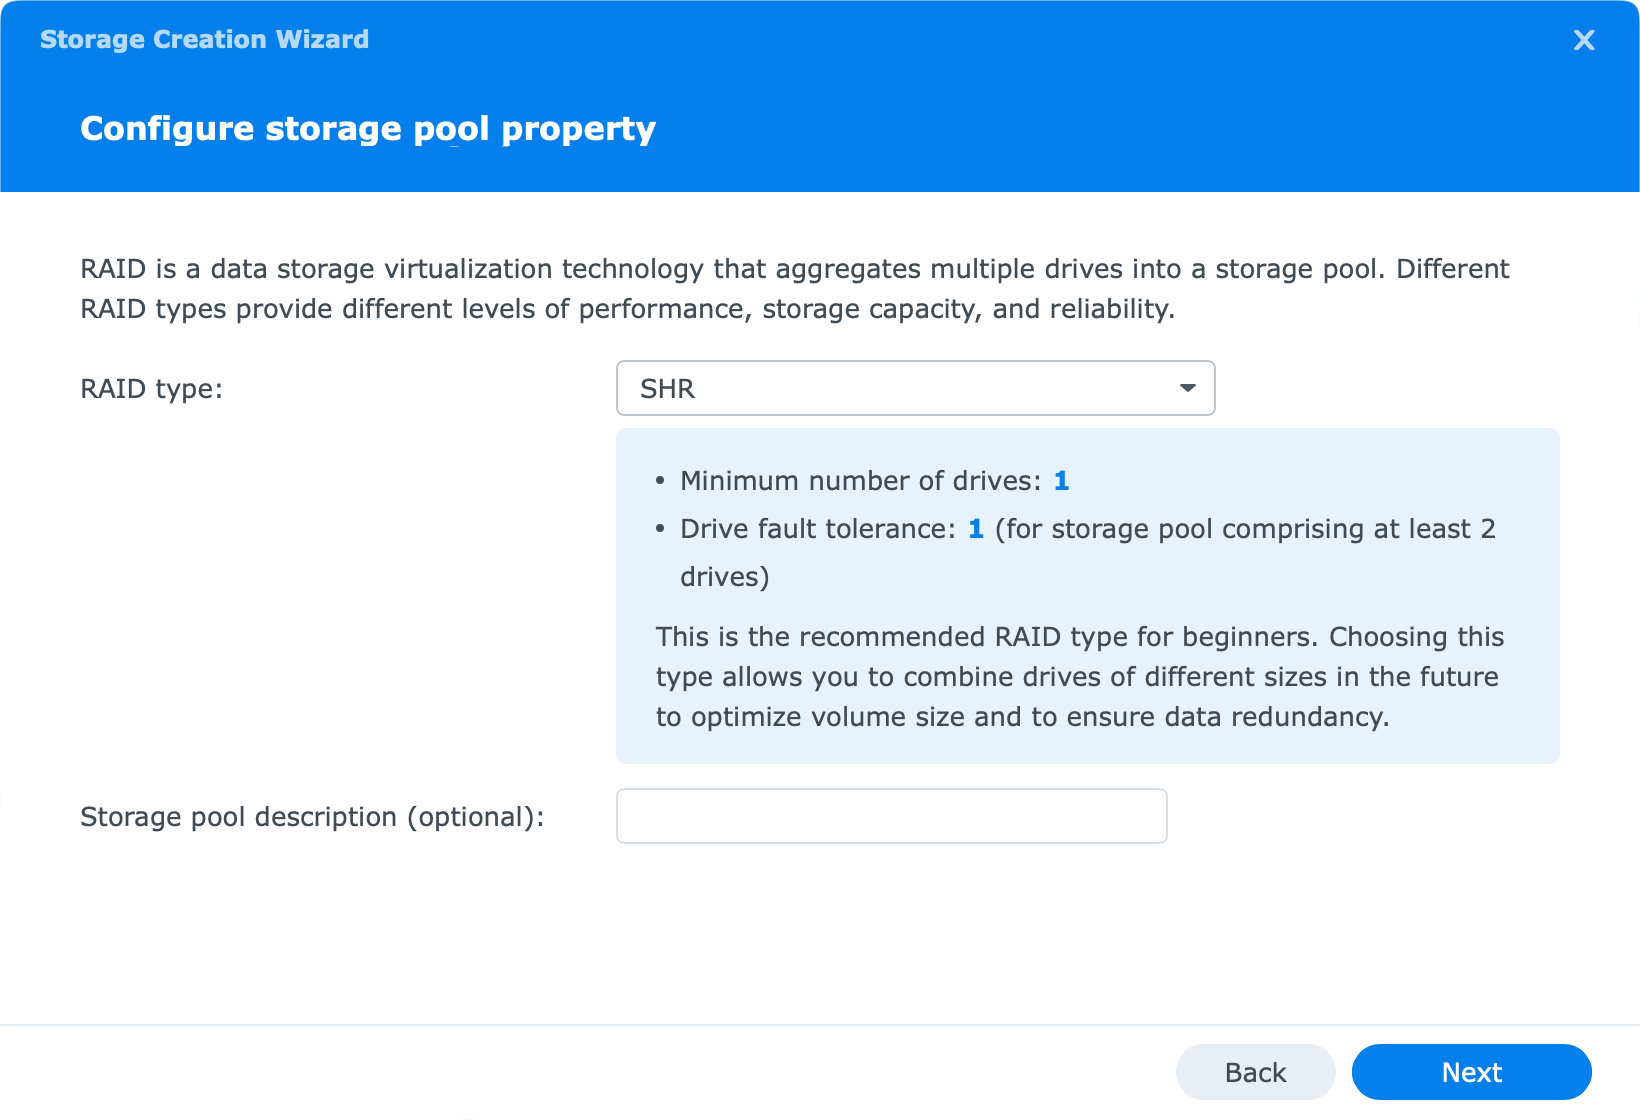
For this testing, I will be using two separate RAID0 volumes. 2TB drives will be one volume, and 4TB will make the second volume.
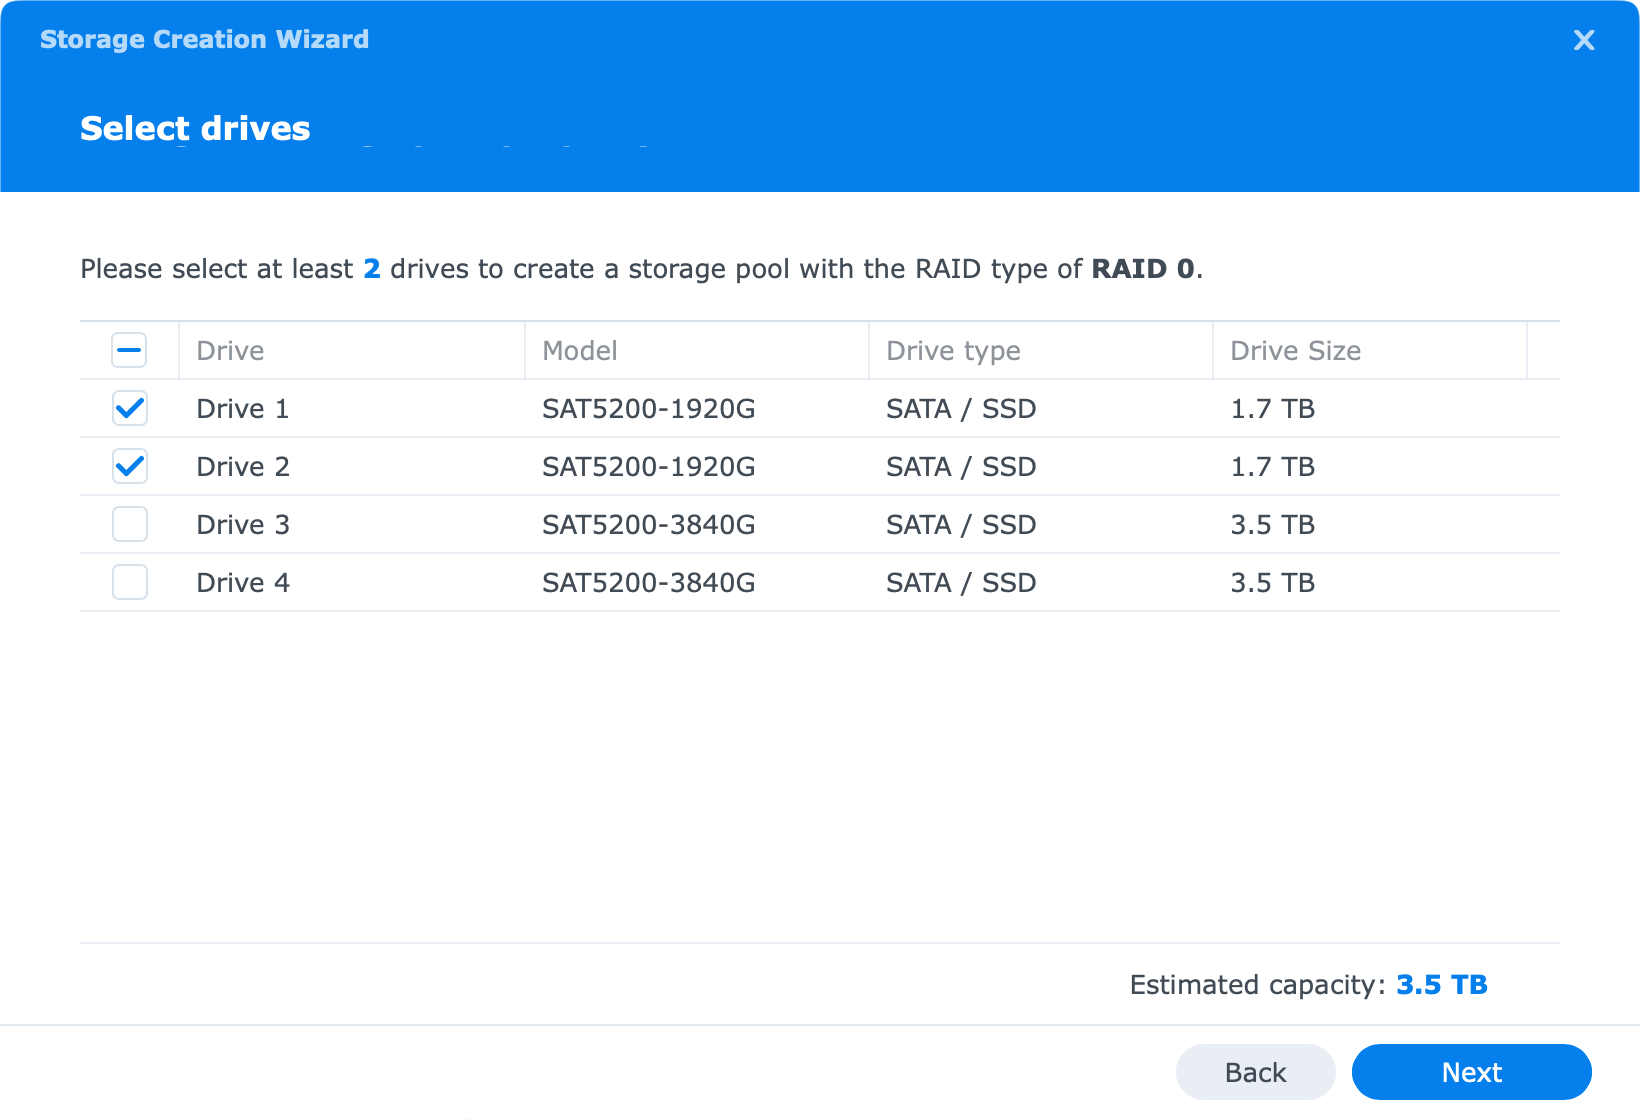
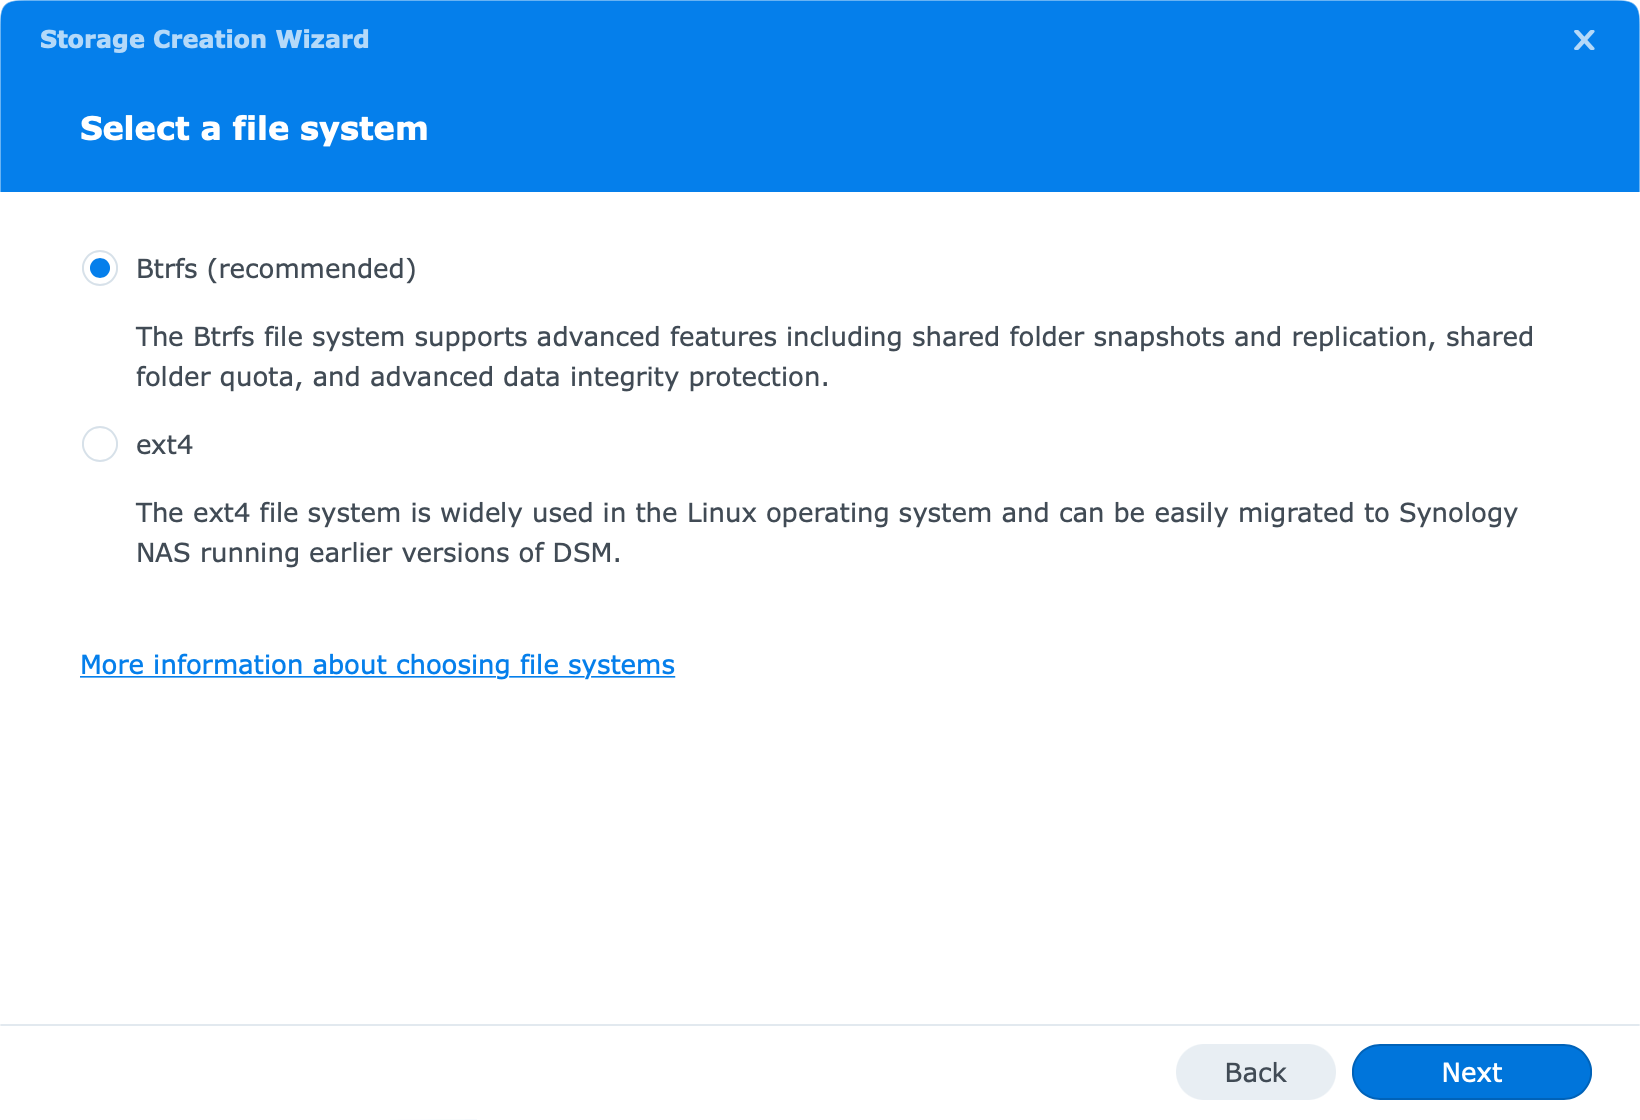
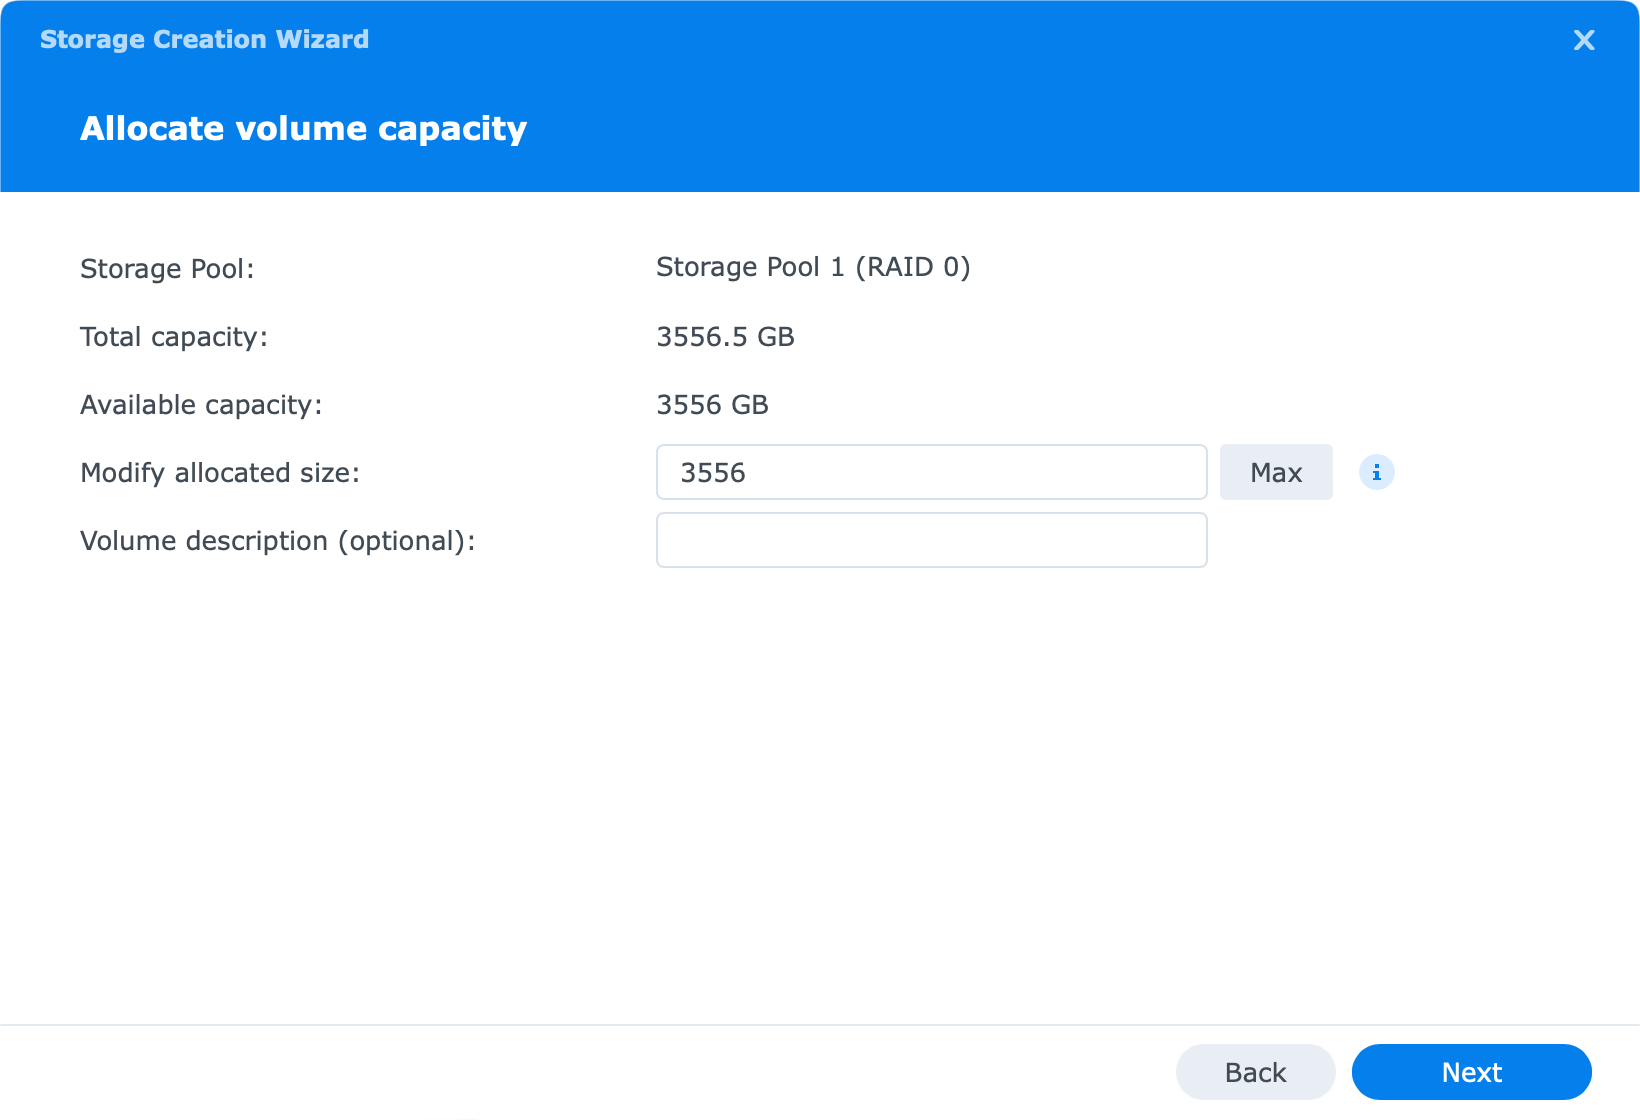
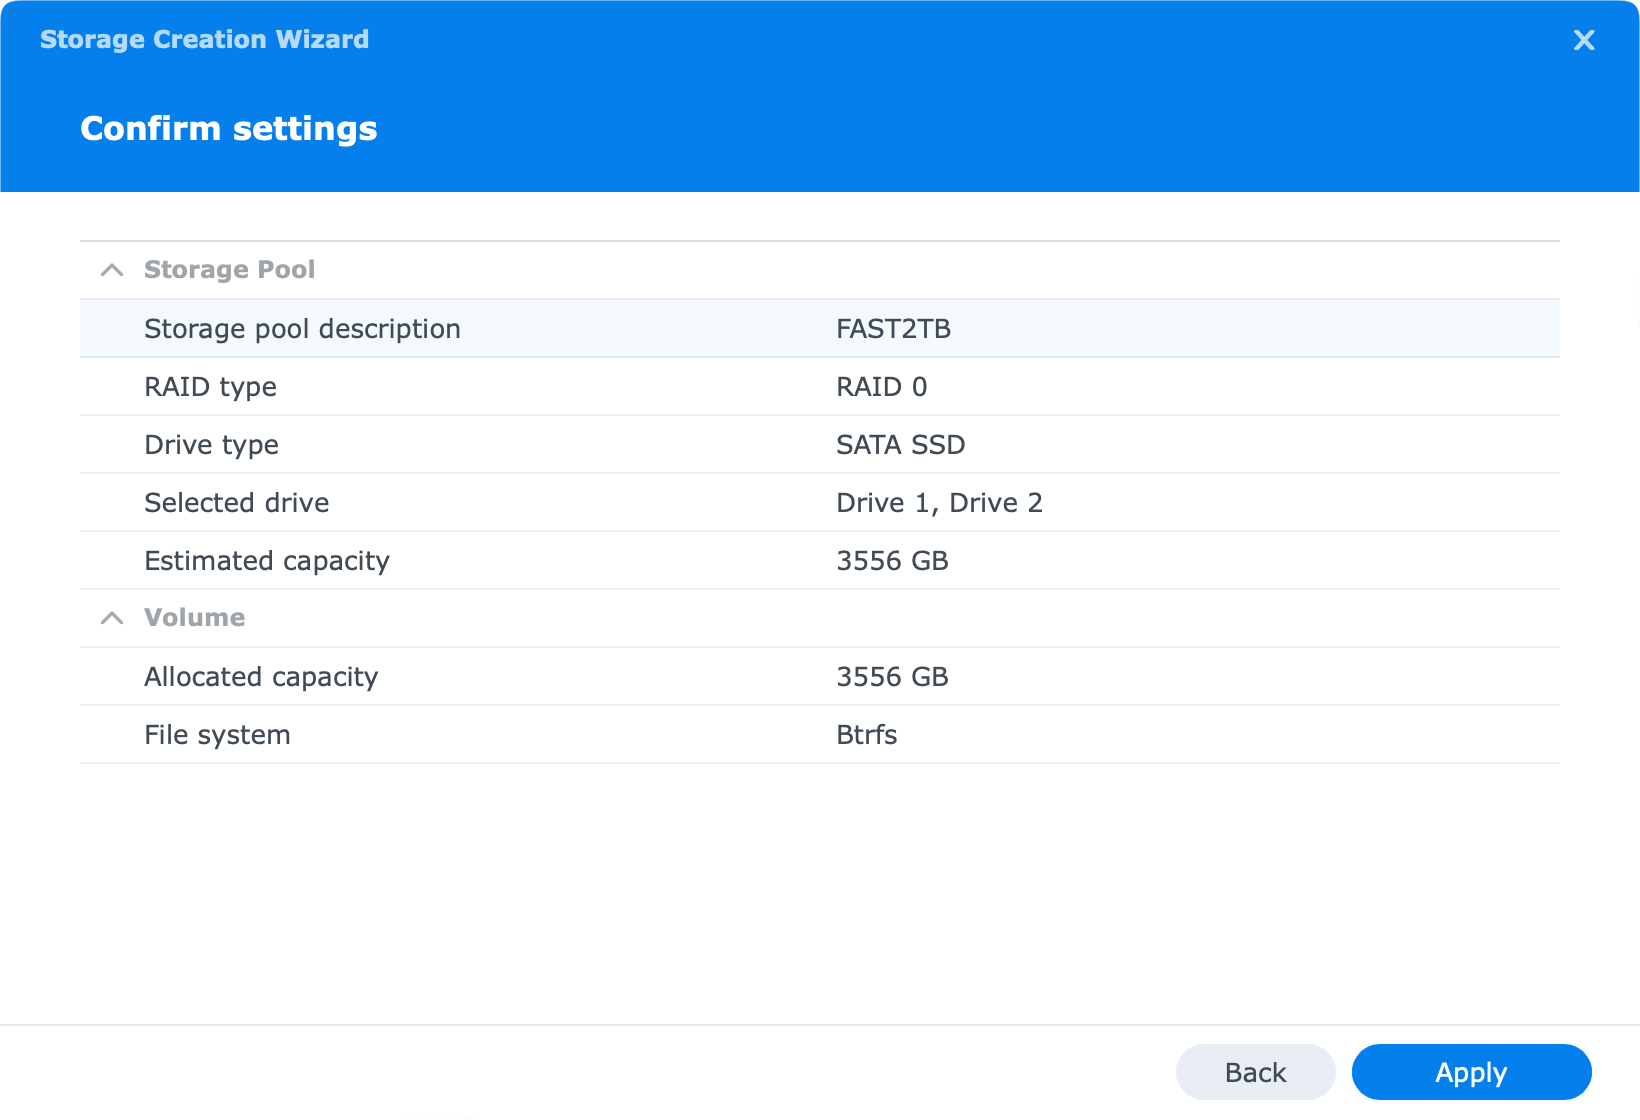
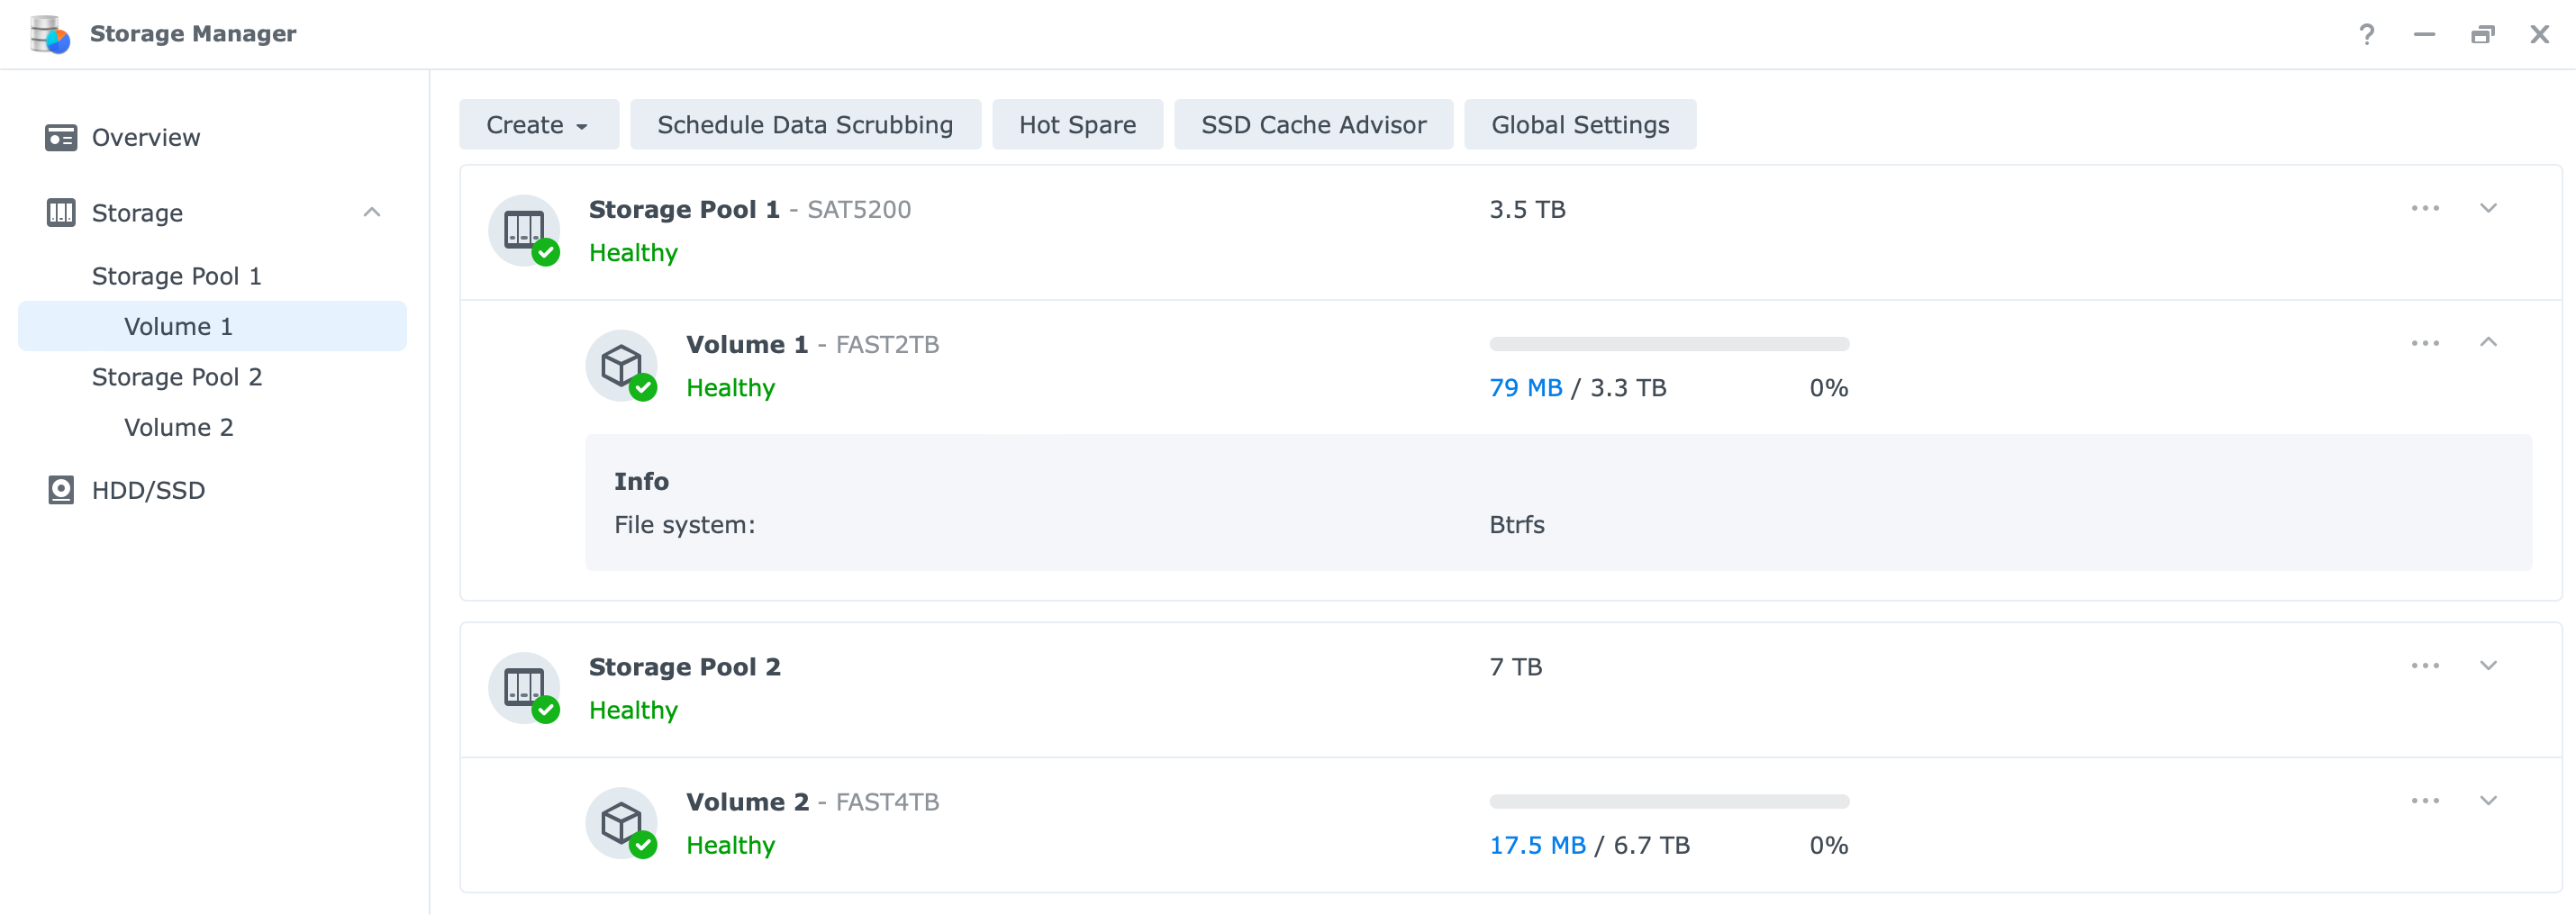
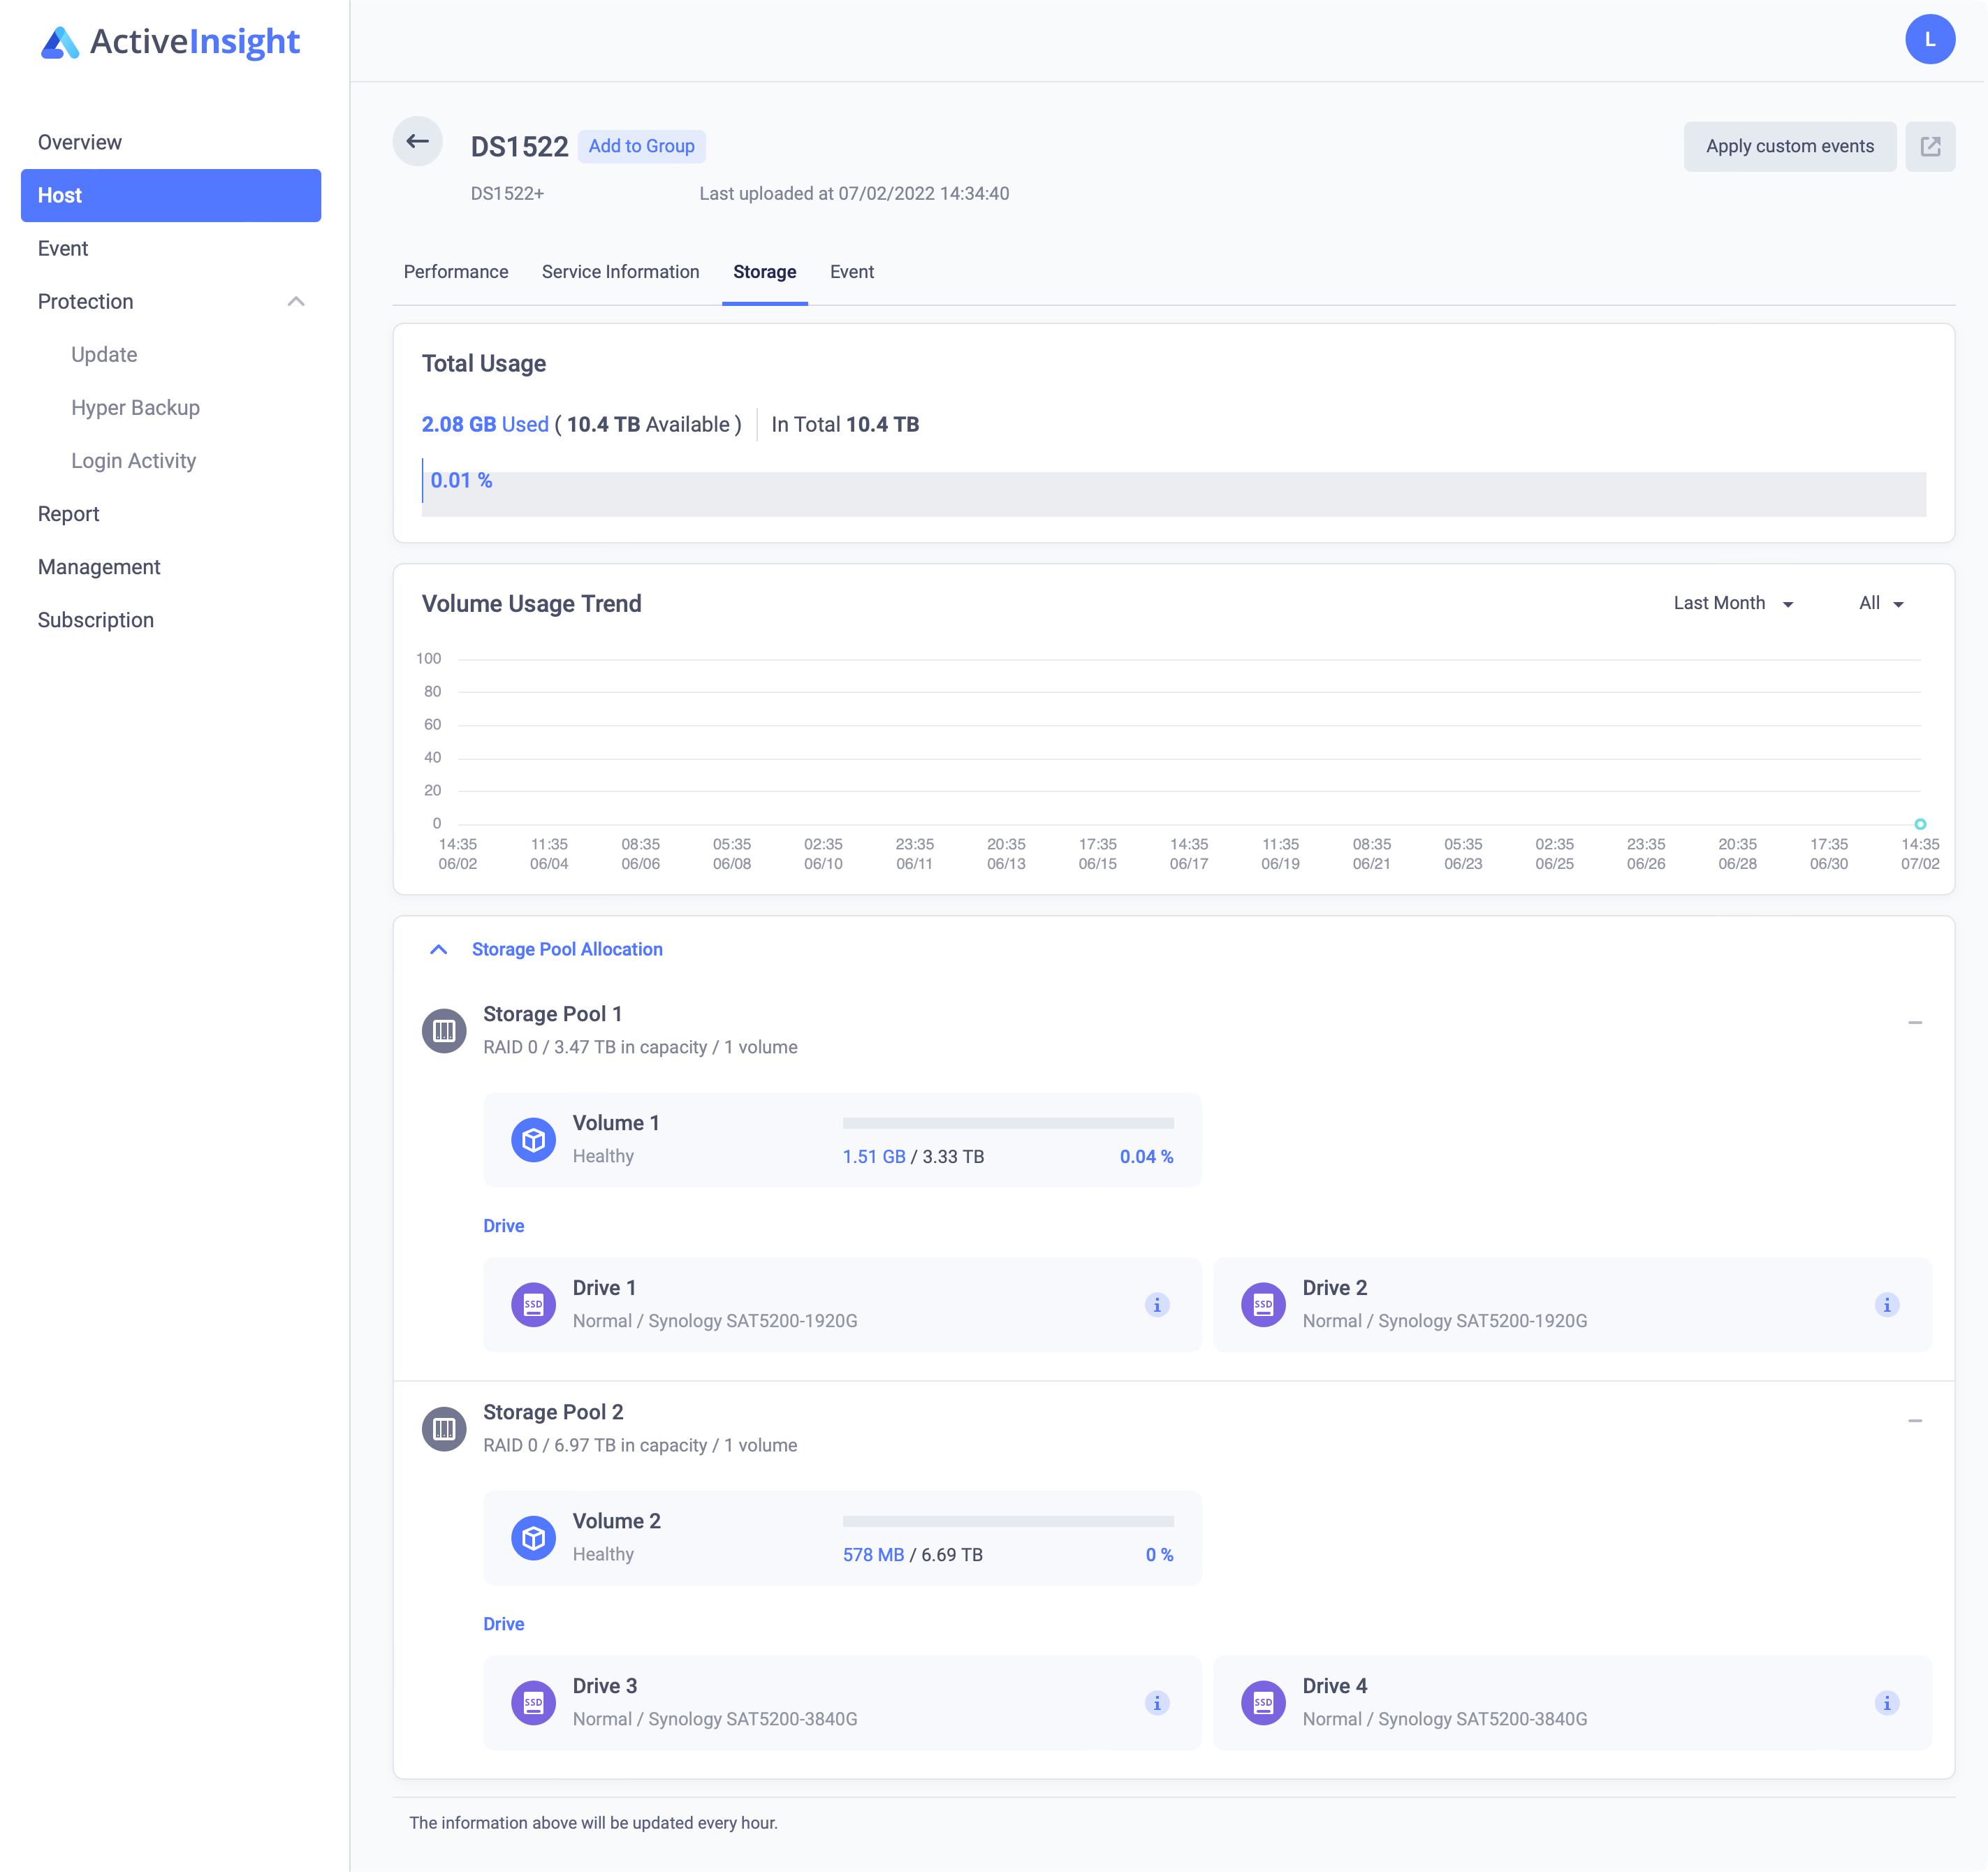
Once the process has been completed we now have two separate pools, each with one RAID0 volume. As we can see from the image, the smaller BTRFS volume with two 2TB drives allows us for about 3.3TB of space, while the larger one will give us 6.7TB.
One thing that we can use Storage manager for, other than making changes to our volumes, and updating firmware for the drives themselves, is to get a quick overview of the drive's state, including their health, bad sector count, temperature, and more.
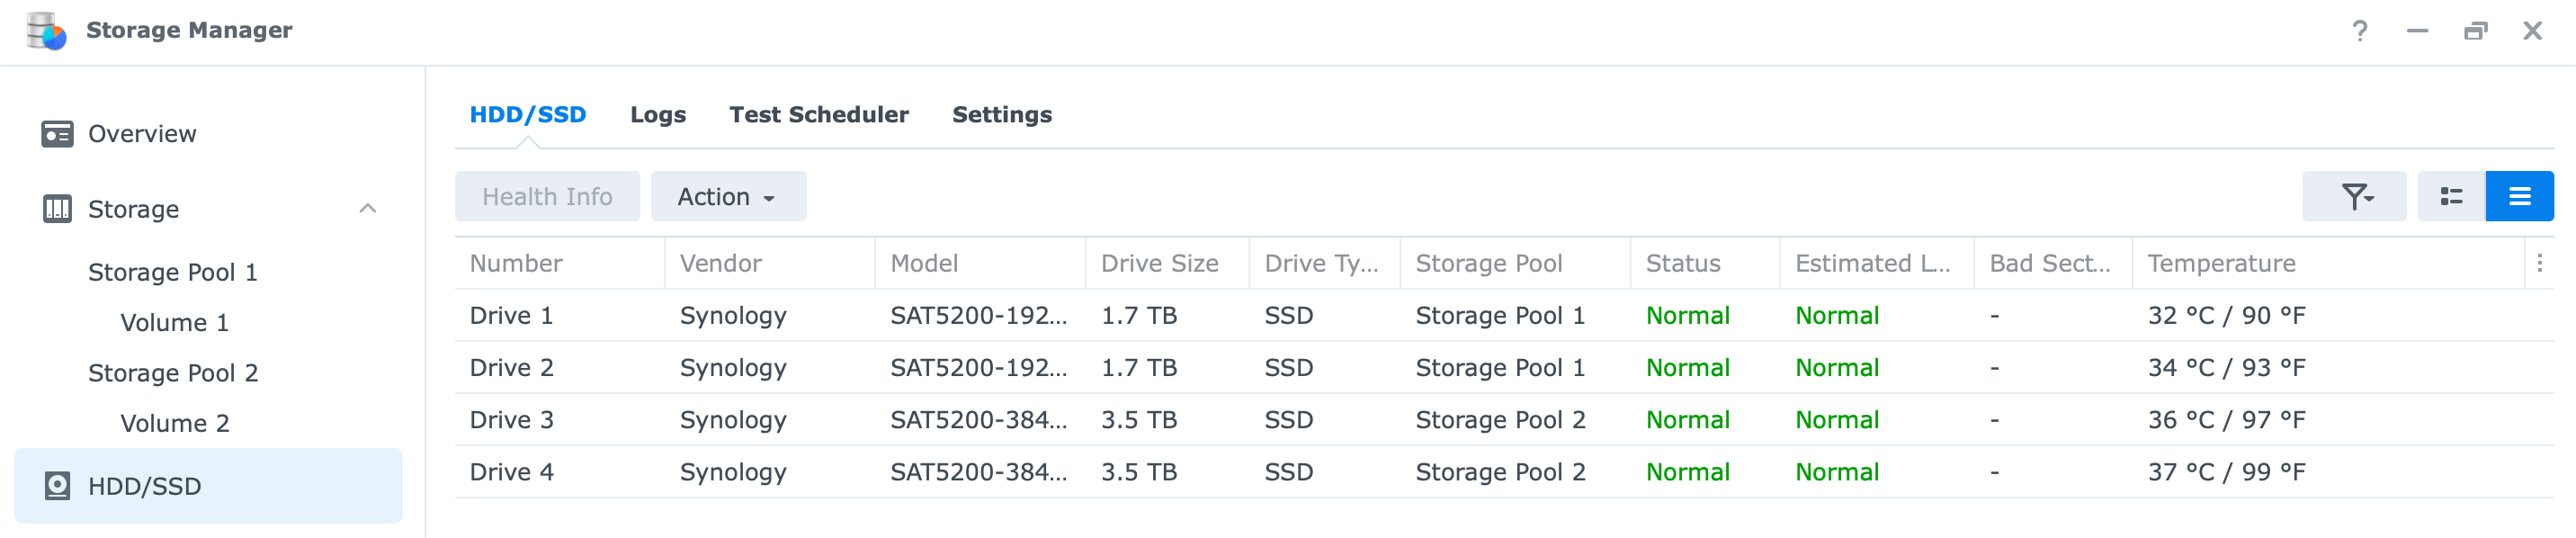
So in total 10TB of SSD storage across both volumes.
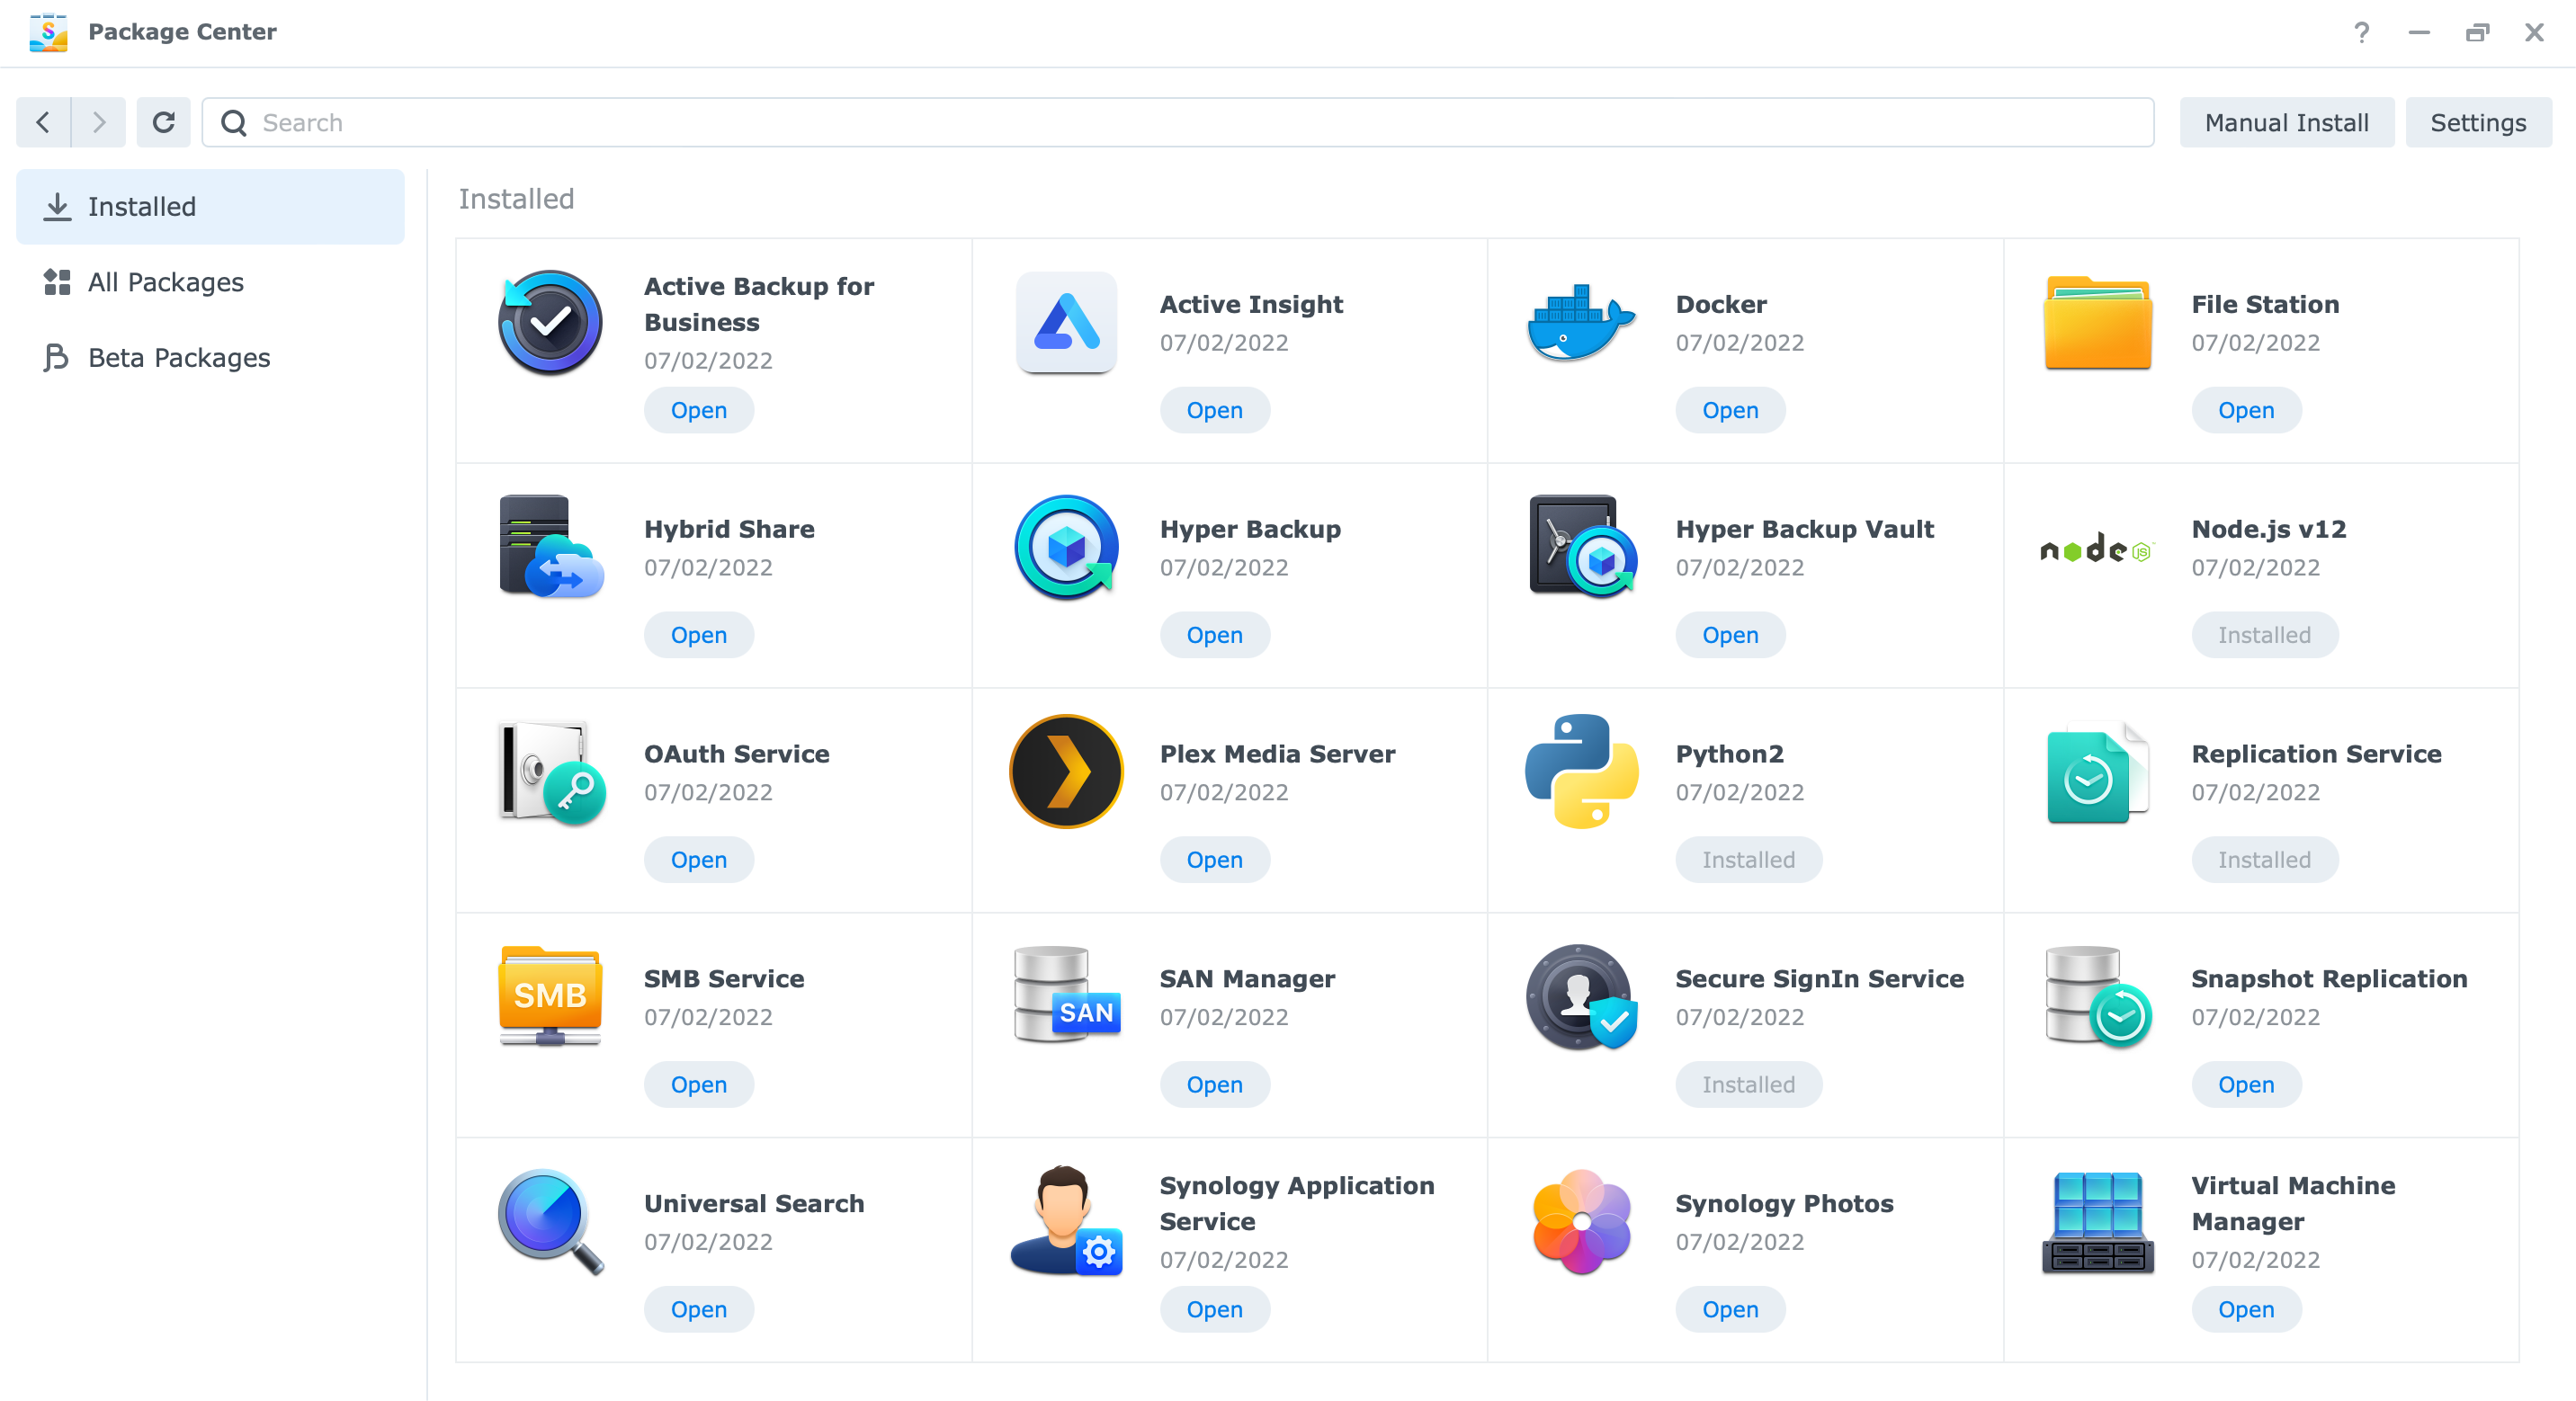
Next up, app installations. Using the Package center we can pull in any app that we want or need and tailor the DSM setup as we see fit. For this test scenario, I will focus on the usual suspects like Hyper Backup, Active Backup for Business, Snapshot Replication, VMM, Docker, and more.
So mostly backup tools that will test the behavior of the drives and the NAS itself in typical situations, but also trying some virtual machine tasks, containerization as well as people image processing using Synology Photos.
One thing that I would like to mention here is a platform that doesn't get too much attention but it is extremely useful for diagnostics and troubleshooting if you are unable to get to your NAS. Of course, to have all that information available to you when needed, you will need to configure it ahead of time. I'm talking about Active Insight.
Coming as a preinstalled app on a compatible DSM 7 machine, AI simply requires to be activated on the DSM side, and you are done.

Once DSM starts sending the metrics data (usually within minutes), you will be able to see them using the AI portal at, insight.synology.com link.
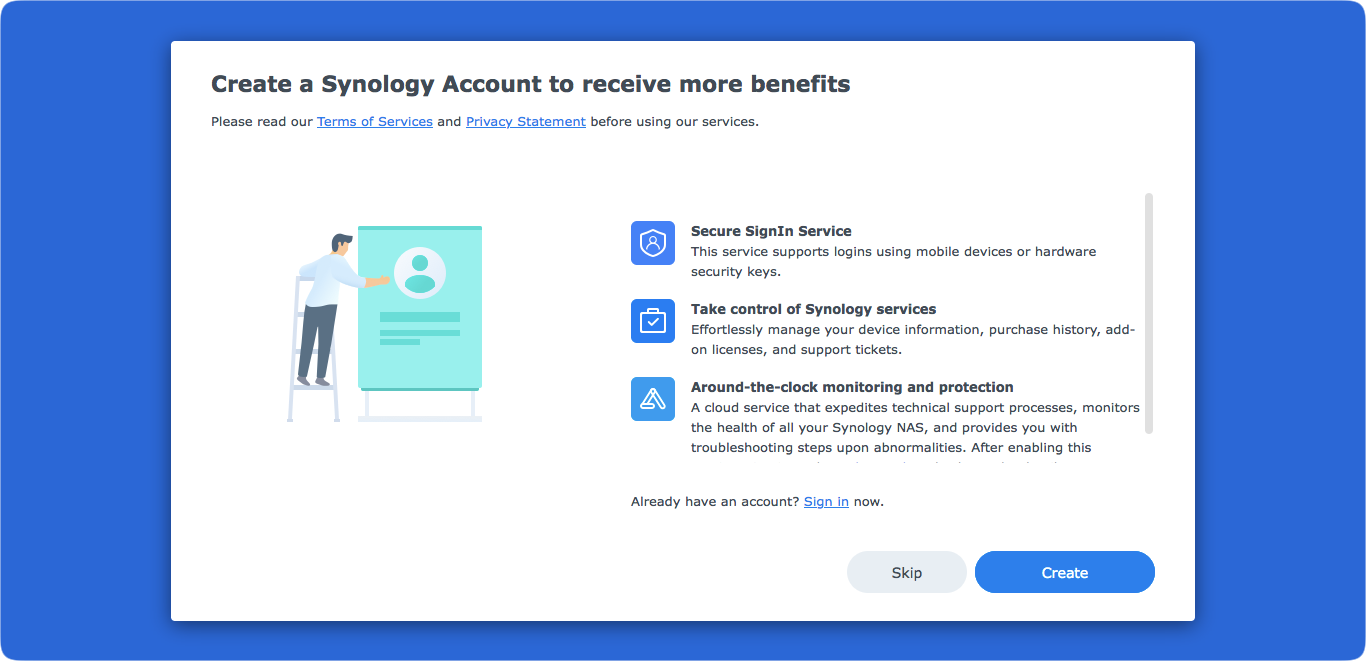
Finally, one more "in case I need it but not sure when" configuration parameter that I like to set up. Automatic DSM configuration backup. Now, with this setting, you will have a piece of mind when it comes to DSM OS configuration backup and restores needs, as well as your compatible DSM apps.
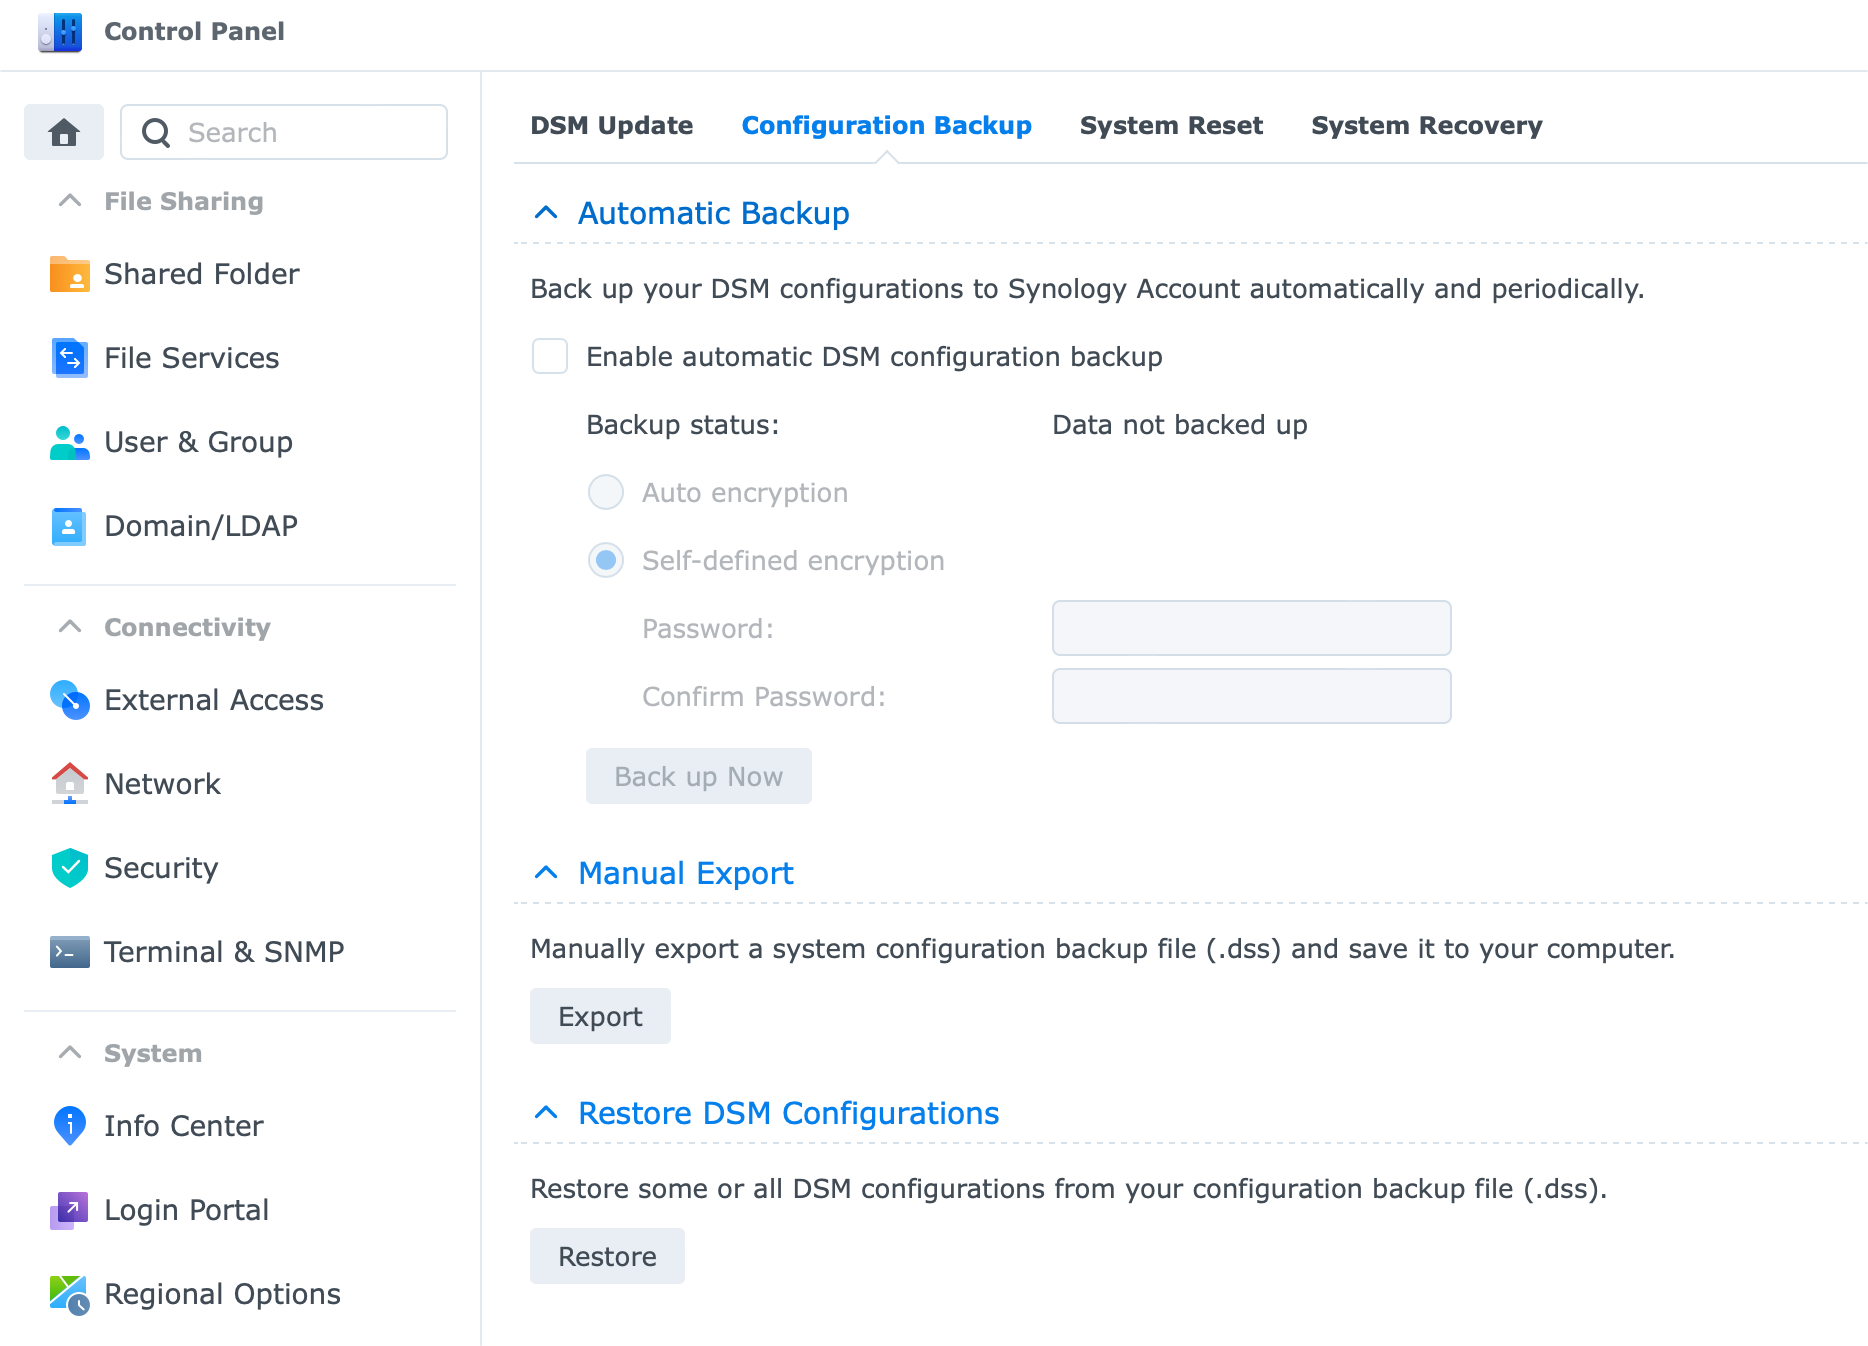
Mind you this is DSM 7 feature only, so any DSM 6 NAS will not have this particular option. Another thing that you need to be aware of here is that this feature requires that you have a valid Synology Account. This will be hard to avoid these days as most features require it, from registration of your NAS, DDNS, AI, etc, so just make one and give yourself peace of mind.
Any further steps that you would need to take when setting up a new NAS are mainly security hardening, so be sure to check this article if you need more info.

:Speed tests
In this section, the focus will be on various tests from various apps, while some tests will have a dedicated section of their own, like PLEX and VMM/Docker.
10G iPefr
To begin with let's start with the obvious one, and see how well the new 10G card work when it comes to benchmark tests using the iPerf tool.
For this test, DS1522+ was the client and the trusty RS3614RP+ was the server. Both are connected with a 10G connection to the UniFi US‑16‑XG 10G switch. iPerf is running in Docker on both ends.
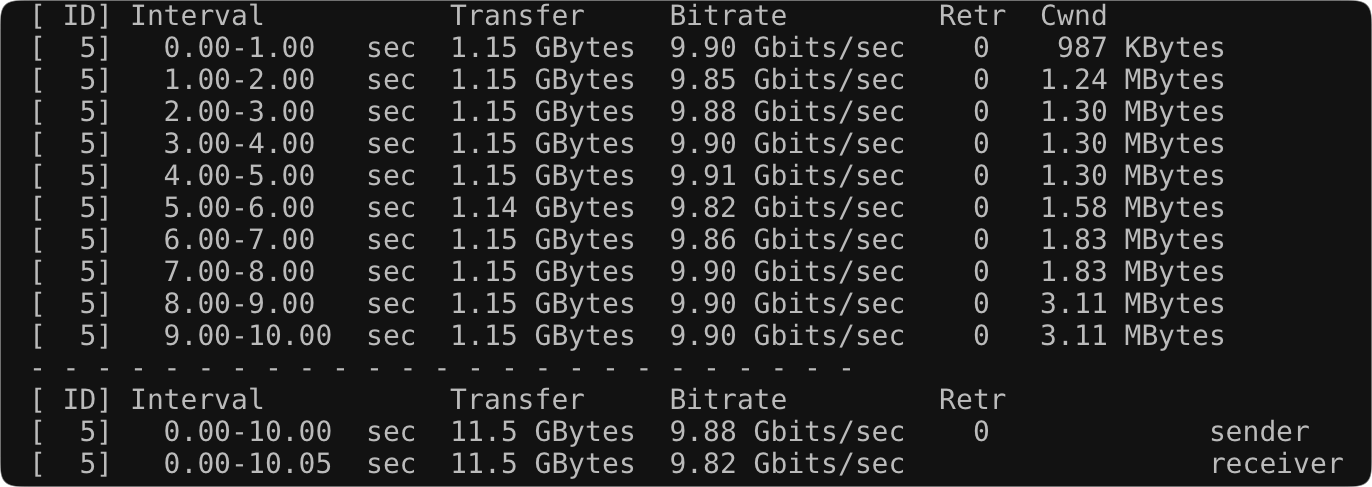
No real surprise there. DS1522+ with its E10G22-T1-mini card performed excellent in 10G tests, so you can be sure that it will not be a weak link in any 10G transfers.
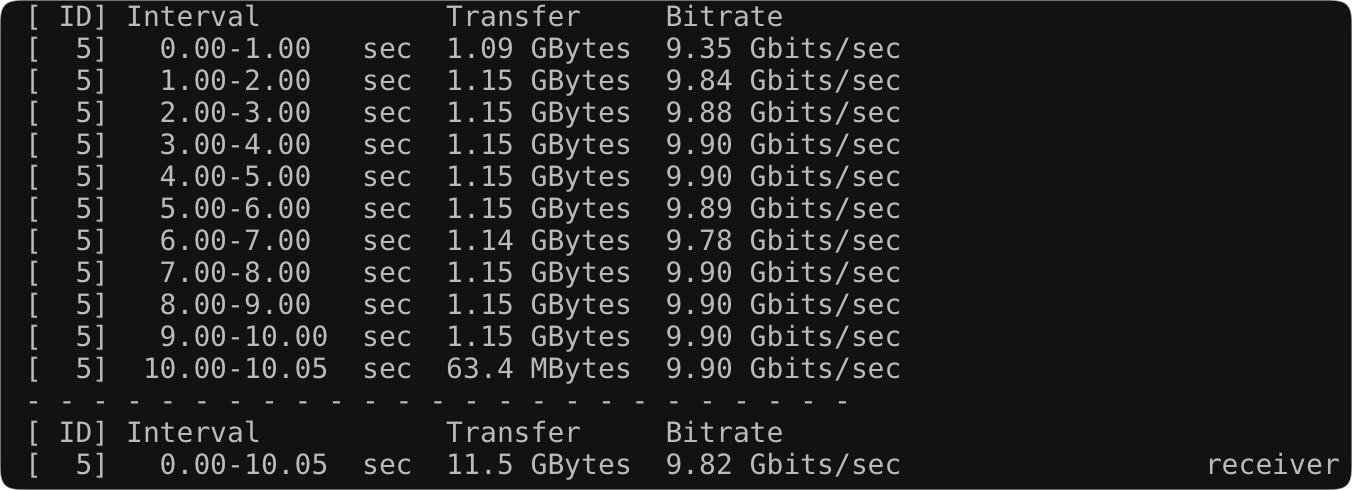
Next, let's see how well DS1522+ performs with read/write operations when it's both in the role of a receiver and sender
SMB/CIFS (File Station single file) RS3614RP+ > DS1522+
The single sample file for this test was 17,5GB in size and it took 1 min to transfer it with an average transfer speed of 300MB/s.
Considering that this was an enterprise HDD volume transfer towards an SSD volume on the DS1522+ side, the slowest link here was the RAID6 array made of 12 HDDs 7200 RPM drives.
SMB/CIFS (File Station single file) DS1522+ > RS3614RP+
In the reverse scenario using the same file, only this time we are reading off the RAID0 volume on the DS1522+ and writing back to the RS3614RP+ the results are much better.
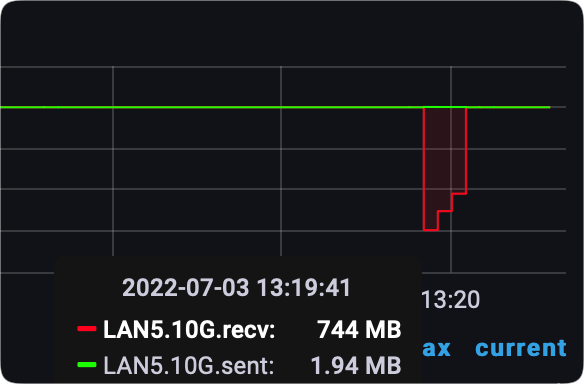
The sample file took 32 sec to transfer with an average speed of 560MB/s and a peek at 744MB/s.
Taking into consideration that these results might vary for you depending on the drives, array configuration, utilization, and other factors, it is clear that you can expect very high transfer speeds. I'm certain that with a full SSD setup on both ends, and of course the device that can handle it, you would get a full 1G/s transfer speed easily.
SMB/CIFS (File Station multiple files) RS3614RP+ > DS1522+
For this test, the sample is larger with more files as well. Specifically, 47.5GB across 108 files in total.
In this scenario, the transfer was about 3min long with an average speed of about 275MB/s.
SMB/CIFS (File Station multiple files) DS1522+ > RS3614RP+
When the roles were reversed using the same sample of 108 files the outcome was as follows.
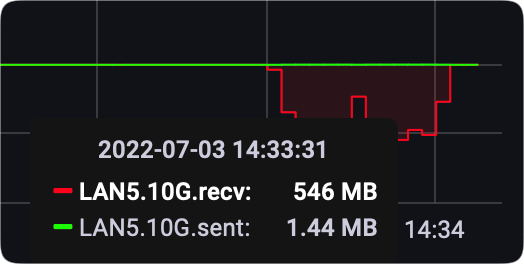
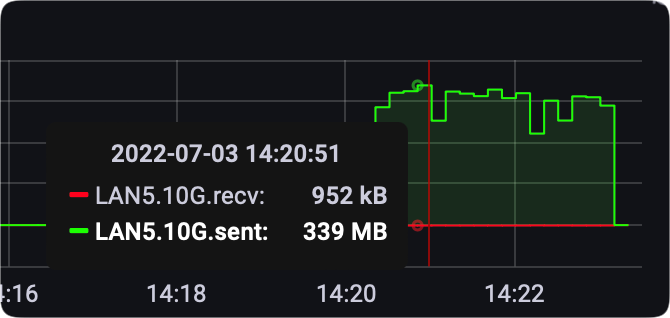
With an average speed of 405MB/s and a peek at 546MB/s the transfer was completed in just over 2 min time.
RAID0 to RAID0 volume copy (File Station)
Considering there are two separate volumes using the same drive series only with different capacities, let's see how long it takes for it to transfer the same single file from one to the other.
Using File Station again, the results are these.
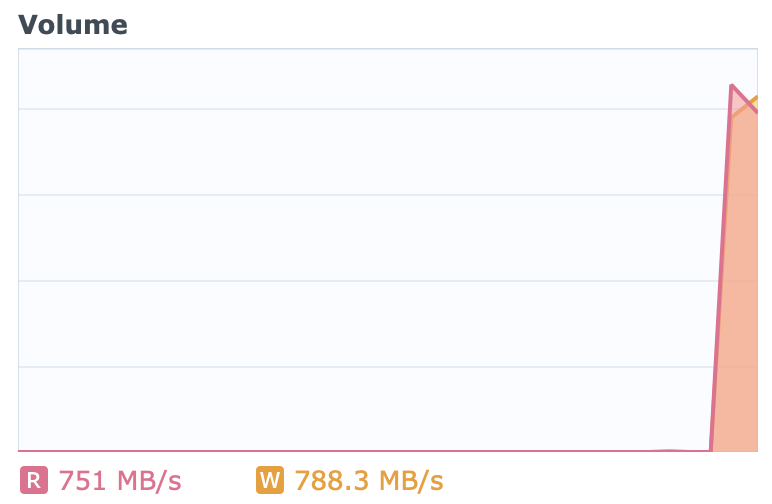
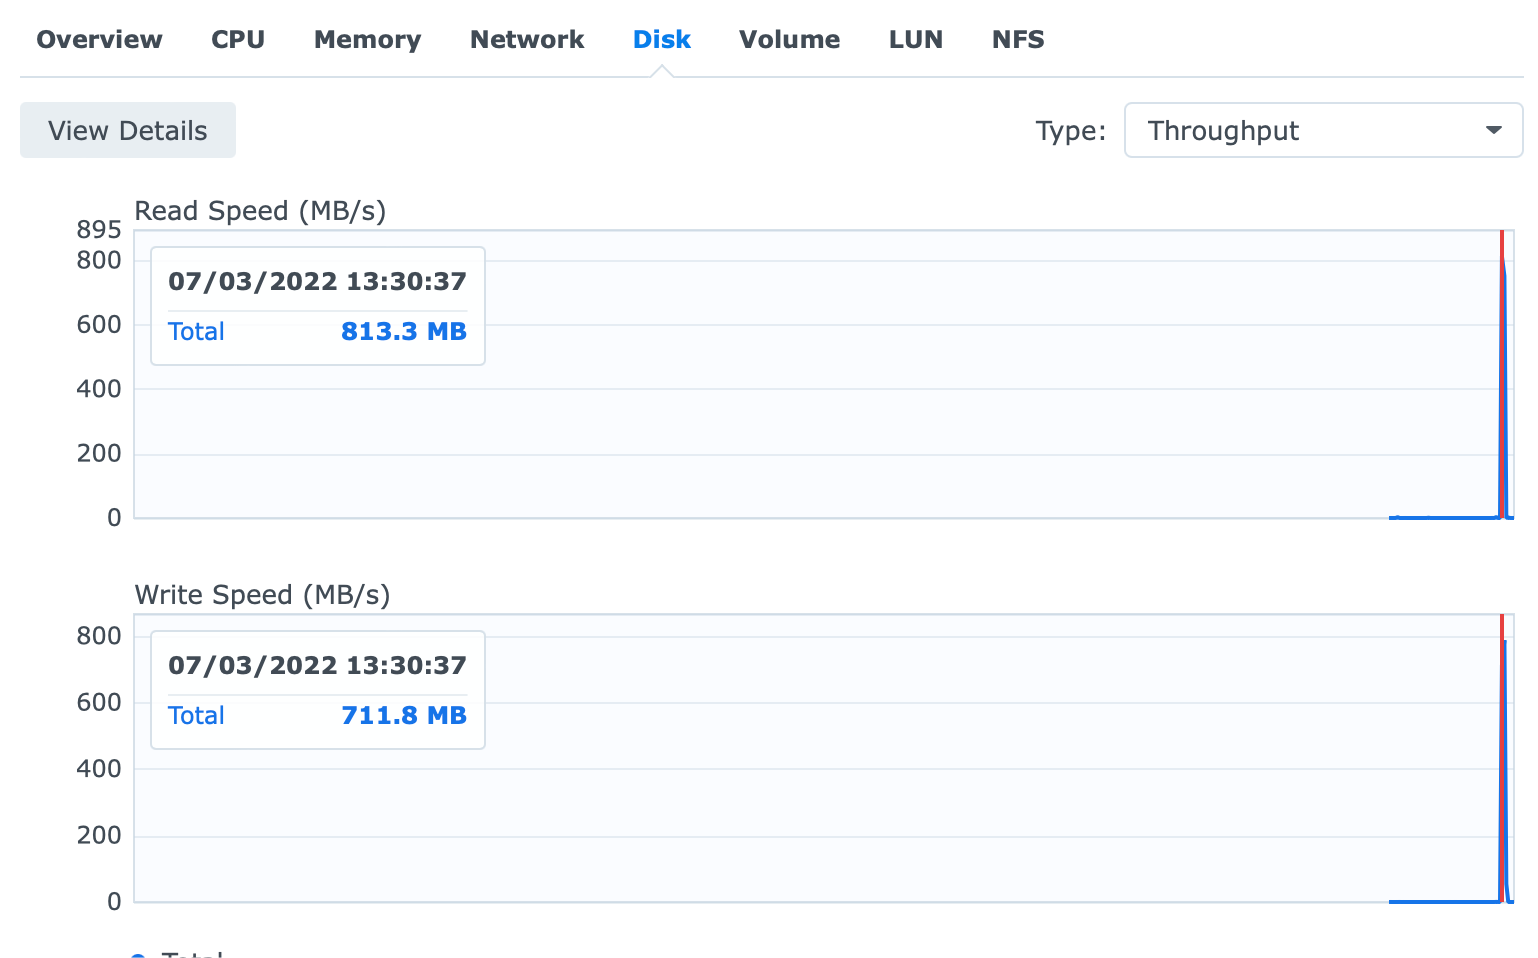
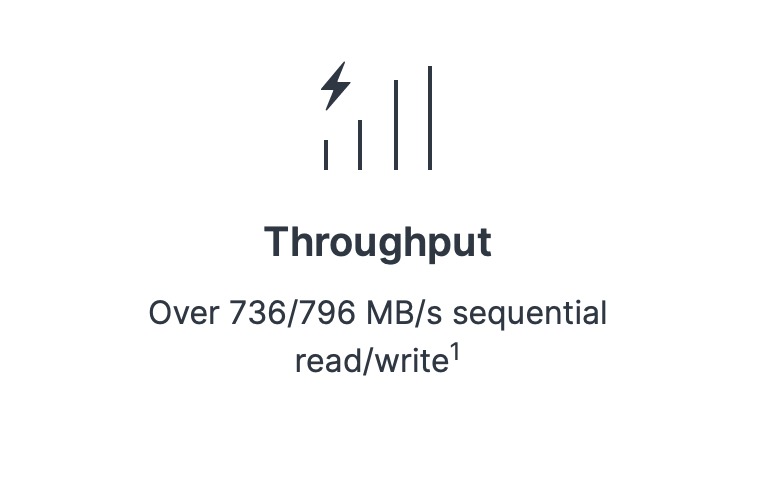
With a peak speed of 813.3MB/s read, and 711.8MB/s write, the transfer was completed in 31 sec. So close and similar to the advertised speeds on the DS1522+ page.
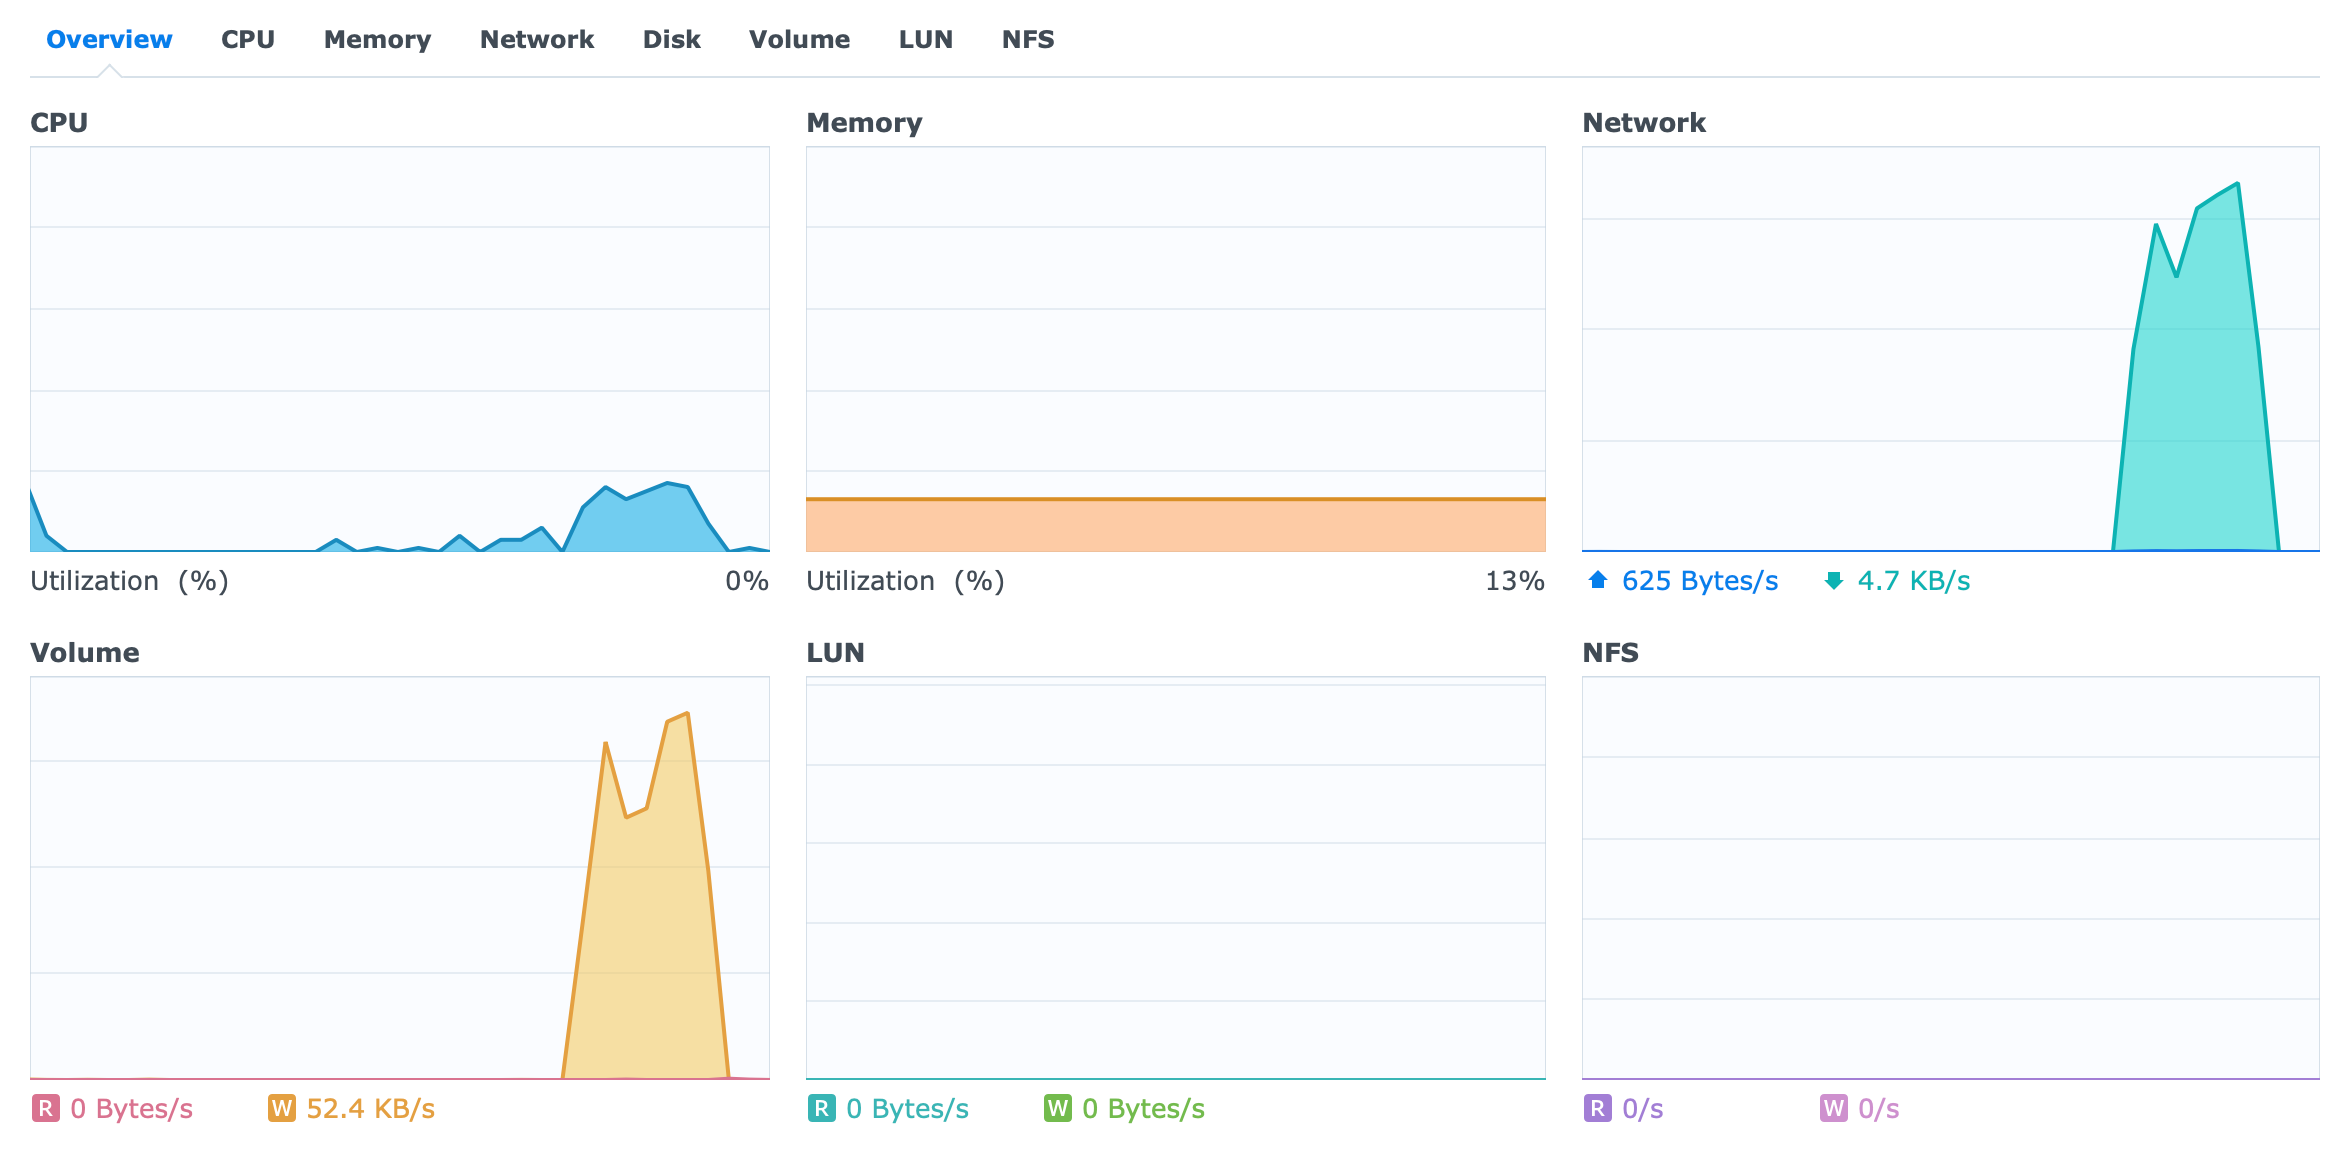
Encrypted content transfers (File Station)
While the previous tests were all with non-encrypted folders let's how this NAS works while transferring data from a non-encrypted folder to an encrypted one(on the same volume), as well as from two separate encrypted folders.
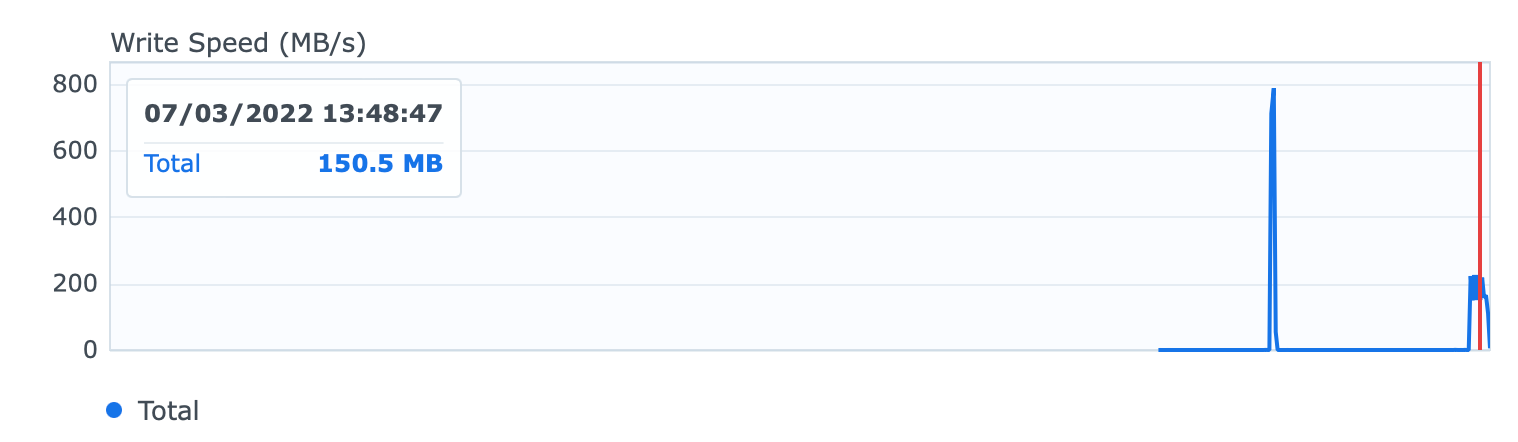

In this case, as expected the transfer of that 17.5GB file took about 120 sec with an average speed of 150MB/s give or take.
When the same copy was executed from one encrypted folder to the other (two separate volumes), the speed and completion time was almost identical.
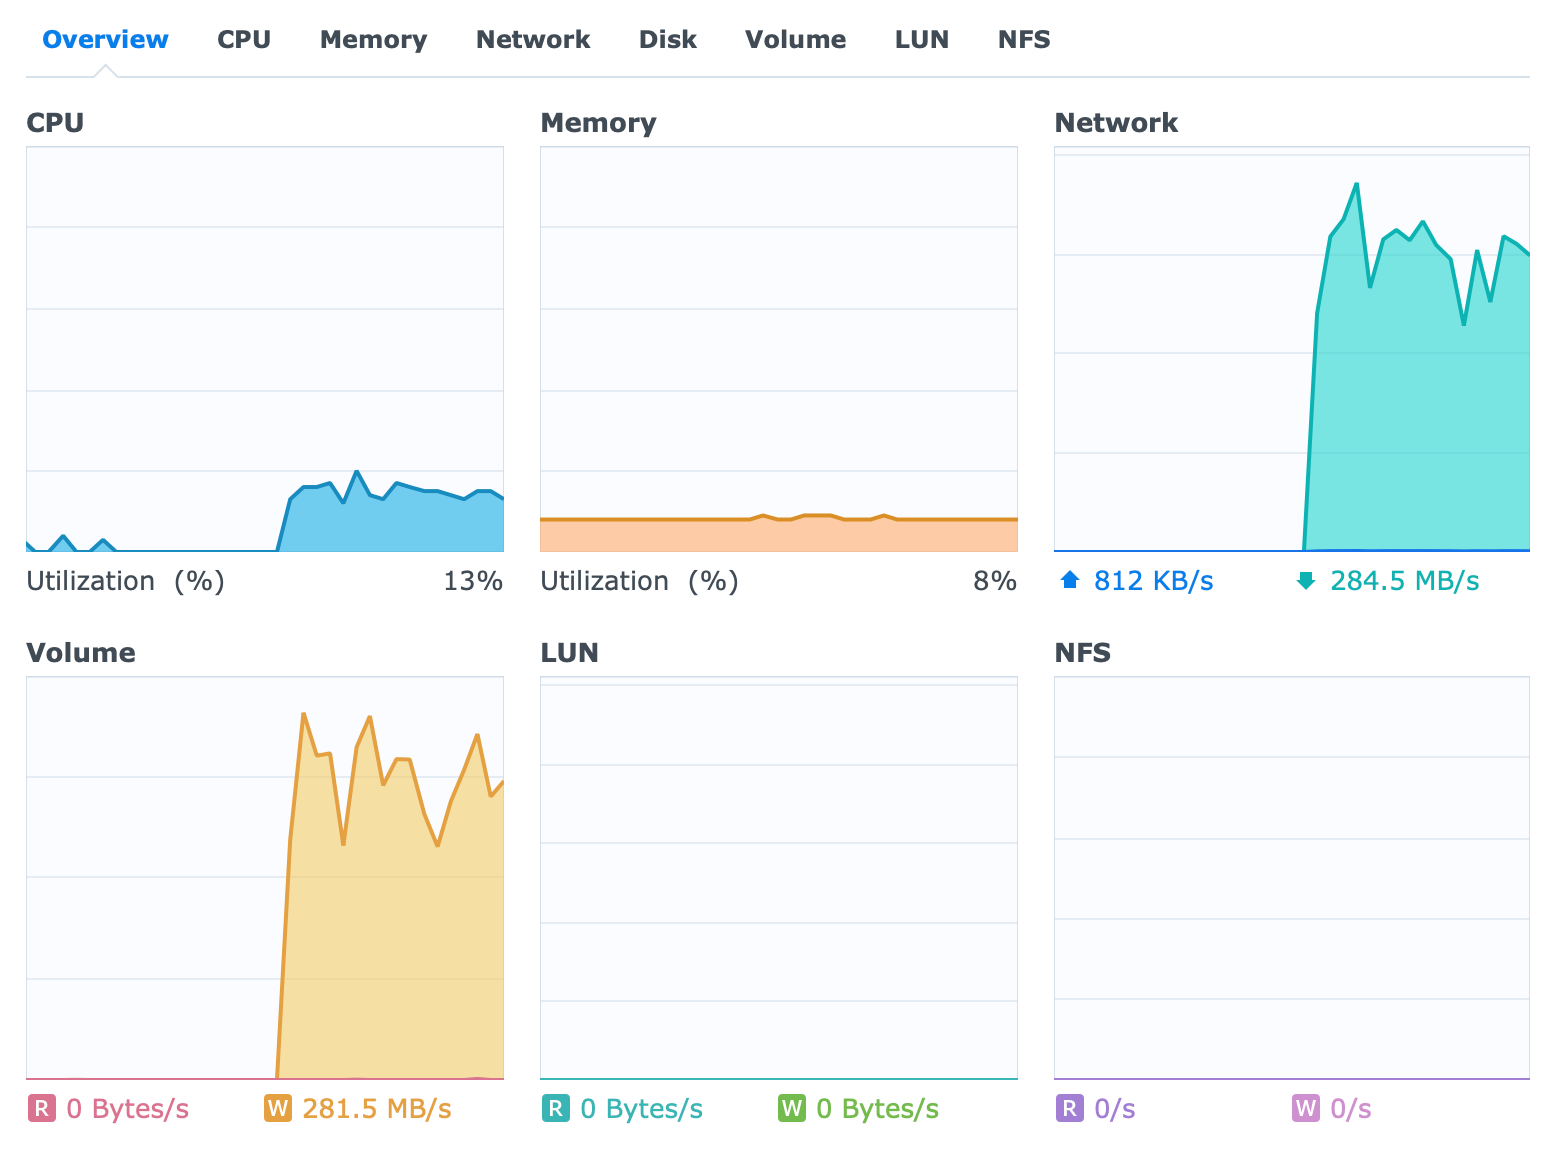
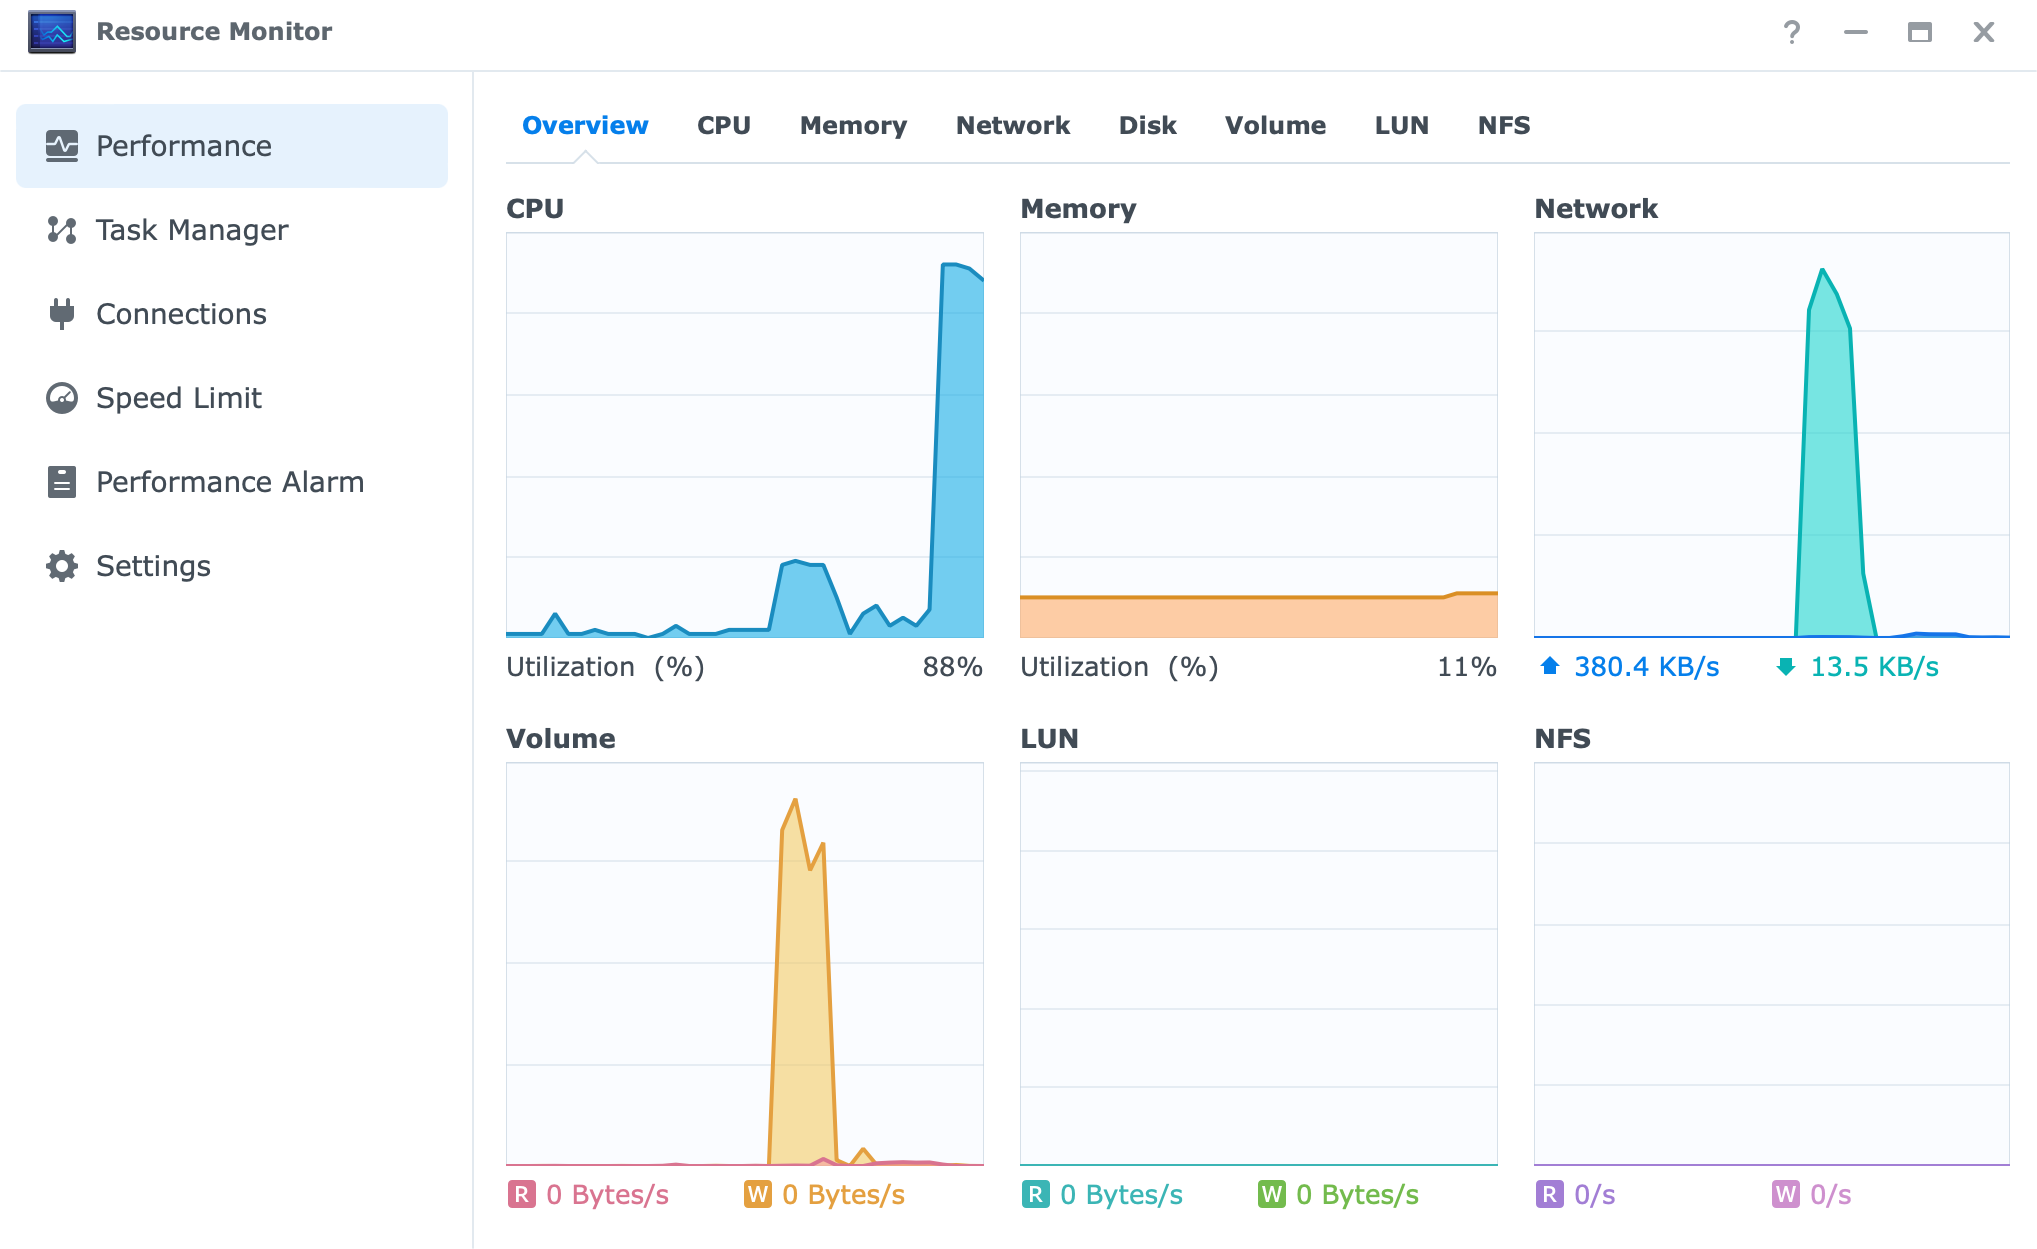
Looks like this dual-core AMD has no problem following the demand of the transfers as it has barely managed to pass the 15% CPU utilization. Granted, no services are running just yet that will utilize it, but still, very impressed so far.
Even with these tasks happening the temperature on the drives remains the same with 2TB models at about 33-35C, and the 4TB ones running at about 37-38C.
Hyper Backup (RAID0 to RAID0) non-encrypted backup
Let's continue with some Synology apps and tools. Starting with, Hyper Backup. For the first test, I will be transferring those same 108 files (47,5GB) from one volume to the other using the proprietary HB format.
The reason is that you might be in a situation where you need to transfer some data from one volume to the next, so let's see if we will be close to these SMB transfers or not.
This test will copy non-encrypted data to another non-encrypted folder on the second volume, and the task itself will not use client-side encryption.
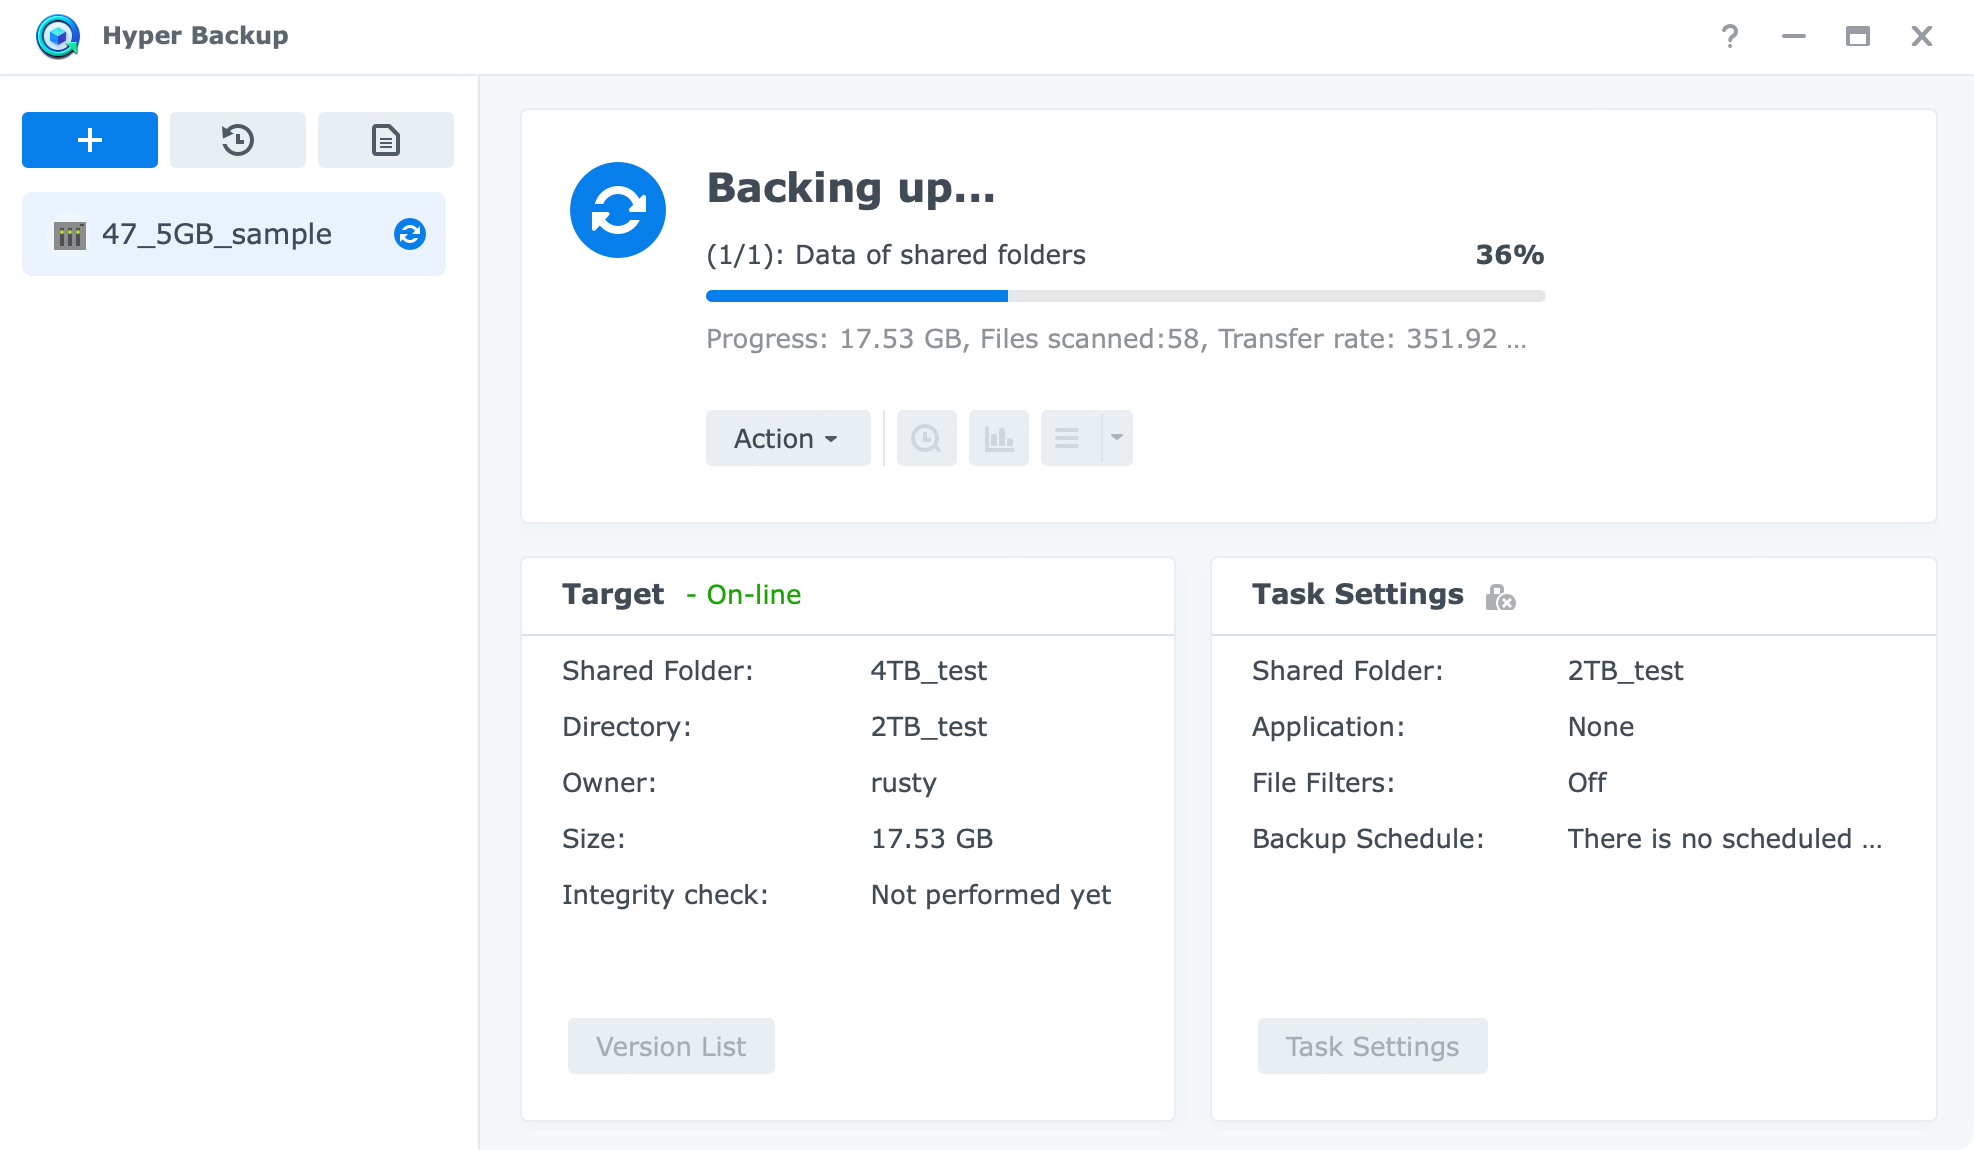
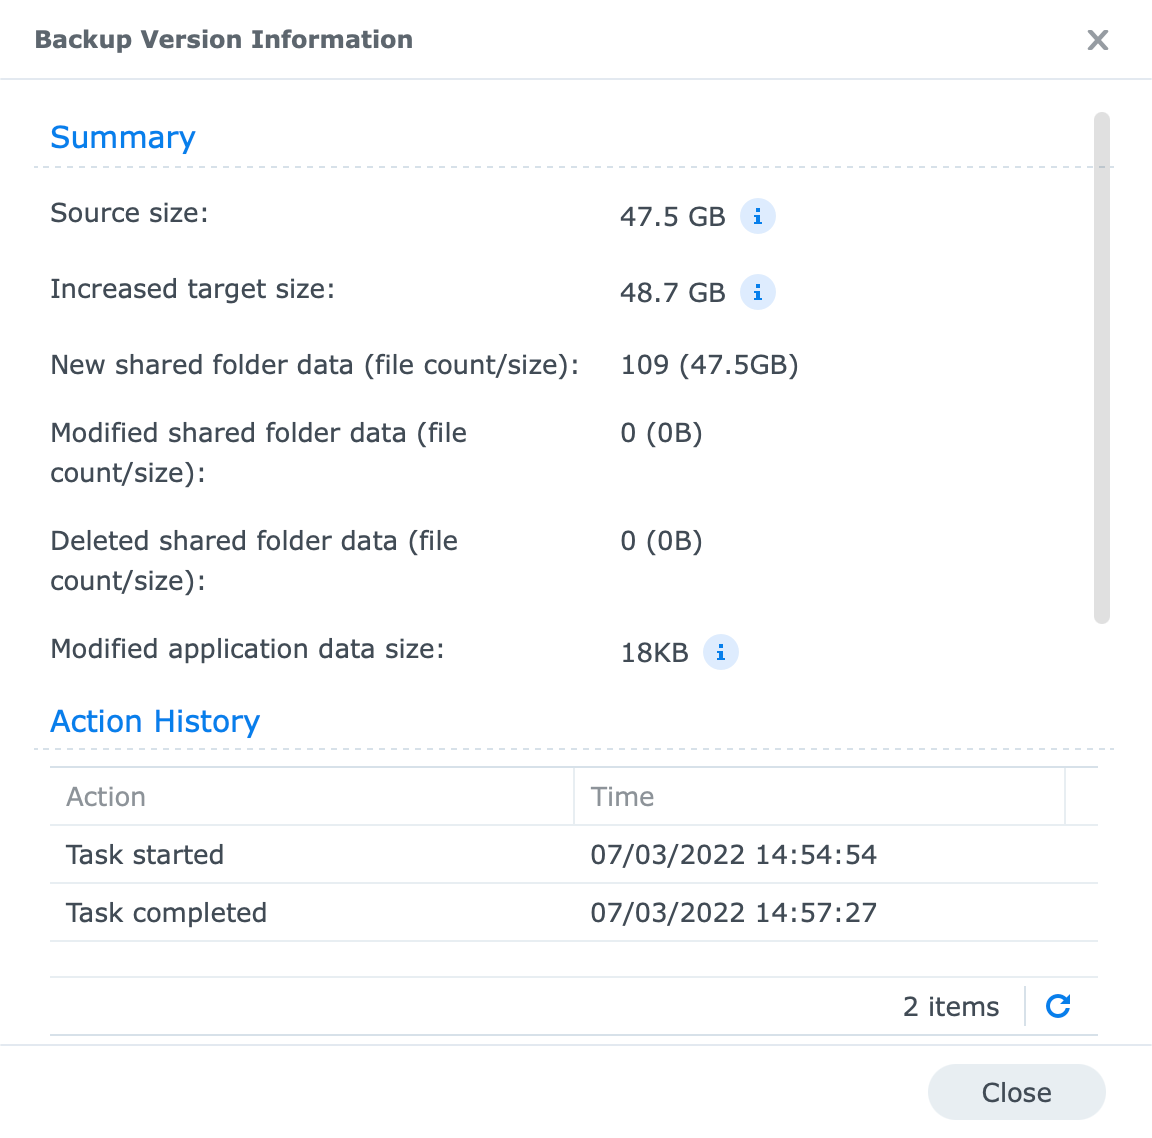
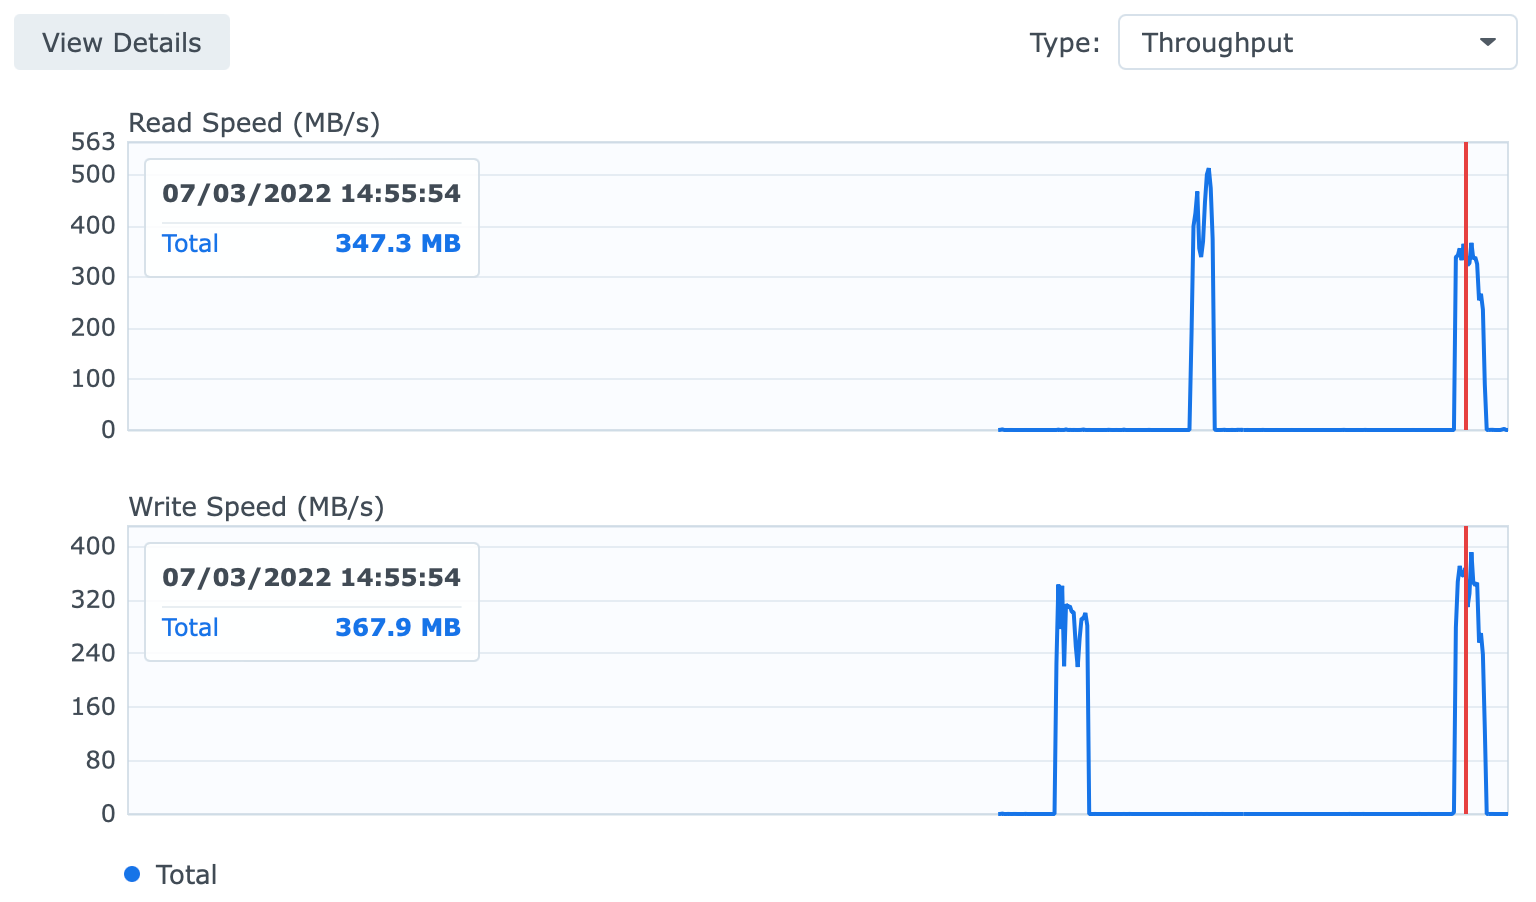
The task was completed in just over 2.5 min with an average speed of 317MB/s. This is nothing strange that we will not get consistent speeds depending on the protocol and app in question. It is common that the speed for pure SMB transfers is faster than HB, Active Backup, or Snapshot replication. Considering that all those apps work in a specific way as well as that there are many other factors in that exact moment that depends on the speed, the outcome will vary.
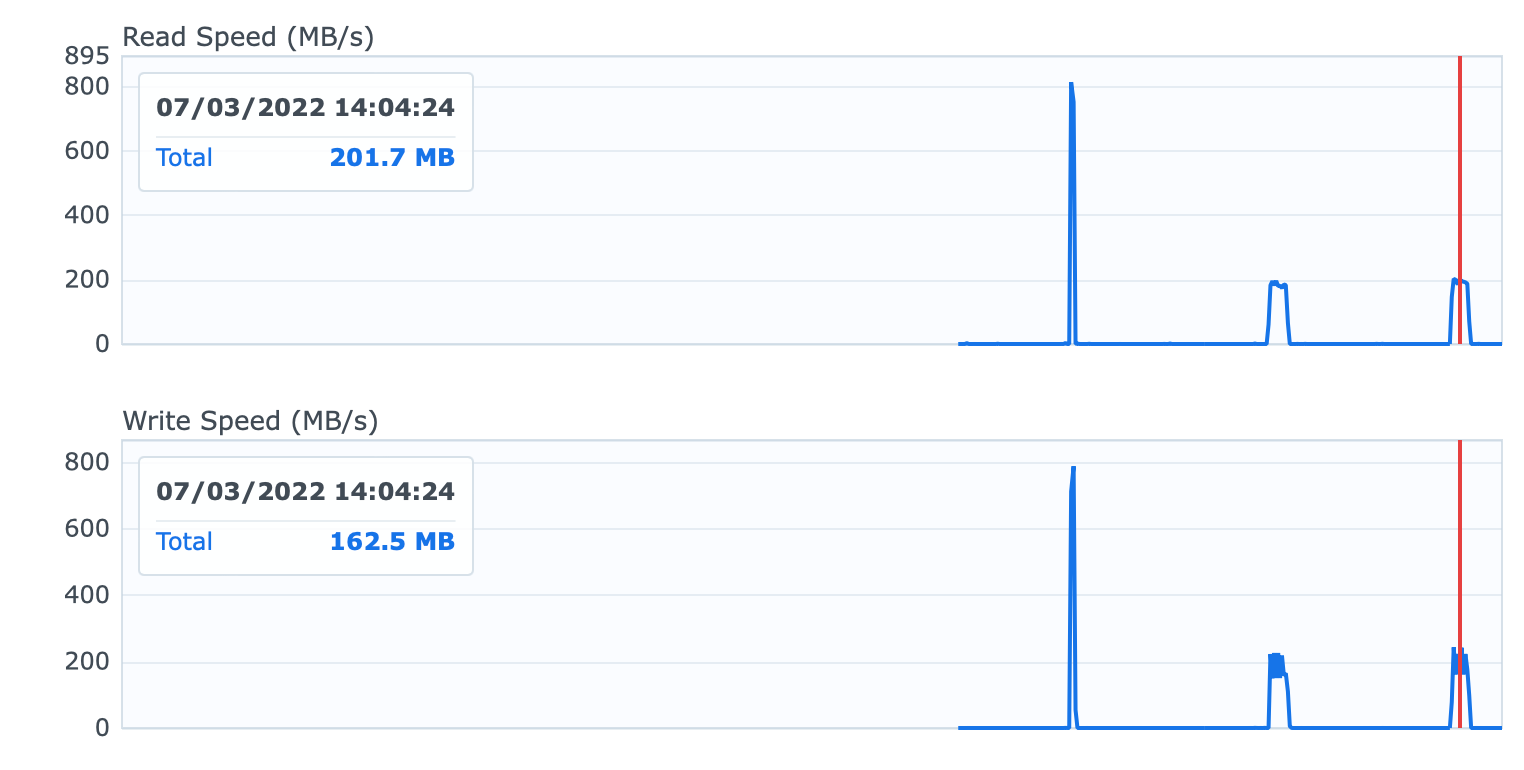
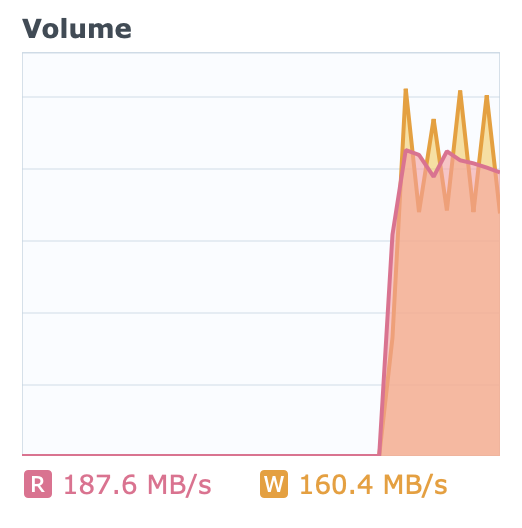
Snapshot Replication (local volume folder replication)
Following on the previous test and taking the same sample again, let's see if a local volume folder replication is faster than Hyper Backup.
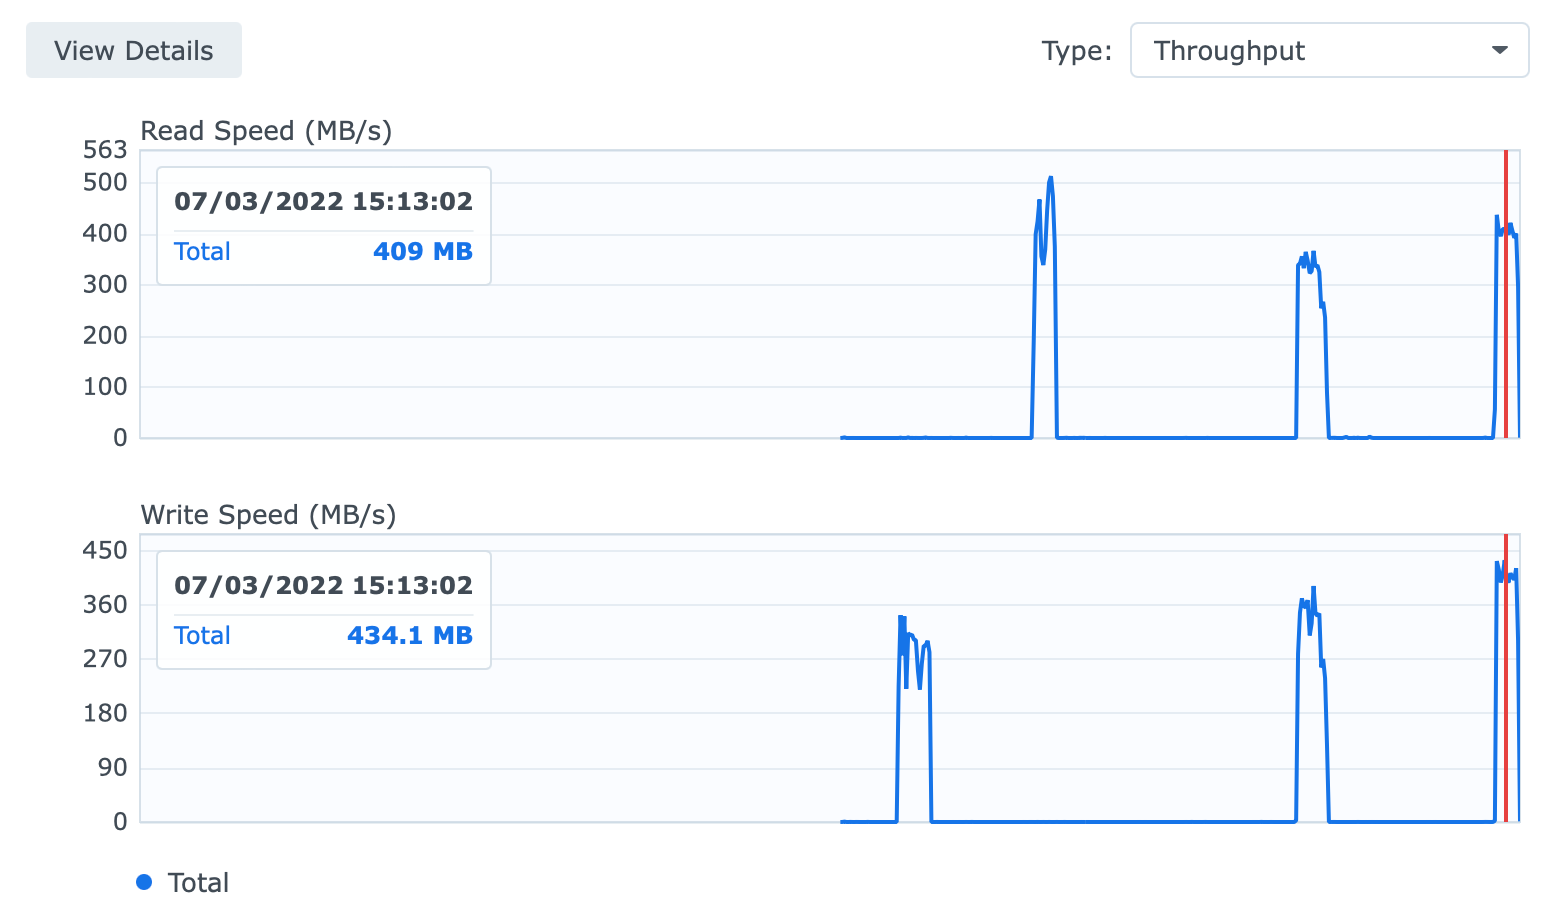
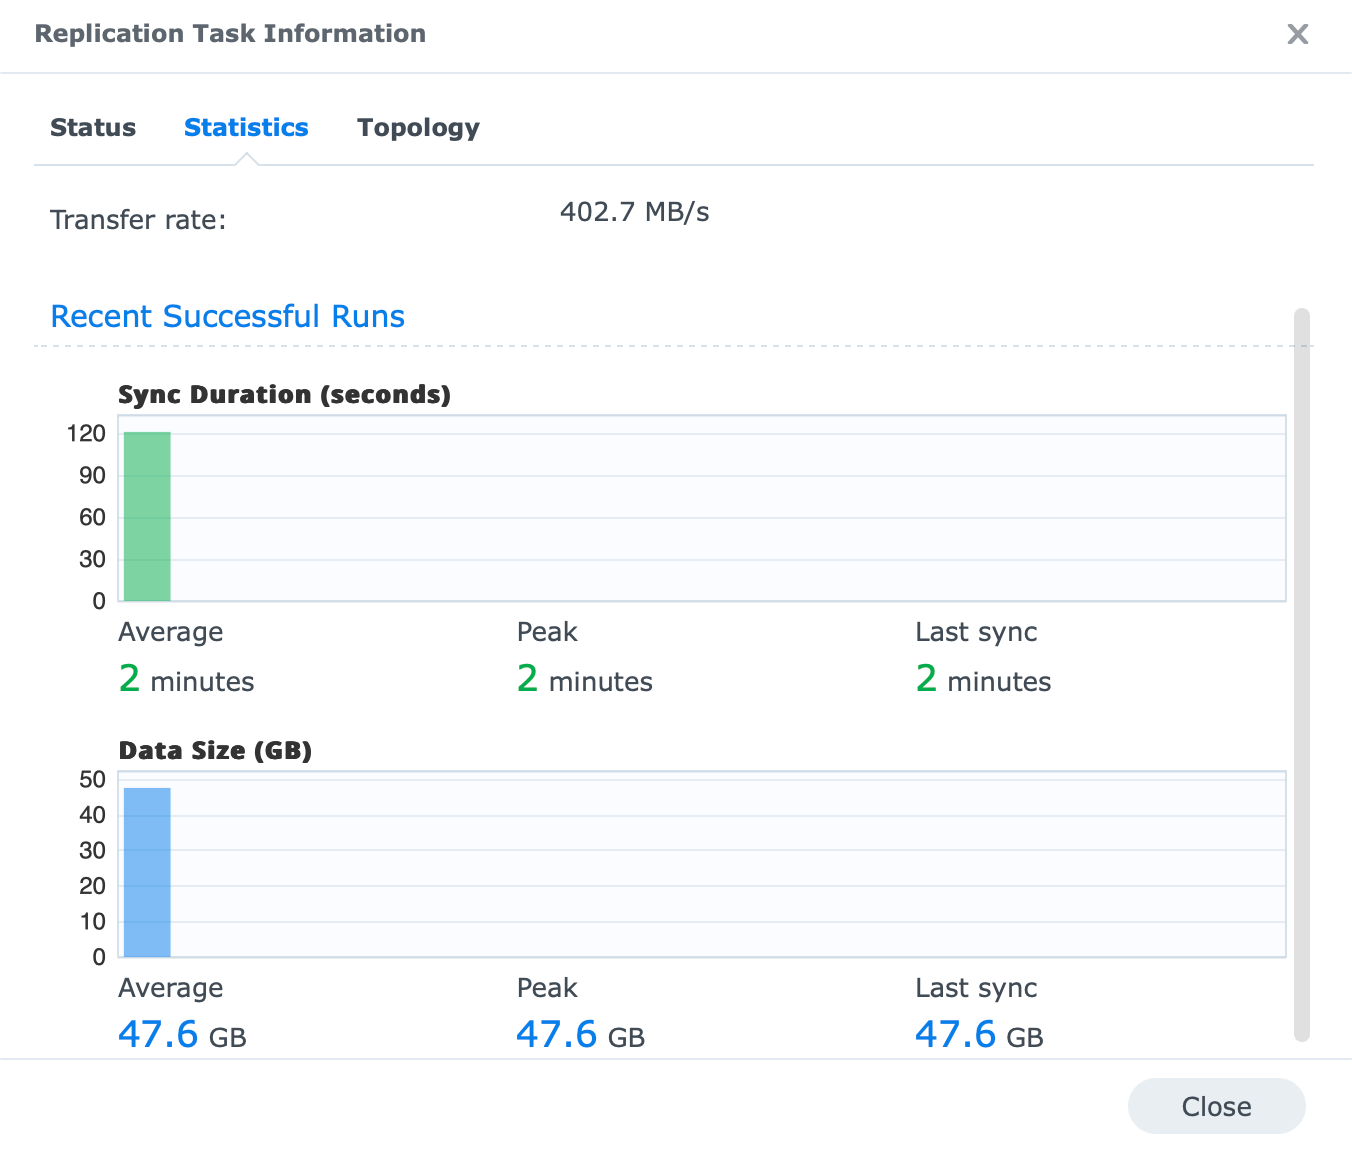
The task was completed in just a little over 2 min (2 min and 7 sec) with an average speed of about 402.7MB/s. So as I said before, it will depend on what app and protocol you use, and depending on those the outcome will be different. Also, in the image above we can clearly see that the speeds for the last task are indeed faster than the middle graph (Hyper Backup).
Snapshot Replication (remote volume folder replication)
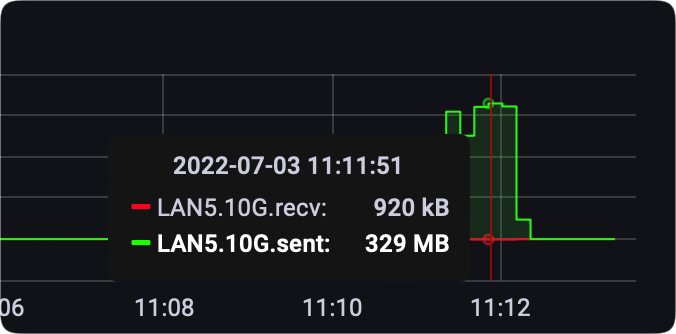
Pushing the same task but this time to a remote NAS (RS3614RP+) over a 10G network connection resulted in the following.
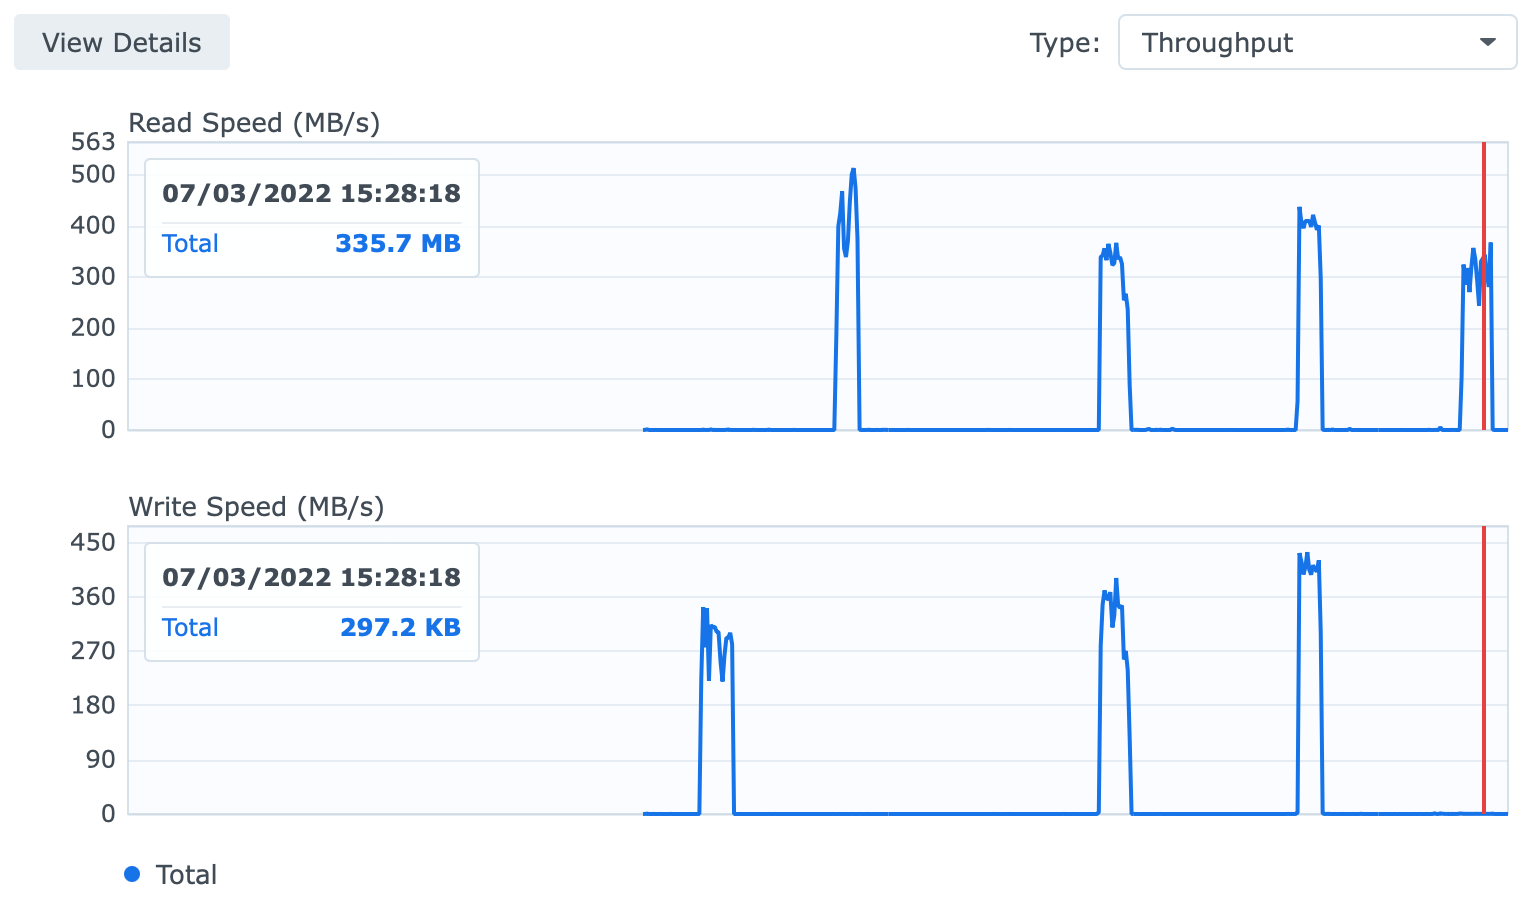
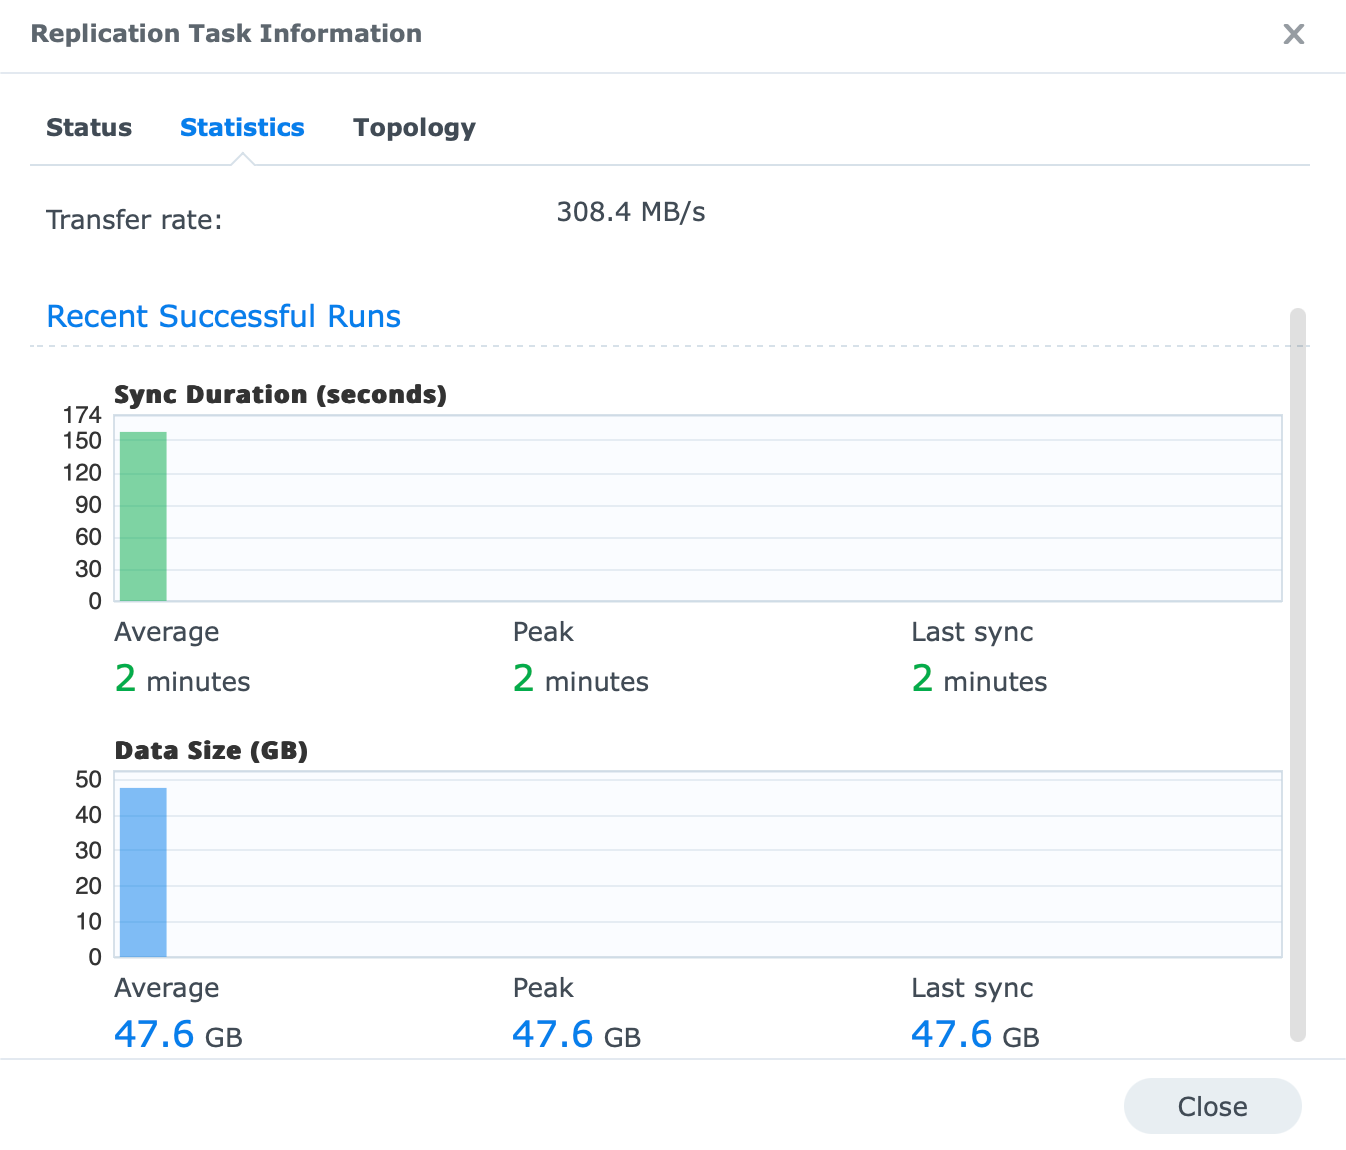
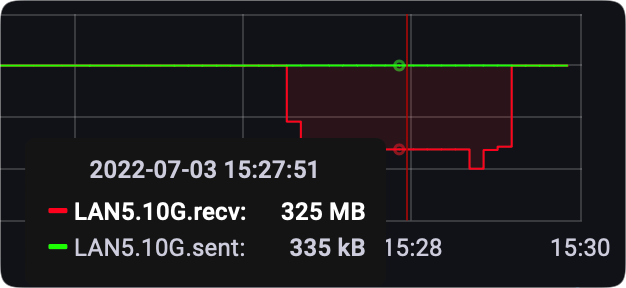
With 2 min and 40 sec and an average speed of 308.4MB/s, the task was done. As stated before the speed is different if we compare it to the SMB transfer on the same file sample and direction (and of course same hardware). With an average of 100MB/s slower speeds in the case of the Snapshot replication tool.
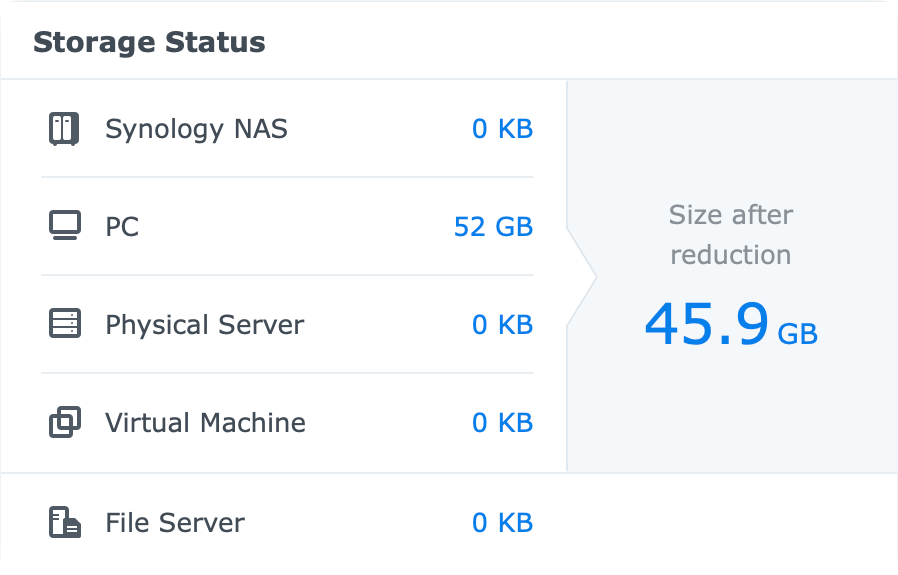
Active Backup for Business (bare-metal Windows machine backup)
Considering that at the moment, ABB does not support macOS backup (yet), let's do a demo with a Windows-based machine.
With a bit over 50GB in size, it took close to 14min to do the initial machine backup over a 1G connection with an average speed of about 60MB/s.
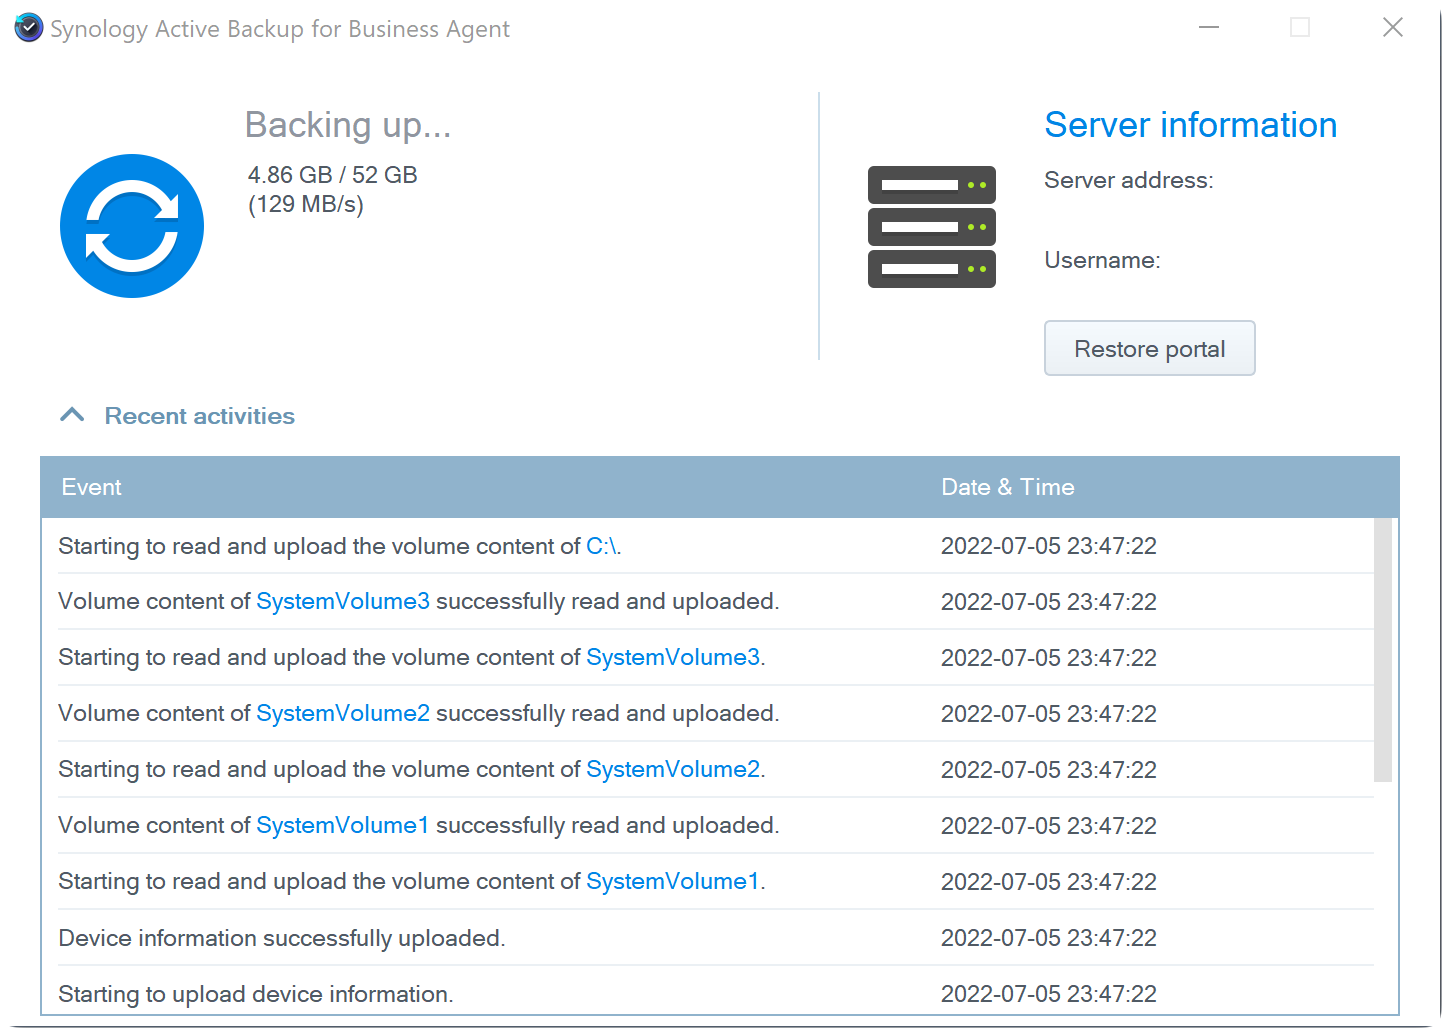
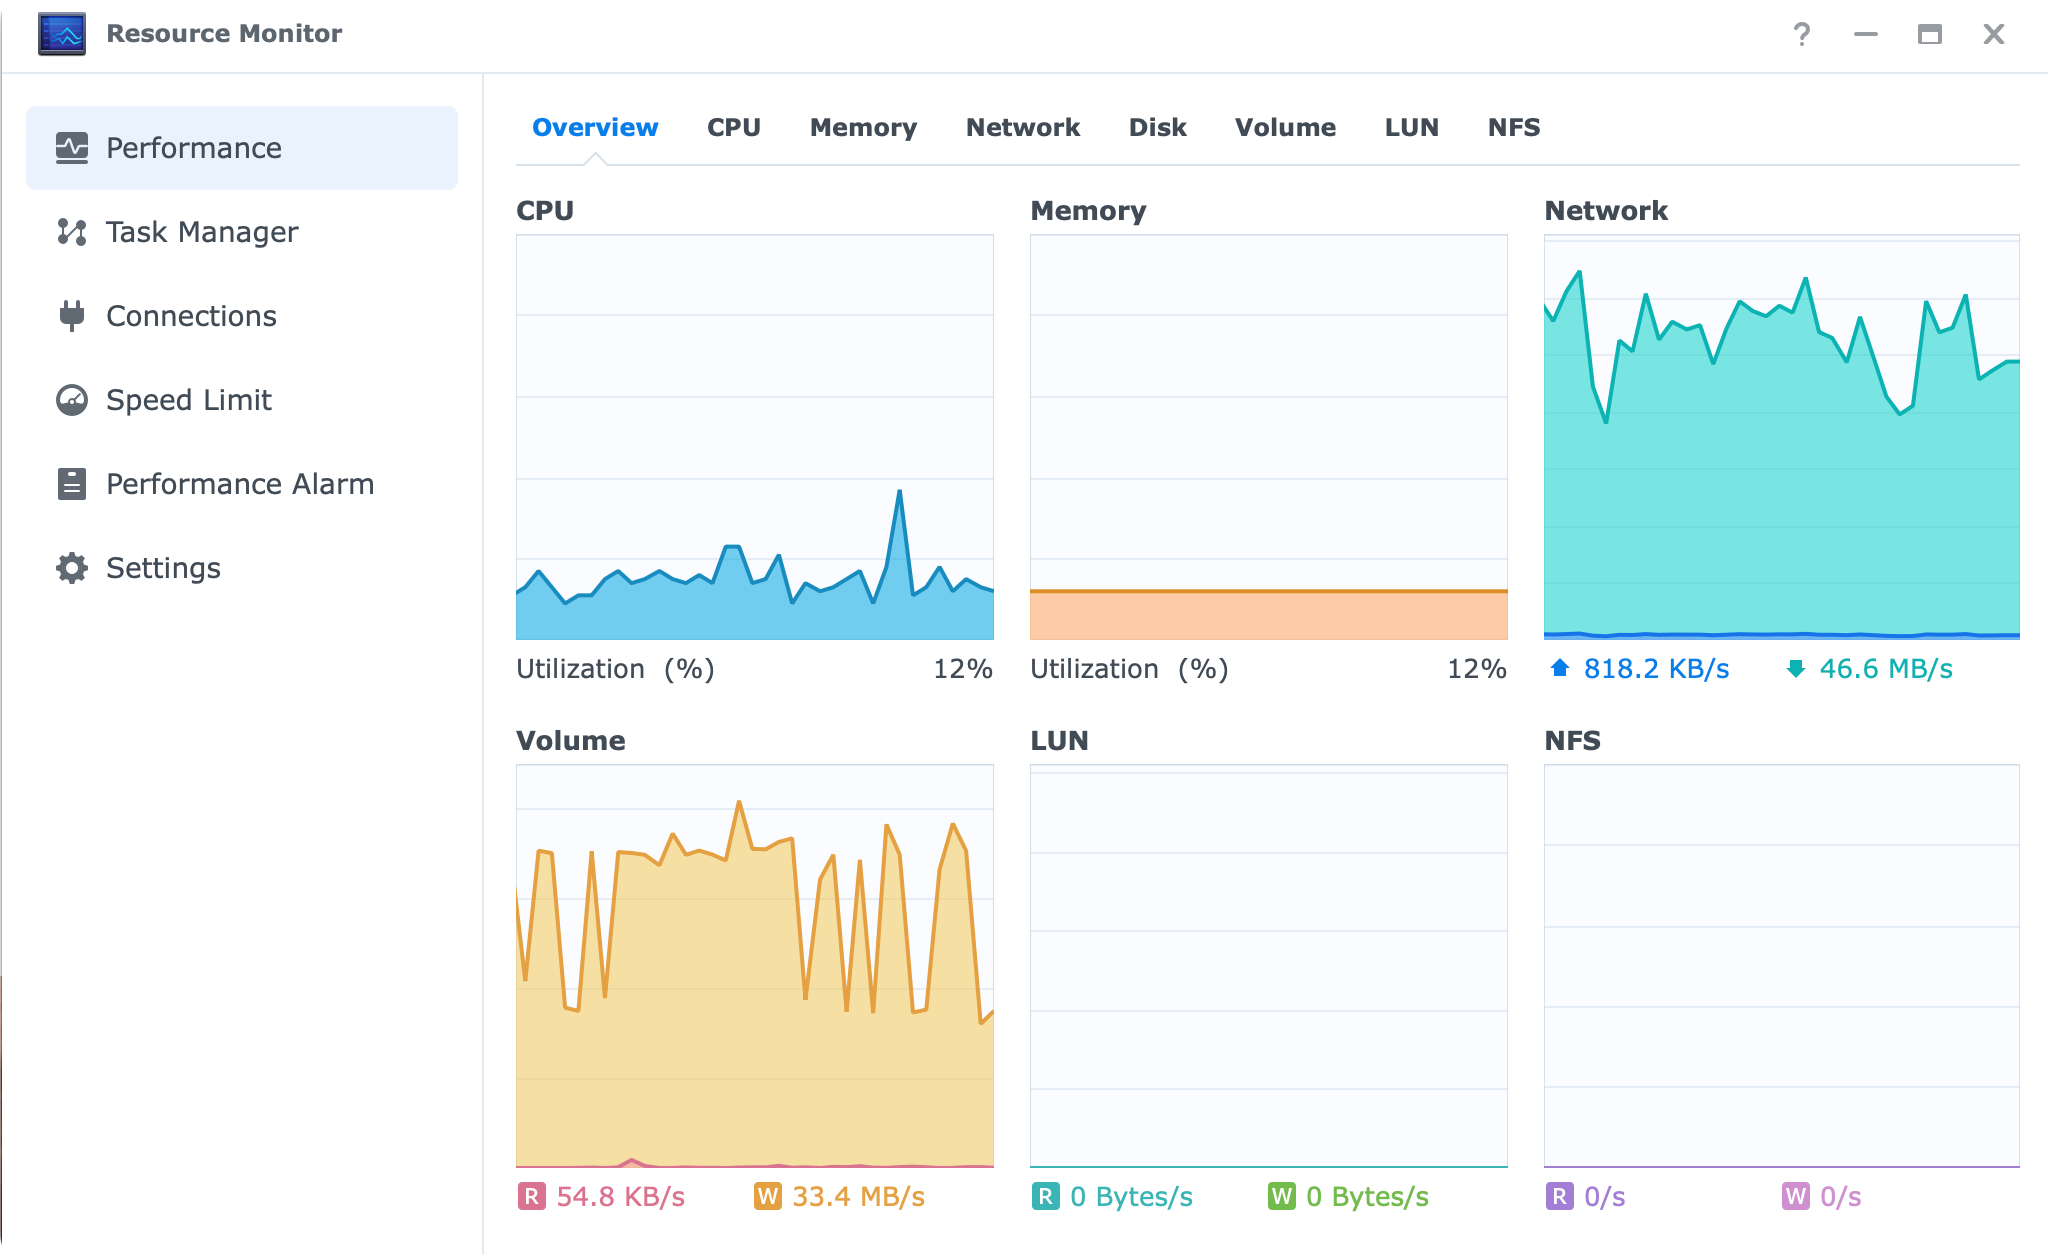
The NAS utilization was not high at all on any element, so by running concurrent backup tasks on this model over a 10G connection, and fast drives, you can be sure that you will have no problems making quick work of your backups.
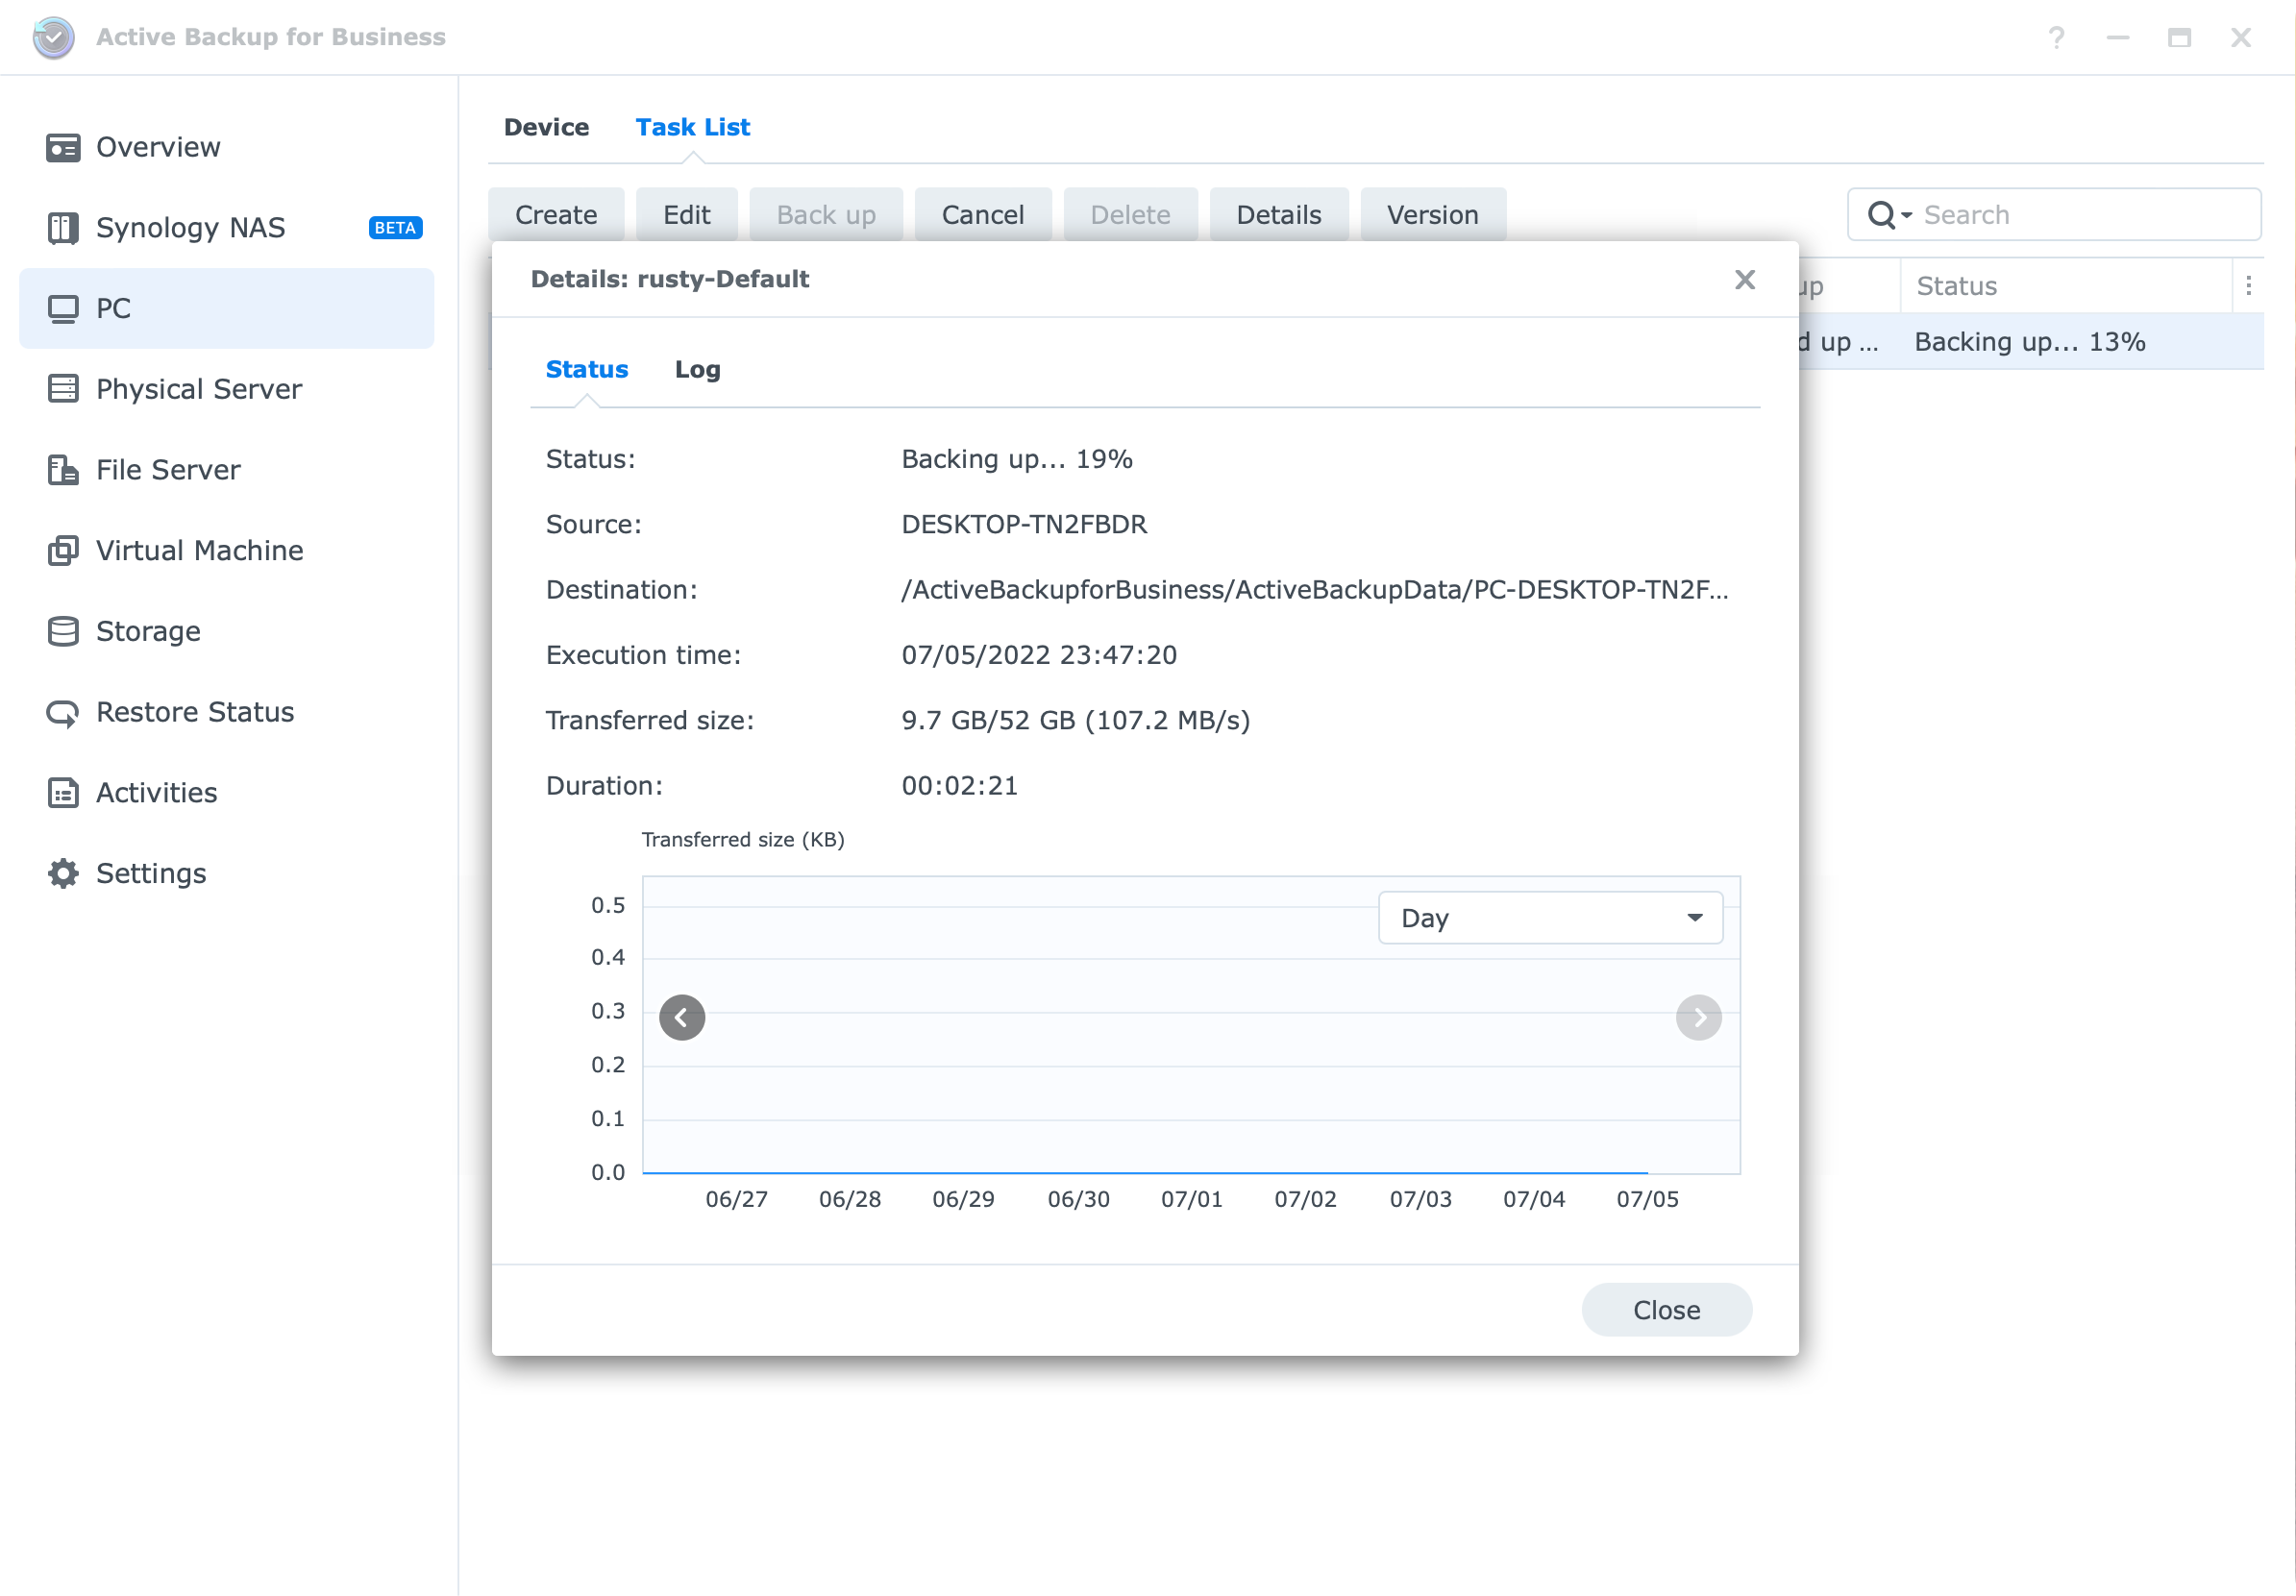
As always the data is accessible over Active Backup for Business Portal, which will allow you to download or restore any backed-up data in case you need it.
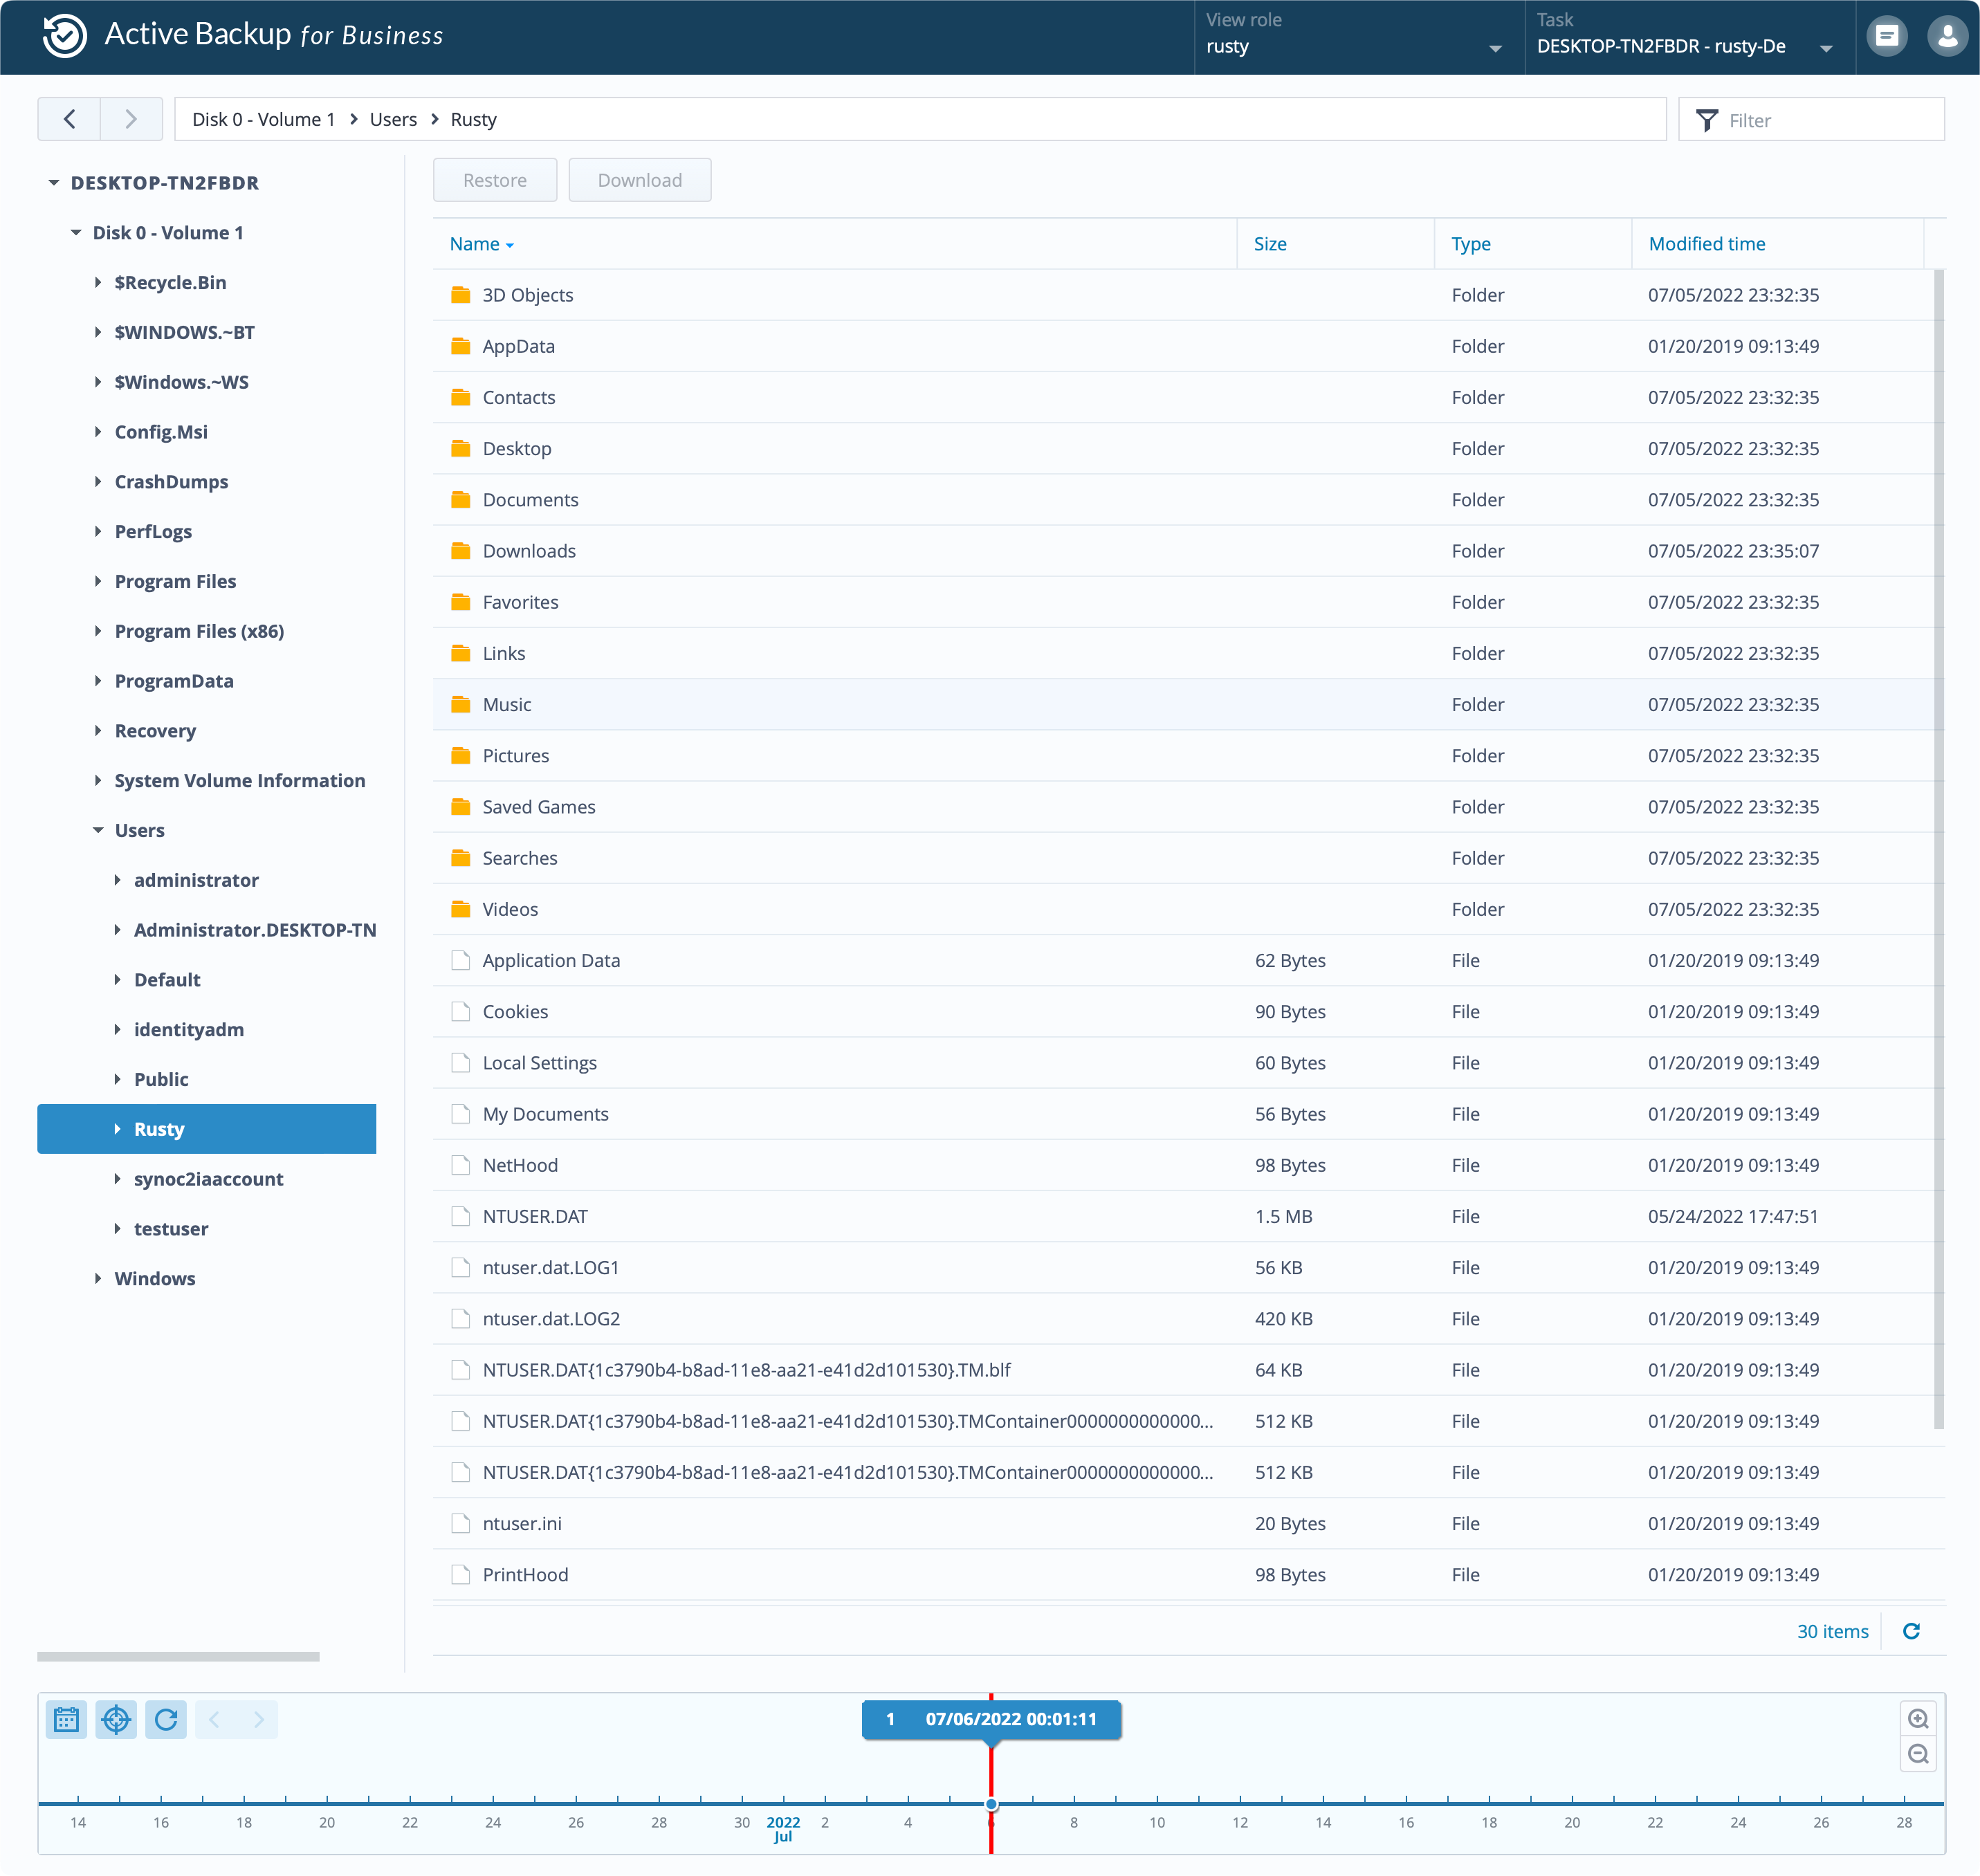
Finally, if you need a complete computer restore (bare-metal) you can do that as well. For more info on that process be sure to follow up here.
Also while we are on the subject of a full backup and restore, be sure to check how you can use this NAS as both a target and source when it comes to NAS backup and restores needs that include the whole DSM OS, apps, and its data. More info and examples are here.
:Virtualization and containerization
Synology "Plus" models were always advertised as devices that can utilize the Virtual Machine Manager app, and it is true. In many cases, you can indeed run various Linux and Windows-based VMs but you will have to maintain your expectations.
I have run VMs on more than a few plus models in various combinations, and always found that the CPU was the weak link in most cases, especially with entry plus models. Once you move up into the RS, or RSxs, or better models that stops being an issue.
Of course, the hard drives are a big factor as well, so running your VM on an HDD volume, vs an SSD volume you can expect a huge difference, but again, if the CPU is not already an issue.
I think it is clear that running a low-end CPU model with spindle drives and not SSD, you really have to manage your expectations.
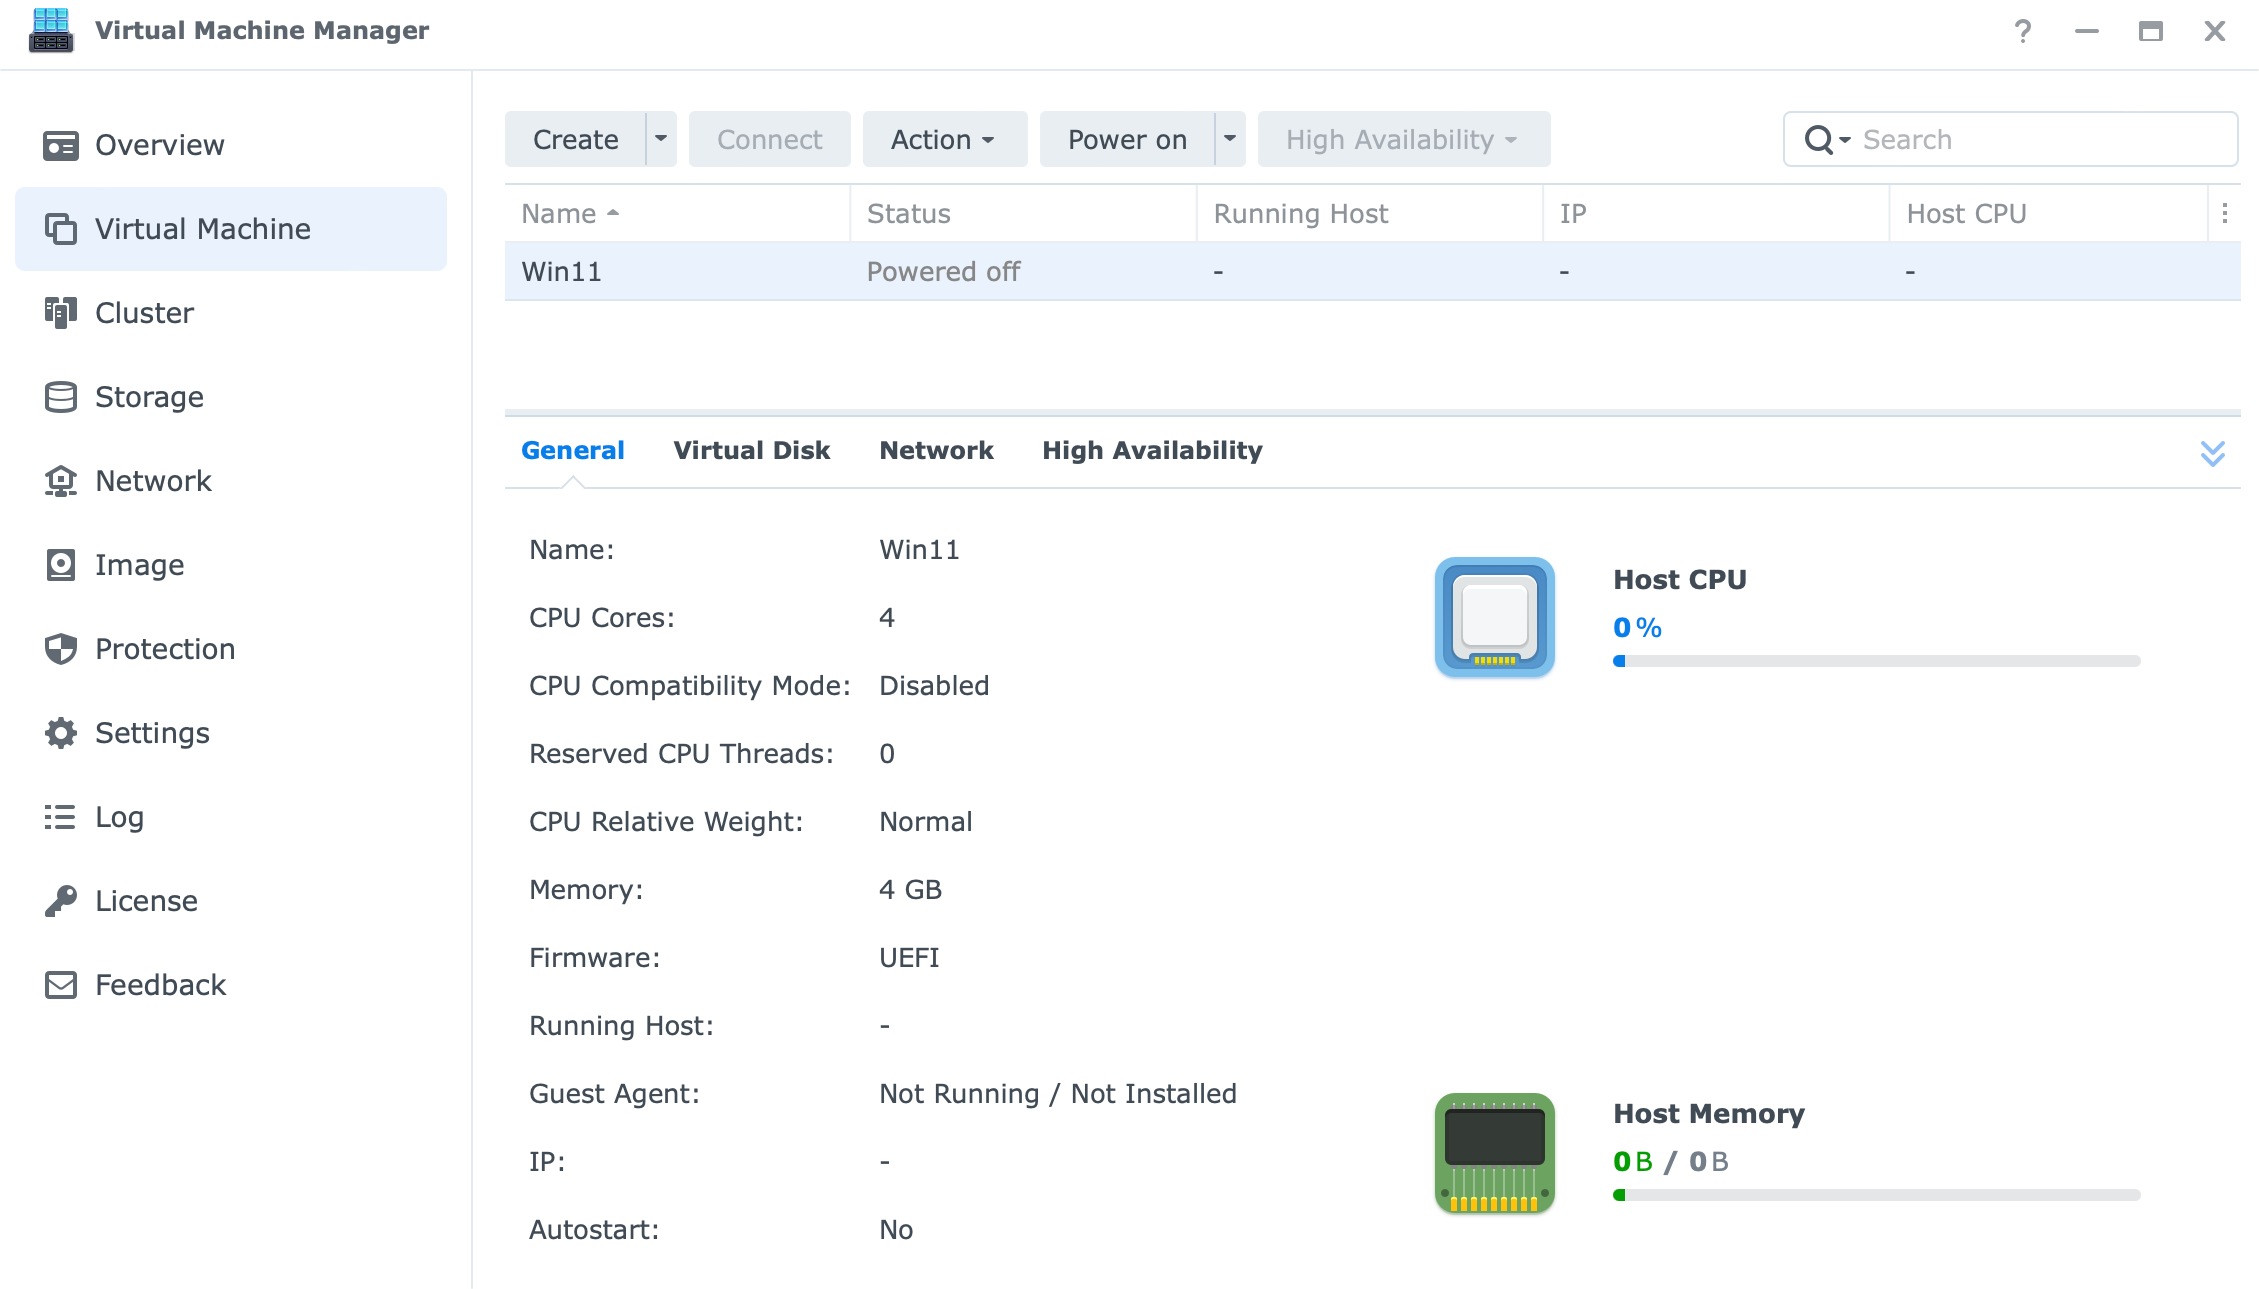
So with all that, let's see how this dual-core (quad-threaded) CPU with a full SSD setup and 8GB of DDR4 RAM will perform for a basic Windows 11 installation.
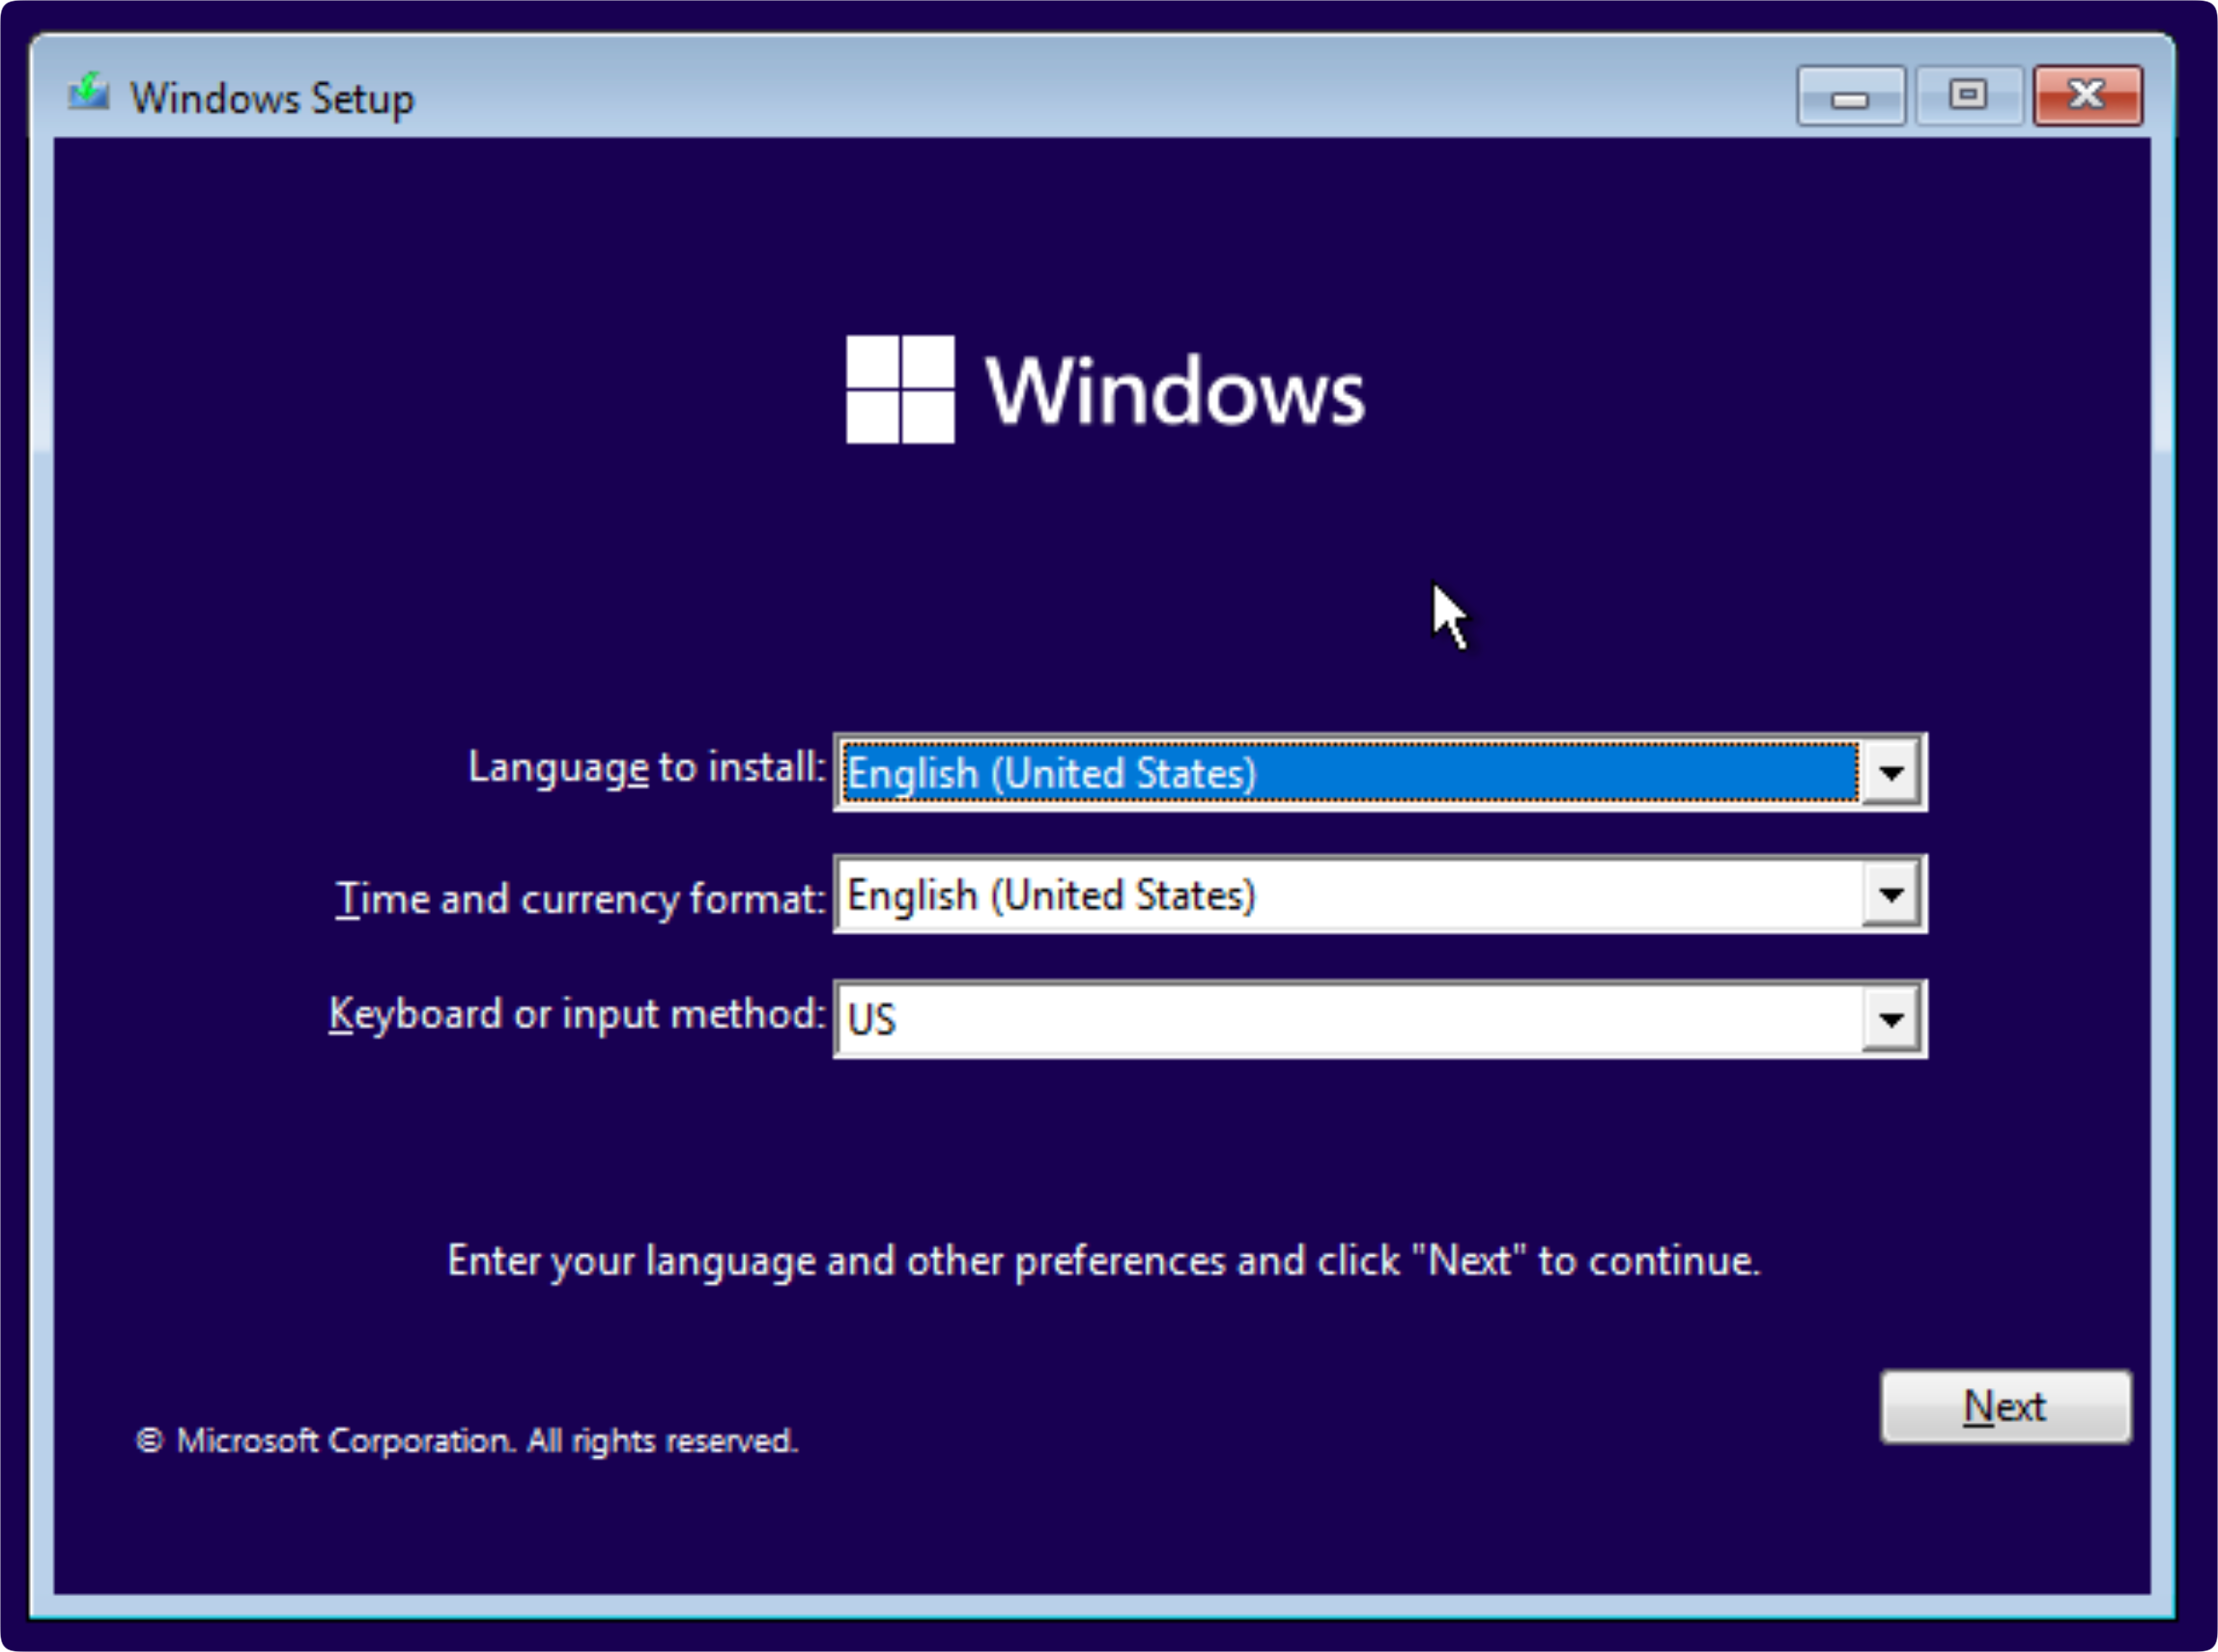
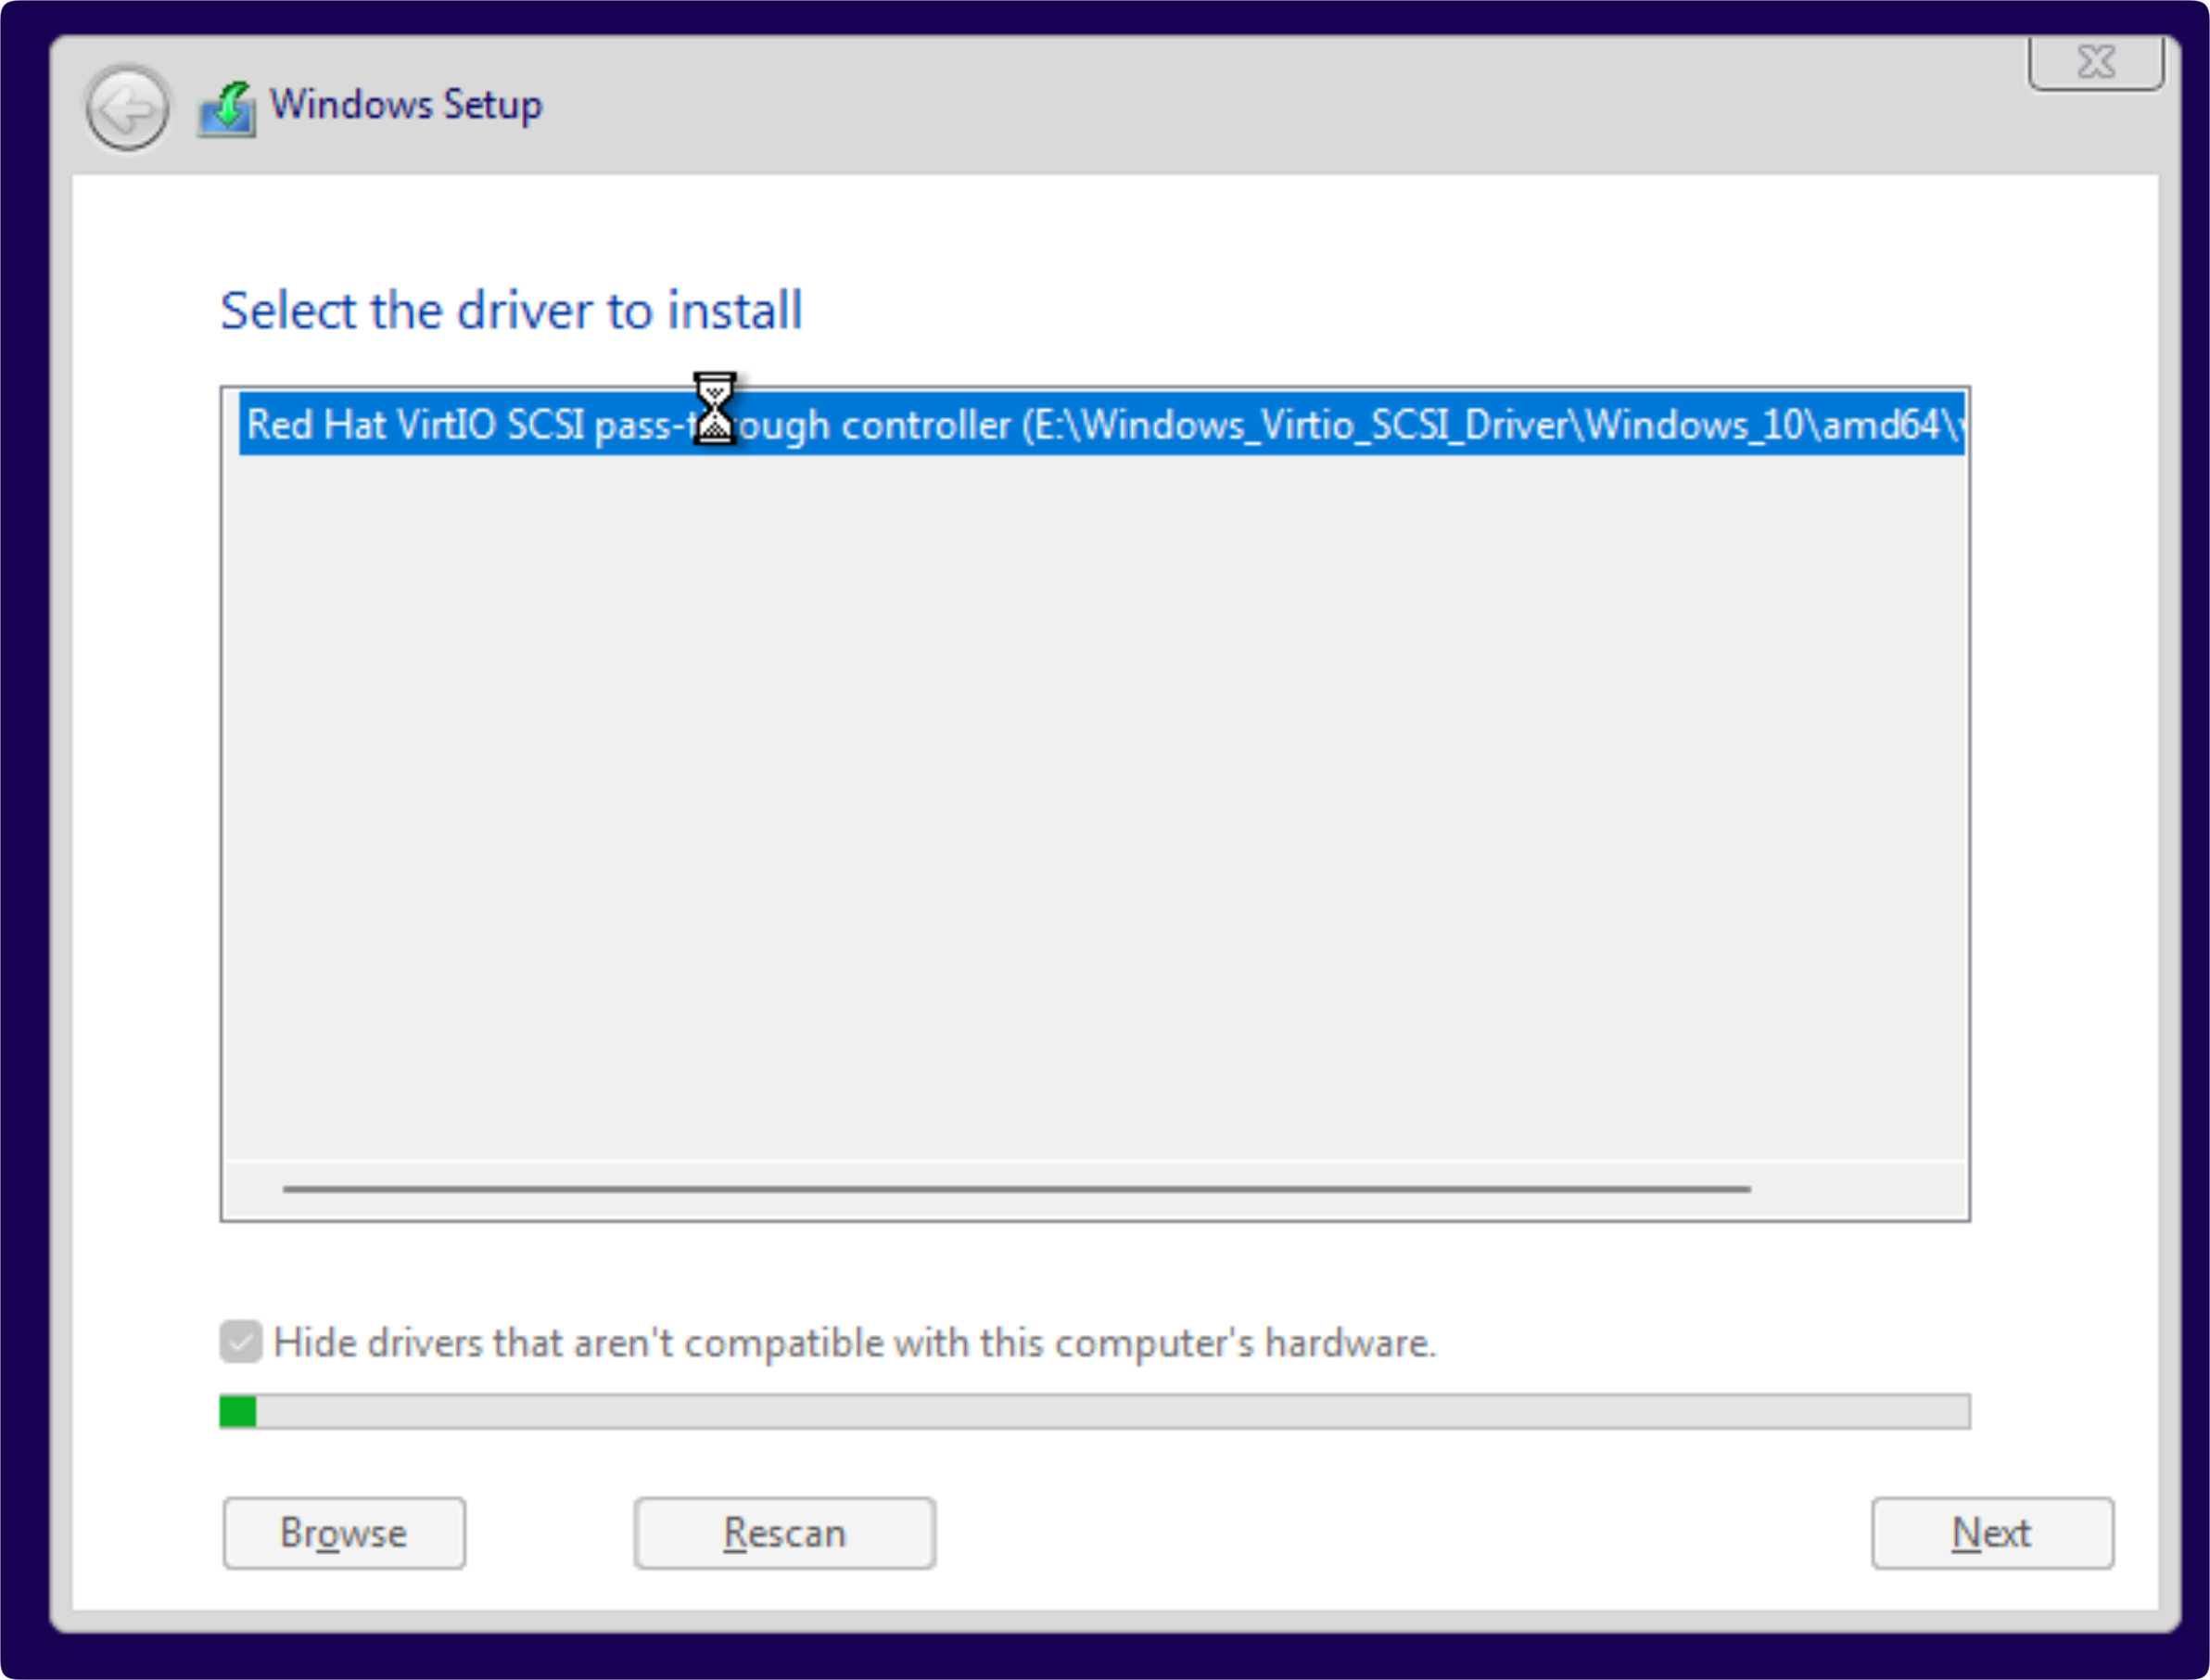
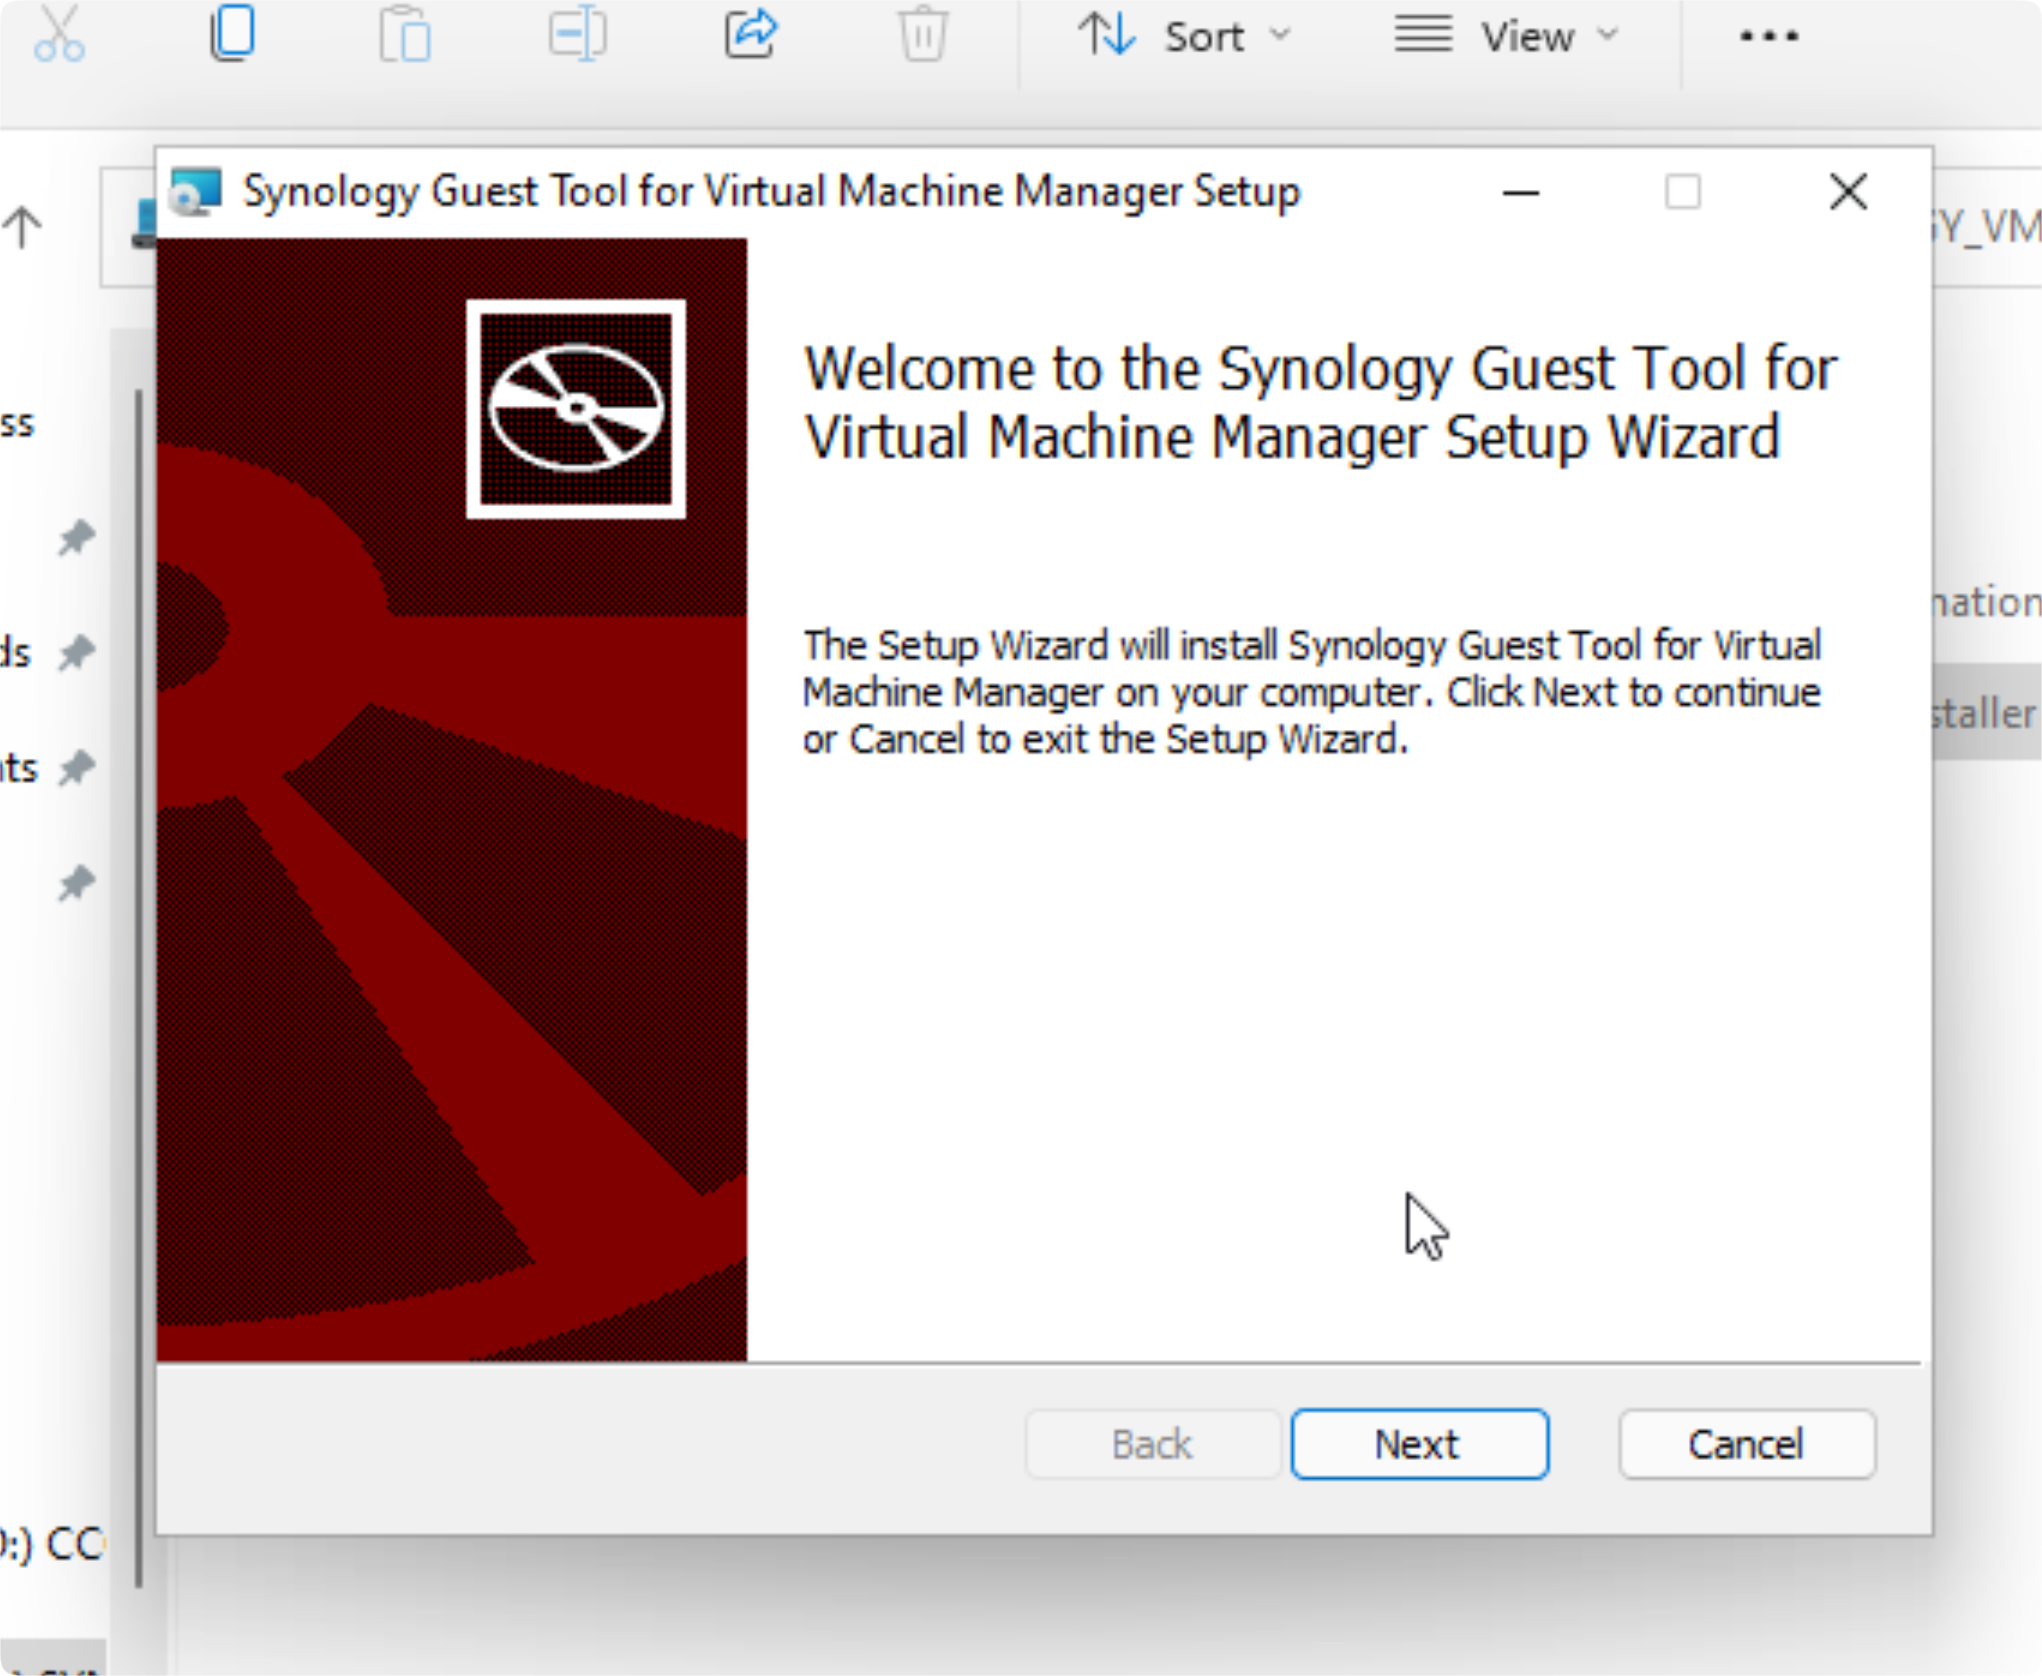
Windows 11 install process
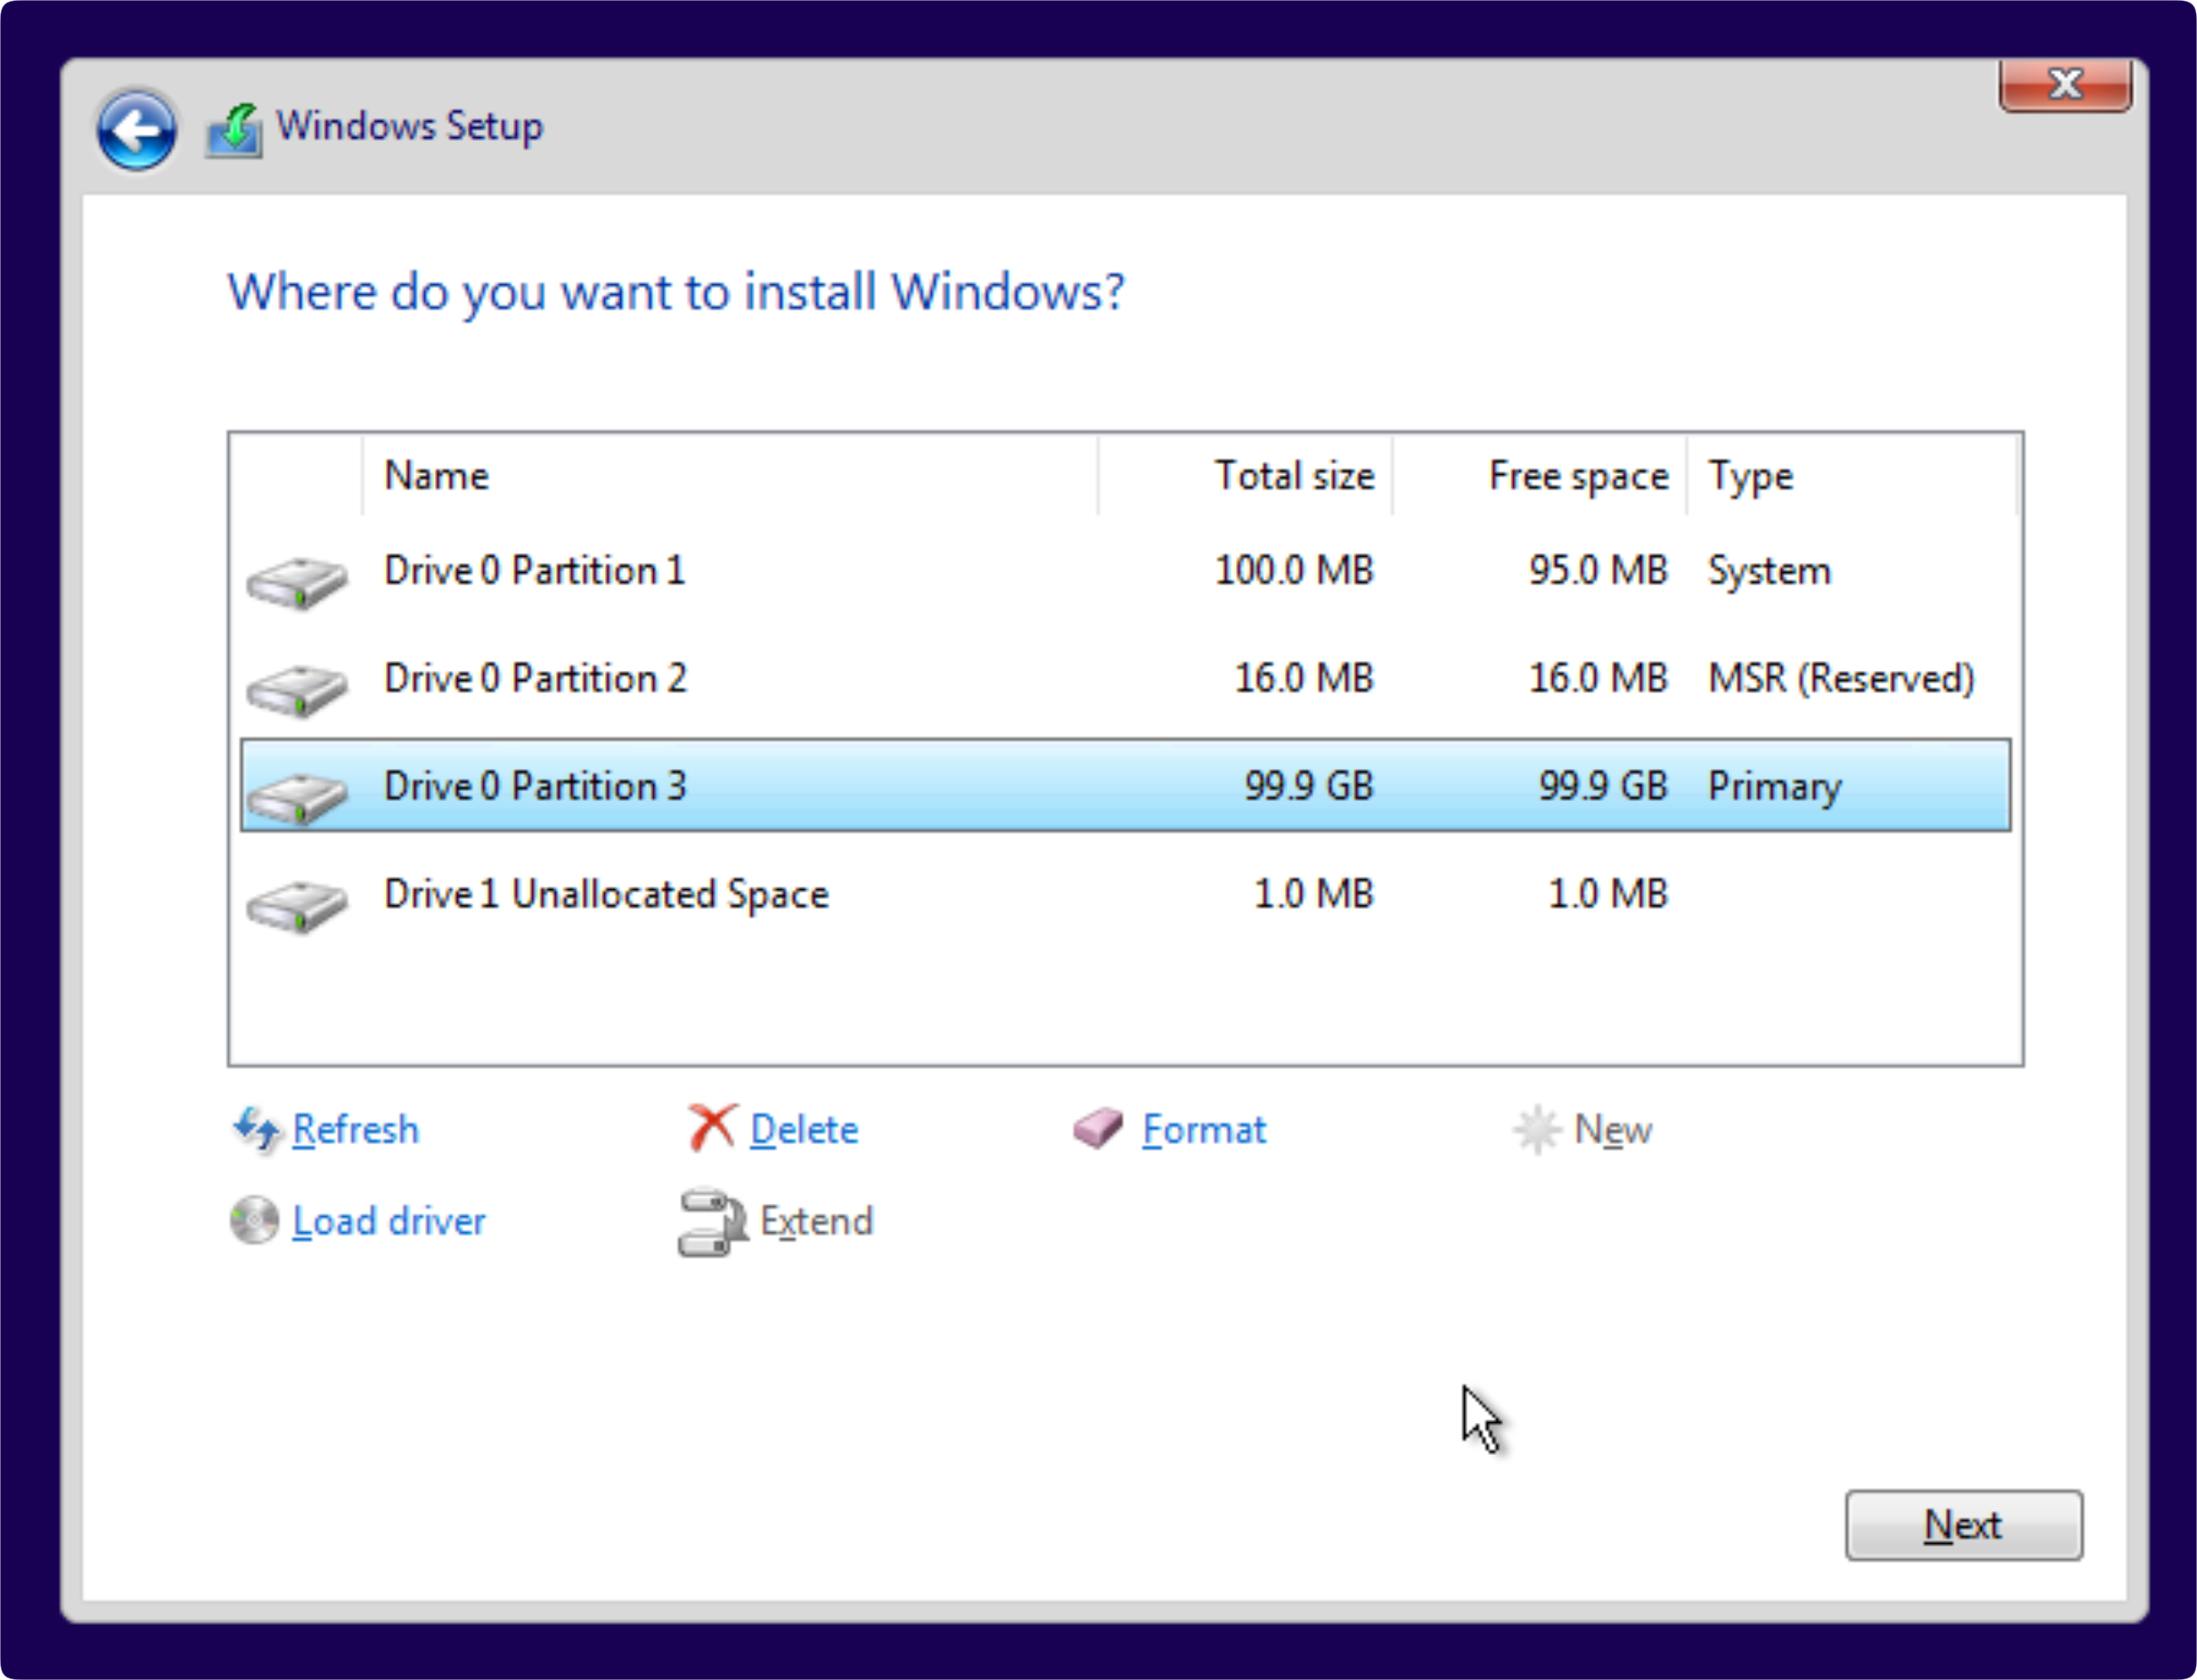
Aside from configuring the VMM package, installing Windows 11 instance took under 12 min of total time (including me taking screens, answering secret questions, configuring the drives during the installation, etc), which I think was great overall.
The VM was configured with 4 vCPU and 4GB of RAM, as well as 100GB of storage and 10G capable LAN.
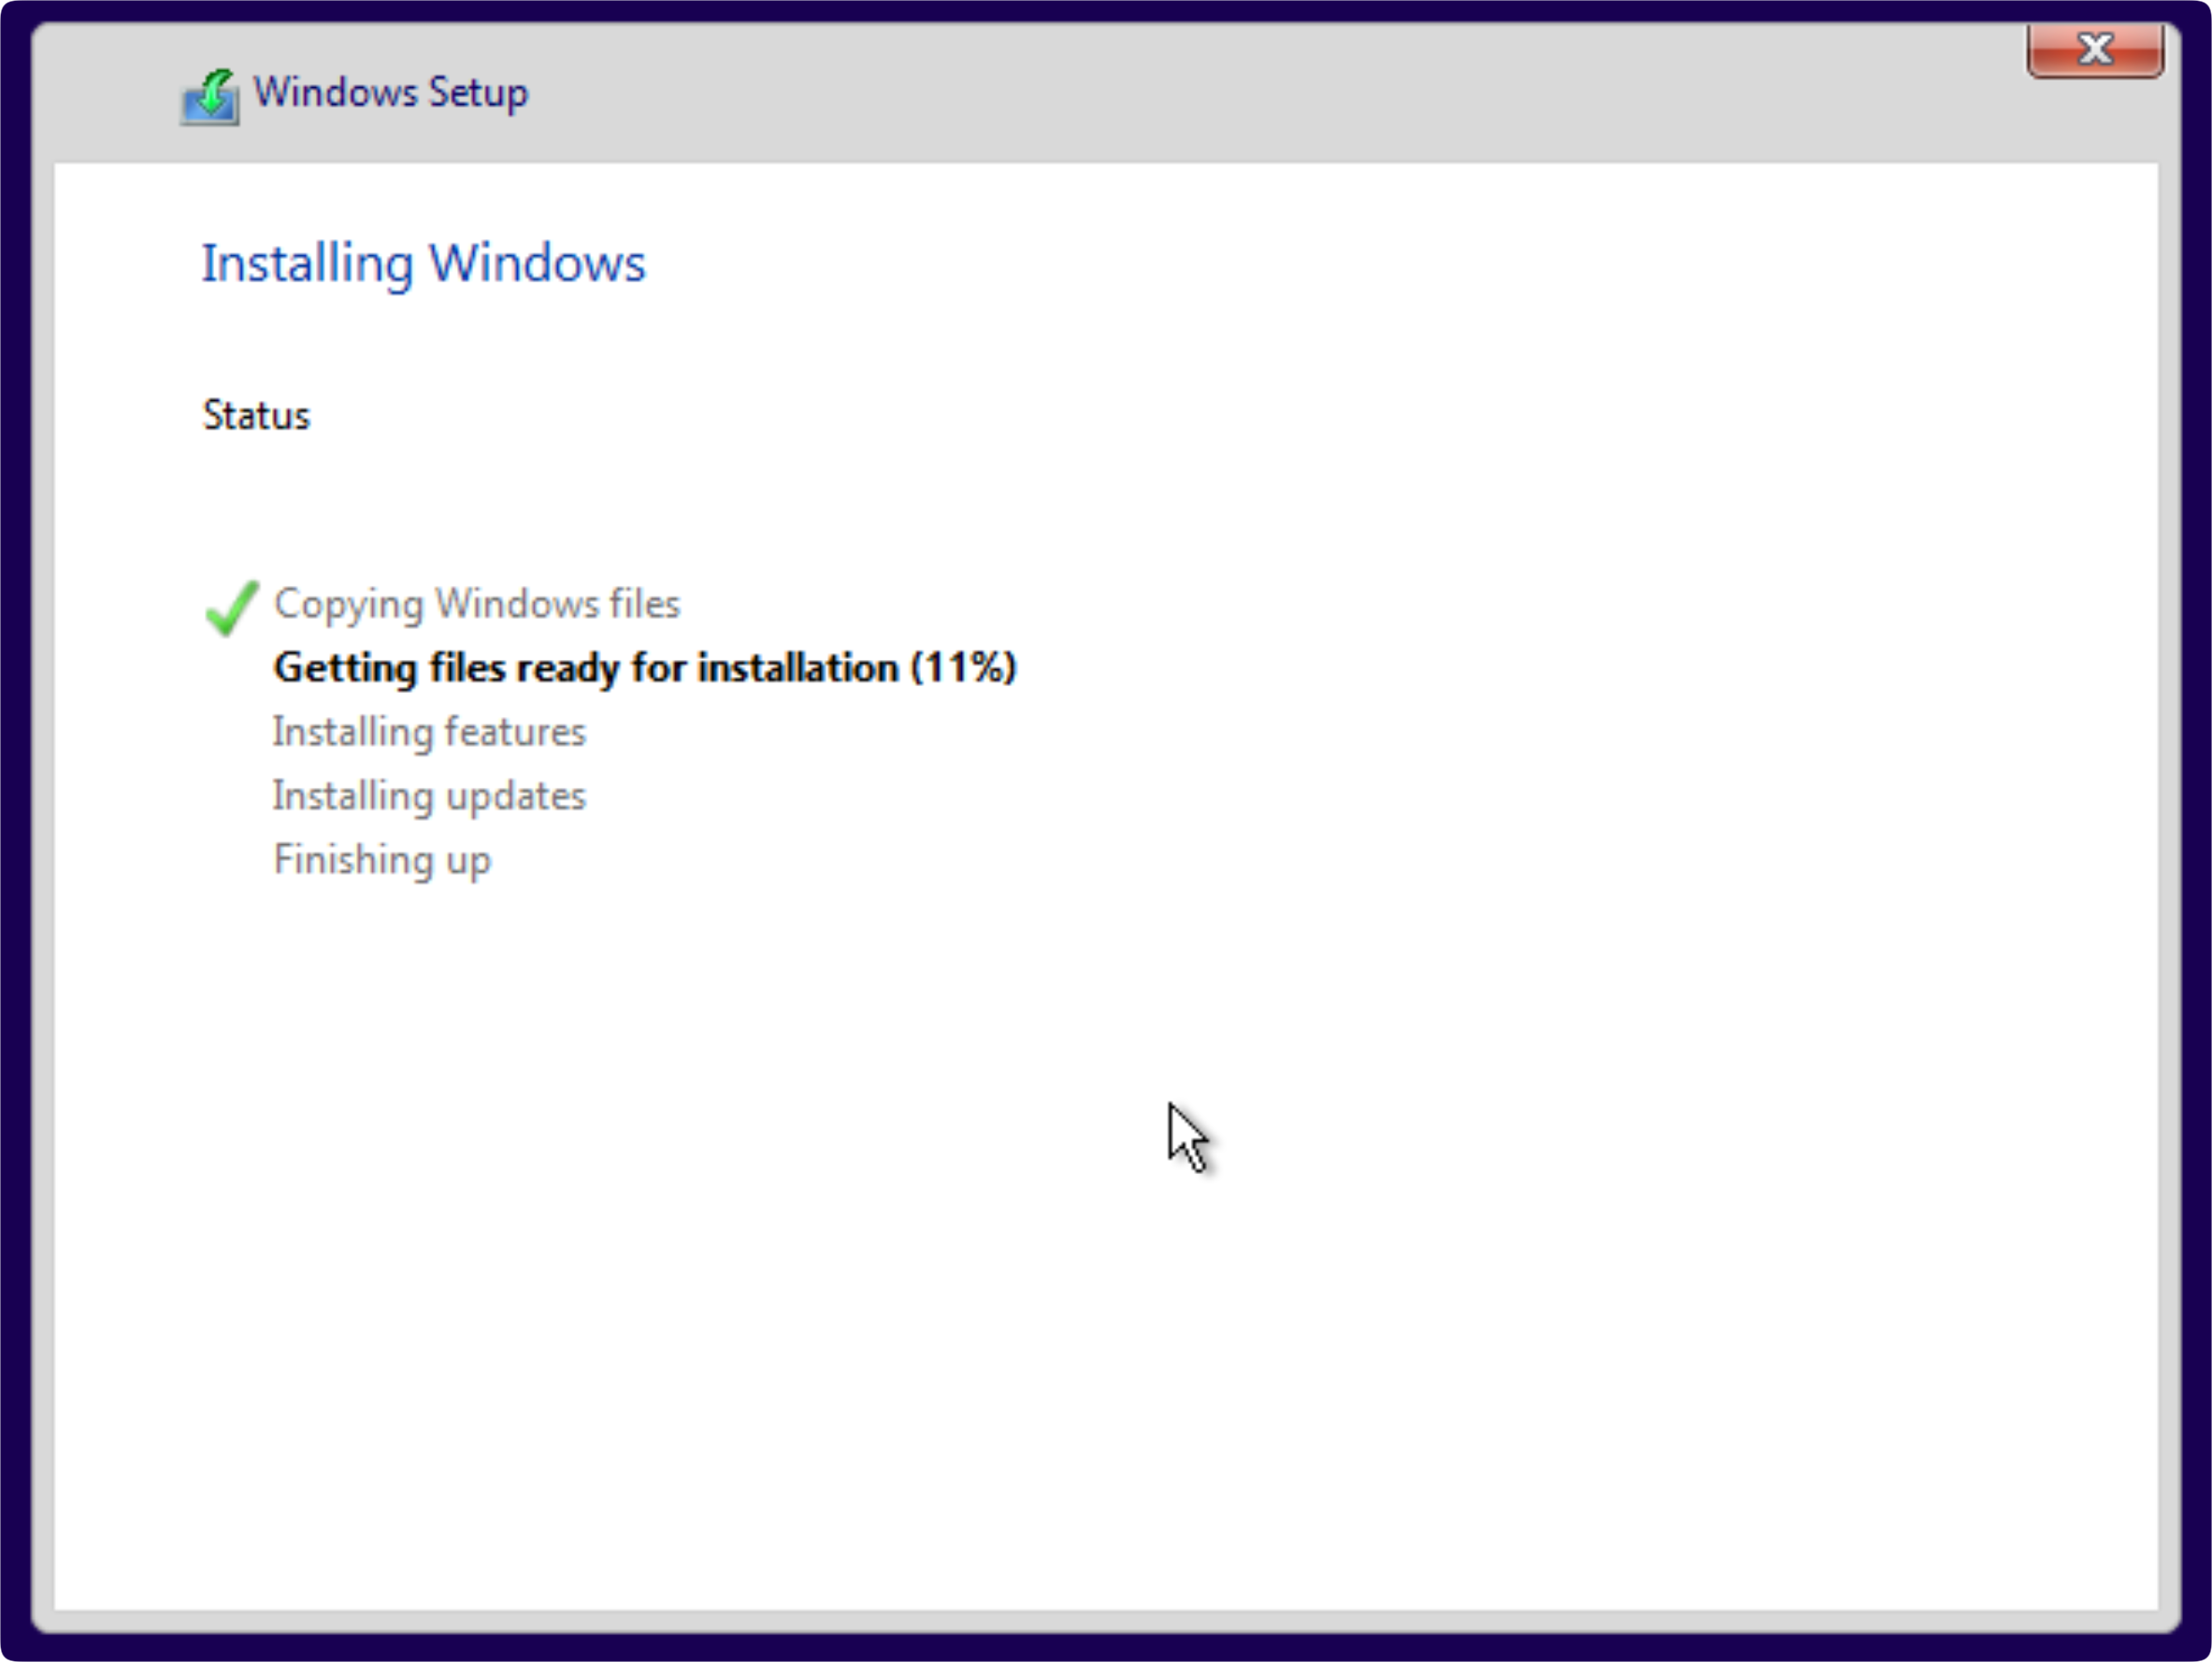
The first stage of setting up, from the boot process until the first reboot took under 5 min.
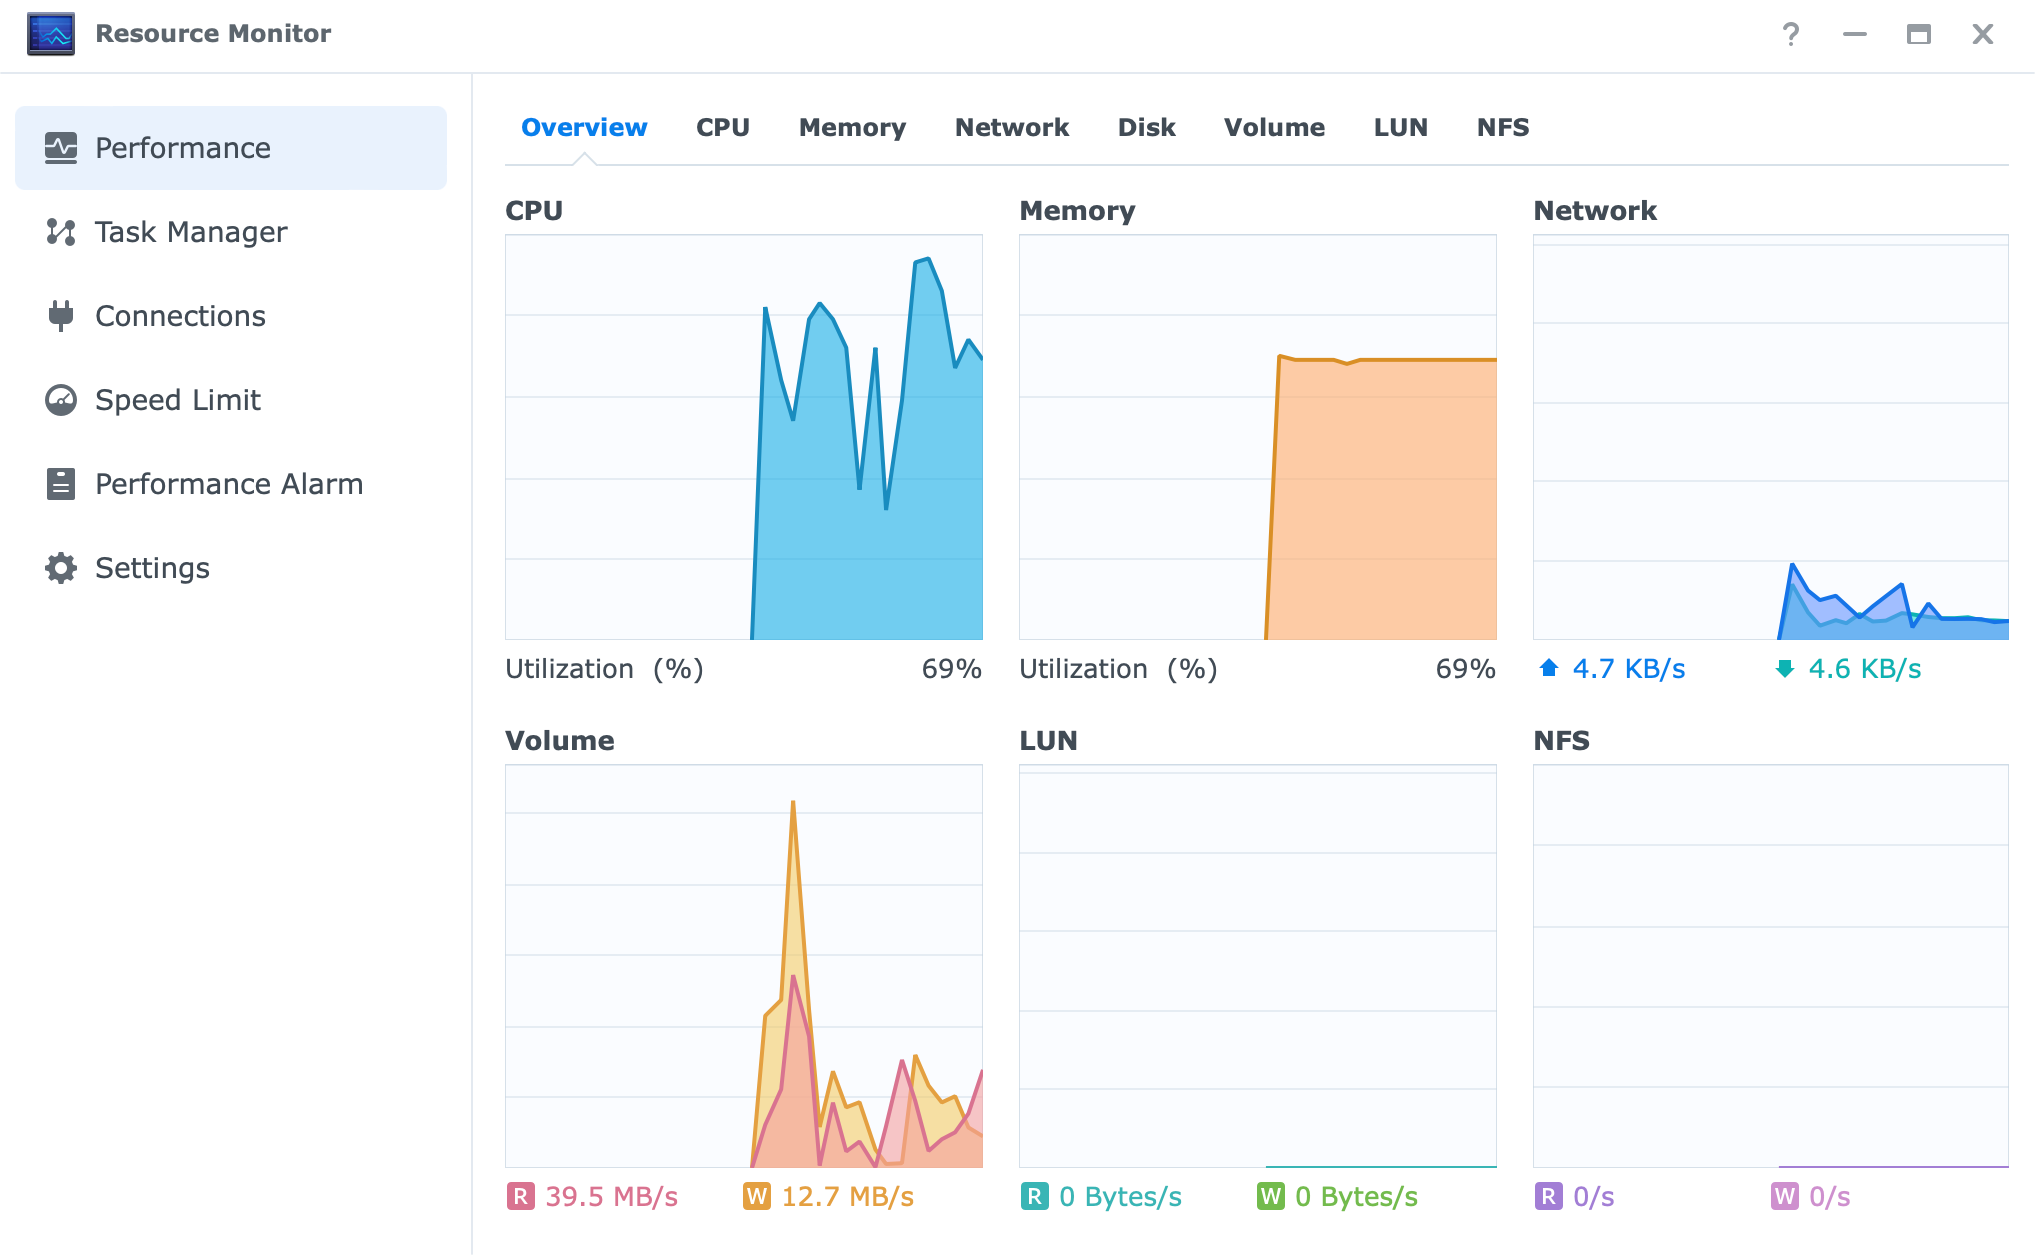
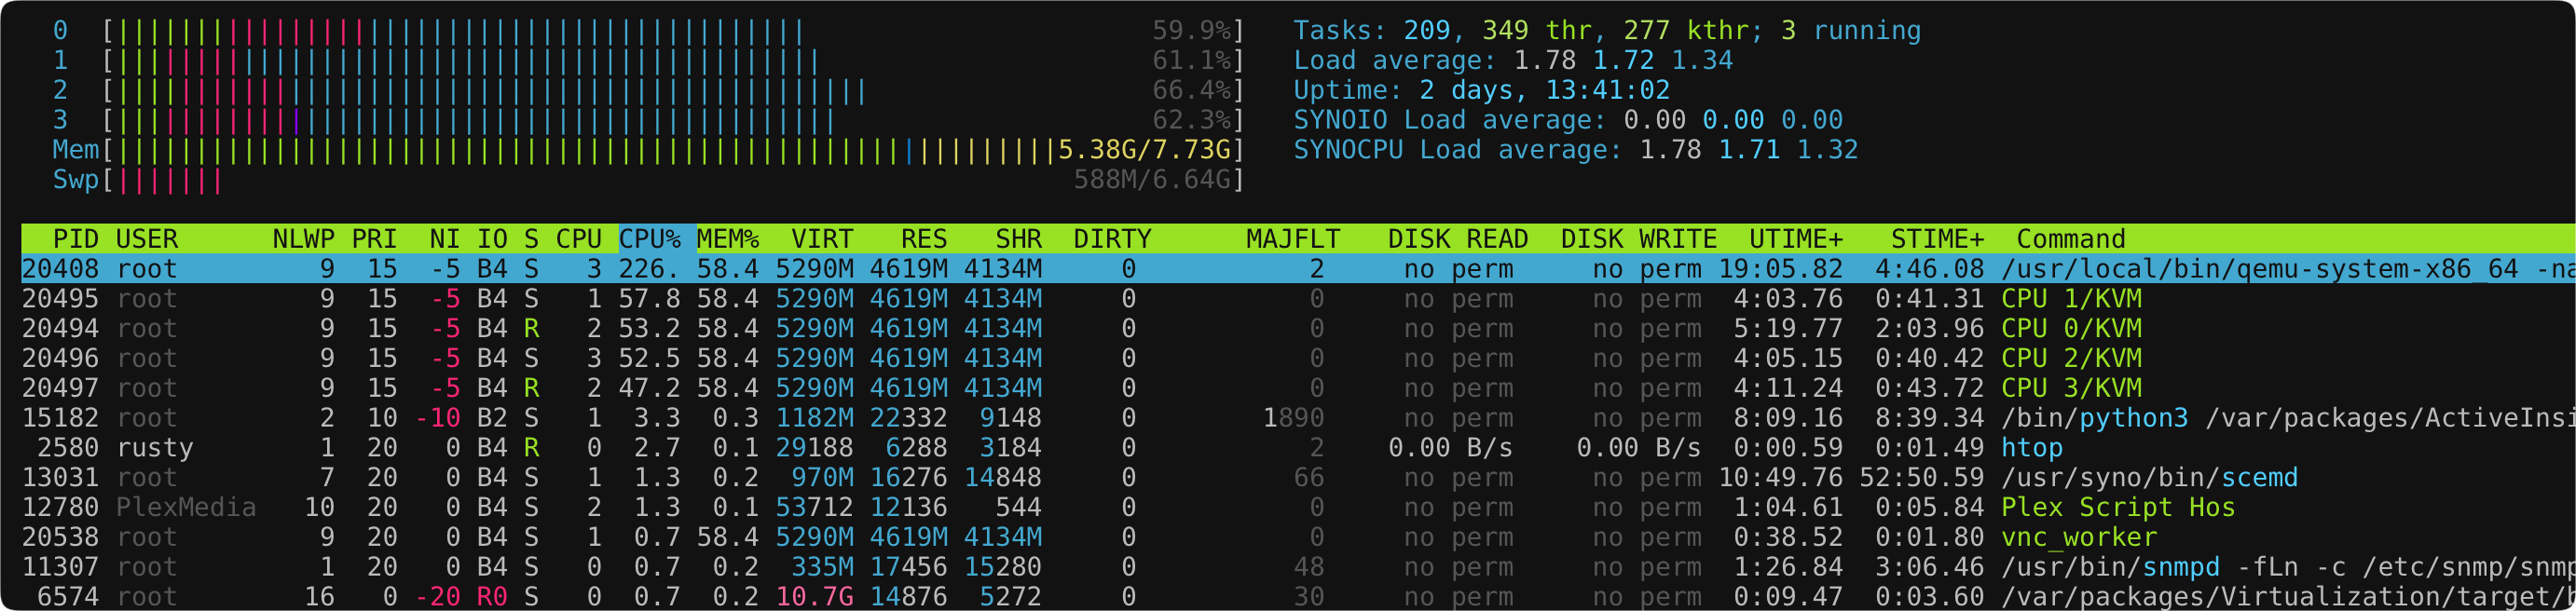
Here is the first time we see this CPU showing its dual cores getting hit with over 80% utilization in some cases.
The second stage was done little under 3 min, following the installation of support tools for better mouse and graphics handling.

With all the installations and configurations as well as numerous reboots, we can see the NAS being pushed to its limits, and as expected, the CPU is the weak link.
Windows 11 experience
Once the support tools were configured, we can access the machine using the RDP client as the web console is not the best for doing any tasks other than checking the status of the machine itself.
Experience is very smooth and fast (but not as a bare metal machine), for most basic and light tasks. I would advise maintaining the usage of this setup for some basic browsing, office tasks, and general file management.
Utilizing this NAS with more apps under a similar VM configuration will significantly deteriorate the overall experience. By this I mean the likes of Photoshop, AutoCAD, or similar.
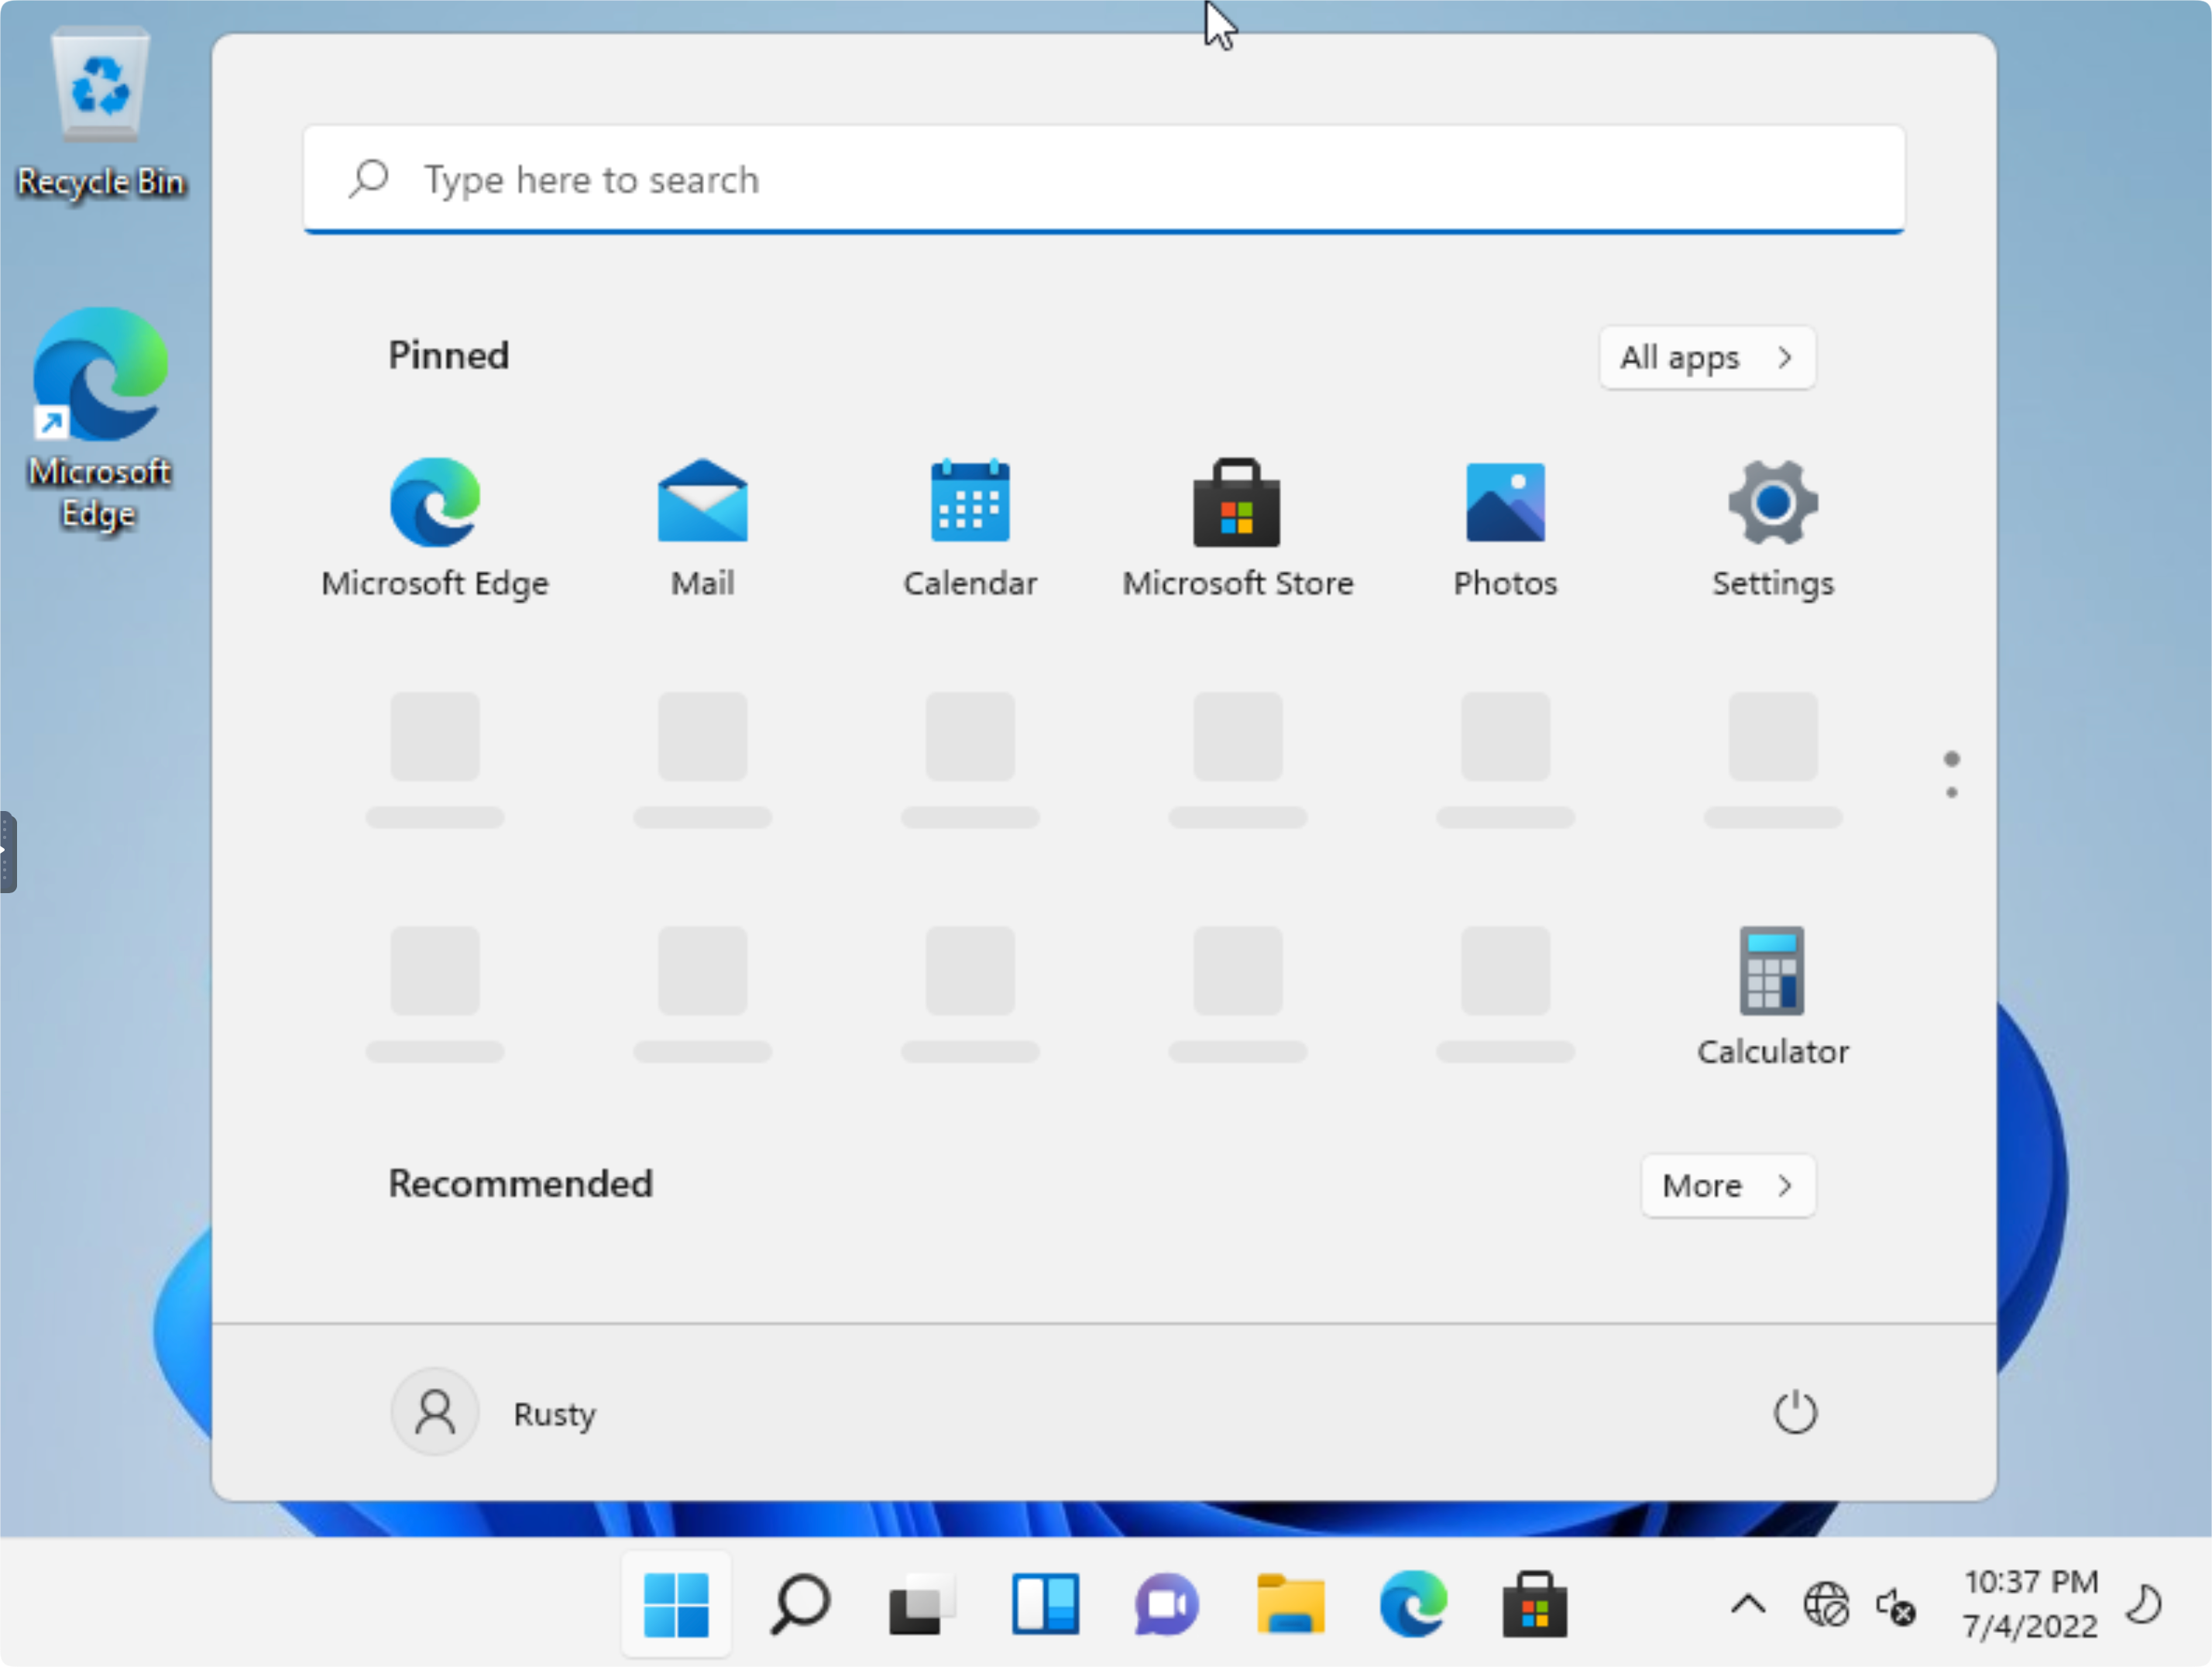
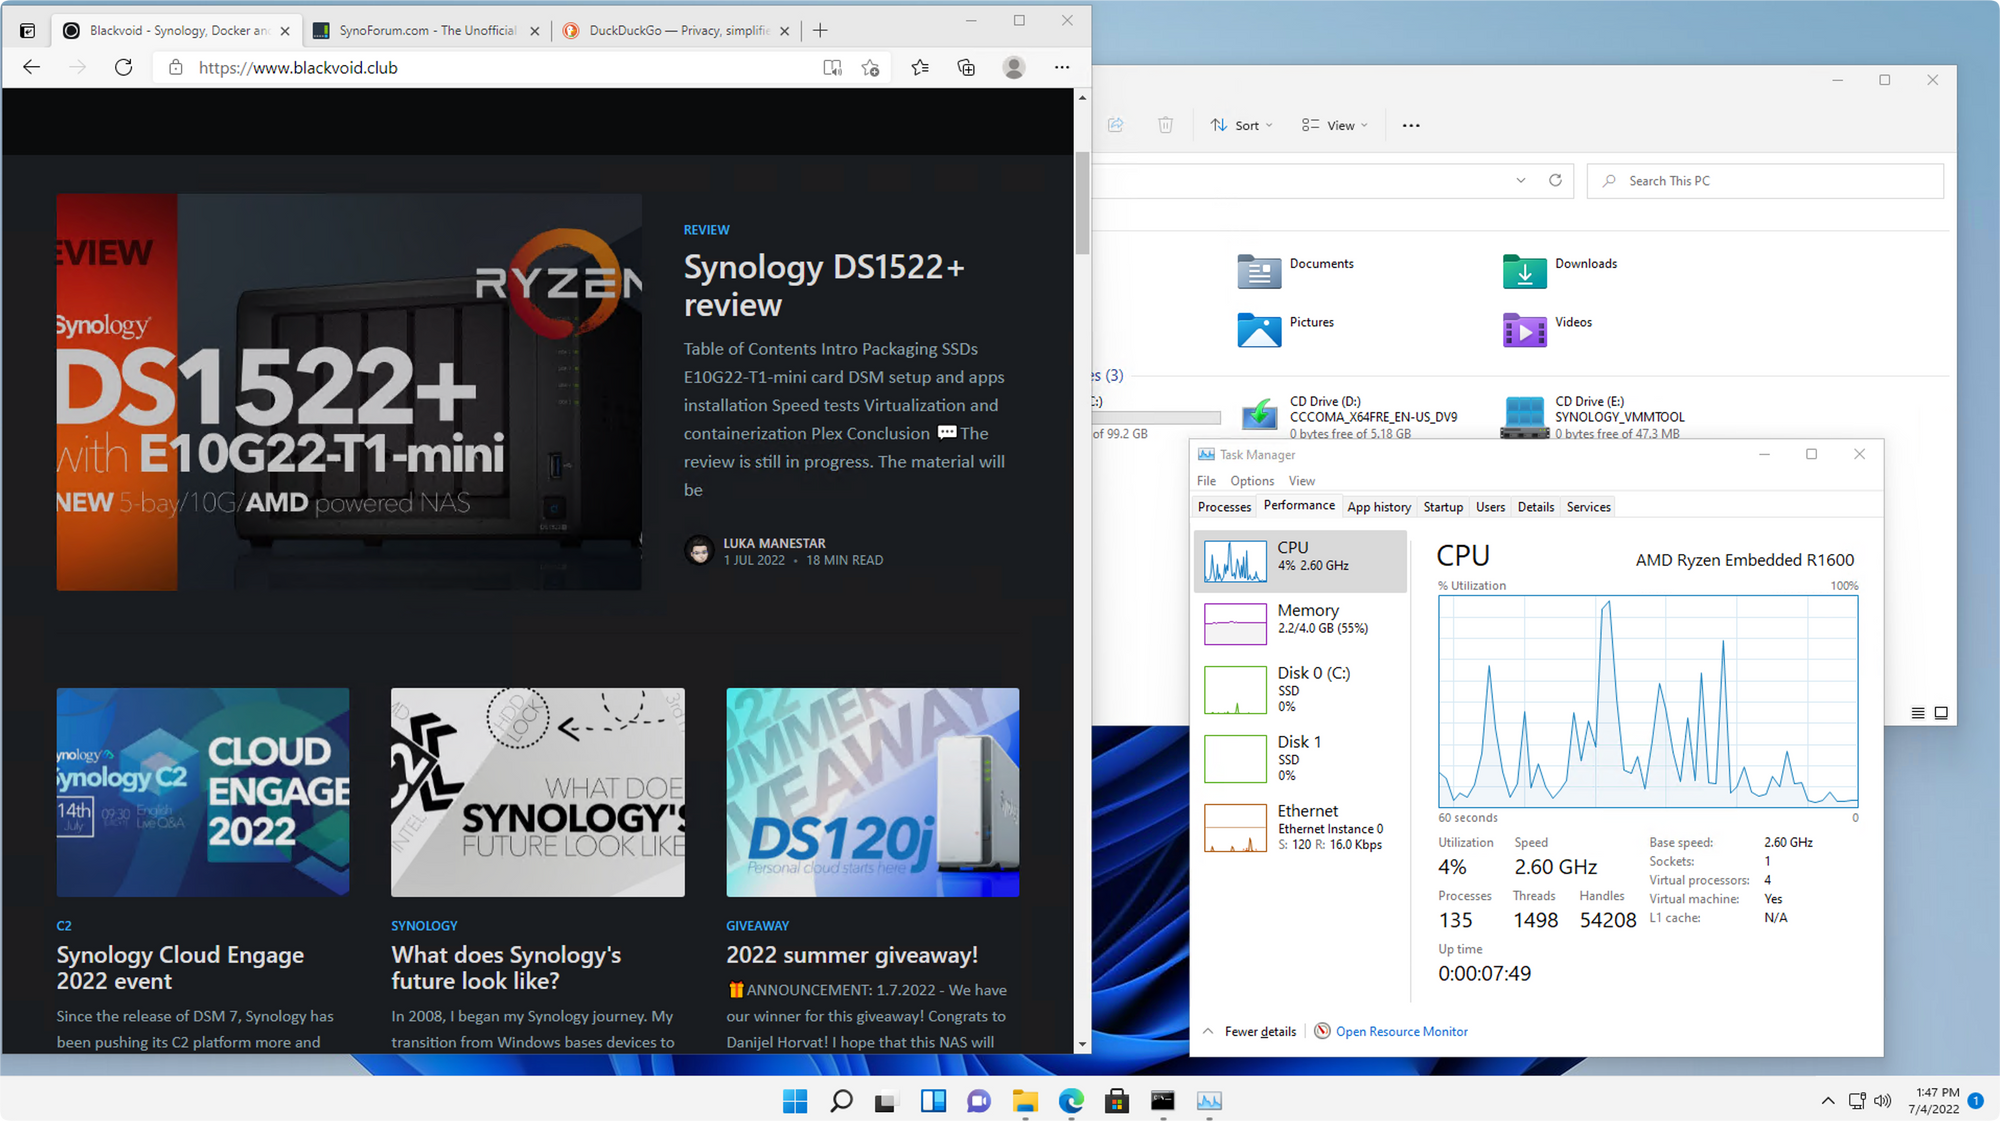
Here is an example of some basic window and app management just so you can get the feel of how it works in general.
Note, if you check the image above (or the video) you will see that the drive utilization (green squares in the task manager) is flat. As expected the drives themselves will not slow you down (SSDs that is), but rather the CPU. Even a full quad-core CPU from the lower segment like Celeron will start to show problems.
Until you get a NAS with some Intel i3 (or better), or an AMD alternative you should not think about any serious usage other than what was mentioned here or maybe for some lab testing scenarios.
Regarding network speed, the VirtIO drives turned this VMs network card into a "10G" detected interface. Speed vise, it was more along the line of 5-6G (around 600MBits top) getting about half my available bandwidth.
Still, saying all this, if you do plan on getting this NAS with an SSD setup for the sole purpose of running some VMs, keep in mind that running more than one at a time, you will start to get problems with VMs running a full-blown visual UI.
If you plan on running some "core" VMs, or light Linux instances you could get away with a few of them in parallel. All of the above was done without any other "stress" on the NAS itself, so keep that in mind as well. With multiple concurrent users, apps, services, etc, running in parallel, your experience might vary.
Finally, I have to say that the Win 11 experience in terms of installation speed, and usage, was more than I expected, but still, this was done on a bare NAS with no other services or users utilizing it, so one more time, manage your expectations.
Along the VM element, as with any other "plus" model, DS1522+ offers Docker support as well. Containers are a new "hot" thing in the past decade, and they continue to grow. A brilliant addition to a very capable device, and if you are looking for apps to host on your NAS that are not in the official Package Center, Docker is a perfect platform for it.
The only thing that you will have to be mindful of with Docker is RAM. Be sure to have enough of it, based on the type of quantity of containers, and you will be fine.
I won't go into specific containers, but there is no platform that this device will not be able to host. Password manager, DBs, web hosting, smart device controllers, you name it, it will deliver. If you are looking for more details or examples, be sure to check my Docker section for some ideas.

:Plex
One of the most common roles that you might use in your NAS today, is local media storage, backup, and of course, streaming. My favorite platform of choice is Plex, even though Synology has it's own called Video Station.
The reason I use Plex is that it's been around since 2010 (way before VS came out), and it got better and better over the years. I won't go into details, but let's say that if you want to use your NAS as your media storage, you can't go wrong with any device, but if you want that NAS to be also a streaming server, well then more then a few factors need to be considered, the platform is just one of them.
So, can DS1522+ be served as a media storage device? No problem there, a file is a file, right? But can it be a Plex media server? It can, and it can't. Let's see what I mean by that.
Plex server it can do, HW transcode, it can't
Considering the choice of the AMD CPU for this model, Synology was going for a device setup that can provide enough power to be a fast multi-user device, support lots of RAM (for docker and VM needs), and provide near 1G/s transfers both on the drive side of things and the network.
What didn't make the cut was the media streaming element, specifically transcoding from one format/resolution to the other. Because the beforementioned CPU has no GPU component inside it, and Plex doesn't officially support HW transcoding using the AMD platform (but it will work most of the time), when it comes that you need to transcode your content, this NAS will have to accept defeat.
I have tested some 4K, 1080p, and 720p content both in HDR10/H265 and regular H264 format.
As long as you have a compatible file format for your Plex clients, you will get what is called a Direct Play or Direct Stream stream, and the impact on the NAS will be nonexisting. But, as soon as you start to transcode, manually or automatically, depending on the scenario, the situation changes, drastically.
In the following images, you will see how much of an impact transcode has on this model, and what are its limits.
4K direct play (iOS, iPhone 11, official Plex client)
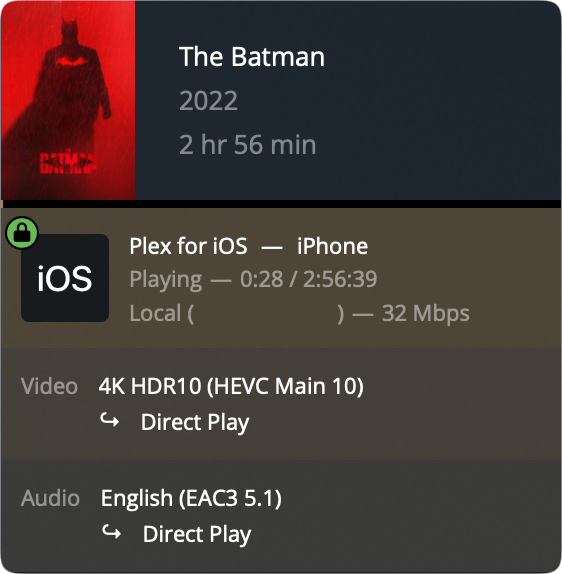
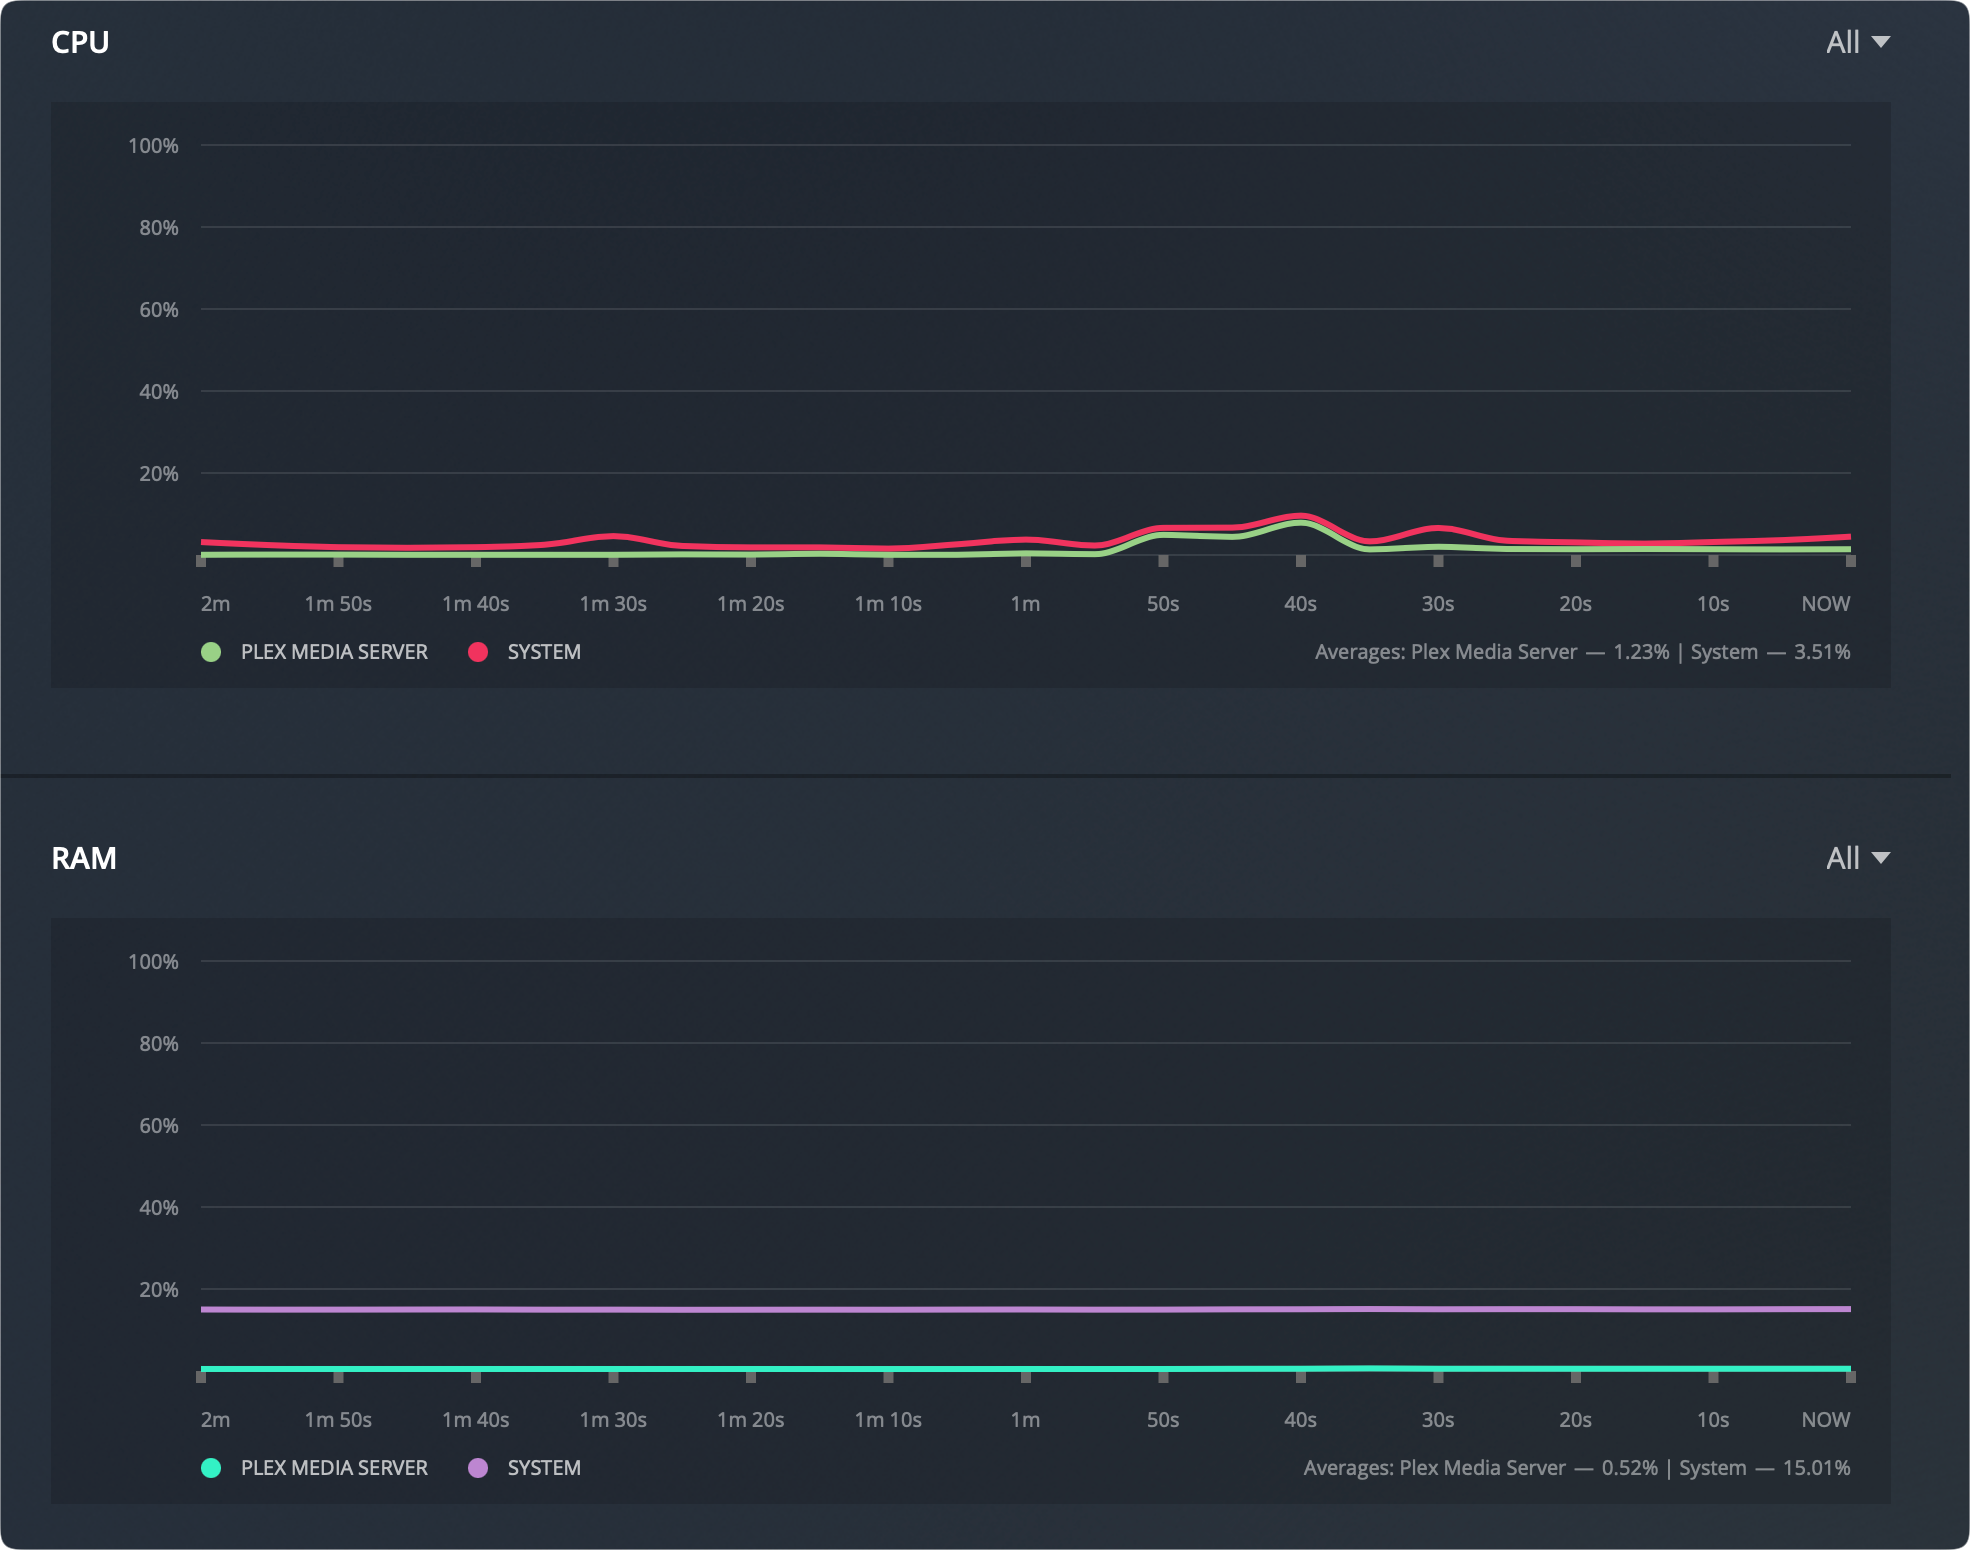
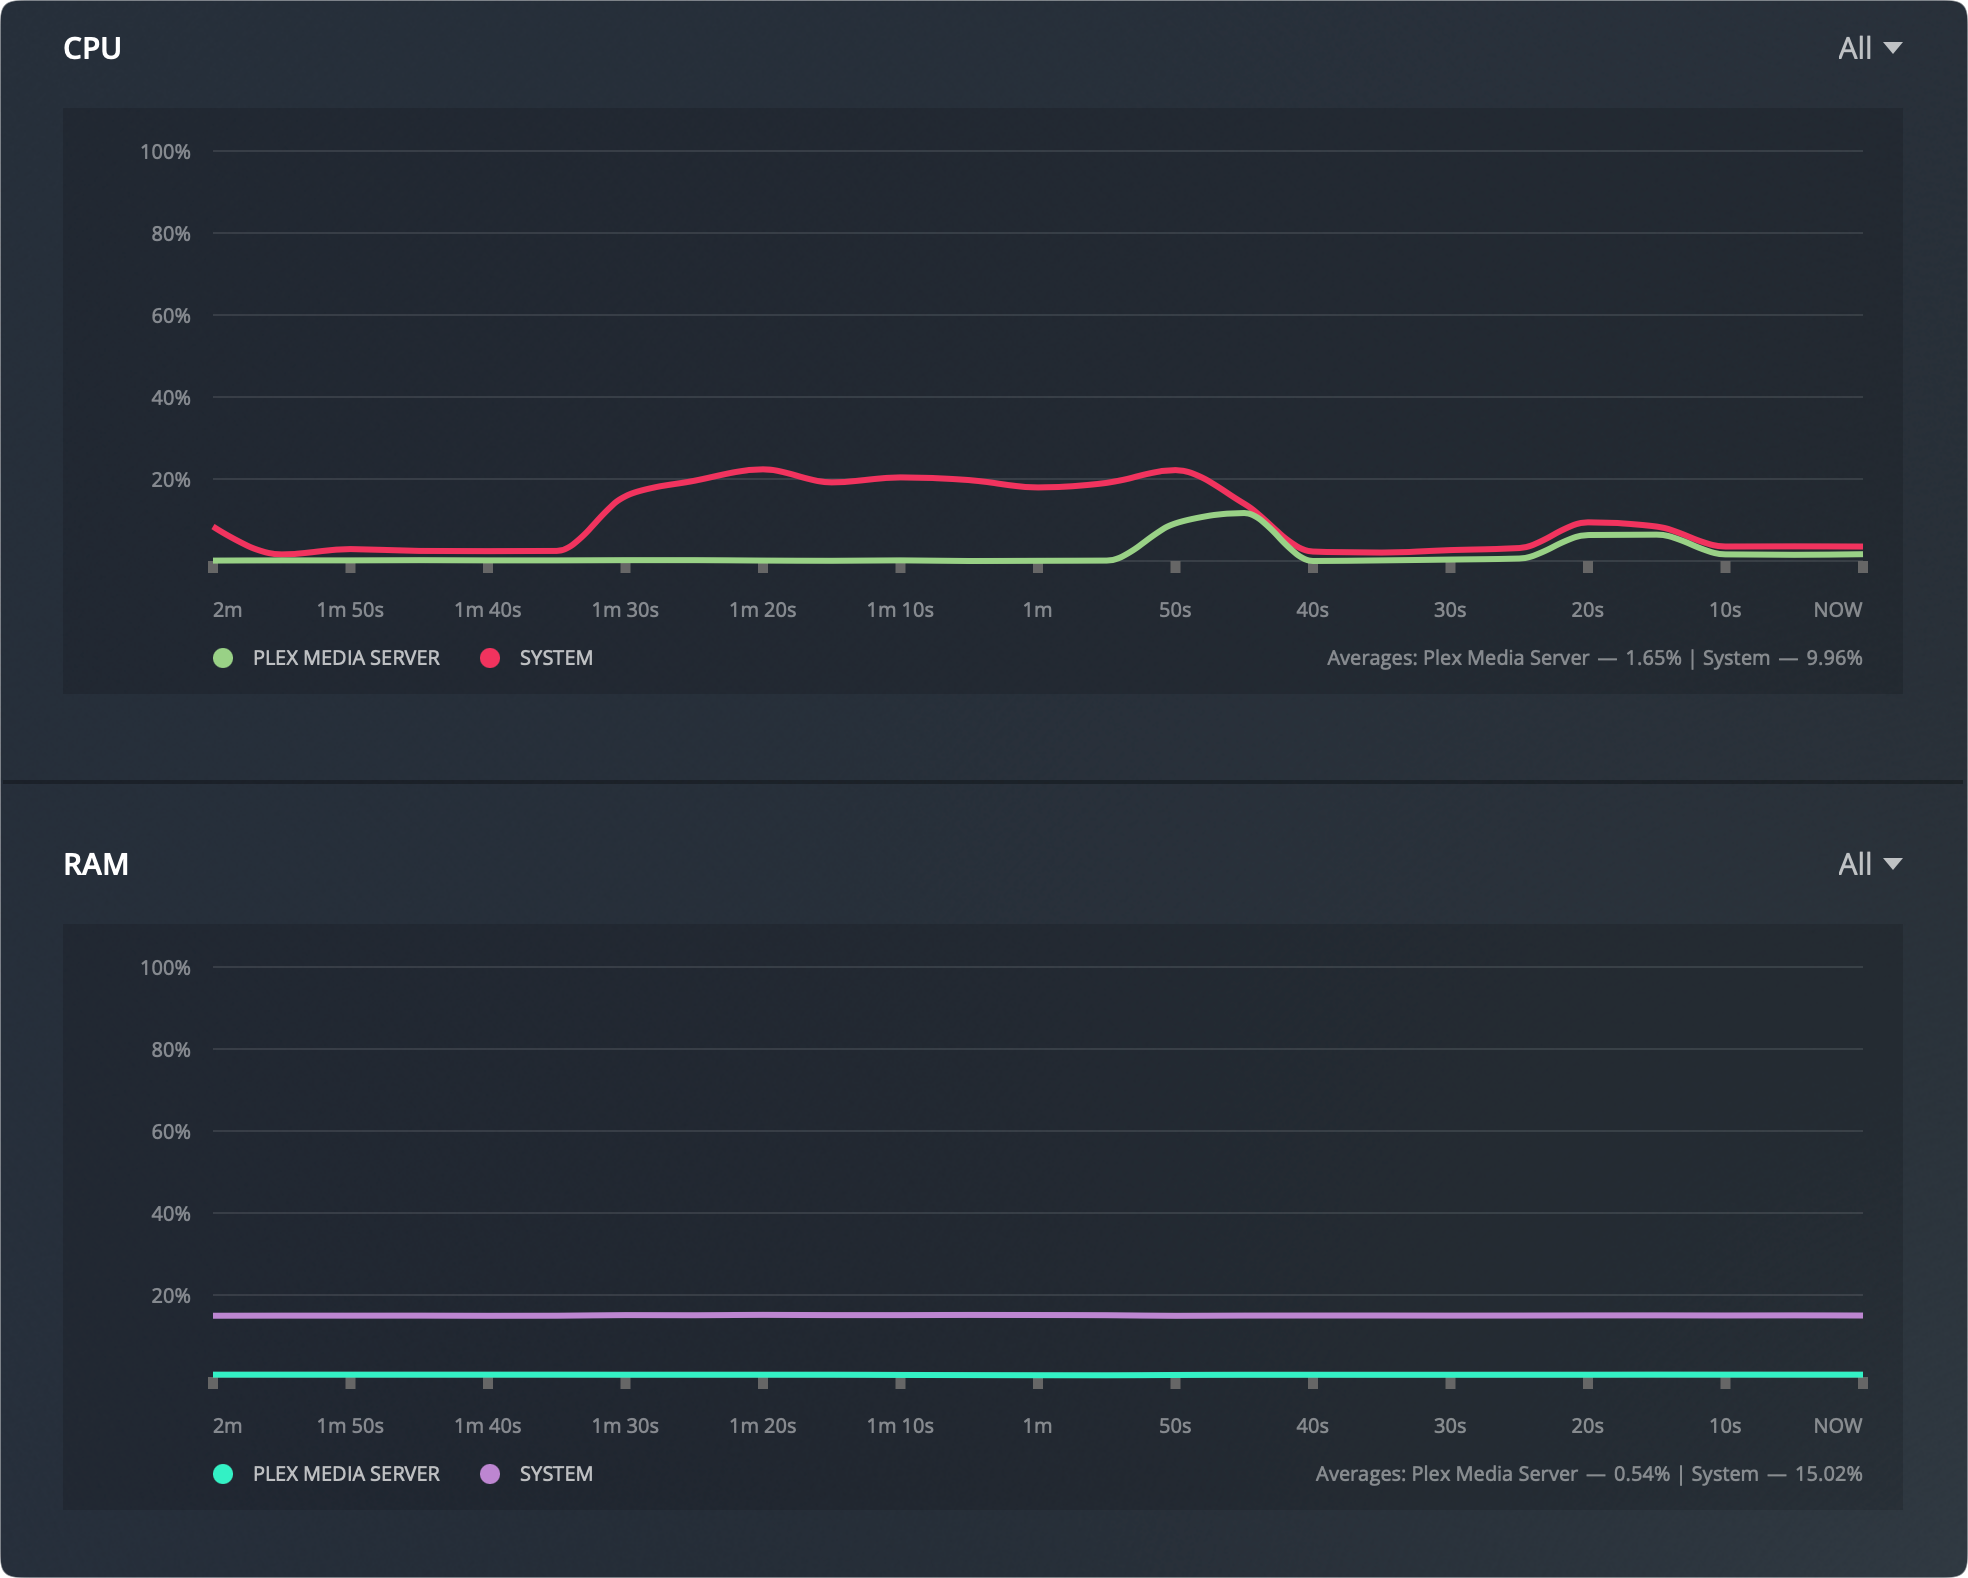
As we can see DS1522+ has no problem serving the file in DirectPlay (original format), and the playback was smooth while the CPU utilization was almost 0%.
4K > 1080p transcode play (iOS, iPhone 11, official Plex client)
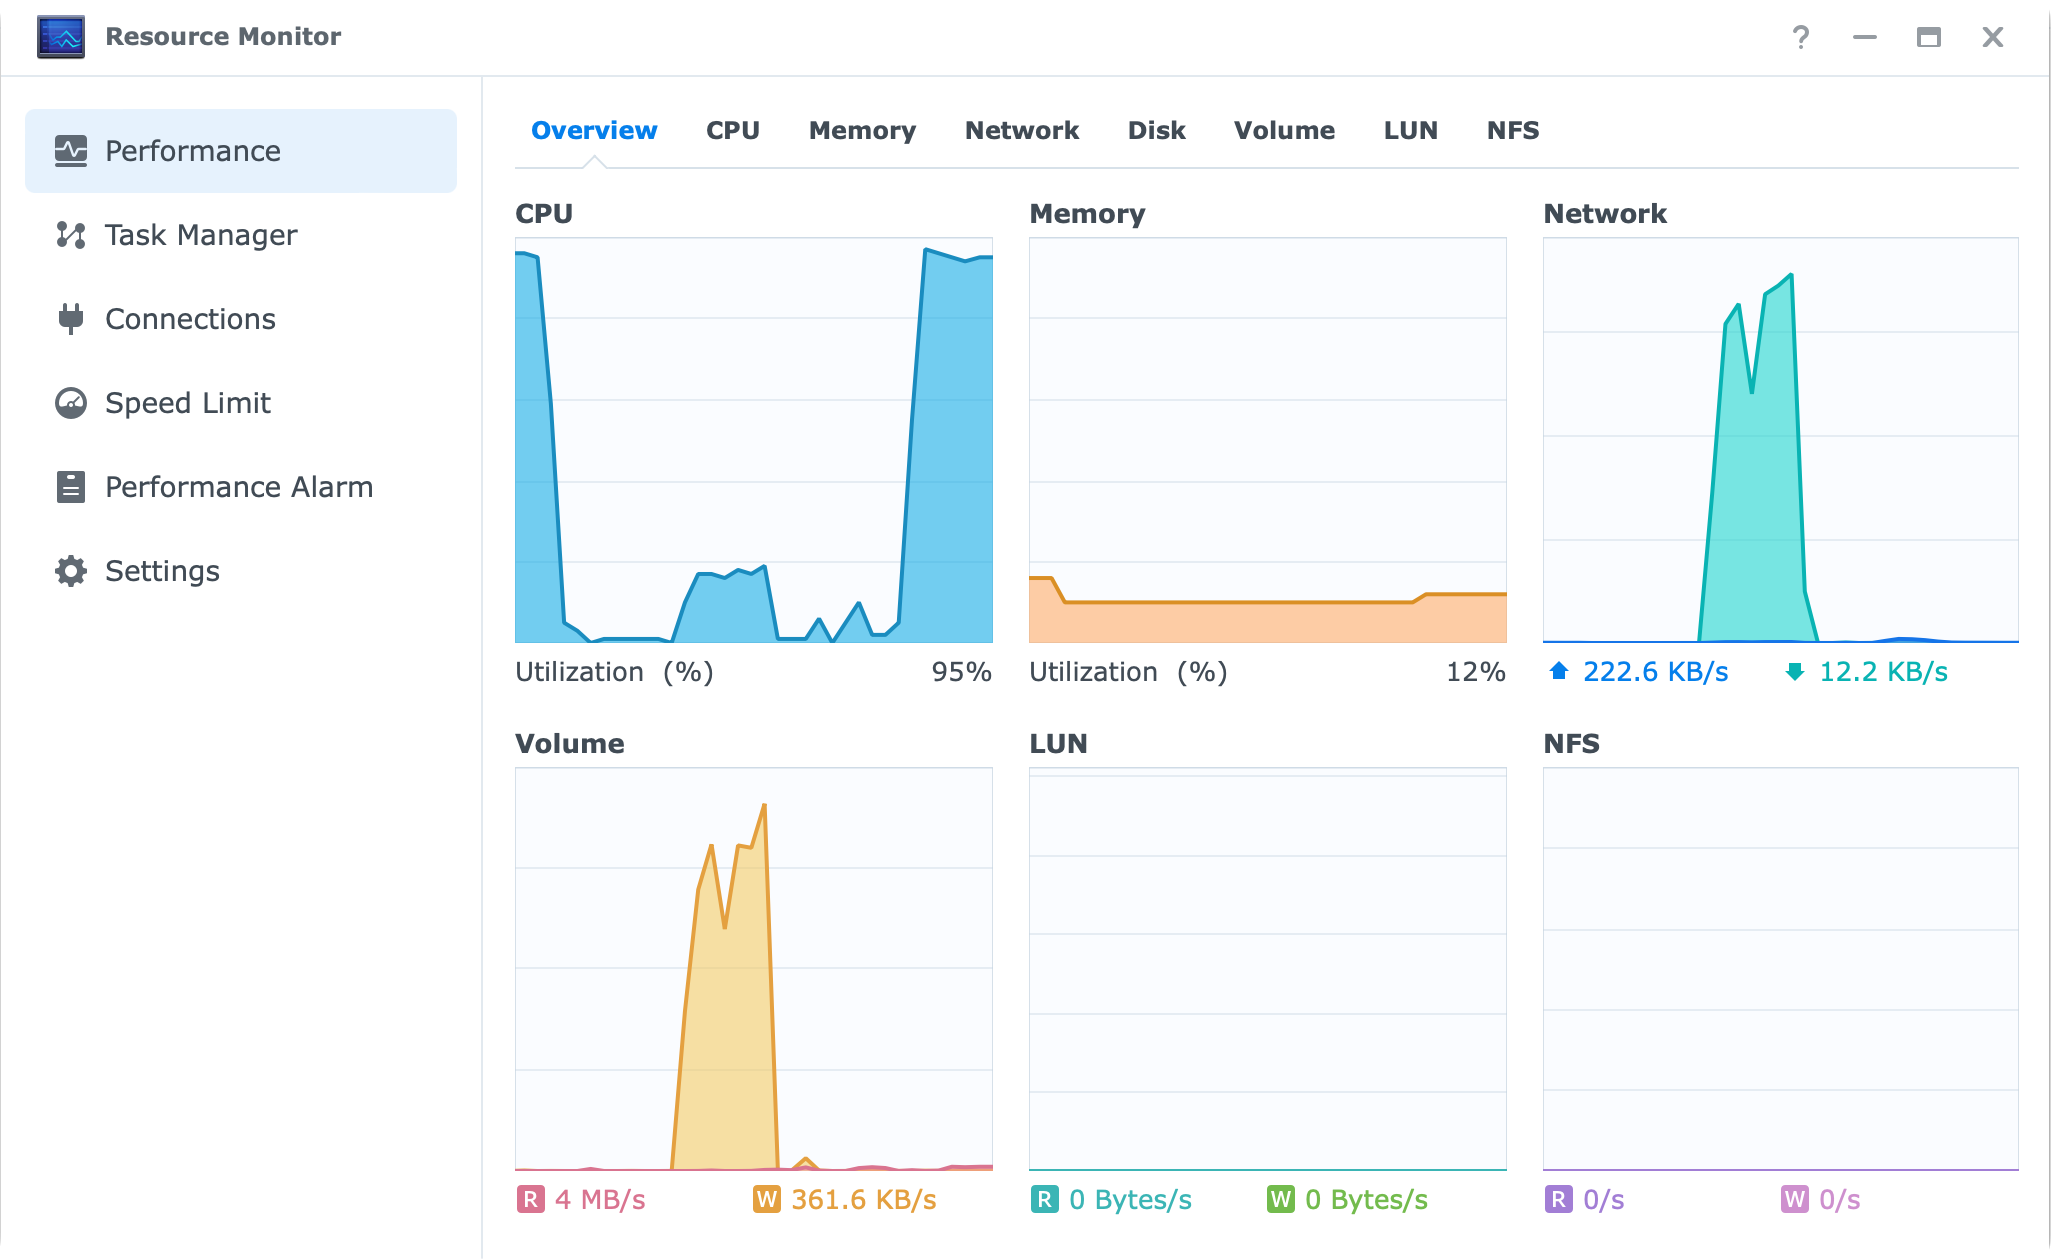
When I try the same file as before but want to push it down to 1080p, transcode kicks in, and with no QuickSync or NVIDIA GPU support, this AMC CPU has to do a software transcode operation that will have problematic results when it comes to presenting your content.
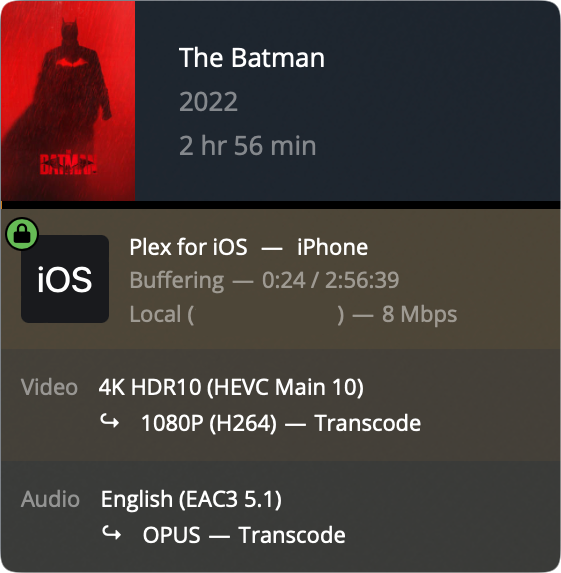
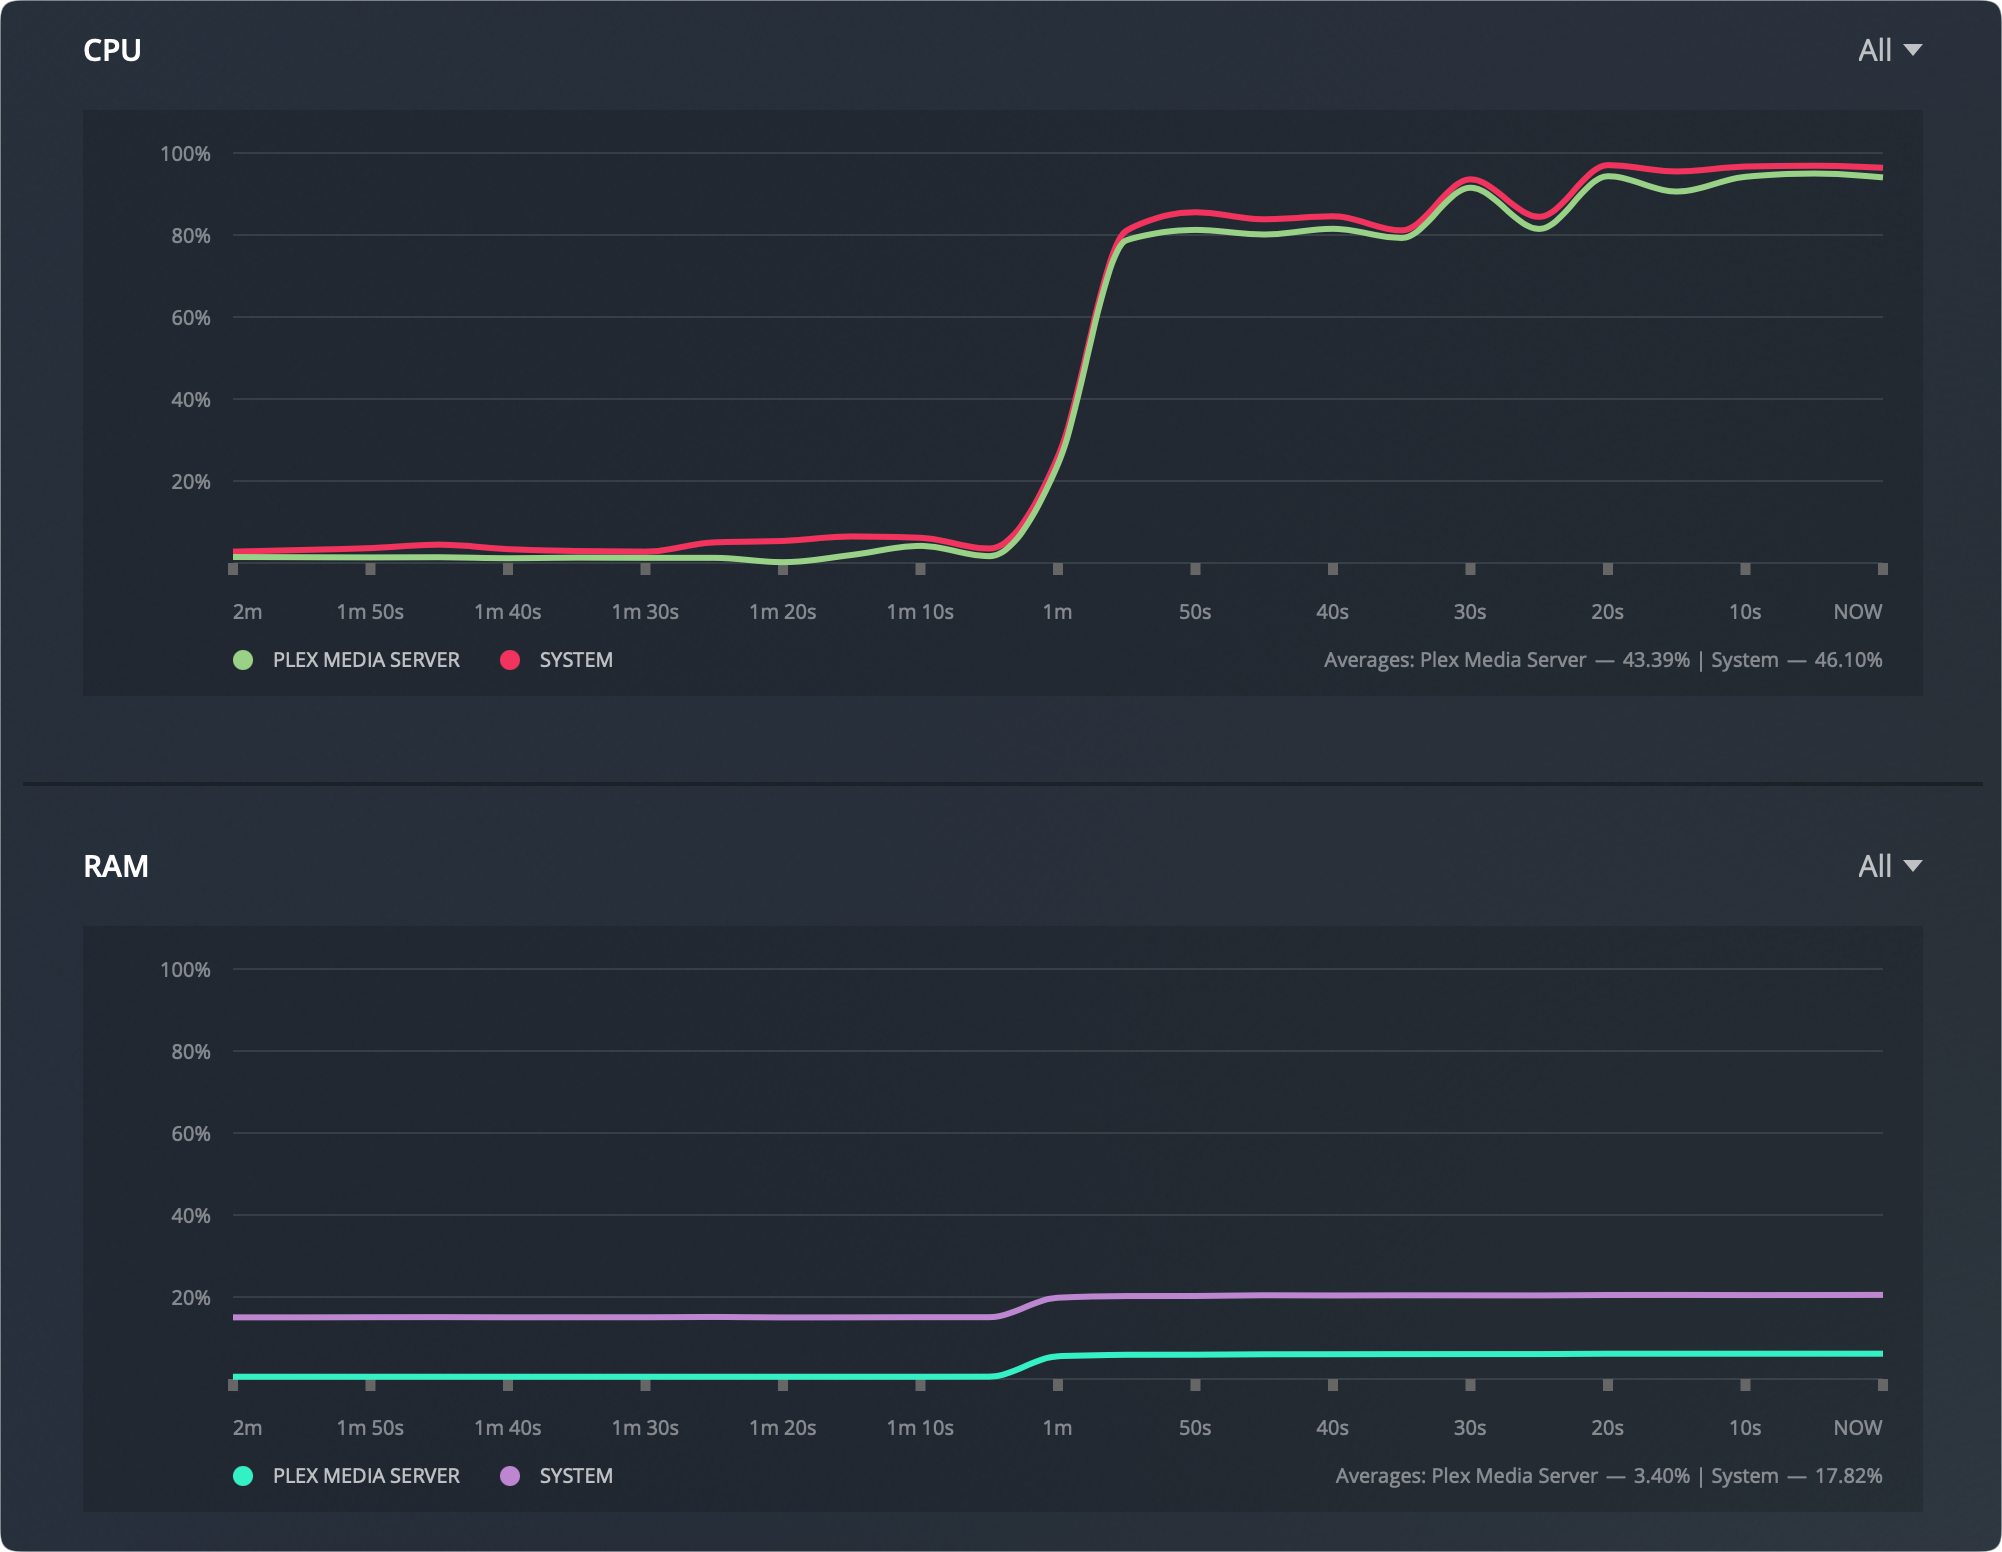
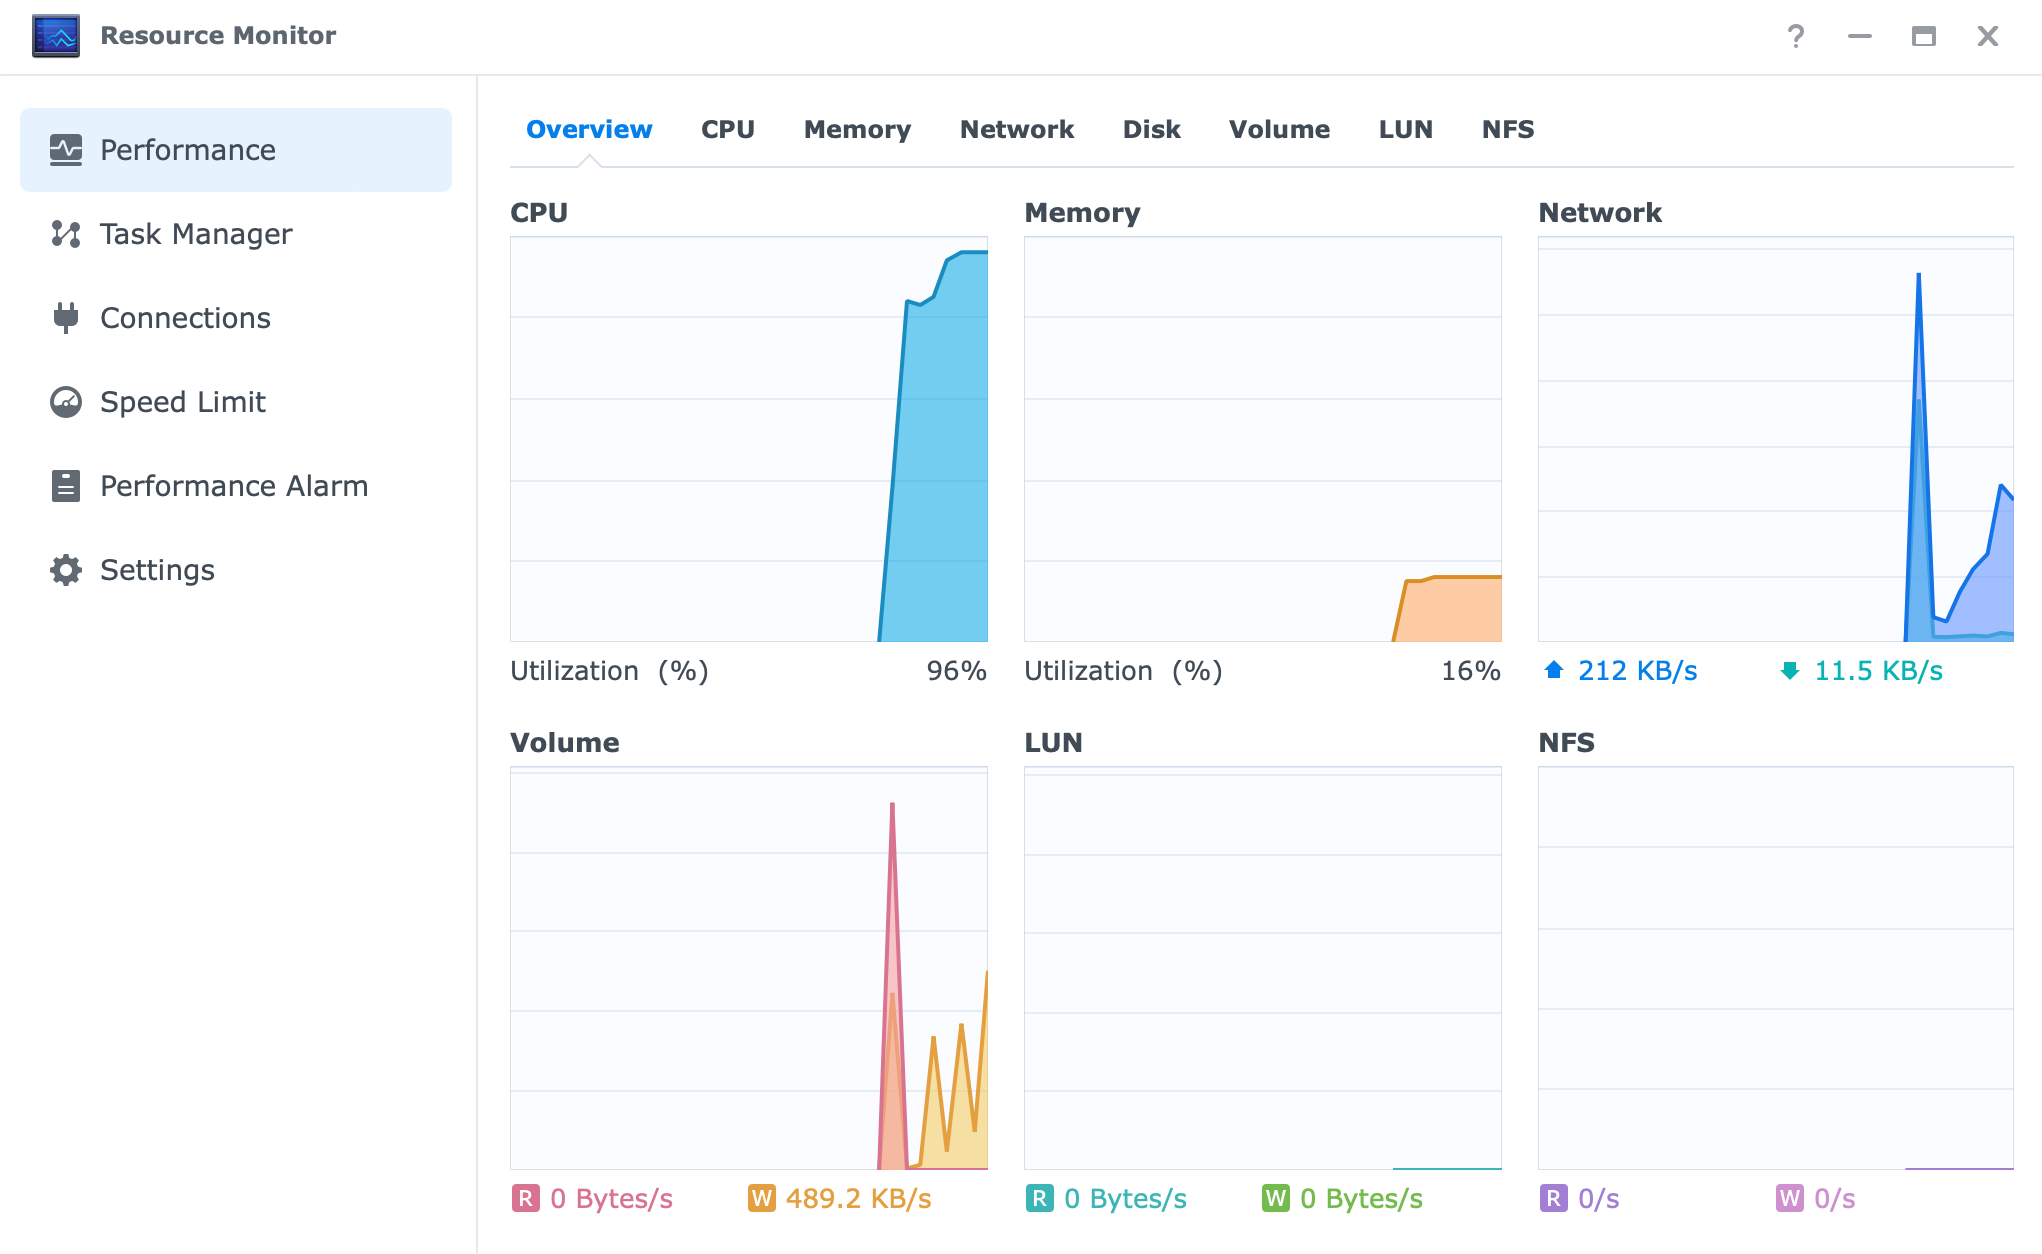
The screenshots clearly show how the content is being transcoded from 4K native to 1080p, and in order to do it, the CPU utilization in this dual-core model skyrocketed to well over 96%. The stream was buffering every few seconds and was unplayable.
1080p direct play (iOS, iPhone 11, official Plex client)
Stepping down from 4K territory into 1080p, again we have a smooth presentation of content with DirectPlay and zero problems.
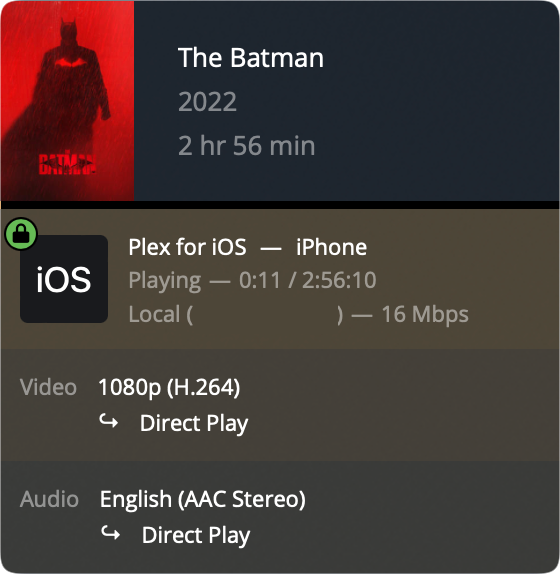
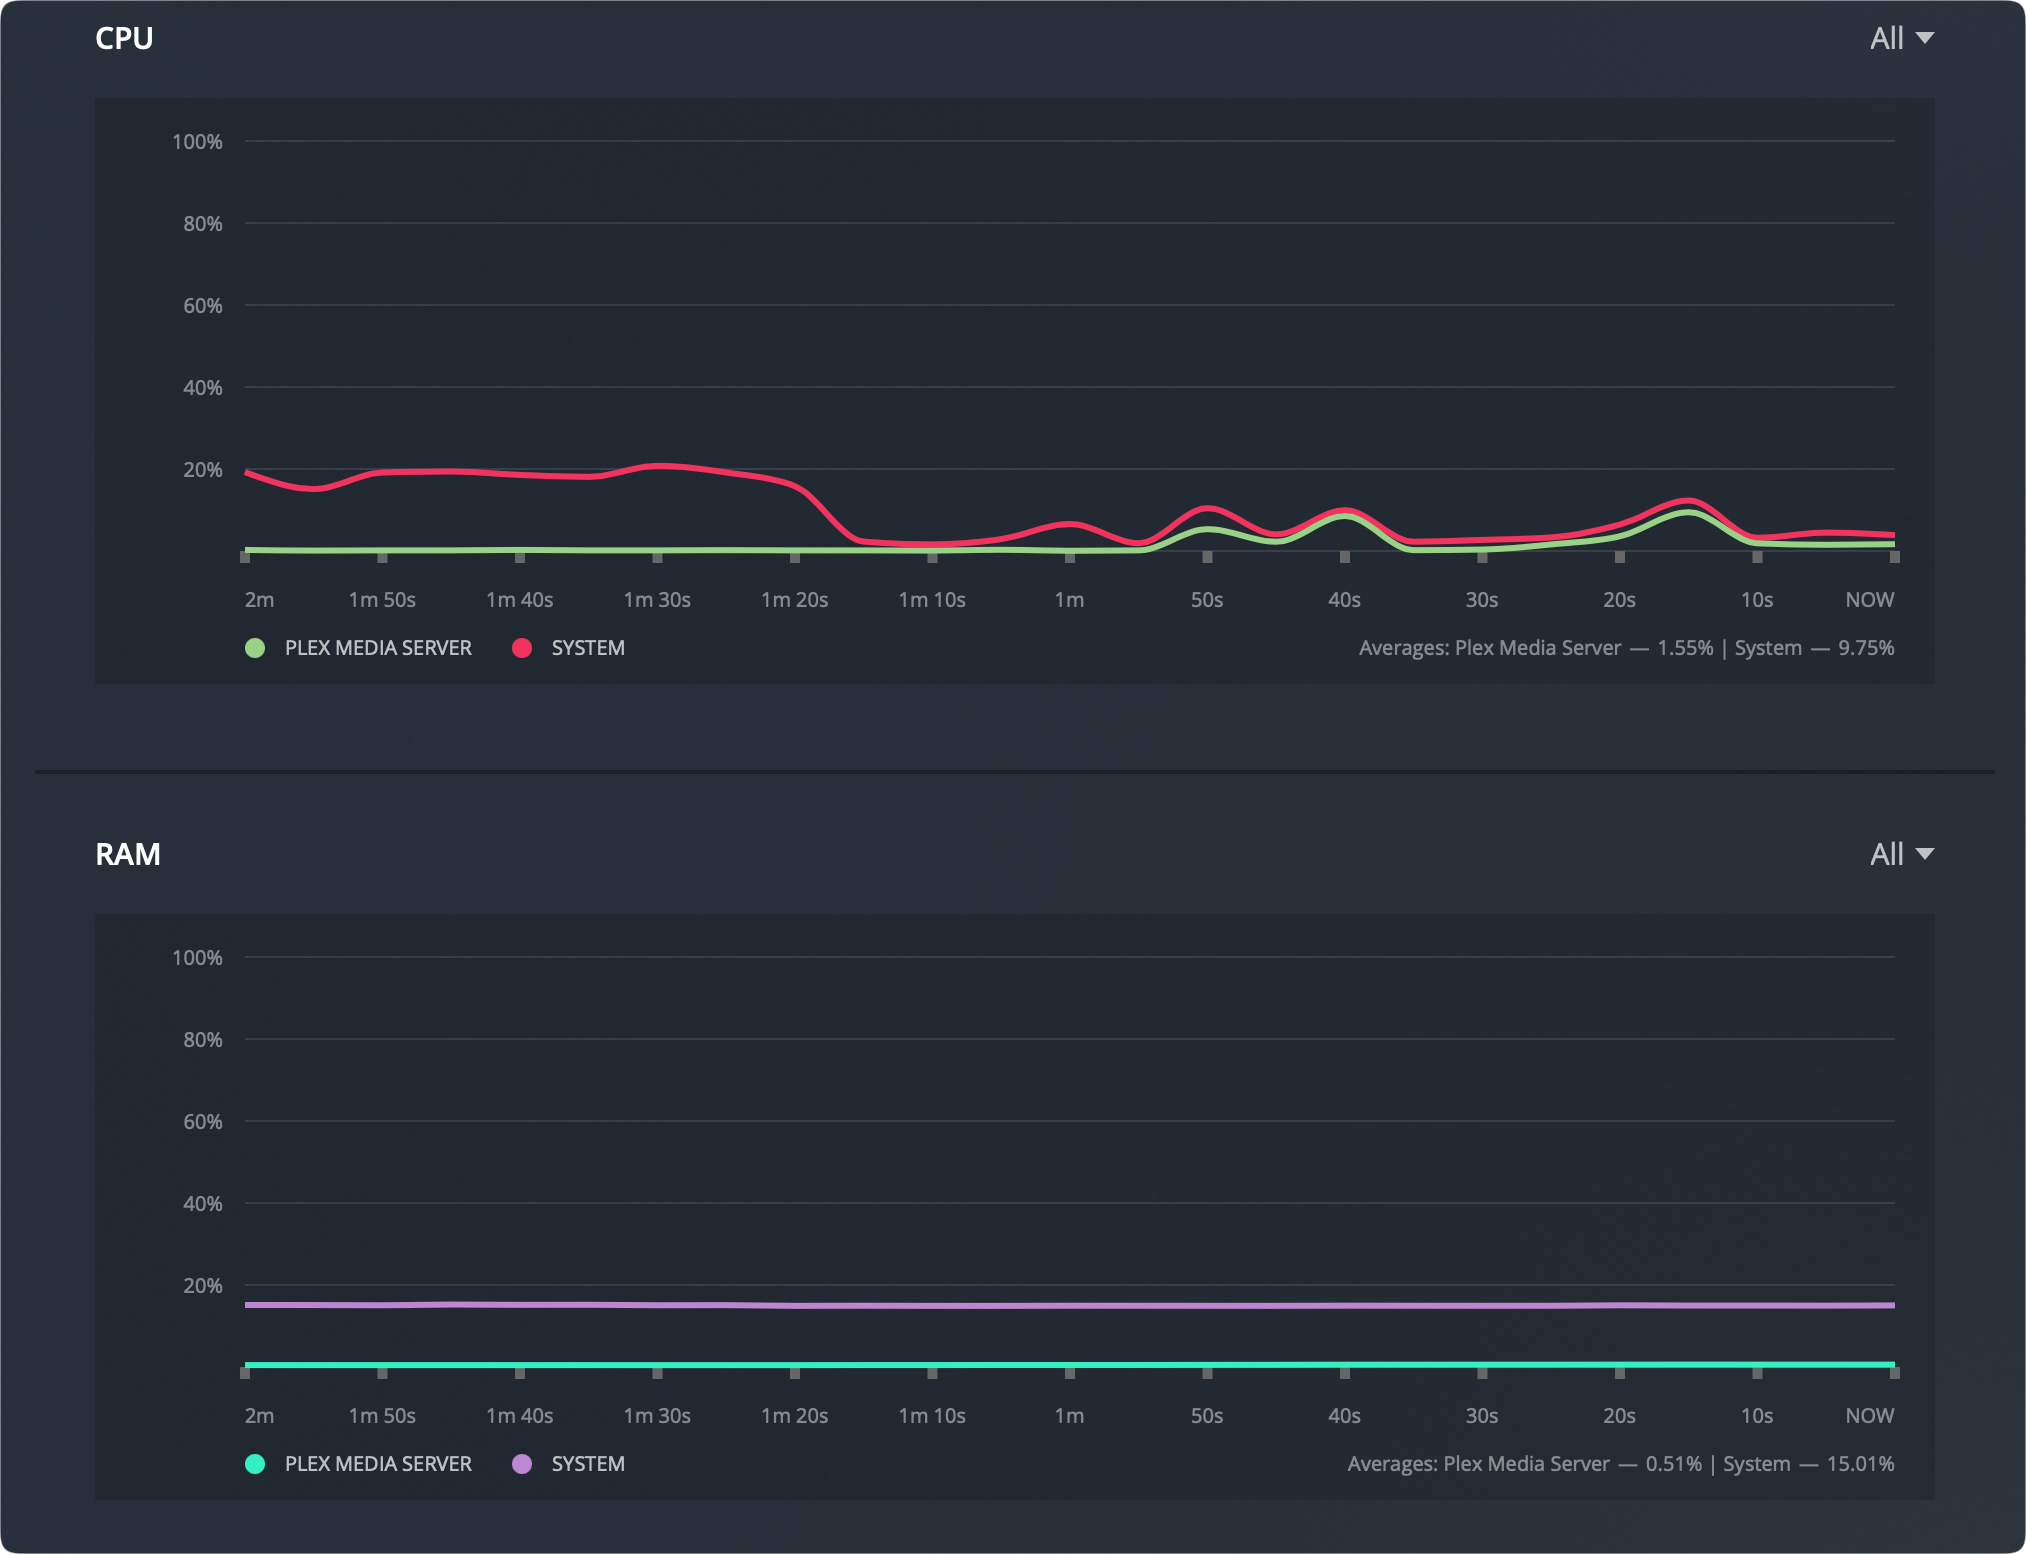
Again, no surprises there. The file in this case was the same content but in a different bitrate and codec.
1080p > 720p transcode play (iOS, iPhone 11, official Plex client)
It is known that the larger the file, and the more you want to transcode it (lower quality) the more the Plex server will have to work. In return, this will result in poor performance when you have no HW transcode capabilities.
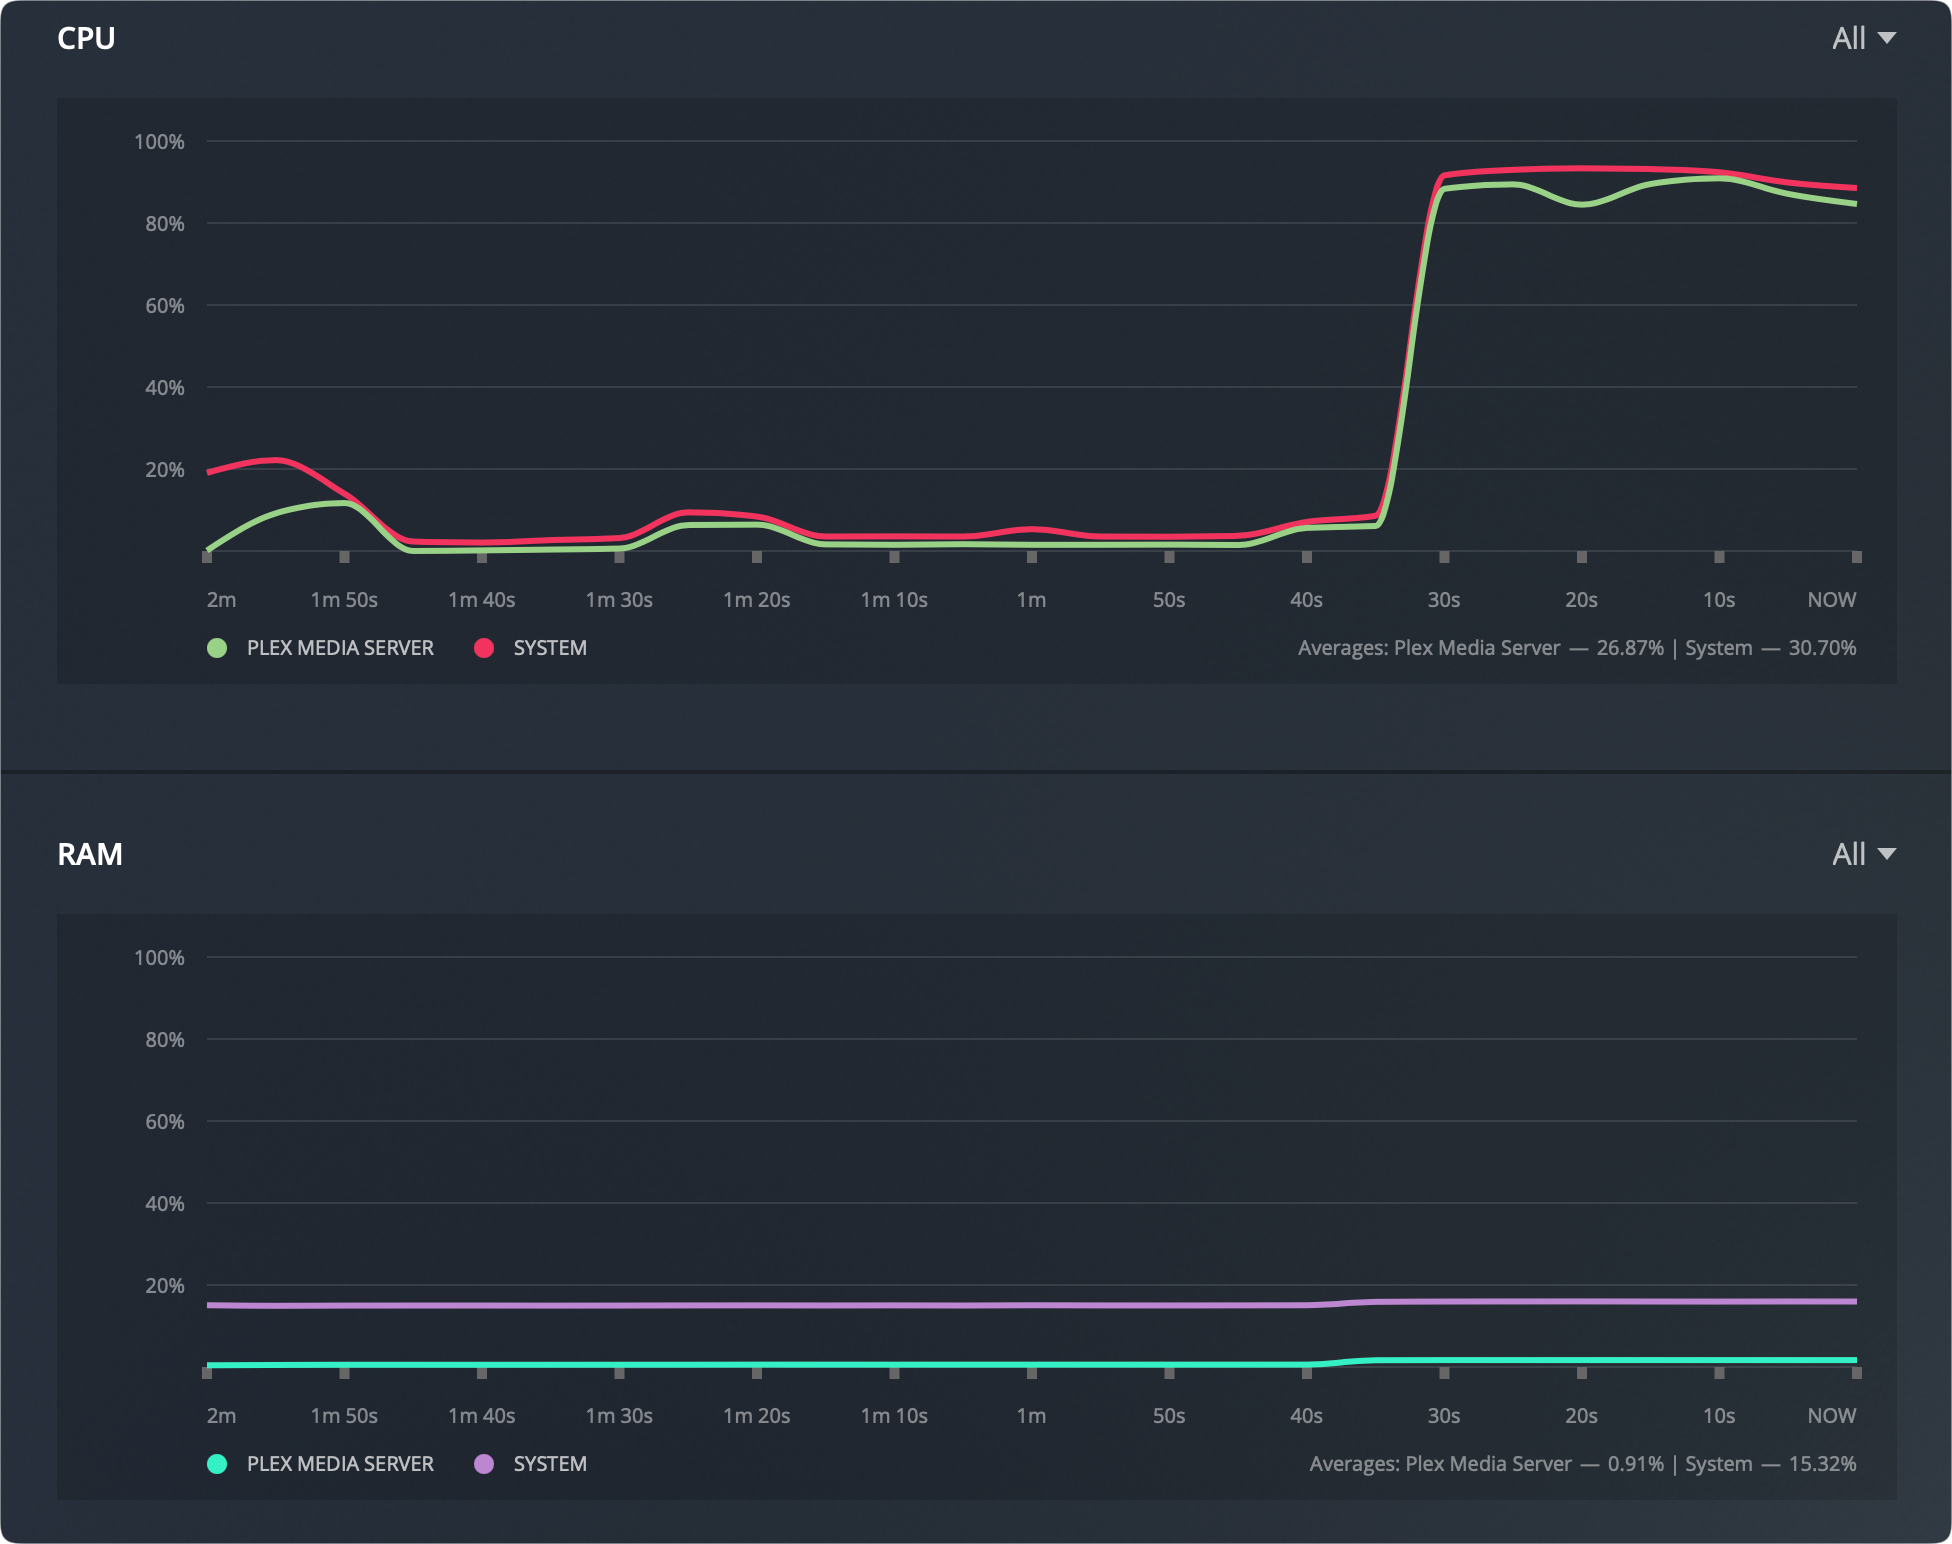
While 4k to 1080p was a no-go, 1080p to 720p was a different story.
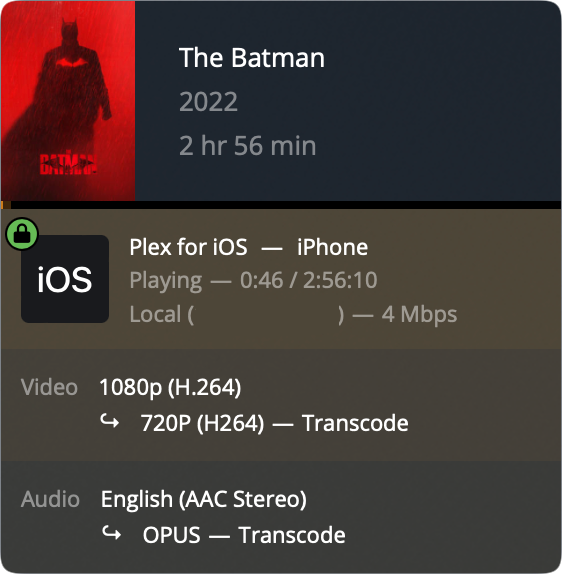
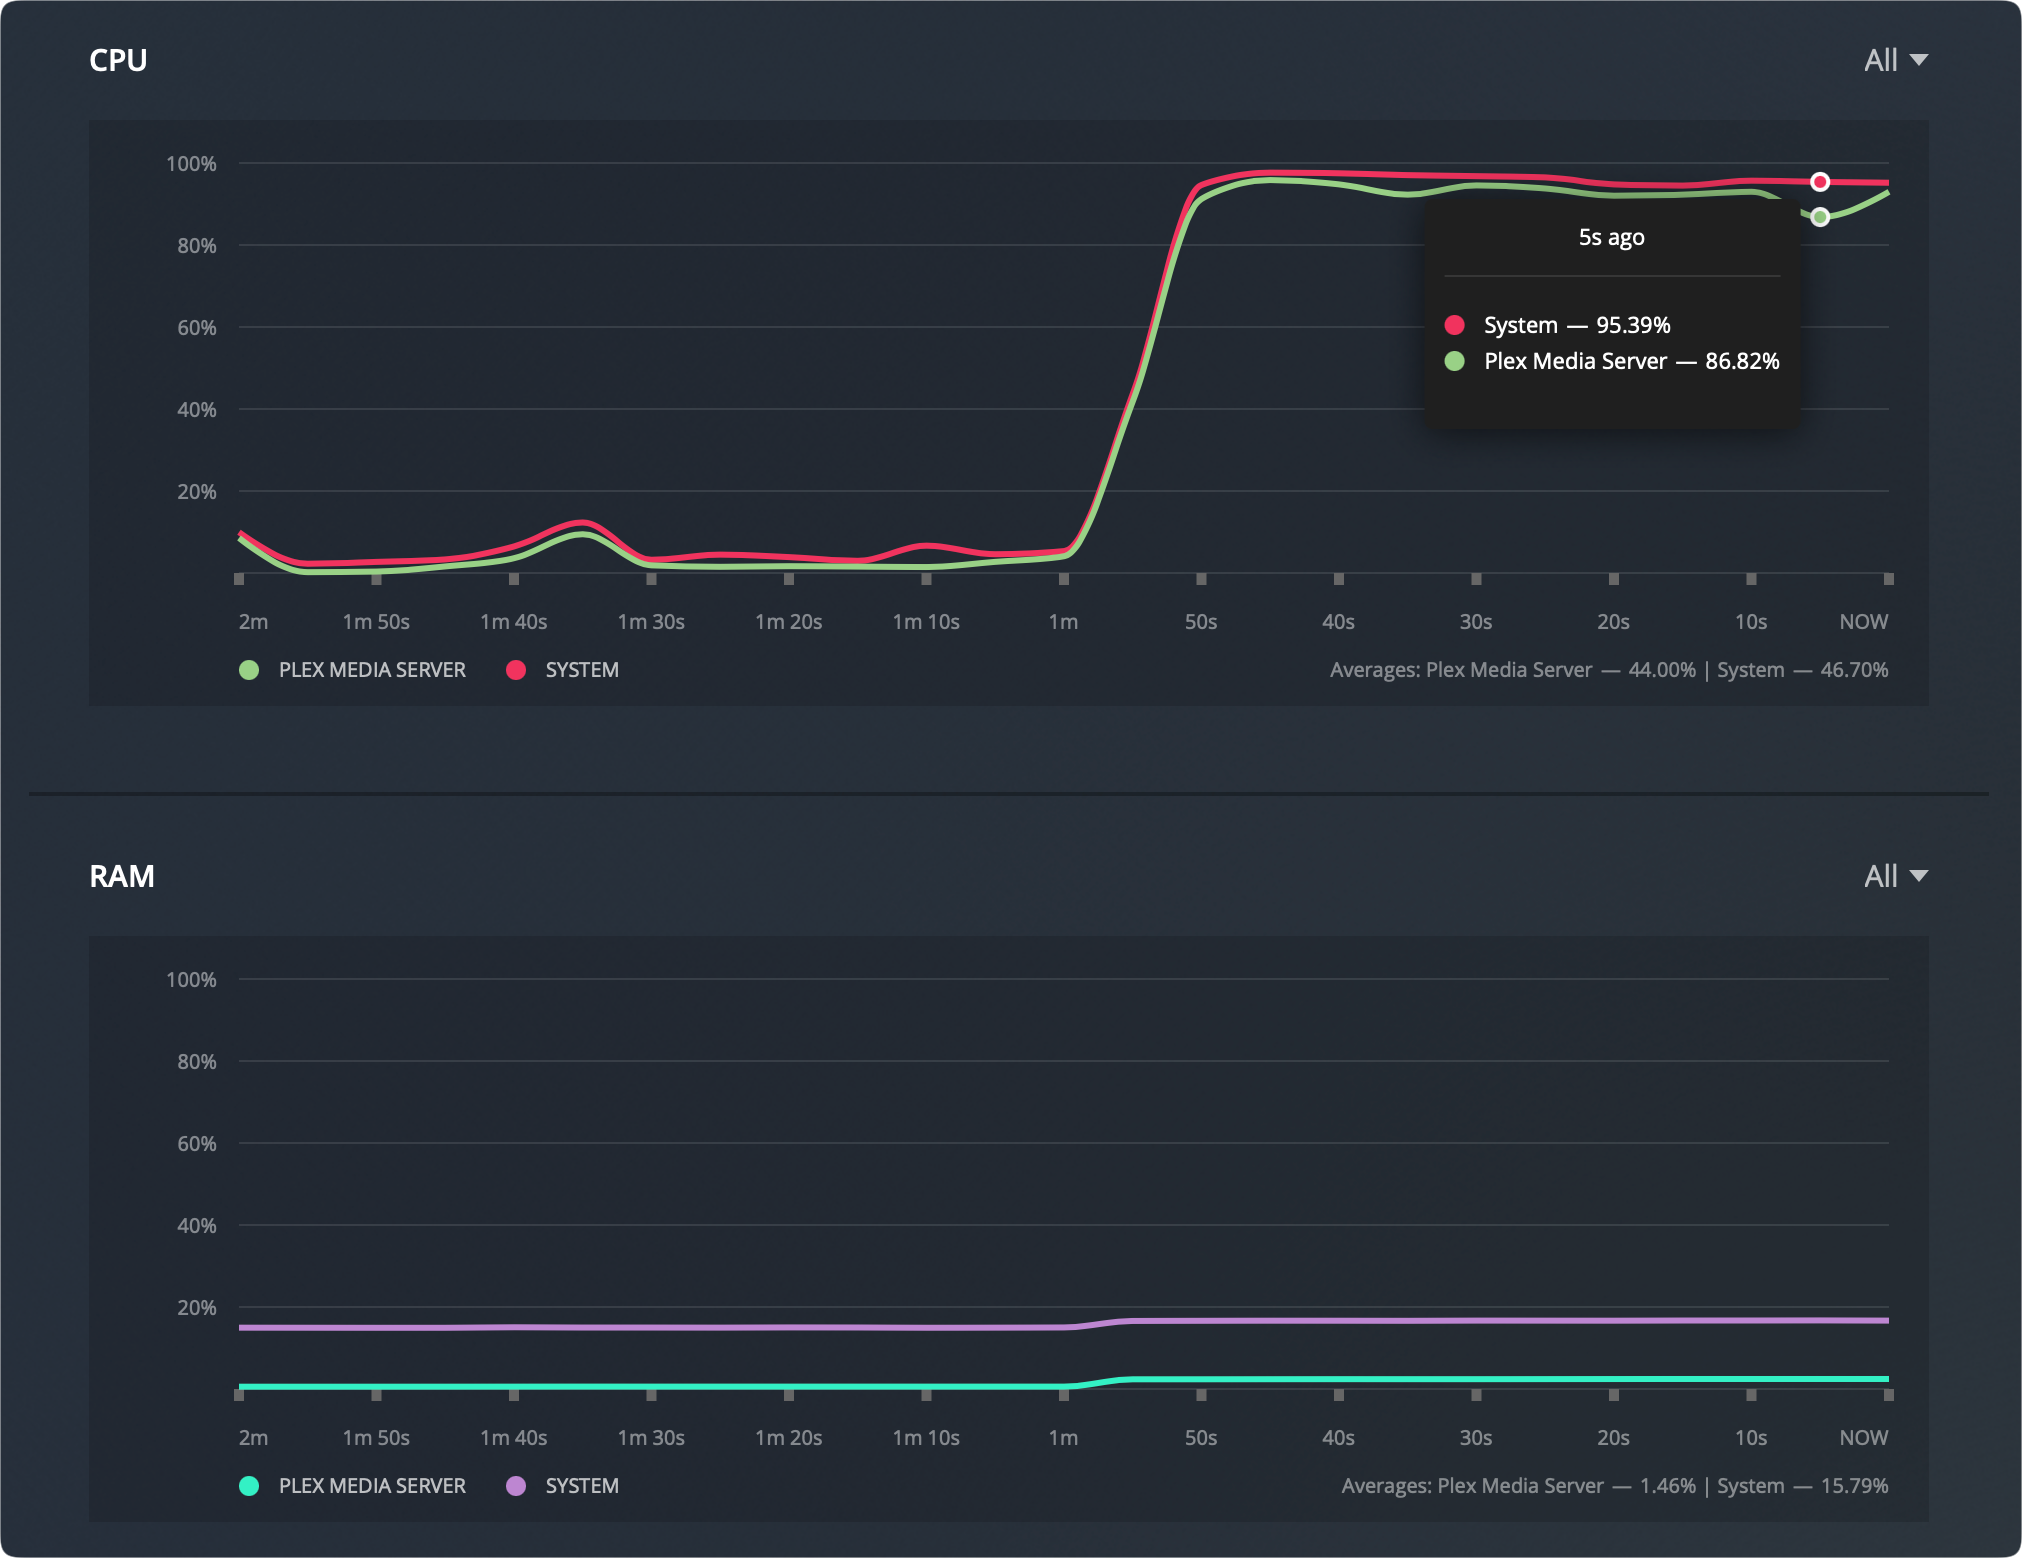
Even though the CPU again hit the high 90%+ it was able to play the content without buffering, unlike the example of the previous conversion. Still, this will soon prove to be a bit of a problem if you have any more services running or multiple users requesting anything from the NAS itself. With such a high CPU, it would be best to not utilize it more.
So, it works, but at a very high price.
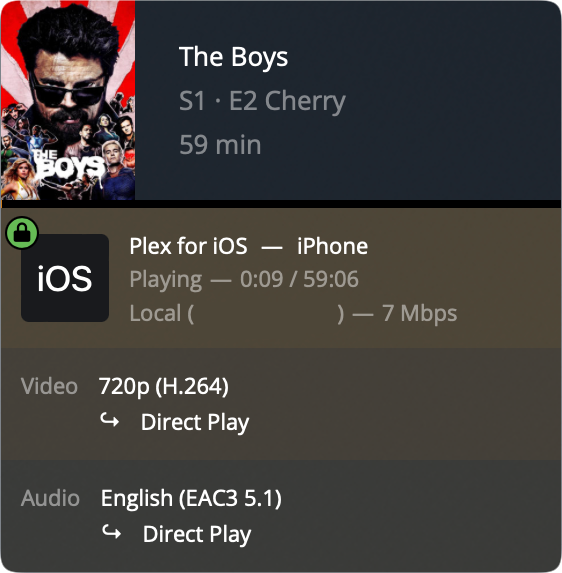
720p direct play (iOS, iPhone 11, official Plex client)
Finally the 720p samples. As you might expect, Direct Play all the way here as well with absolutely no problems at all.
For the final test in the Plex category, transcoding 720p to SD (480p).
720p > 480p transcode play (iOS, iPhone 11, official Plex client)
We can see that again transcoding is done in software, resulting again in very high CPU utilization, but granted not as high as the previous ones.

Utilization was at about 85-90% and played with no problems at all. Same as the previous transcoded example, it can work, but at a steep price.
So there we have it, DS1522+ yes or no as a media (Plex) server? I would say it depends. If you have compatible file formats and clients that can stream and handle them on their own, this NAS will be more than capable to be your media server. However, if you have even the minimum need for transcoding (video, audio, subtitles, etc), you will not have a good experience.
The price of the unit will be too high to justify any transcoding needs, that in the end can't be met.
:Conclusion
In a word, excellent. Excellent device for many things that it can do. Up to 32GB of RAM, 10G option, 2 NVMe slots for cache in case you are going for the spindle drives, 5 bays by default, and 15 with double expansion.
Capable CPU with decent TDP that in some cases ends up being the weak link, but you can't have it all can you. Priced at about 650€ plus tax, this is a worthy successor to the DS1520+ (or DS1019+ for that matter), but you have to make sure that you know what you are getting yourself into.
If you are looking for a media center device that can hold lots of content, and serve multiple local and remote users you might feel that bitter taste considering that it will cost you almost 1500€ to get this beast up and running with some average capacity drives today only to find out that it can't do what the previous models could. You can "thank" Synology for their choice of CPU but, on the other hand, if you want a compact, fast, low-power device that can offer some serious power when it needs to, and satisfy today's growing needs of editing 4K content right of the NAS, then you have a winner.
DS1522+ has a lot going on for itself, but it will be up to you to decide if that is the exact model you were looking for based on what you expect this device to do. In this short time with it, I can say that anyone starting off in the world of self-hosting, having a need to back up a decent amount of devices, or just hosting your favorite photos and videos for your family or business, will get their money's worth.
Any NAS is a long-term investment, and DS1522+ is definitely a worthy model that will keep you going for a long time. It might not be the next "media center" device you were expecting, but then again not many devices can be low power, small in size, powerful, fast, 10G, and HW transcode, now can they?
In case this is the device with the specs you were looking for but the wrong format, you can also choose the rack station model, the RS422+. Identical in specs (CPU and 10G), only smaller amount of RAM initially, and one bay less (also, no expansions).
One last thing to touch on is the fact that you should keep your eye on the drive compatibility list before you buy the NAS, this one, or any other. Try not to deviate from it, if you don't want to potentially end up in a bad spot with Syno support if you ever might need their help.
I hope this review was informative and interesting, and as always, do let me know in the comment section below what you think about this particular NAS or if you have any comments, suggestions, or critics on the topic.


